Colophon
Practical Identity Management With MidPoint
by Radovan Semančík et al.
Evolveum
Book revision: 2.3
Publication date: 2024-11-19
Corresponding midPoint version: 4.8.5
© 2015-2024 Radovan Semančík and Evolveum, s.r.o. All rights reserved.
This work is licensed under a
Creative Commons Attribution-NonCommercial-NoDerivatives 4.0 International License.
Major sponsoring for this book was provided by:

Introduction
It’s a dangerous business, Frodo, going out your door. You step onto the road, and if you don’t keep your feet, there’s no knowing where you might be swept off to.
The Lord of the Rings by J.R.R. Tolkien
Many years ago we started a project. Because we had to. Back then, we didn’t think too much about business and markets and things like that. We were focused on technology. The project started, and it simply went on. It had its ups and downs – but all the time there was purpose, improvement and pure engineering passion. The effort brought fruits, and now there is a product like no other: midPoint.
MidPoint is an identity governance and administration (IGA) platform. It is a comprehensive and feature-rich system. MidPoint can handle identity lifecycle management, identity governance and analytics. It can speed up the process that create accounts for new employee, student or customer. MidPoint can automatically disable accounts. MidPoint manages assignment of roles and entitlements to employees, partners, agents, contractors, customers and students. MidPoint make sure the policies are continually maintained and enforced. It governs the processes of access certification (attestations). It provides auditing and reporting based on the identity data.
Moreover, midPoint has one inherent advantage over the competing products: midPoint is completely open source platform. Open source is the fundamental philosophy of midPoint. We believe that open source is a critical aspect in the development of quality software. Open source principles are guiding development of midPoint community: partners, contributors supporters and all the engineers that work with midPoint. Open source character means that any engineer can completely understand how midPoint works. It also means that midPoint can be modified as needed, that issues can be fixed quickly, and especially to ensure the continuity of midPoint development. After all these years with midPoint, we simply cannot imagine using any identity technology which is not open source.
There are engineers in our team who have been dealing with identity management deployments since early 2000s. The term "Identity and Access Management" (IAM) was not even invented back then. We have seen a lot of IAM solutions during our careers. Identity management system, such as midPoint, is the core of the vast majority of these solutions. Identity management platform is the beating heart of IAM deployments. We have designed midPoint specifically for that role. When it is used by the right hands, midPoint can do miracles. Which is exactly what this book is all about: the right use of midPoint to build a practical identity management solutions.
This book will tell you how to build and deploy identity management and governance solution. It will also tell you why to do it in the first place. The book will explain not just the features and configuration options. It will also describe the motivation and the underlying principles of identity management. Understanding the principles is as at least as important as knowing the mechanics of an identity management product. The book describes how the things work, when they work. It also tries to describe the limitations, drawbacks and pitfalls. The limitations are often much more important than the features, especially when designing a new solution on a green field.
This book goes for quite a deep dive. It explains how, it also explains why, it includes a lot of details. It is meant for people that seek deep understanding of identity and access management. This is the best way for some people, yet it may be quite challenging. There may be easier ways to start with midPoint. There are videos, trainings, and there is a first steps methodology designed especially for easy start with midPoint. Therefore, if you want to start as quickly as possible, this book may not suit your needs. However, if you want to really know what you are doing, you are at the right place.
The first chapter of this book is an introduction to the basic concepts of Identity and Access Management (IAM). It is very general, and it does not deal with midPoint at all. Therefore, if you are familiar with Identity and Access Management, feel free to skip the first chapter. However, according to our experience, this chapter has some things to tell even to experienced IAM engineers. This chapter contains important information to put midPoint in broader context. You will need that information to build a complete IAM solution.
The second chapter describes midPoint big picture. It shows how midPoint looks like from the outside. It describes how midPoint what midPoint does, how it behaves. The purpose of this chapter is to familiarize the reader with midPoint workings and basic principles. It describes how midPoint is used.
The third chapter describes basic concepts of midPoint configuration. It guides the reader through midPoint installation. It describes how midPoint is customized, to suit the needs of a particular deployment. However, midPoint customization is a very complex matter, therefore this chapter describes just the basic principles. It will take most of the book to fill in the details.
The fourth chapter describes the concepts of identity resource and mappings. This is the bread-and-butter of identity management. This chapter will tell you how to create very basic midPoint deployment, how to connect target systems and how to map and transform the data.
The fifth chapter is all about synchronization. Primary purpose of synchronization is to get the data from the source systems (such as HR system) to midPoint. However, midPoint synchronization is much more powerful than that, as you will see. This chapter also expands the explanation of underlying midPoint principles such as mappings and deltas.
The sixth chapter talks about midPoint schema. MidPoint has a built-in identity data model. Even though this data model is quite rich, it is usually not sufficient to cover all the real-world use cases. Therefore, the data model is designed to be extensible. This chapter describes the methods how a new data items can be defined in midPoint schema.
The seventh chapter is all about role-based access control (RBAC). MidPoint role-based model is a very powerful tool to set up complex structures describing job roles, responsibilities, privileges and so on. The role model, and especially the concept of assignment, are generic mechanisms that are used in almost every part of midPoint. Organizational structure management and many identity governance features are built on the foundations described in this chapter.
The eighth chapter is an introduction to object templates. Those templates form a basis of an internal data consistency in midPoint. They can be used to set up simple policies and automation rules. Object templates are a basic workhorse that is used in almost all midPoint deployments.
The ninth chapter describes organizational structures. MidPoint organizational structure mechanisms are generic and very powerful. They can be used to model traditional organizational hierarchies, arbitrary trees, and even structures that are not exactly trees. The same mechanism can be used to set up projects, teams, workgroups, classes or almost any conceivable grouping concept. This chapter describes how organizational structures are synchronized with the outer world. The concept of generic synchronization can be applied to synchronize midPoint objects with almost any external data structure.
The tenth chapter is about troubleshooting. To err is human. Given all the flexibility of midPoint mechanisms, configuration mistakes just happen, and it may not be easy to figure out the root cause of problems. Therefore, this chapter provides an overview of midPoint diagnostic facilities and recommendations for their use.
The eleventh chapter provides overview of midPoint development process and overall approach. It is also explained how midPoint development is funded and how midPoint subscriptions work.
The twelfth chapter is a collection of pointers to additional information. This includes a pointer to sample files that accompany this book.
Finally, there is a glossary, explaining all the strange and confusing terms used in identity management and governance field.
The other chapters are not written yet. The description of policies, entitlements, authorizations, archetypes, deployment practices and all the other advanced topics is missing. This book is not finished yet. Just like midPoint itself, this book is written in an incremental and iterative way. Writing a good book is a huge task in itself, and it takes a lot of time. We cannot dedicate that much time to writing the book in one huge chunk. Obviously, a book like this is needed for midPoint community. Therefore, we have decided not to wait until the book is complete. We will be continuously publishing those chapters that are reasonably well finished. It is better to have something than to have nothing, isn’t it? Please be patient. The whole book will be finished eventually. As always, your support, contributions and sponsoring may considerably speed up things here
Even though the first version of this book was published in 2015, we are regularly updating the book to reflect new midPoint versions as well as changes in IT environment and trends. Similarly to midPoint itself, the book has to be kept up-to-date to deliver value. The book is usually reviewed at the time new long-term-support (LTS) version of midPoint is released.
We would like to thank all the midPoint developers, contributors and supporters. There was a lot of people involved in midPoint during all these years. All these people pushed midPoint forward. Most of all, we would like to thank the people that were there when the midPoint project was young, people that set midPoint on its path. We would like to thank Katka Stanovská, Katka Bolemant (née Valaliková), Igor Farinič, Ivan Noris, Vilo Repáň, Pavol Mederly and Radovan Semančík.
Anything that is stated in this book are the opinions of the authors. We have tried really hard to remain objective. However, as hard as we might try, some points of view are difficult to change. We work for Evolveum – a company that is also an independent software vendor. Therefore, our opinions may be slightly biased. We have honestly tried to avoid any biases and follow proper engineering practices. You are the judge and the jury in this matter. You, the reader, will decide whether we have succeeded or not. You have free access to all the necessary information to do that: this book is freely available as is all the midPoint documentation and the source code. We are not hiding anything. Unlike many other vendors, we do not want or need to hide any aspect of the software we are producing.
This work is licensed under a Creative Commons Attribution-NonCommercial-NoDerivatives 4.0 International License (CC BY-NC-ND). This essentially means that you can freely use this book for a personal use. You can retrieve and distribute it at no cost. You can use this book freely to learn about midPoint. However, you are not allowed to sell it, modify it or use any parts of this book in commercial projects. You can point to this book by URL, but you are not allowed to pass this book to the customer as a part of product documentation in a commercial project. You are not allowed to use this book as material during commercial training. You are not allowed use the book in any way that generates profit. If you need to use this book in such a way, please contact Evolveum, and you can obtain special license to do this. The license fees collected in this way will be used to improve midPoint and especially midPoint documentation. There is no direct profit that we make from this book. The primary reason for writing this book is spreading knowledge about midPoint. However, even open source projects such as midPoint need funding. If you use midPoint in a commercial project that is a source of profit we think it is only fair if you share part of that profit with midPoint authors. You know as well as we do that this is needed.
Following people have worked on the words and images that make up this book:
-
Radovan Semančík (author and maintainer)
-
Veronika Kolpaščiková (illustrations, corrections)
-
Richard Richter (corrections, suggestions)
Yet there is much more people whose work was needed to make this work happen: midPoint developers, contributors, analysts and deployment engineers, specialists and generalists, theoretical scientists and practical engineers, technical staff and business people, people of Evolveum and the people that work for our partners, our families, friends and all the engineers and scientists for generations and generations past. We indeed stand on the shoulders of giants.
1. Understanding Identity and Access Management
The beginning of knowledge is the discovery of something we do not understand.
What is identity and access management? Answer to that question is both easy and complex. The easy part is: identity and access management (IAM) is a set of information technologies that deal with identities in the cyberspace. The complex part of the answer takes the rest of this book.
The story of identity and access management starts with information security. The security requirements dictate the need for authentication and authorization of the users. Authentication is a mechanism by which the computer checks that the user is really the one they pretend to be. Authorization is a related mechanism by which the computer determines whether to allow or deny the user a specific action. Almost every computer system has some means of authentication and authorization.
Perhaps the most widespread form of authentication is a password-based "log in" procedure. The user presents an identifier and a password. The computer checks whether the password is valid. For this procedure to work the computer needs access to the database of all valid users and passwords. Early stand-alone information systems had their own databases that were isolated from the rest of the cyberspace. The data in the database were maintained manually. However, the advent of computer networking changed everything. Users were able to access many systems, and the systems themselves were connected to each other. Maintaining an isolated user database in each system did not make much sense any longer. That’s where the real story of digital identity begins.
|
Enterprise Identity and Access Management
This book deals mostly with Enterprise Identity and Access Management.
That is identity and access management applied to larger organizations such as enterprises, financial institutions, government agencies, universities, health care organizations, etc.
The focus is on managing employees, contractors, customers, partners, students and other people that cooperate with the organization.
However, many of the mechanisms and principles described in this book can be applied to non-enterprise environments.
|
Directory Services and Other User Databases
The central concept of identity management is a data record which contains information about a person. This concept has many names: user profile, persona, user record, digital identity and many more. The most common name in the context of identity management is user account. Accounts usually hold information that describes the real-world person using a set of attributes such as given name and family name. However, probably the most important part of the account is the technical information that relates to the operation of an information system for which the account is created. This includes operational parameters such as location of user’s home directory, wide variety of permission information such as group and role membership, system resource limits and so on. User accounts are represented in a wide variety of forms, ranging from relational database records through structured data files to semi-structured text files. Regardless of the specific method used to store and process the records, the account is undoubtedly one of the most important concepts of IAM field - and so are the databases where the accounts are stored.
The account databases are as varied as the account types. Most account databases in the past were implemented as an integral part of the monolithic information system using the same database technology as the system used. This is an obvious choice, and it remains quite popular even today. Therefore, many accounts are stored in relational database tables and similar application data stores.
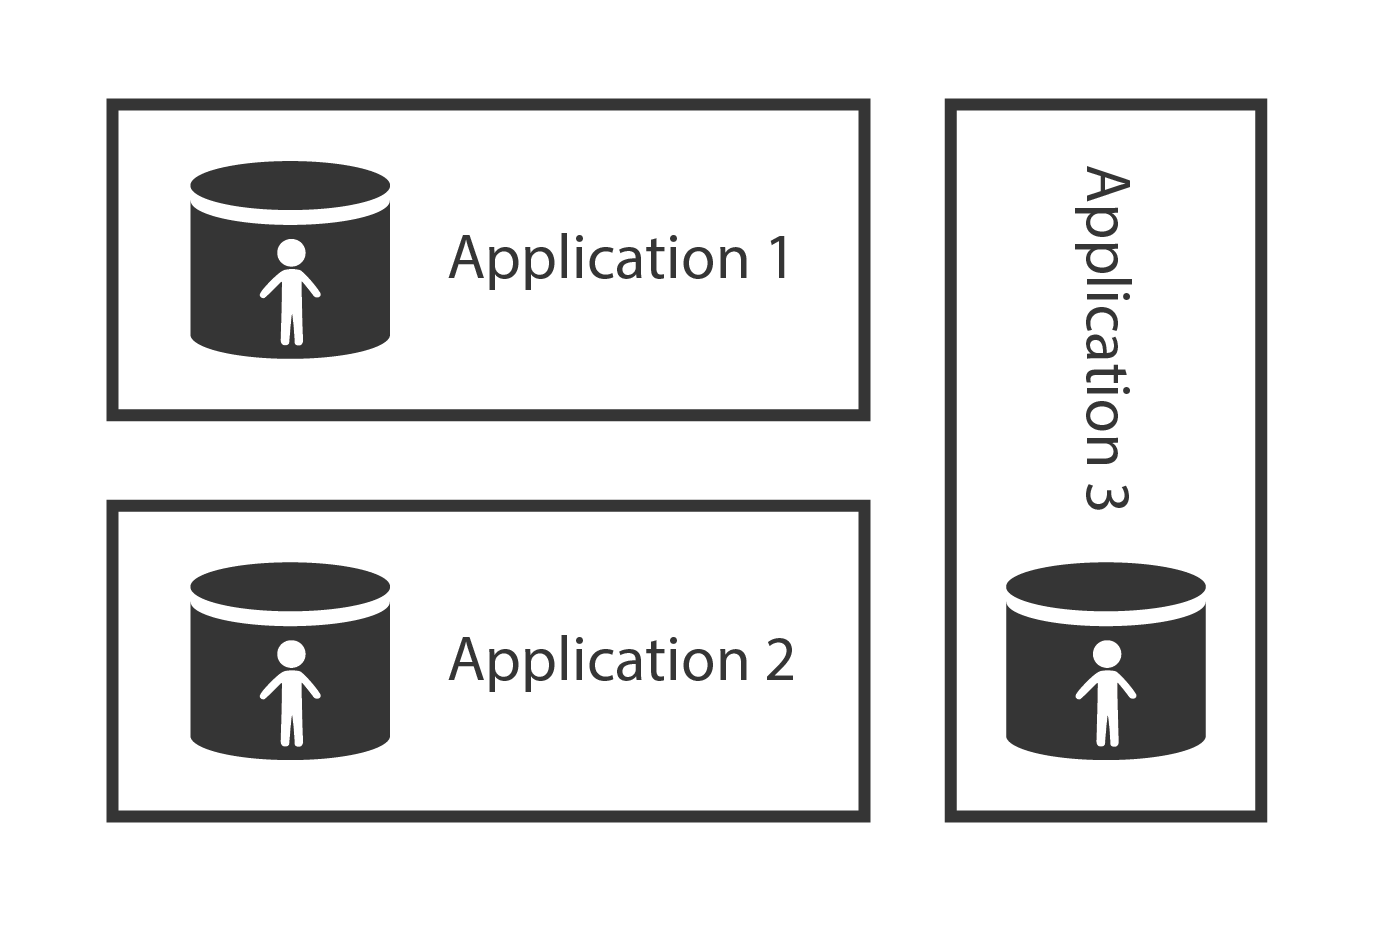
Application data stores are usually tightly bound to the application. Therefore, accounts stored in such databases are difficult to share with other applications. However, sharing account data across the organization is more than desirable. It makes very little sense to maintain account data in each database separately – especially if most the accounts are the same in each application. Therefore, there is a strong motivation to deploy account databases that can be shared by many applications.
Directory servers are built with the primary purpose to provide shared data storage to applications. While application databases usually use their own proprietary communication protocol, directory servers implement standardized protocols. While databases are built for application-specific data model, directory servers usually extend standardized data model, which improves interoperability. While databases may be heavyweight and expensive to scale, directory servers are designed to be lightweight and provide massive scalability. That makes directory servers almost ideal candidates for a shared account database.
Shared identity store is making user management easier. An account needs to be created and managed in one place only. Authentication still happens in each application separately. Yet, as the applications use the same credentials from the shared store, the user may use the same password for all the connected applications. This is an improvement over setting the password for each application separately.
Identity management solutions based on shared directory servers are simple and quite cost-efficient. Therefore, we have been giving the same advice for many years: if you can connect all your applications to an LDAP directory server, do not think too much about it and just do it. The problem is that this usually works only for very simple systems.
Lightweight Directory Access Protocol (LDAP)
Lightweight Directory Access Protocol (LDAP) is a standard protocol for accessing directory services. It is an old protocol, when judging by Internet age standards. LDAP roots go as far back as 1980s to a family of telecommunication protocols known as X.500. Even though LDAP may be old, it is widely used. It is a very efficient binary protocol that was designed to support massively distributed shared databases. It has a small set of well-defined simple operations. The operations and the data meta-model implied by the protocol allow very efficient data replication and horizontal scalability of directory servers. This simplicity contributes to low latencies and high throughput for read operations. The horizontal scalability and relative autonomy of directory server instances is supposed to increase the availability of the directory system. These benefits often come at the expense of slow write operations. As identity data are often read but seldom modified, slower writes are usually a perfectly acceptable trade-off. Therefore, LDAP-based directory servers were, and in many places still remain, the most popular databases for identity data.
LDAP is one of the precious few established standards in the IAM field. However, it is far from being perfect. LDAP was created in 1990s, with roots going back to 1980s. There are some problems in original LDAP design, that were never fully addressed. Also, LDAP schema has a distinctive feel of 80s and 90s. LDAP would deserve a major review, to correct the problems and bring the protocol to 21st century. Sadly, there hasn’t been a major update to LDAP specifications for decades.
Even though LDAP has its problems, it still remains a useful tool. Most LDAP server vendors provide proprietary solutions to LDAP problems. Many organizations store identities in LDAP-enabled data stores. There are many applications that support LDAP, mostly for centralization of password-based authentication. LDAP still remains a major protocol in Identity and Access Management field. Therefore, we will be getting back to the LDAP protocol many times in this book.
Directory Servers are Databases
Directory servers are just databases that store information. Nothing more. The protocols and interfaces (APIs) used to access directory servers are designed as database interfaces. They are good for storing, searching and retrieving data. While the user account data often contain entitlement information (permissions, groups, roles, etc.), directory servers are not well-suited to evaluate them. I.e. directory server can provide information what permissions an account has, but it is not designed to make a decision whether to allow or deny a specific operation. Also, directory servers do not contain data about user sessions. Directory servers do not know whether the user is currently logged in or not. Many directory servers are used for basic authentication and even authorization. Yet, the directory servers were not designed to do this. Directory servers provide only the very basic capabilities. There are plug-ins and extensions that provide partial capabilities to support authentication and authorization. However, that does not change the fundamental design principles. Directory servers are databases, not authentication or authorization servers. Being databases, they should be used as such.
However, many applications use directory servers to centralize password authentication. In fact, this is somehow good and cost-efficient way to centralize password-based authentication, especially if you are just starting with identity and access management. Nevertheless, you should be aware that this a temporary solution. It has many limitations. The right way to do it is to use an authentication server instead of directory server. Access Management (AM) technologies can provide that.
Single Directory Server Myth
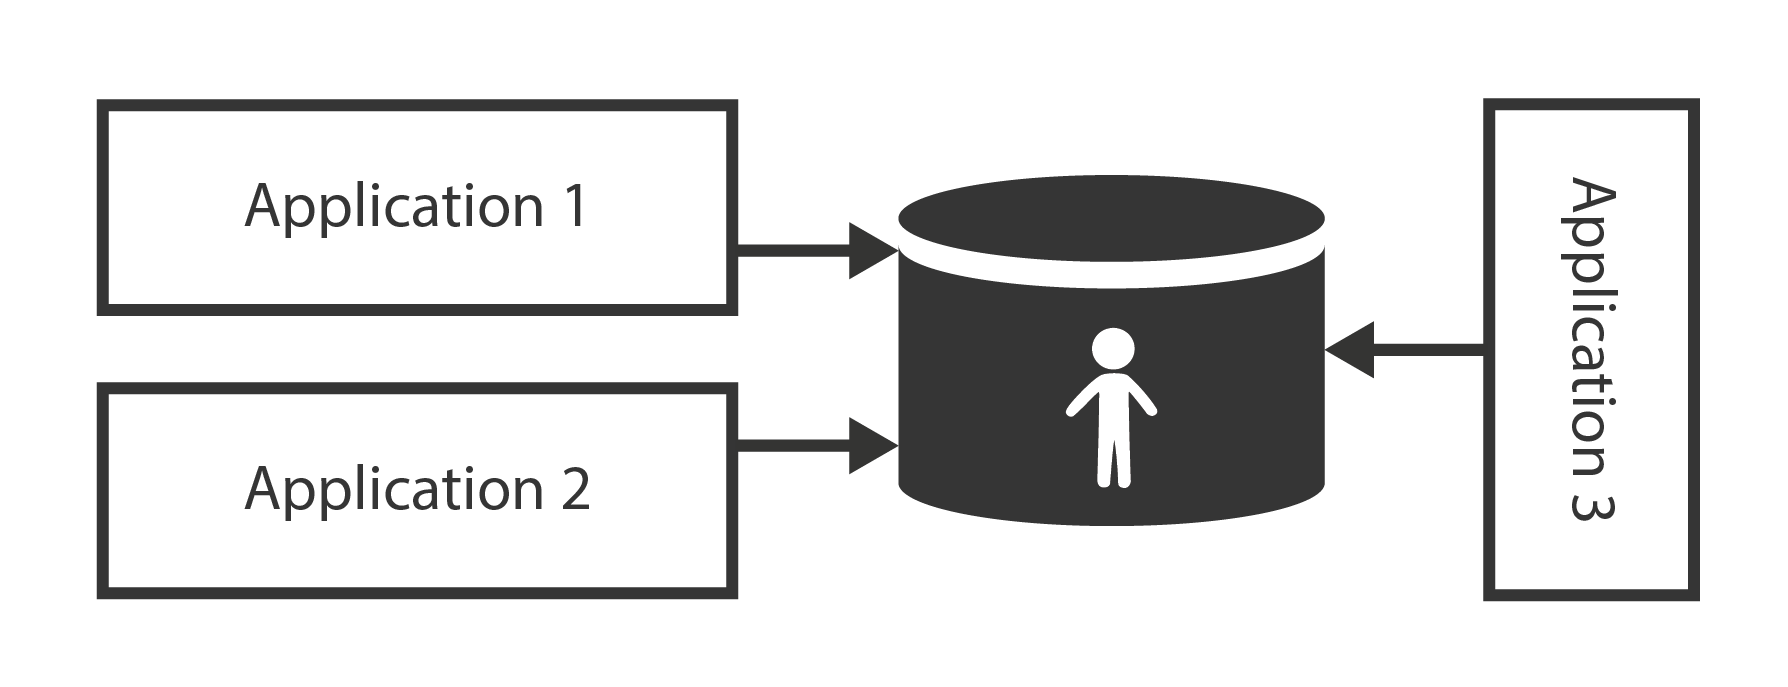
Now listen, this is a nice and simple idea: Let’s keep all our user data in a single directory server. All our applications can access the data there, all the applications will see the same data. We even have this "LDAP" thing, standardized protocol to access the database. Here, all identity management problems are solved!
Unfortunately, they are not. Shared directory server makes user management easier. However, this is not a complete solution, and there are serious limitations to this approach. The heterogeneity of information systems makes it nearly impossible to put all required data into a single directory system.
The obvious problem is the lack of a single, coherent source of information. There are usually several sources of information for a single user. For example, a human resources (HR) system is authoritative for the existence of an employee in the enterprise. However, the HR system is usually not authoritative for assignment of employee identifier such as username. There needs to be an algorithm that ensures uniqueness of the username, ensuring uniqueness across all the current and past employees, contractors and partners. Moreover, there may be additional sources of information. For example Management information system may be responsible for determination of user’s roles (e.g. in project-oriented organizational structure). Inventory management system may be responsible for assigning telephone number to the user. The groupware system may be an authoritative source of the user’s e-mail address and other electronic contact data. There are usually 2 to 20 systems that provide authoritative information for a single user. Therefore, there is no simple way how to feed and maintain the data in the directory system.
Then there are spacial and technological barriers. Many complex applications need local user database. They must store the copies of user records in their own databases to operate efficiently. For example, large billing systems cannot work efficiently with external data (e.g. because of a need to make relational database join). Therefore, even if directory server is deployed, these applications still need to maintain a local copy of identity data. Keeping the copy synchronized with the directory data may seem like a simple task. But it is not. Additionally, there are legacy systems which usually cannot access the external data at all (e.g. they do not support LDAP protocol at all).
Some services need to keep even more state than just a simple database record. For example file servers usually create home directories for users. While the account creation can be usually done in on-demand fashion (e.g. create user directory at first user log-on), the modification and deletion of the account is much more difficult. Directory server will not do that.
Perhaps the most painful problem is the complexity of access control policies. Role names and access control attributes may not have the same meaning in all systems. Different systems usually have different authorization algorithms that are not mutually compatible. While this issue can be solved with per-application access control attributes, the maintenance of these attributes is seldom trivial. If every application has its own set of attributes to control access control policies, then the centralized directory provides only a negligible advantage. The attributes may as well reside in the applications themselves. That’s exactly how most directory deployments end up. Directory servers contain only the groups, groups that usually roughly approximate low-level RBAC roles.
Quite surprisingly, LDAP standards themselves create a significant obstacle to interoperability in this case. There are at least three or four different - and incompatible - specifications for group definition in LDAP directories. Moreover, the usual method to manage LDAP groups is not ideal at all. It is especially problematic when managing big groups. Therefore, many directory servers provide their own non-standard improvements, which further complicates interoperability. Yet even these server-specific improvements usually cannot support complex access control policies. Therefore, access control policies and fine-grained authorizations are usually not centralized in directory servers, they are maintained directly in the application databases.
The single directory approach is feasible only in very simple environments or in almost entirely homogeneous environments. In all other cases there is a need to supplement the solution by other identity management technologies.
This does not mean that the directory servers or other shared databases are useless. Quite the contrary. They are very useful if they are used correctly. They just cannot be used alone. More components are needed to build a complete solution.
Access Management
While directory systems are not designed to handle complex authentication, access management (AM) systems are built to handle just that. Access management systems handle all the flavors of authentication, and even some authorization aspects. The principle of all access management systems is basically the same:
-
Access management system gets between the user and the target application. This can be done by a variety of mechanisms, the most common method is that the applications themselves redirect the user to the AM system if they do not have existing session.
-
Access management system prompts user for the username and password, interacts with user’s mobile device or in any other way initiates the authentication procedure.
-
User enters the credentials.
-
Access management system checks the validity of credentials and evaluates access policies.
-
If access is allowed then the AM system redirects user back to the application. The redirection usually contains an access token: a small piece of information that tells the application that the user is authenticated.
-
Application validates the token, creates a local session and allows the access.
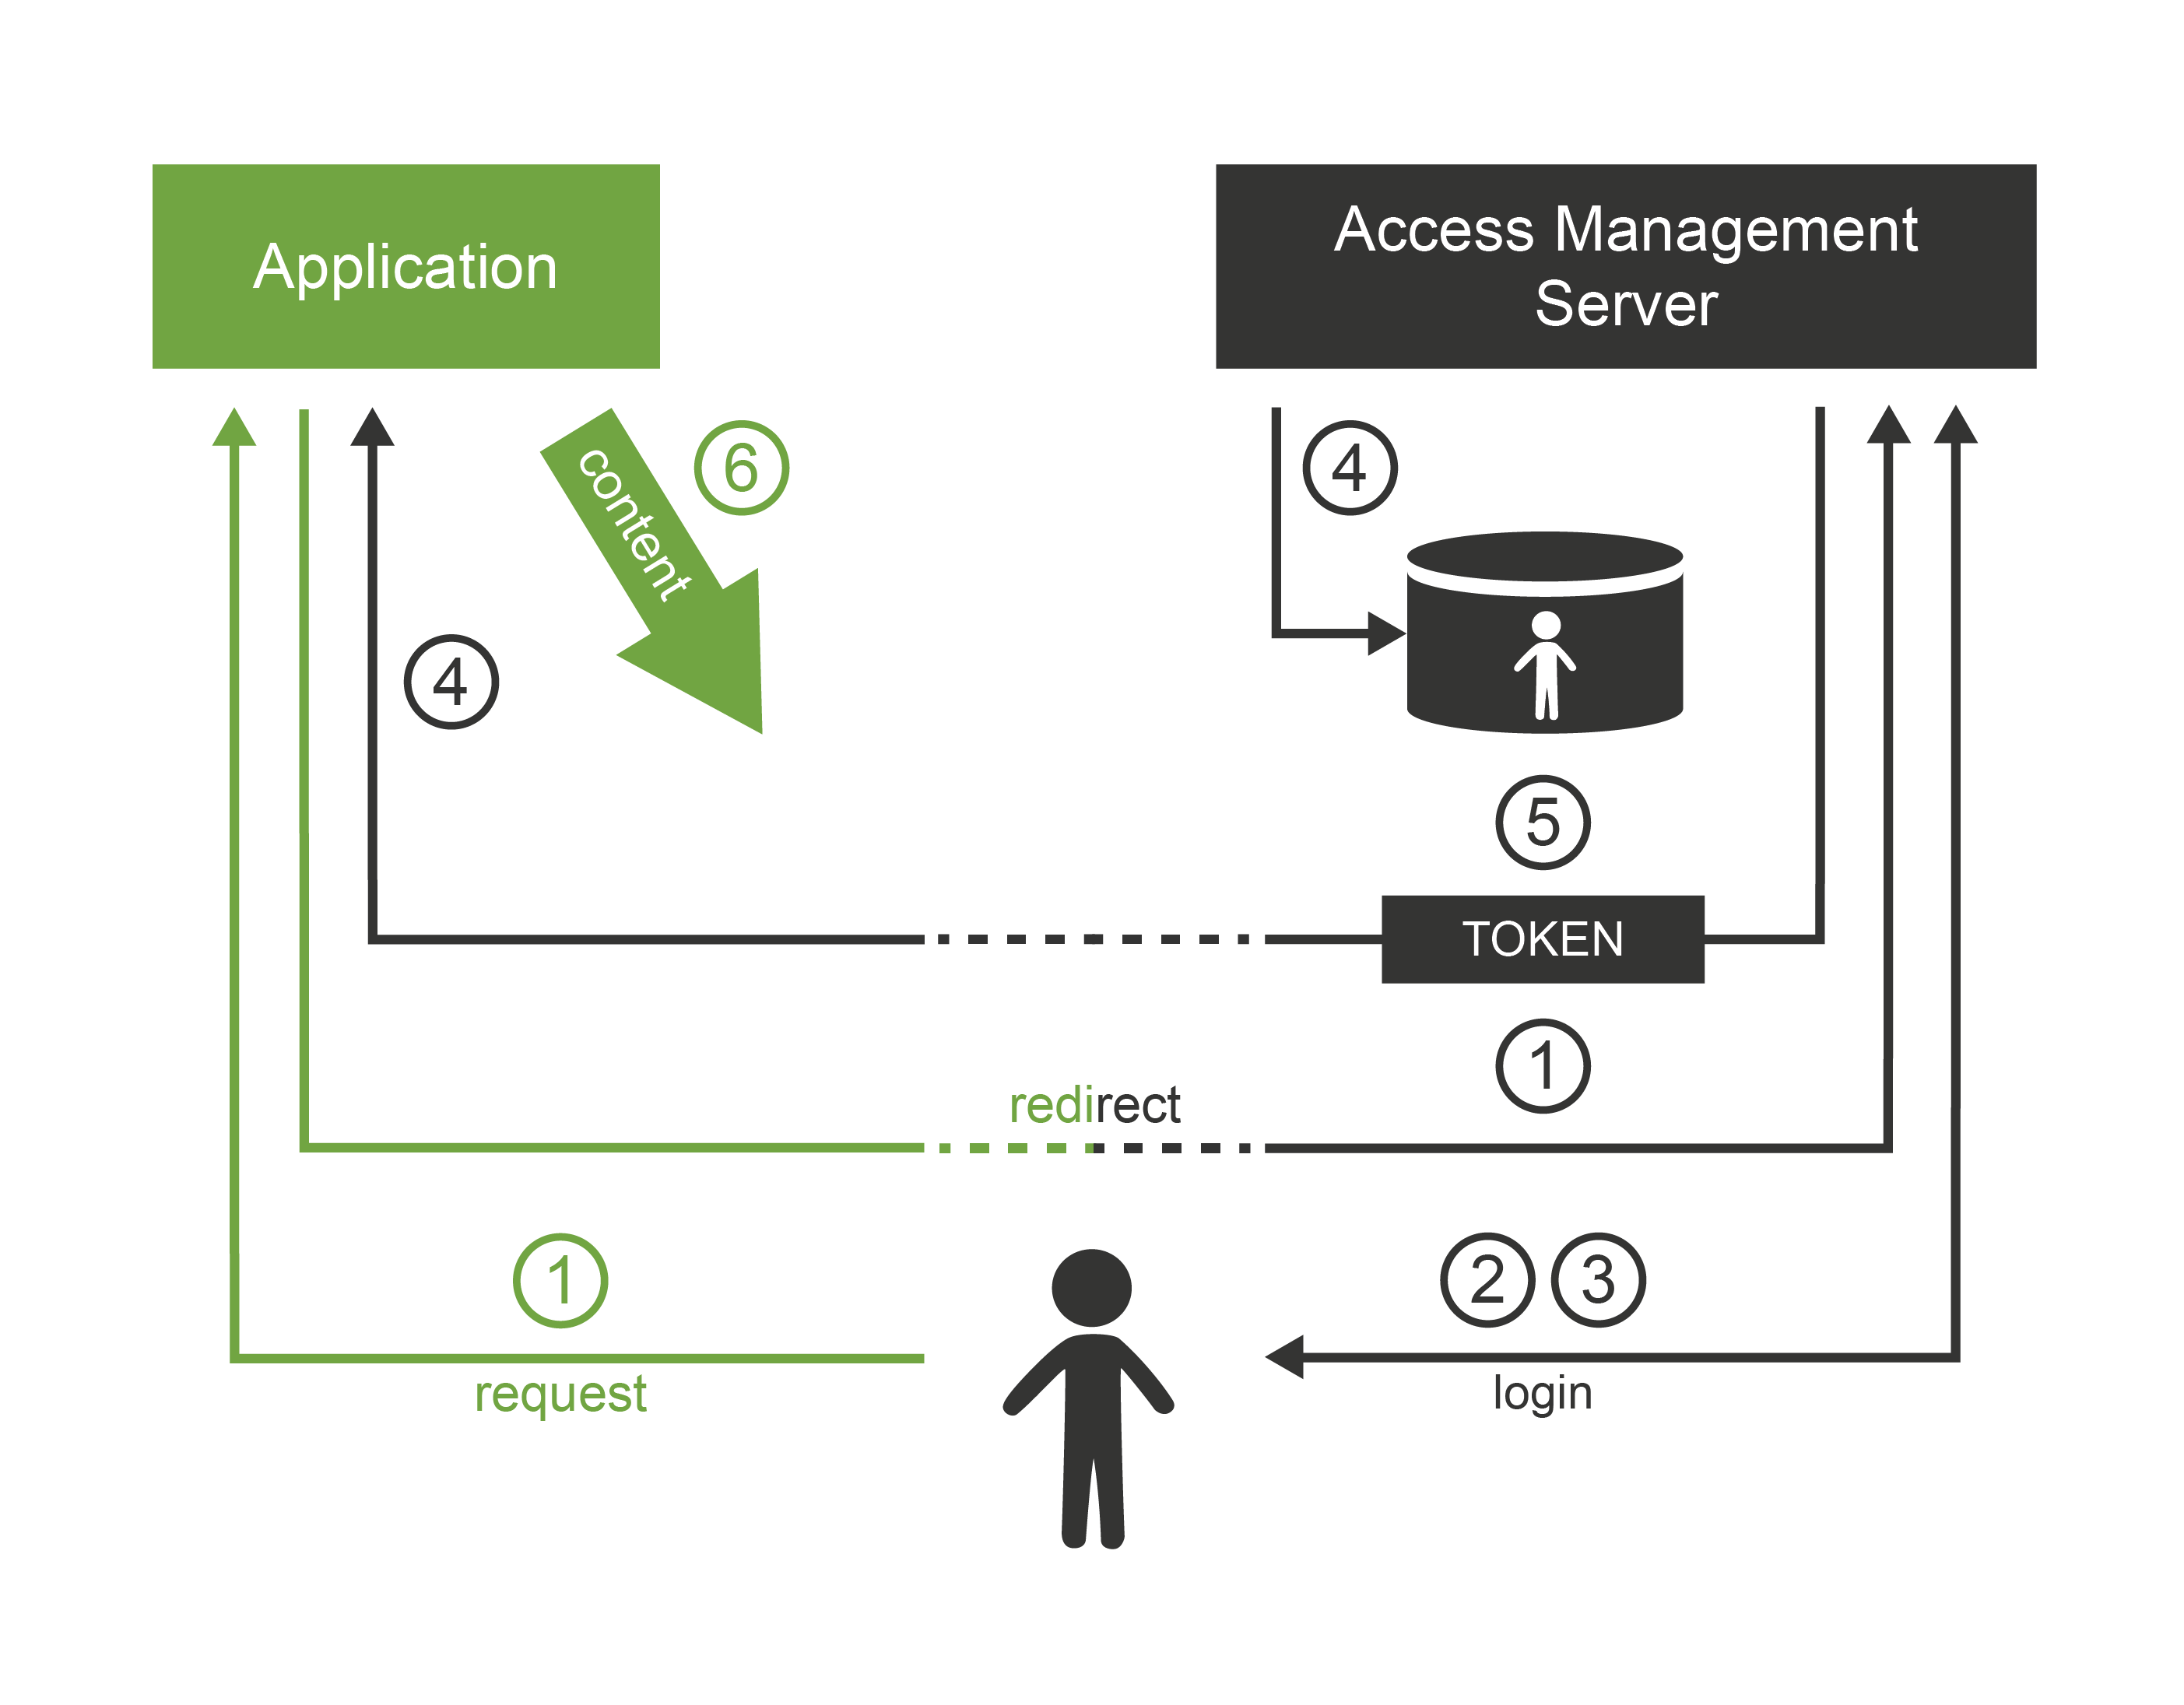
After that procedure, the user works with the application normally. Only the first access goes through the AM server. This is important for AM system performance and sizing, and it impacts session management functionality.
The applications only need to provide the code that integrates with the AM system. Except for that small integration code, applications do not need to implement any authentication code at all. It is the AM system that prompts for the password, not the application. This is a fundamental difference when compared to LDAP-based authentication mechanisms. In the LDAP case, it is the application that prompts for the password. In the AM case, the Access Management server does everything. Many applications do not even care how the user was authenticated. All they need to know is that he was authenticated and that the authentication was strong enough. This feature brings a very desirable flexibility to the entire application infrastructure. The authentication mechanism can be changed at any time without disrupting the applications. We live in an era when passwords are frowned upon and replaced by stronger authentication mechanisms. The flexibility that the AM-based approach brings may play a key part in that migration.
Web Single Sign-On
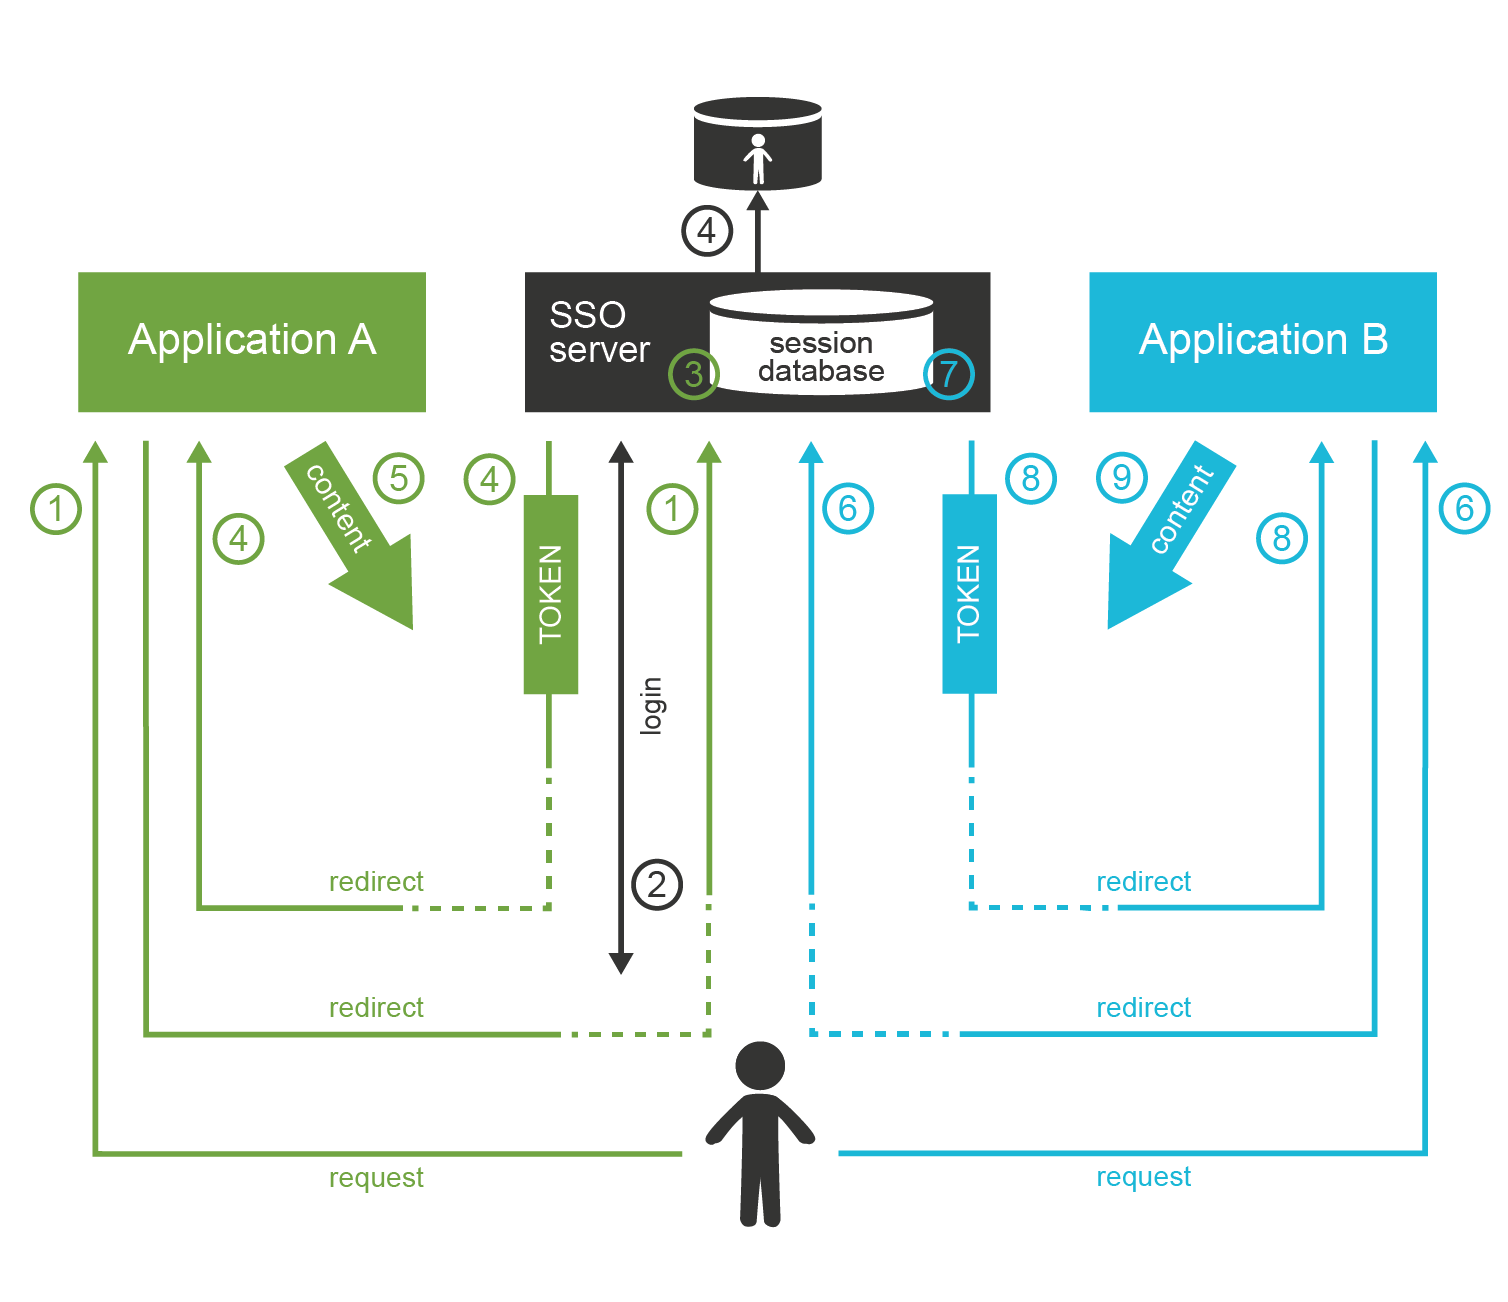
Single Sign-On (SSO) systems allow user to authenticate once, and access number of different systems re-using that authentication. There are many SSO systems for web applications, however it looks like these systems are all using the same basic principle of operation. The general access management flow is described below:
-
Application
Aredirects the user to the access management server (SSO server). -
The access management server authenticates the user.
-
The access management server establishes session (SSO session) with the user browser. This is crucial part of SSO mechanism.
-
User is redirected back to application
A. ApplicationAusually establishes a local session with the user. -
User interacts with application
A. -
When user tries to access application
B, it redirects user to the access management server. -
The access management server checks for existence of SSO session. As the user authenticated with the access management server before, there is a valid SSO session.
-
Access management server does not need to authenticate the user again, it immediately redirects user back to application
B. -
Application
Bestablishes a local session with the user and proceeds normally.
The user usually does not even realize that there were any redirects when accessing application B.
There is no interaction between the redirects, and the processing on the access management server is usually very fast.
It looks like the user was logged into the application B all the time.
Authorization in Access Management
The request of a user accessing an application is directly or indirectly passed through the access management server. Therefore, the access management server can analyze the request and evaluate whether the user request is authorized or not. That is a theory. Unfortunately, the situation is much more complicated in practice.
The AM server usually intercepts only the first request to access the application, because it would be a performance impact to intercept all the requests. After the first request, the application established a local session and proceeds with the operation without any communication with the AM server. Therefore, the AM server can only enforce authorization during the first request. This means it can only enforce a very coarse-grained authorization decisions. In practice, it usually means that the AM server can make only all-or-nothing authorization decisions: whether a particular user can access all parts of a particular application or that he cannot access the application at all. The AM server usually cannot make any finer-grain decisions just by itself.
Some AM systems provide agents that can be deployed to applications, agents that enforce a finer-grain authorization decisions. Such agents often rely on HTTP communication. They are making decisions based on the URLs that the user is accessing. This approach might have worked well in the 1990s, but it has only very limited applicability in the age of single-page web applications and mobile applications. In such cases the authorization is usually applied to services rather than applications.
However, even applying the authorization to service front-ends does not solve the problem entirely. Sophisticated applications often need to make authorization decisions based on context, which is simply not available in the request or user profile at all. E.g. an e-banking application may allow or deny a transaction based on the sum of previous transactions that were made earlier that day. While it may be possible to synchronize all the authorization information into the user profile, it is usually not desirable. It would be a major burden to keep such information updated and consistent, not to mention security and privacy concerns. Many authorization schemes rely on a specific business logic, which is very difficult to centralize in an authorization server.
Then there are implementation constraints. In theory, the authorization system should make only allow/deny decisions. However, this is not enough to implement an efficient application. The application cannot afford to list all the objects in the database, pass them to authorization server, and then realize that the authorization server denied access to almost all of them. Authorization has to be processed before the search operation, and additional search filters have to be applied. Which means that authorization mechanisms need to be integrated deep into the application logic. This significantly limits the applicability of centralized authorization mechanisms.
AM systems often come with a promise to unify authorization across all the applications and to centralize management of organization-wide security policies. Unfortunately, such broad promises are seldom fulfilled. The AM system can theoretically evaluate and enforce some authorization statements. This may work well during demonstrations and even in very simple deployments. Yet in complex practical deployments, this capability is extremely limited. The vast majority of the authorization decisions is carried out by each individual application and is completely outside the reach of an AM system.
SAML and OpenID Connect
Some access management systems use proprietary protocols to communicate with the applications and agents. This is obviously an interoperability issue – especially when the AM principles are used in the Internet environment. Indeed, it is the Internet that motivated standardization in this field.
The first widespread standardized protocol in this field was Security Assertion Markup Language (SAML). The original intent of SAML was to allow cross-domain sign-on and identity data sharing across organizations on the Internet. SAML is both an access management protocol and a security token format. SAML is quite complex, heavily based on XML standards. Its specifications are long, divided into several profiles, there are many optional elements and features. Overall, SAML is not just a protocol, it is a set of very rich and flexible mechanisms.
Primary purpose of SAML is transfer of identity information between organizations. There are big SAML-based federations with hundreds of participating organizations. Many e-government solutions are based on SAML, there are big partner networks running on SAML, and overall it looks like SAML is a success. Yet, SAML was a victim of its own flexibility and complexity. The latest fashion trends are not very favorable to SAML. XML and SOAP-based web service mechanisms are hopelessly out of fashion, which impacts popularity of SAML. That has probably motivated the inception of other access management protocols.
The latest fashion still favors RESTful services and simpler architectural approaches. That probably contributed to the development of OpenID Connect protocol (OIDC). OpenID Connect is based on much simpler mechanisms than SAML, but it is reusing the same basic principles. OpenID connect has a very eventful history. It all started with a bunch of homebrew protocols such as LID or SXIP, that are mostly forgotten today. That was followed by the development of OpenID protocol, which was still very simple. OpenID gained some attention especially with providers of Internet services. Despite its simplicity, OpenID was not very well engineered, and it quickly reached its technological limits. It was obvious that OpenID needs to be significantly improved. At that time, there was almost unrelated protocol called OAuth, which was designed for management of cross-domain authorizations. That protocol was developed into something that was almost, but not quite, entirely unlike the original OAuth protocol. As the new protocol had almost nothing to do with the original OAuth protocol, it is perfectly understandable that it was dubbed OAuth2. In fact, OAuth2 is not really a protocol at all. It is rather a vaguely-defined framework to build other protocols. OAuth2 framework was used to build a cross-domain authentication and user profile protocol. This new protocol is much more similar to SAML than to the original OpenID, therefore it was an obvious choice to call it OpenID Connect. Some traditions are just worth maintaining.
Now there are two protocols that are using the same principle and doing almost the same thing: SAML and OpenID Connect. The principle of both protocols is illustrated in the following diagram.
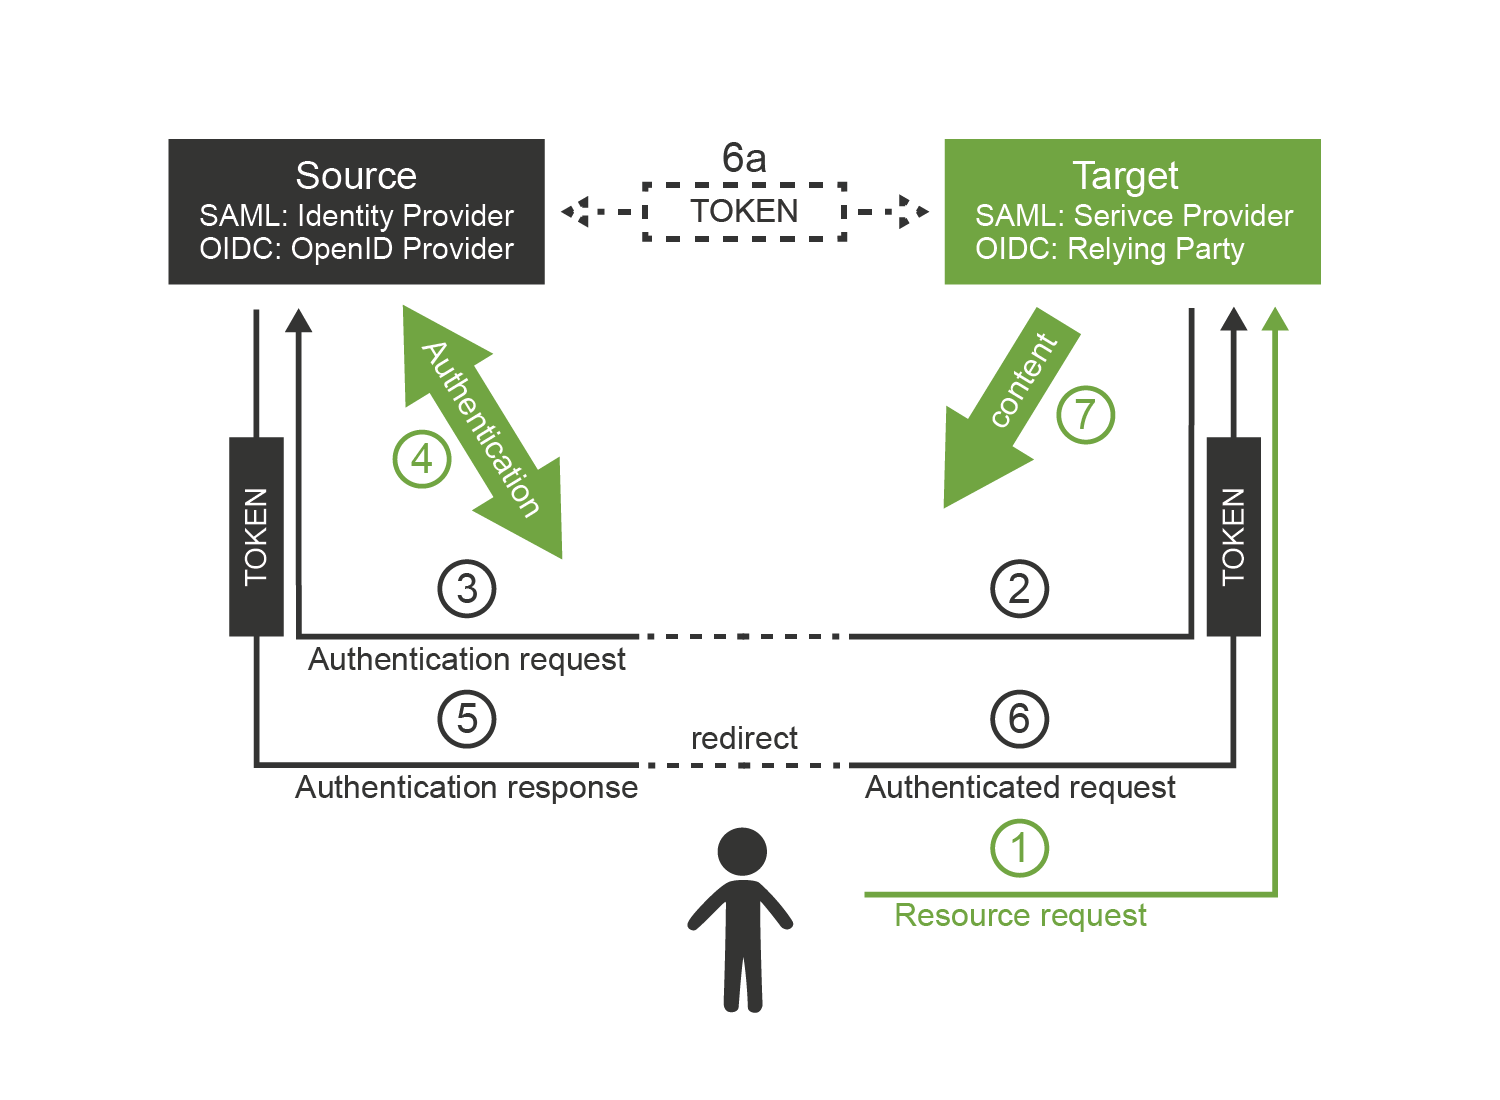
The interaction goes like this:
-
User is accessing a resource. This can be web page or web application running on the target site.
-
Target site does not have a valid session for the user. Therefore, it redirects user browser to the source site. It adds authentication request into that redirect.
-
Browser follows the redirect to the source site. The source site gets the authentication request and parses it.
-
If the user is not already authenticated with the source site then the authentication happens now. The source site prompts for the username, password, certificate, one-time password or whatever credential that is required by the policy. With a bit of luck the authentication succeeds.
-
The source site redirects the browser back to the target site. The source site adds authentication response to the redirect. The most important part of the response is a token. The token directly or indirectly asserts user’s identity.
-
The target site parses the authentication response and processes the token. The token may be just a reference (e.g. SAML artifact) pointing to real data, or it may be access key to another service that provides the data (OIDC UserInfo). In that case the target site makes another request (6a). This request is usually a direct one and does not use browser redirects. One way or another, the target site now has claims about user identity.
-
Target site evaluates the identity, processes authorizations and so on. A local session with the user is usually established at this point to skip the authentication redirects on the next request. The target site finally provides the content.
Following table compares the terminology and technologies used in SAML and OIDC worlds.
| SAML World | OpenID Connect World | |
|---|---|---|
Source site |
Identity Provider (IdP) |
Identity Provider (IDP) or OpenID Provider (OP) |
Target site |
Service Provider (SP) |
Relying Party (RP) |
Token reference |
SAML Assertion (or artifact) |
ID token, access token |
Token format |
SAML Token |
JSON Web Token (JWT) |
Intended for |
Web applications, web services (SOAP) |
Web applications, mobile applications, REST services |
Based on |
N/A |
OAuth2 |
Data representation |
XML |
JSON |
Cryptography framework |
XMLenc, XMLdsig |
JSON Object Signing and Encryption (JOSE) |
Careful reader surely noticed the similarity with the web-based access management mechanisms. That’s right. This is the same wheel, reinvented over and over again. However, to be completely honest, we have limited our description to cover flows intended for web browser only. Both SAML and OIDC has broader applicability that just web browser flows. The differences between the two protocols are much more obvious in these extended use cases. However, the web browser case nicely illustrates the principles and similarities of SAML, OpenID Connect and also the simple web-SSO systems.
Maybe the most important differences between SAML, OIDC and web-SSO (also known as Web Access Management or WAM) systems is the intended use:
-
SAML was designed for the web applications and SOAP web services world. It will handle centralized (single-IDP) scenarios very well, but it can also work in decentralized federations. Go for SAML if you are using SOAP and WS-Security or if you plan to build big decentralized federation. On second thought, you should probably forget about SAML anyway. It is not very fashionable these days.
-
OpenID Connect was designed mostly for use with social networks and similar Internet services. Its philosophy is still somehow centralized. It will work well if there is one strong identity provider and many relying parties. Technologically it will fit into RESTful world much better than SAML. Current fashion trends are favorable to OIDC.
-
Web-SSO/WAM systems are designed to be used inside a single organization. This is ideal to implement SSO between several customer-facing applications so the customers will have no idea that they interact with many applications and not just one. The web-SSO/WAM systems are not designed to work across organizational boundaries. Which is quite unfortunate in the current "cloudy" IT environment.
Although SAML and OIDC are designed primarily for cross-domain use, it is no big surprise to see them inside a single organization. There is a clear benefit in using an open standardized protocol instead of a proprietary mechanism. However, it has to be expected that the SSO system based on SAML or OIDC will have slightly more complicated setup than a simple Web-SSO/WAM system.
Kerberos, Enterprise SSO and Friends
Many of us would like to think that everything is based on web technologies today, and that non-web mechanisms are things of the past. Yet, there are still systems that are not web-based and where web-based SSO and AM mechanisms will not work. There are still some legacy applications, especially in the enterprise environment - applications based on rich clients or even character-based terminal interactions. Then there are network operating systems such as Windows and numerous UNIX variants and there are network access technologies such as VPN or 802.1X. There are still many cases where web-based access management and SSO simply won’t work. These technologies usually pre-date the web. Honestly, the centralized authentication and single sign-on are not entirely new ideas. It is perhaps no big surprise that there are authentication and SSO solutions even for non-web applications.
The classic classroom example of non-web SSO system is Kerberos. The protocol originated at MIT in the 1980s. It is a single sign-on protocol for operating systems and rich clients based on symmetric cryptography. Even though it is a cryptographic protocol, it is not too complicated to understand, and it definitely withstood the test of time. It has been used to this day, especially for authentication and SSO of network operating systems. It is a part of Windows network domain, and it is often the preferred solution for authentication of UNIX servers. The most serious limitation of Kerberos is given by its use of symmetric cryptography. The weakness of symmetric cryptography is key management. Kerberos key management can be quite difficult especially when Kerberos realm gets very big. Key management is also one of the reasons why it is not very realistic to use Kerberos in cross-domain scenarios. However inside a closed organization, Kerberos is still a very useful solution.
The major drawback in using Kerberos is that every application and client needs to be "kerberized". In other words everybody that wants to take part in Kerberos authentication needs to have Kerberos support in one’s software. There are kerberized versions of many network utilities so this is usually not a problem for UNIX-based networks. However, it is a big problem for generic applications. There is some support for Kerberos in common web browsers which is often referred to as "SPNEGO". However, this support is usually limited to interoperability with Windows domains. Even though Kerberos is still useful for operating system SSO, it is not a generic solution for all applications.
Many network devices use RADIUS protocol for what network engineers call "Authentication, Authorization and Accounting" (AAA). However, RADIUS is a back-end protocol. It does not take care of client interactions. The goal of RADIUS is that the network device (e.g. WiFi access point, router or VPN gateway) can validate user credentials that it has received as part of other protocol. The client connecting to VPN or WiFi network does not know anything about RADIUS. Therefore, RADIUS is similar to the LDAP protocol, and it is not really an access management technology.
Obviously there is no simple and elegant solution that can provide SSO for all enterprise applications. Despite that one technology appeared in the 1990s and early 2000s and promised to deliver universal enterprise SSO solution. It was called "Enterprise Single Sign-On" (ESSO). The ESSO approach was to use agents installed on every client device. The agent detects when login dialog appears on the screen, fills in the username and password and submits the dialog. If the agent is fast enough the user does not even notice the dialog and this creates the impression of Single Sign-On. However, there are obvious drawbacks. The agents need to know all the passwords in a cleartext form. There are ESSO variations with passwords randomly generated or even single-user passwords which partially alleviates this problem. In that case there is an additional drawback that the ESSO also needs to be integrated with password management of all the applications, which is not entirely easy. However, the most serious drawback of ESSO are the agents. These only work on workstations that are strictly controlled by the enterprise. Yet the world is different now, enterprise perimeter has efficiently disappeared, and the enterprise cannot really control all the client devices. Therefore, also ESSO is now mostly a thing of the past.
Access Management and the Data
Access Management servers and identity providers need to know the data about users to work properly. However, it is quite complicated. The purpose of access management systems is to manage access of users to the applications. Which usually means processing authentication, authorization (partially), auditing of the access and so on. For this to work, the AM system needs access to the database where the user data are stored. It needs access to usernames, passwords and other credentials, authorization policies, attributes and so on. The AM systems usually do not store these data themselves. They rely on external data stores. In most cases, these data stores are directory services or noSQL databases. This is an obvious choice: these databases are lightweight, highly available and extremely scalable. The AM system usually need just simple attributes, therefore the limited capabilities of directories and NoSQL databases are not a limiting factor here. Marriage of access management and lightweight database is an obvious and very smart match.
However, there is one critical issue – especially if the AM system is also used as a single sign-on server. The data in the directory service and the data in the applications must be consistent. E.g. it is a huge problem if one user has different usernames in several applications. Which username should he use to log in? Which username should be sent to the applications? There are ways how to handle such situations, but this is usually very cumbersome and expensive. It is much easier to unify the data before the AM system is deployed.
Even though the "M" in AM stands for "management", typical AM system has only a very limited data management capabilities. The AM systems usually assume that the underlying user database is already properly managed. E.g. a typical AM system has only a very minimalistic user interface to create, modify and delete user records. Some AM systems may have self-service functionality (such as password reset), but even that functionality is usually very limited. Even though the AM relies on the fact that the data in the AM directory service and the data in applications are consistent, there is usually no way how to fully synchronize the data by using the AM system itself. There may be methods for on-demand or opportunistic data updates, e.g. creating user record in the database when the user logs in for the first time. However, there are usually no solutions for deleting the records or for updating the records of inactive users.
Therefore, the AM systems are usually not deployed alone. The underlying directory service or NoSQL database is almost always a hard requirement for even humblest AM functionality. However, for the AM system to really work properly, it needs something to manage and synchronize the data. Identity Management (IDM) system is usually used for that purpose. In fact, it is usually strongly recommended to deploy directory and IDM system before the AM system. The AM system cannot work without the data. If the AM tries working with data that are not maintained properly, it will not take a long time until it fails.
Advantages and Disadvantages of Access Management Systems
Access management systems have significant advantages. Most of the characteristics are given by the AM principle of centralized authentication. As the authentication is carried out by a central access management server, it can be easily controlled and audited. Such centralization can be used to consistently apply authentication policies - and to easily change them when needed. It also allows better utilization of an investment into authentication technologies. E.g. multi-factor or adaptive authentication can be quite expensive if it has to be implemented by every application. When it is implemented in the AM server, it is re-used by all the applications without additional investment.
However, there are also drawbacks. As the access management is centralized, it is obviously a single point of failure. Nobody is going to log in when the AM server fails. This obviously means major impact on functionality of all applications. Therefore, AM servers need to be highly available and scalable. Which is not always an easy task. The AM servers need a very careful sizing, as they may easily become a performance bottlenecks.
However, perhaps the most severe drawback is the total cost of access management solution. The cost of the AM server itself is usually not a major issue. However, the server will not work just by itself. The server needs to be integrated with every application. Even though there are standard protocols, the integration is far from being straightforward. Support for AM standards and protocols in the applications is still not universal. Especially older enterprise applications need to be modified to switch their authentication subsystem to the AM server. This is often so costly that the adoption of AM technologies is often limited just to a handful of enterprise applications. Although recent applications usually have some support for AM protocols, setting it up is still not an easy task. There are subtle incompatibilities and treacherous details, especially if the integration goes beyond mere authentication into authorization and user profile management.
Even though many organizations are planning deployment of an AM system as their first step in the IAM project, this approach seldom succeeds. Projects usually plans to integrate 50-80% applications into the AM solution. However, the reality is that only a handful of applications can be easily integrated with the AM system. The rest of the applications is integrated using an identity management (IDM) system, which is hastily added to the project. Therefore, it is better to plan ahead: analyze the AM integration effort, prototype the deployment, and make a realistic plan for the AM solution. Make sure the AM can really bring the promised benefits. Starting with IDM and adding AM part later is often much more reasonable strategy.
Homogeneous Access Management Myth
There are at least two popular access management protocols for the web. There are huge identity federations based on SAML. Cloud services and social networks usually use OpenID Connect or its variations. There are variations and related protocols to be used for mobile applications and services. Then there are other SSO protocols, primarily focused on intra-organizational use. There is no single protocol or mechanism that can solve all the problems in the AM world.
Additionally, the redirection approach of AM systems assumes that the user has something that can display authentication prompts and carry out user interaction. Which is usually a web browser. Therefore, the original variant of access management mechanisms applies mostly to conventional web-based applications. Variations of this approach are also applicable to network services and single-page web applications. However, this approach is usually not directly applicable for applications that use rich clients, operating system authentication and similar "traditional" applications. Browser is not the primary environment that can be used to carry out the authentication in those cases. There are some solutions that usually rely on embedded browser, however that does not change the basic fact that the AM technologies are not entirely suitable for this environment. These applications usually rely on Kerberos as an SSO system or do not integrate with any SSO system at all.
Typical IT environment is composed of a wild mix of technologies and not all of them are entirely web-based. Therefore, it is quite unlikely a single AM system can apply to everything that is deployed in your organization. Authentication is very tightly bound to the user interaction, therefore it depends on the method how the user interacts with the application. As the user is using different technologies to interact with the web application, mobile application and operating system then it is obvious that also authentication and SSO methods for these systems will be different.
Therefore, it has to be expected that there will be several AM or SSO systems in the organization, each one serving its own technological island. Each island needs to be managed.
Practical Access Management
Unifying access management system, Single Sign-On, cross-domain identity federation, social login, universally-applicable 2-factor authentication – there are the things that people usually want when they think about Identity and Access Management (IAM). These are all perfectly valid requirements. However, everything has its cost. It is notoriously difficult to estimate the cost of access management solutions, because the majority of the cost is not in the AM software. Huge part of the total cost is hidden inside existing applications, services and clients. All of this has to be considered when planning an access management project.
Even though the AM is what people usually want, it is usually wise not to start with AM as the first step. AM deployment has many dependencies: unified user database, managed and continually synchronized data and applications that are flexible enough to be integrated are the very minimum. Unless your IT infrastructure is extremely homogeneous and simple, it is very unlikely that these dependencies are already satisfied. Therefore, it is almost certain that an AM project attempted at the beginning of the IAM program will not reach its goals. It is much more likely for such AM projects to fail miserably. On the other hand, if the AM project is properly scoped and planned and has realistic goals, there is high chance of success.
Perhaps the best way to evaluate an AM project is to ask several questions:
-
Do I really need access management for all applications? Do I need 100% coverage? Can I afford all the costs? Maybe it is enough to integrate just a couple of applications that are source of the worst pain. Do I know which applications are these? Do I know what my users really use during they workday? Do I know what they need?
-
What are the real security benefits of AM deployment? Will I be disabling the native authentication to the applications? Even for system administrators? What will I do in case of administration emergencies (e.g. system recovery)? Would system administrators still be able to circumvent the AM system? If yes then what is the real security benefit? If not then what will be the recovery procedure in case the AM system fails?
-
Do I really need SSO for older and rarely used applications? What is the real problem here? Is the problem that users are entering the password several times per day? Or is the real problem that they have to enter a different username or password to different applications, and they keep forgetting the credentials? Maybe simple data cleanup and password management will solve the worst problems, and I can save a huge amount of money on AM project?
The access management technologies are the most visible part of the IAM program. However, it is also the most expensive part, and the most difficult piece to set up and maintain. Therefore, do not underestimate other IAM technologies. Do not try to solve every problem with AM golden hammer. Using the right tool for the job is a good approach in every situation. In IAM program, it is absolutely critical for success.
Identity Management
Identity management (IDM) is maybe the most overlooked and underestimated technology in the whole identity and access management (IAM) field. Yet IDM is a crucial part of almost every IAM solution. It is IDM that can bring substantial benefits to almost any organization. So, what that mysterious IDM thing really is?
Identity management is exactly what the name says: it is all about managing identities. It is about the processes to create Active Directory accounts and mailboxes for a new employee. IDM sets up accounts for students at the beginning of each school year. IDM makes it possible to immediately disable all access to a suspicious user during a security incident. IDM takes care of adding new privileges and removing old privileges of users during reorganization. IDM makes sure all the accounts are properly disabled when the employee leaves the company. IDM automatically sets up privileges for students and staff appropriate for their classes. IDM records access privileges of temporary workers, partners, support engineers and all the third-party identities that are not maintained in your human resources (HR) system. IDM automates the processes of role request and approval. IDM records every change in user privileges in the audit trail. IDM governs the annual reviews of roles and access privileges. IDM makes sure the copies of user data that are kept in the applications are synchronized and properly managed. IDM makes sure data are managed according to data protection rules. IDM does many other things that are absolutely essential for every organization to operate in an efficient and secure manner.
It looks like IDM is the best thing since the sliced bread. So where’s the catch? Oh yes, there is a catch. At least, there was a catch. The IDM systems used to be expensive. Very expensive. The IDM systems used to be so expensive, it was very difficult to justify the cost even with such substantial and clear benefits. That time is over now. Identity management is still not cheap. However, the benefits clearly outweigh the costs now.
|
Terminology
The term identity management is often used for the whole identity and access management (IAM) field.
This is somehow confusing because technologies such as single sign-on or access management do not really manage the identities.
Such technologies manage the access to the applications.
Even directory servers do not exactly manage the identities.
Directory servers store the identities and provide access to them.
There is in fact one whole branch of technologies that manage identities.
Those systems are responsible for creating identities and maintaining them.
Those are sometimes referred to as identity provisioning, identity lifecycle management or identity administration systems.
However, given the current state of the technology such names are indeed an understatement.
Those systems can do much more than just provisioning or management of identity lifecycle.
Recently, the term Identity Governance and Administration (IGA) was introduced.
It is supposed to include identity management systems with identity governance capabilities.
We will refer to these systems simply as identity management (IDM) systems.
When we refer to the entire field that contains access management, directory services, identity management and governance we will use the term identity and access management (IAM).
|
History of Identity Management
Let’s start at the beginning. In the 1990s there was no technology that would be clearly identified as "identity management". Of course, all the problems above had existed almost since the beginning of modern computing. There had always been some solutions for those problems. Historically, most of that solutions were based on paperwork and scripting. That worked quite well - until the big system integration wave spread through the industry in the 1990s and 2000s. As data and processes in individual applications got integrated, the identity management problems became much more pronounced. Manual paper-based processes were just too slow for the age of information superhighways. The scripts were too difficult to maintain in the world where new application is deployed every couple of weeks. The identity integration effort naturally started with the state-of-the-art identity technology of the day: directory services. As we have already shown, the directories were not entirely ideal tools for the job. The directories did not work very well in environment where people though that LDAP is some kind of dangerous disease, where usernames and identifiers were assigned quite randomly and where every application insisted that the only authoritative data are those stored in its own database.
The integration problems motivated the inception of identity management technologies in early 2000s. Early IDM systems were just data synchronization engines that were somehow hard-coded to operate with users and accounts. Some simple role-based access control (RBAC) engines and administration interfaces were added a bit later. During mid-2000s there were several more-or-less complete IDM systems. This was the first generation of real IDM systems. These systems were able to synchronize identity data between applications and provide some basic management capabilities. Even such a simple functionality was a huge success at that time. The IDM systems could synchronize the data without any major modification of the applications, therefore they brought the integration cost to a reasonable level - at the application side. The problem was that the cost of the IDM systems themselves was quite high. These systems were still somehow crude, therefore the configuration and customization required a very specialized class of engineers. IDM engineers were almost exclusively employed by IDM vendors, big system integrators and expensive consulting companies. This made the deployment of IDM solutions prohibitively expensive for many mid-size and smaller organizations. Even big organizations often deployed IDM solution with quite limited features to make the cost acceptable.
Early IDM systems evolved and improved in time. There were companion products for identity governance and compliance that augmented the functionality. Yet, it is often almost impossible to change the original architecture of a product. Therefore, almost all the first-generation IDM products struggled with limitations of the early product design. Most of them do not exist today, or are considered to be legacy.
All these IDM systems were commercial closed-source software. However, the closed-source character of the IDM products is itself a huge problem. Every IDM solution has to be more-or-less customized - which usually means more rather than less. It has to be the IDM system that adapts, and not the applications. Requiring each application to adapt to a standardized IDM interface means a lot of changes in a lot of different places, platforms and languages. The total cost of all necessary modifications adds up to a huge number. Such approach is tried from time to time, it almost always fails. While there are many applications in the IT infrastructure, there is just one IDM system. If the IDM system adapts to applications and business processes, the changes are usually smaller, and they are all in one place, implemented in a single platform. The IDM system must be able to adapt. It has to adapt a great deal, and it has to adapt easily and rapidly. Closed-source software is notoriously bad at adapting to requirements that are difficult to predict. Which in practice means that the IDM projects based on first-generation products were hard to use, slow to adapt and expensive.
Even worse, the closed-source software is prone to vendor lock-in. Once the IDM system is deployed and integrated, it is extremely difficult to replace it with a competing system. The closed-source vendor is the only entity that can modify the system, and the system cannot be efficiently replaced. Which means that the end customer is not in a position to negotiate. Which means high maintenance costs. It naturally follows that the first generation of IDM systems was a huge commercial success. For the vendors, that is.
Then the 2000s were suddenly over, with an economic crash at the end. We can only speculate what were the reasons, but the fact is that around the years 2009-2011 several very interesting new IDM products appeared on the market. One interesting thing is that all of them were more-or-less open source. The benefit that open source character brings may be easy to overlook for business-oriented people. However, the benefits of open source in the identity management are almost impossible to overstate. As every single IDM engineer knows, understanding of the IDM product, and the ability to adapt the product, are two critical aspects of any IDM project. Open source is the best way to support both understanding and flexibility. There is also third important advantage: it is almost impossible to create a vendor lock-in situation with an open source product. All the open source products are backed by companies that offer professional support services that are equivalent to the services offered by commercial IDM products. This brings quality assurance for the products and related services. However, the companies does not really "own" the products, there is no way for them to abuse intellectual property rights against the customers. Open source brings new and revolutionary approach, both to technology and business.
New products appeared since early 2010s, in many areas in identity and access management. However, it is still a humble identity management platform that forms the core of the solution. The products have evolved to the point, that the entire field is not called identity governance and administration (IGA). New functionality was added to the products: identity governance, analytics, policy management, advanced reporting, and many more. New IGA platforms are much more powerful than ever, yet they are still the heart of IAM solutions.
What is This Identity Management, Anyway?
Identity management (IDM) is a simple term which encompasses a very rich and comprehensive functionality. It contains identity provisioning (and reprovisioning and deprovisioning), synchronization, organizational structure management, role-based access control, data consistency, approval processes, auditing and few dozens of other features. All of that is thoroughly blended and mixed with a pinch of scripting and other seasoning until there is a smooth IDM solution. Therefore, it is quite difficult to tell what identity management is just by using a dictionary-like definition. We would rather describe what identity management is by using a couple of typical usage scenarios.
Let’s have a fictional company called ExAmPLE, Inc. This company has few thousand employees, decent partner network, customers and suppliers and all the other things as real-world companies have. And ExAmPLE company has an IDM system running in its IT infrastructure.
ExAmPLE hires a new employee, Alice.
Alice signs an employee contract few days before she starts her employment.
The contract is entered into the human resource (HR) system by the ExAmPLE HR staff.
The IDM system periodically scans the HR records, it discovers the record of a new hire.
The IDM systems pulls in the record and analyzes it.
The IDM system takes user’s name and employee number from the HR record, it generates a unique username, and based on that information it creates a user record in the IDM system.
The IDM system also gets the organization code of 11001 from the HR record.
The IDM will look inside its organizational tree and discovers that the code 11001 belongs to sales department.
Therefore, IDM will automatically assign the user to the sales department.
The IDM will also process the work position code of S007 in the HR record.
The IDM policies say that the code S007 means sales agent and that anybody with that code should automatically receive Sales Agent role.
Therefore, the IDM assigns that role.
As Alice is a core employee, the IDM system automatically creates an Active Directory account for her together with company mailbox.
The account will be placed into the Sales Department organizational unit.
The Sales Agent role entitles the user to more privileges.
Therefore, the Active Directory account is automatically assigned to sales groups and distribution lists.
The role also gives access to the CRM system, therefore CRM account is also automatically created and assigned to appropriate groups.
All of that happens in a couple of seconds after the new HR record is detected.
It all happens automatically.
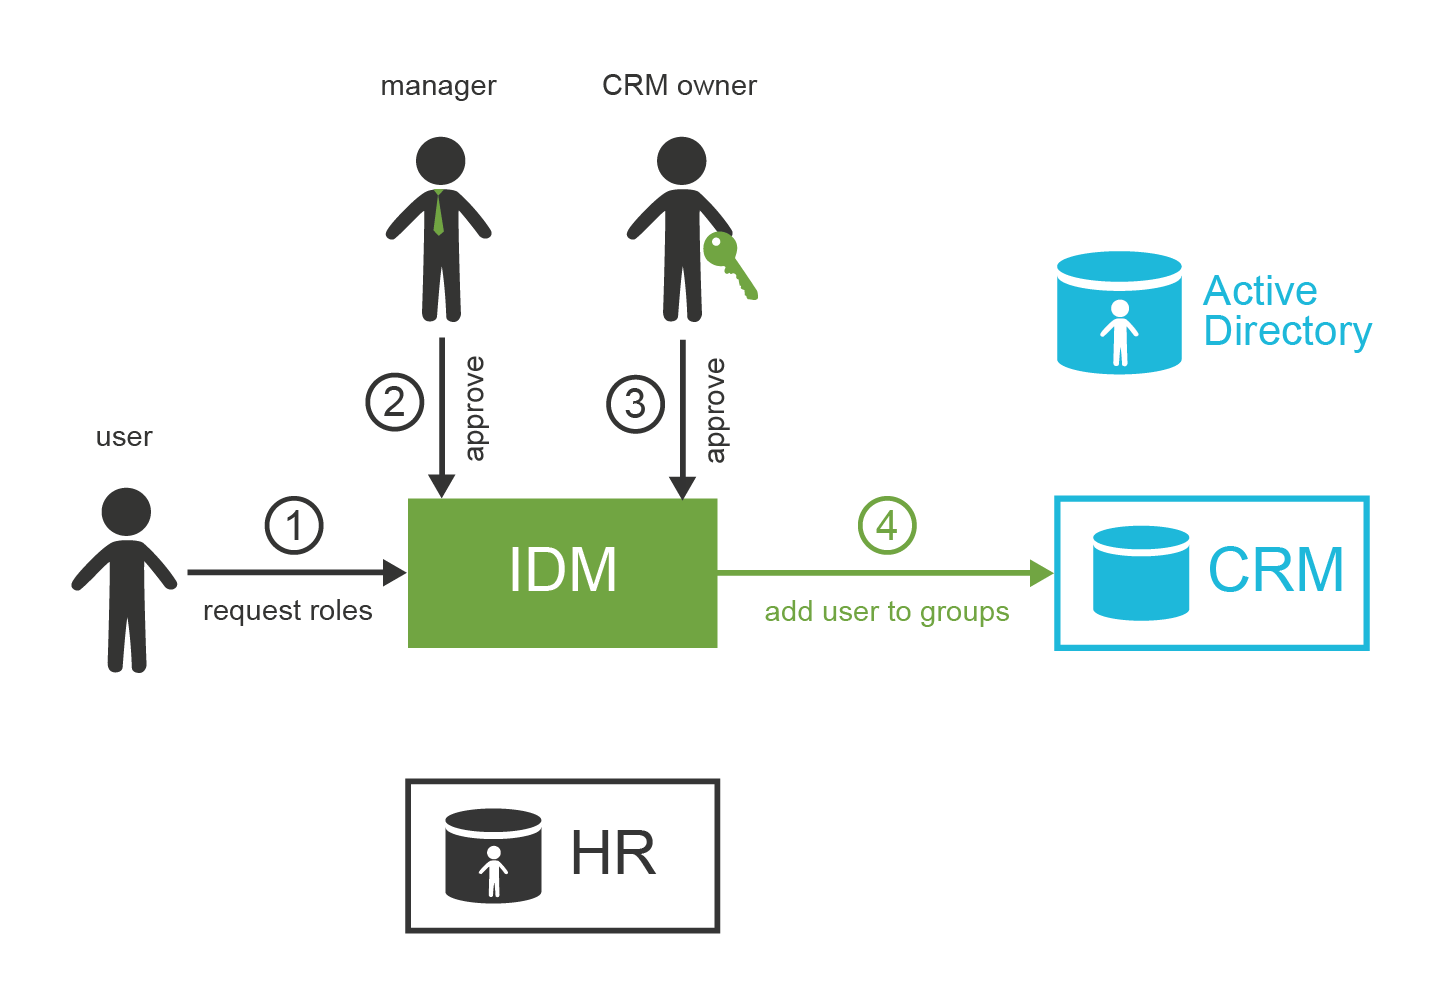
Alice starts her career, and she is a really efficient employee. Therefore, she gets more responsibilities. Alice is going to prepare specialized market analyses based on empirical data gathered in the field. ExAmPLE is an innovative company, always inventing new ways how to make business operations more efficient. Therefore, they invented this work position especially to take advantage of Alice’s skills. Which means there is no work position code for Alice’s new job. However, she needs new privileges in the CRM system to do her work efficiently. She needs that right now. Fortunately, the ExAmPLE has a flexible IDM system. Alice can log into the IDM system, select the privileges that she needs and request them. The request has to be approved by Alice’s manager and by the CRM system owner too. They get the notification about the request, and they can easily approve or reject it in the IDM system. Once the request is approved, Alice’s CRM account is automatically added to appropriate CRM groups. Alice may start working on her analysis minutes or hours after she has requested the privileges.
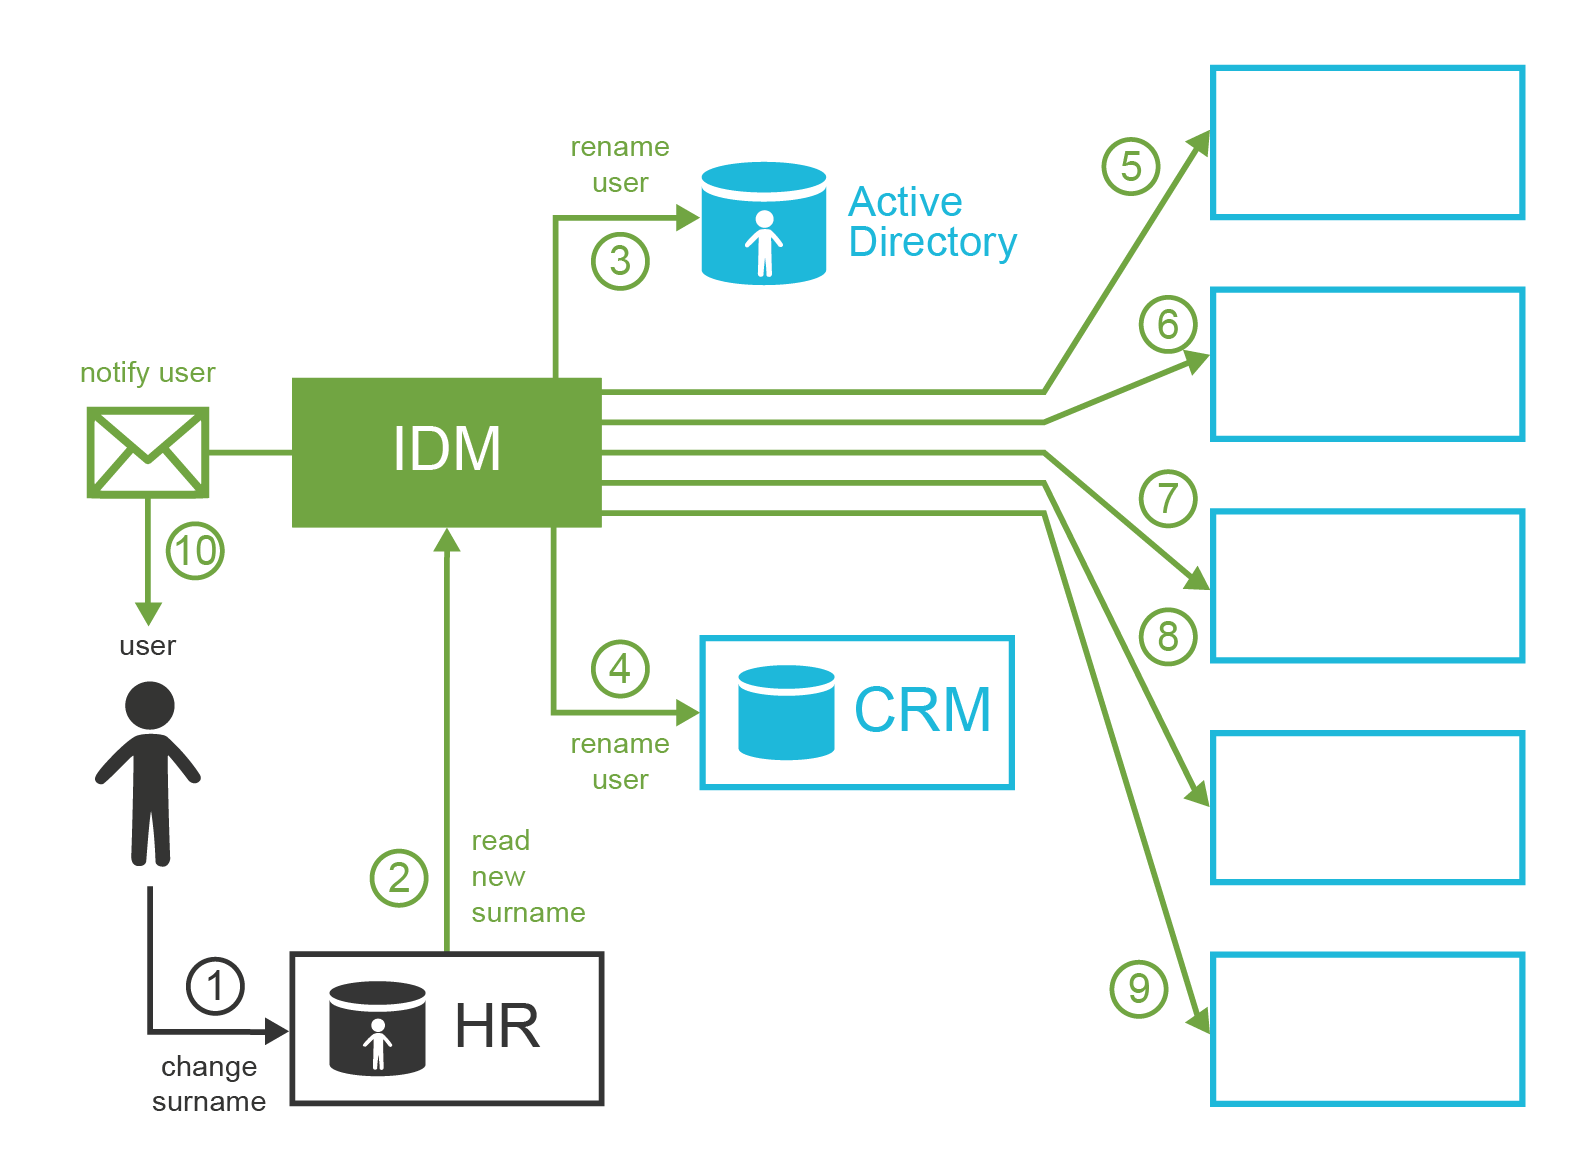
Alice lives happily ever after. One day she decides to get married. Alice, similarly to many other women, has the strange habit of changing her surname after the marriage. Alice has a really responsible work position now, she has accounts in a dozen information systems. This is no easy task to change her name in all of them, is it? In fact, it is very easy because ExAmPLE has its IDM system. Alice goes to the HR department, and the HR staff changes her surname in the HR system. The IDM system will pick up the change and propagate that to all the affected systems. Alice even automatically gets a new e-mail address with her new surname (keeping the old one as an alias). Alice receives a notification that now she can use her new e-mail address. The change is fast, clean and effortless.
Later that day Alice discovers that her password is about to expire. Changing the password in all the applications would be a huge task. Alice knows exactly what to do. She logs into the IDM system and changes her password there. The password change is automatically propagated to each affected system according to policy set up by the IT security office.
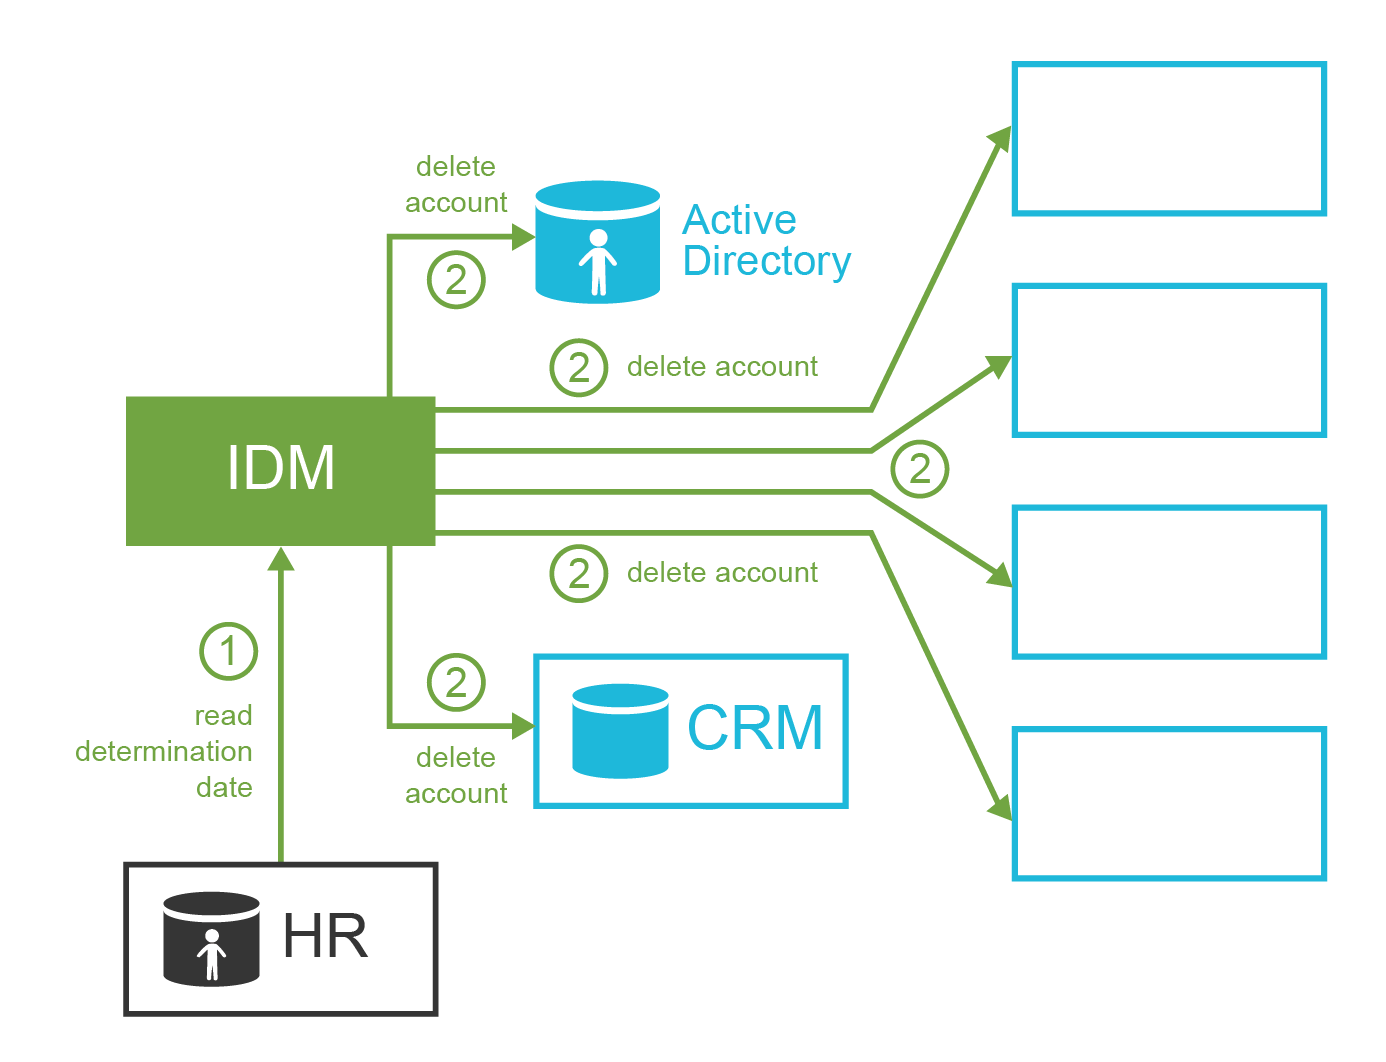
Something unexpected happens the following month. There is a security incident. The security office discovered the incident, and they are investigating it. It looks like it was an insider job. The security officers are using the data from the IDM system to focus their investigation on users that had privileges to access affected information assets. They pinpoint Mallory as a prime suspect. The interesting thing is that Mallory should not have such powerful privileges at all. Luckily, the IDM system also keeps an audit trail about every privilege change. Therefore, security team discovers that it was Mallory’s colleague Oscar that assigned these privileges to Mallory. Both men are to be interviewed. As this incident affects sensitive assets, there are some preventive measures to be executed before any word about the incident spreads. The security officers use the IDM system to immediately disable all the accounts that Mallory and Oscar have. It takes just a few seconds for IDM to disable these accounts in all the affected applications.

Later, the investigation reveals that Oscar is mostly innocent. Mallory misused Oscar’s trust and tricked him to assign these extra privileges. Mallory abused the privileges to get sensitive data which he tried to sell. The decision is that Mallory has to immediately leave the company while Oscar may stay. However, as Oscar has shown poor judgment in this case, his responsibilities are reduced. The IDM system is used to permanently disable all Mallory’s accounts, re-enable Oscar’s accounts, and also to revoke powerful privileges that are considered too risky for Oscar to have.
Few months later, Oscar is still ashamed because of his failure. He decides not to prolong his employee contract with ExAmPLE, and to leave the company without causing any more trouble. Oscar’s contract expires at the end of the month. This date is recorded in the HR system, and the IDM system takes it from there. Therefore, at midnight of the last Oscar’s day at work, the IDM system automatically deletes all Oscar’s accounts. Oscar starts a new career as a barman in New York. He is very successful.
The security office has handled the security incident professionally, and the IDM system provided crucial data to make the security response quick and efficient. Security team receives praise from the board of directors. The team always tries to improve. They try to learn from the incident and reduce the possibility of such a thing happening again. The team is using data from the IDM system to analyze the privileges assigned to individual users. The usual job of the IDM system is to create and modify accounts in the applications. However, the IDM system is using bidirectional communication with the applications. Therefore, this analysis is far from being yet another pointless spreadsheet exercise. The analysis is based on real application data processed and unified by the IDM system: the real accounts, to which user they belong, what roles they have, which groups they belong to and so on. The IDM system can detect accounts that do not have any obvious owner. The analysis discovers quite a rich collection of testing accounts that were obviously used during the last data center outage half a year ago. The IT operations staff obviously forgot about these accounts after the outage. The security staff disables the accounts using the IDM tools and sets up an automated process to watch out for such accounts in the future.
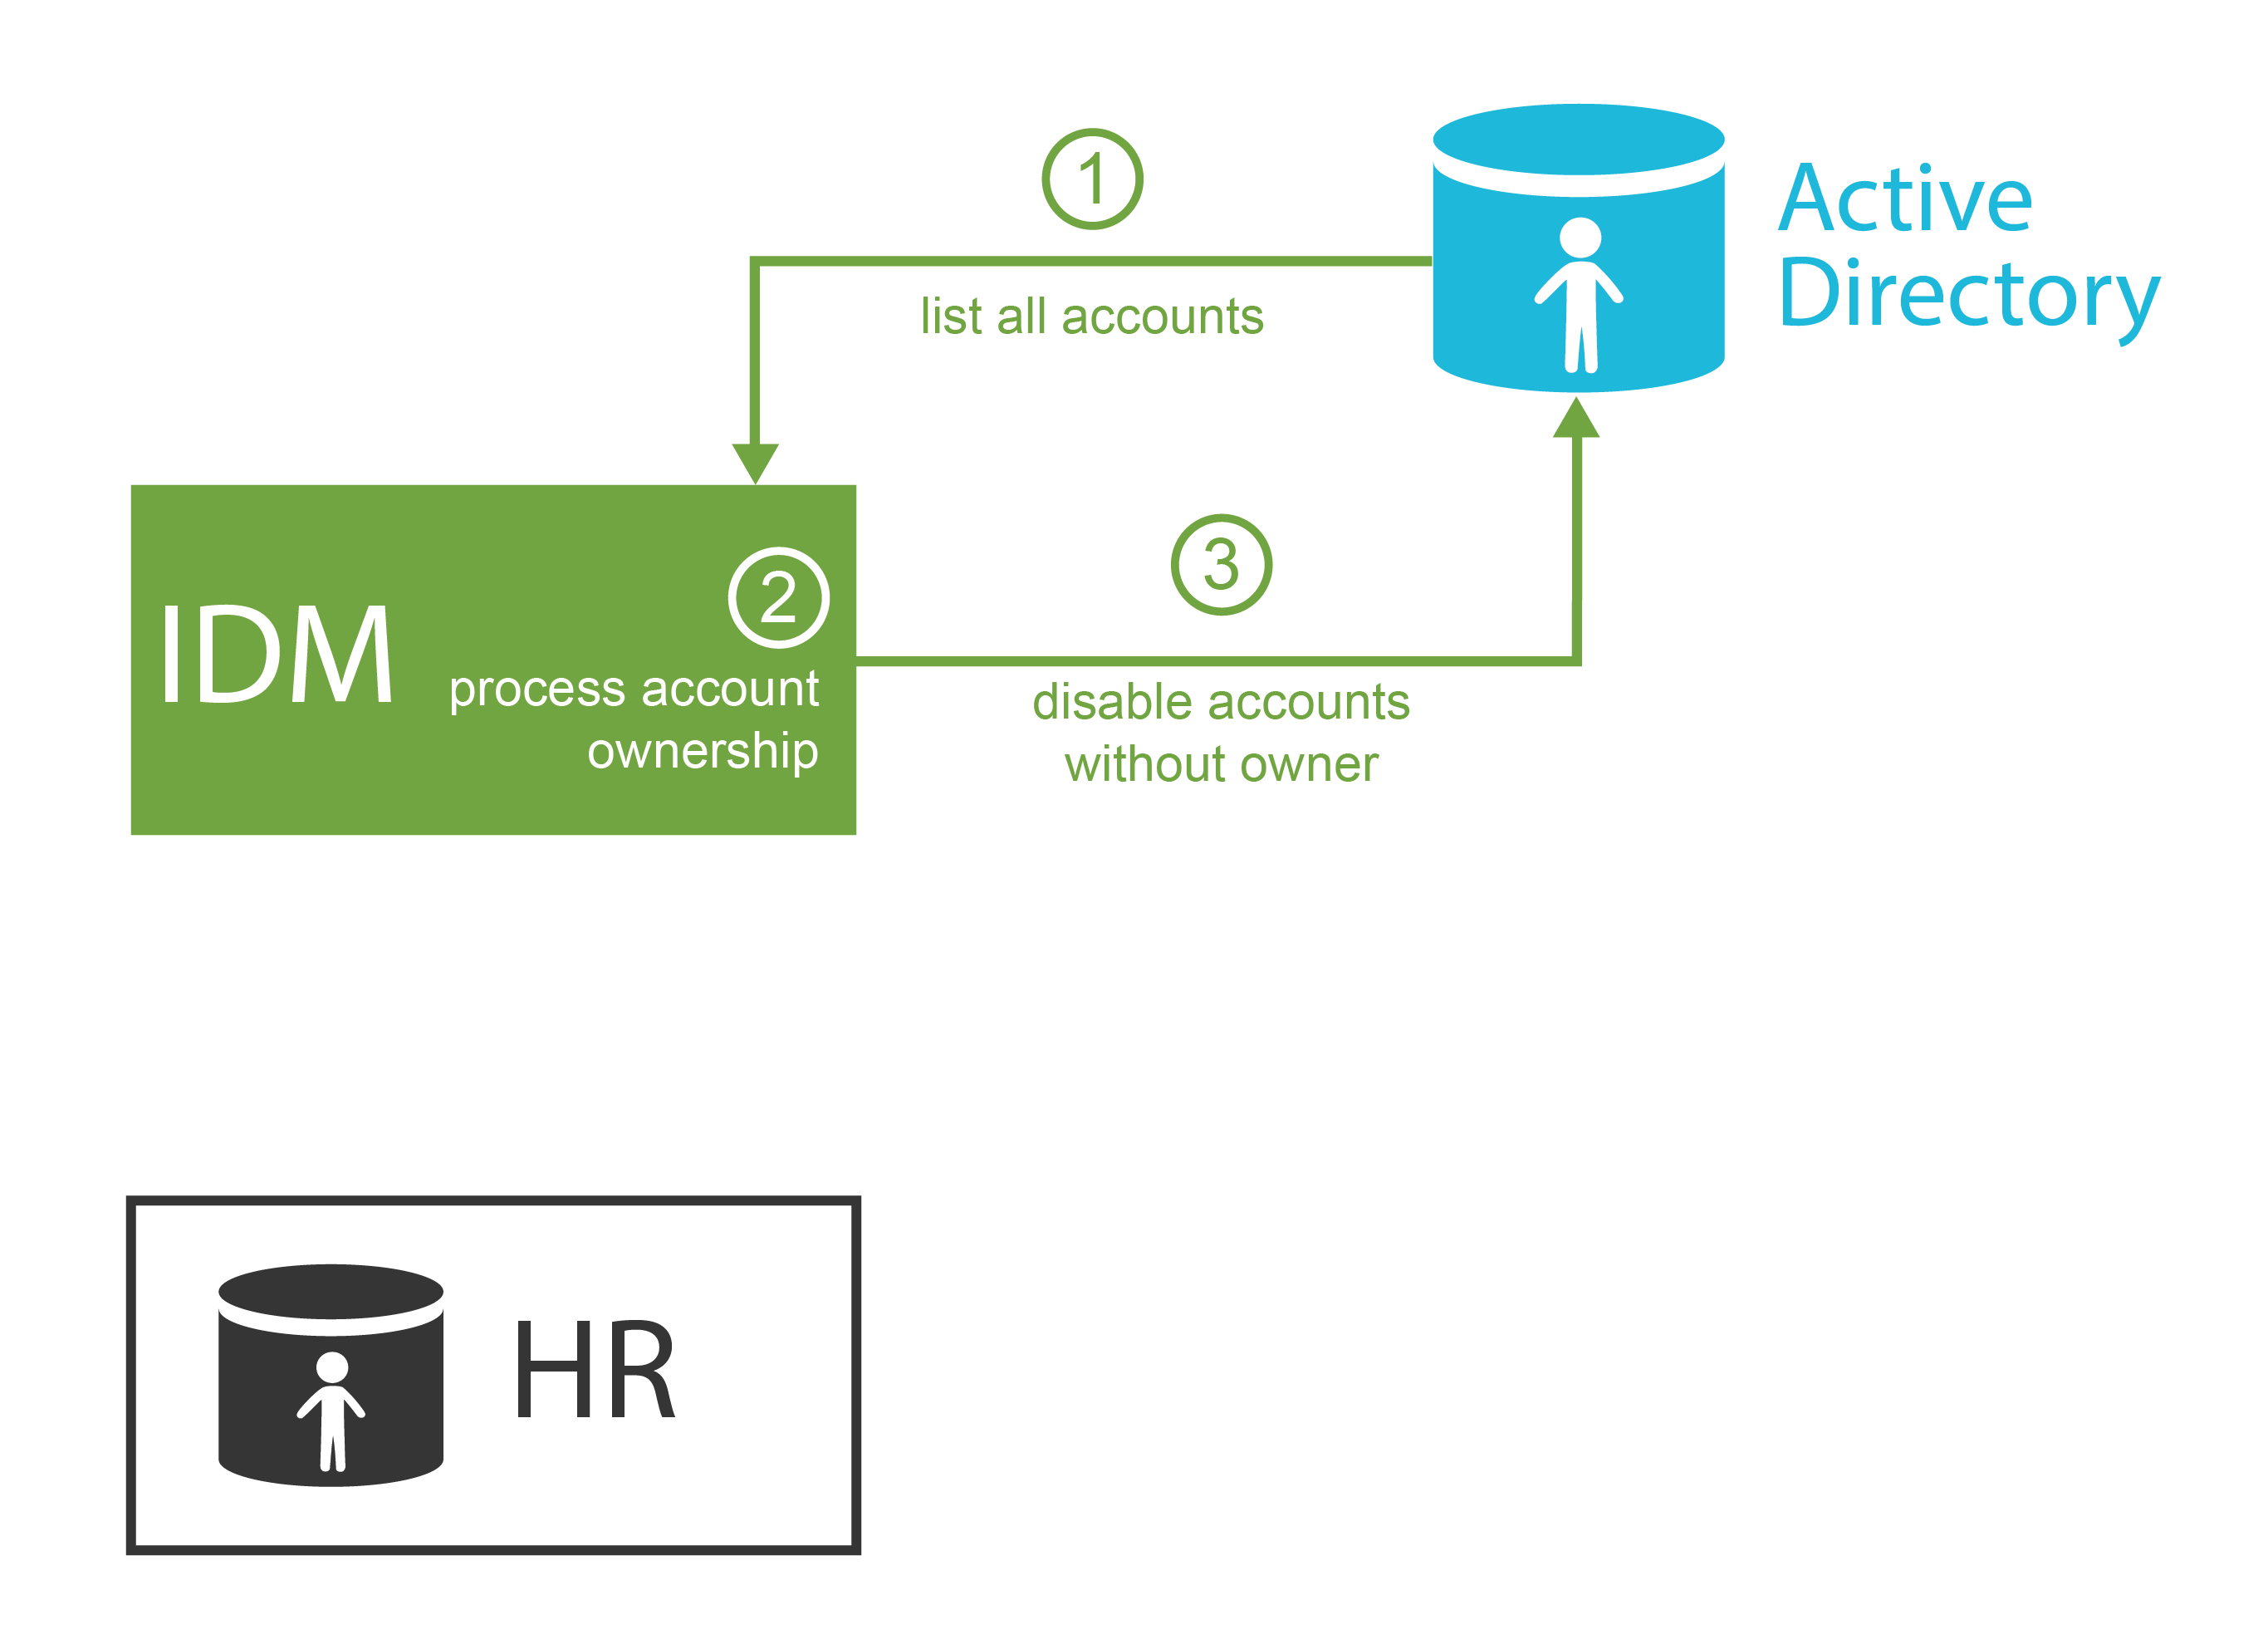
Based on the IDM data, the security officers suspect that there are users that have too many privileges. This is most likely a consequence of the request-and-approval process and these privileges simply accumulated over time. Yet, this is just a suspicion. It is always difficult for a security staff to assess whether particular user should have certain privilege or should not have it. This is especially difficult in flexible organizations such as ExAmPLE, where work responsibilities are often cumulated and organizational structures is somehow fuzzy. Yet there are people that know what each employee should do: the managers. However, there are many managers on many departments, and it would be a huge task to talk to each one of them and consult the privileges. The IDM system comes to the rescue once again. The security officers set up automated access certification campaign. They sort all users to their managers based on the organizational structure which is maintained in the IDM system. Each manager receives an interactive list of their users and their privileges. The manager must confirm (certify) that the user still needs those privileges. This campaign is executed in a very efficient manner as the work is evenly distributed through the organization. The campaign is completed in a couple of days. At the end, the security officers know which privileges are no longer needed and can be revoked. This reduces the exposure of the assets, which is a very efficient way to reduce residual security risk.
| Experienced identity management professionals certainly realized that this description is slightly idealized. The real world is not a fairy tale and real life with an IDM system is much more complicated that this simple story suggests. Even though the real life is harder than a story in a book, the IDM system remains an indispensable tool for automation and information security management. |
How Does The Technology Work?
Obviously identity management systems have a lot of advantages for business, processes, efficiency and all that stuff. How does it really work on a technological level? The basic principle is very simple: identity management system is just a sophisticated data synchronization engine at its core.
Identity management system takes data from the source systems, such as HR databases. It is processing the data, mapping and transforming the values as necessary. It will figure out which records are new. The IDM engine will do some (usually quite complex) processing on the records. That usually includes processing policies such as Role-Based Access Control (RBAC), organizational policies, password policies and so on. The result of this processing is creation or modification of user accounts in other systems such as Active Directory, CRM systems and so on. So basically it is all about getting the data, changing them and moving them around. This does not seem very revolutionary, does it? It is all about the details - the way how the IDM system gathers the data, how it is processing the data and how it is propagating the changes that make all the difference.
In addition to that, there are interesting possibilities for analysis and governance of identity data. The data are synchronized into database of identity management system, transformed, unified, all neatly organized and constantly kept up-to-date. It would be a real shame to let such attractive data to just sit there. Such data can be a basis for analysis. We can watch trends, changes in number of users, number of modifications, monitor application use (e.g. license utilization) and so on. We can look for patterns, suggest new roles, or detect users that have unusual permission patterns (outliers). We can also govern, distribute maintenance of data to departments, nominate role owners, set up processes to maintain the policies … we can all sorts of interesting things.
However, it all depends on the data. The data are at the very core of identity management, administration and governance. We need to have the data, taken from reliable source, transformed, unified, and most importantly, always kept fresh. This is the most important responsibility of identity management system.
Identity Management Connectors
Identity management system must connect to many different applications, databases and information systems. Typical IDM deployment has tens or even hundreds of such connections. Therefore, the ease of connecting IDM system with its environment is one of its essential qualities.
Current IDM systems use connectors to communicate with all surrounding systems. These connectors are based on principles similar to database drivers. On one end, there is unified connector interface that presents that data from all the systems using the same format. On the other end, there is a native protocol that the application supports. The connector acts as a translator between common data format and an application-specific protocol. There are connectors for LDAP and various LDAP variants, SQL protocols and dialects, connectors that are file-based, connectors that invoke REST services and so on. Every slightly advanced IDM system has tens of different connects.

Connector is usually relatively simple piece of code. Primary responsibility of a connector is to adapt communication protocols. Therefore, LDAP connector translates the LDAP protocol messages into data represented using a common connector interface. The SQL connector does the same thing with SQL-based protocols. The connector also interprets the operations invoked on the common connector interface by the IDM system. Therefore, the LDAP protocol executes the "create" operation by sending LDAP "add" message to the LDAP server. Connectors usually implement the basic set of create-read-update-delete (CRUD) operations. Therefore, a typical connector is quite a simple piece of code. Despite its simplicity, the whole connector idea is a clever one. The IDM system does not need to deal with the communication details. The core of the IDM system can be built to focus on the generic identity management logic, which is typically quite complex just by itself. Therefore, any simplification that the connectors provide is more than welcome.
Connectors are usually accessing external interfaces (APIs) of source and target systems. It is natural that the connector authors will choose interfaces that are public, well-documented and based on open standards. Many newer systems have interfaces like that. However, there are notorious cases that refuse to provide such an interface. Despite that, there is almost always some way to build a connector. The connector may create record directly in the application database. It may execute a database routine. It may execute a command-line tool for account management. It may even do crazy things such as simulation of a user working with text terminal and filling out a form to create new account. There is almost always a way to do what connector needs to do. Just some ways are nicer than others.
The connector-based architecture is pretty much standard among all advanced IDM systems. Yet the connector interfaces significantly vary from one IDM system to another. The connector interfaces are all proprietary. Therefore, the connectors are not interchangeable between different IDM systems. The connectors are often used as weapons to somehow artificially increase the profit from IDM solution deployment. Except for one case. The ConnId connector framework is the only connector interface that is actively used and developed by several competing IDM systems. It is perhaps no big surprise that ConnId is an open source framework.
Even though connector-based approach is quite widespread, some (mostly older) IDM systems are not using connectors. Some IDM products use agents instead of connectors. Agent does a similar job than the connector does. However, agent is not part of the IDM system instance. Agents are installed in each connected application, and they communicate with the IDM system using a remote network protocol. This is a major burden. The agents need to be installed everywhere. Then they need to be maintained, upgraded, there may be subtle incompatibilities and so on. Also, running a third-party code inside every application can be a major security issue. Overall, the agent-based systems are too cumbersome (and too costly) to operate. The whole agent idea perhaps originated somewhere in our digital past when applications and databases haven’t supported any native remote interfaces. In such a situation the agents are obviously better than connectors. Fortunately, this is a thing of the past. Today even old applications have some way to manage identities using a remote interface. This is typically some REST service that is easy to access from a connector. Even if the application provides only a command-line interface or interactive terminal session there are connectors that can handle that sufficiently well. Therefore, today the agent-based identity management systems are generally considered to be obsolete. However, agents still have one advantage: the agent can reach deep into the system where it is deployed. The agent can monitor the operations, even enforce additional policies. For that reason, agents are still used in privileged access management (PAM) systems. However, it is still a major consideration whether it is worth the trouble of maintaining the agents.
Identity Provisioning
Provisioning, also called fulfilment, is perhaps the most frequently used feature in any IDM system. In the generic sense, provisioning means maintenance of user accounts in applications, databases and other target systems. This includes creation of the account, various modifications during the account lifetime, and permanent disable or delete at the end of the lifetime. The IDM system is using connectors to manipulate the accounts. In fact, good IDM systems can manage much more than just accounts. Management of groups and group membership was quite a rare feature in early years of IDM technology. Yet today, an IDM system that cannot manage groups is almost useless. Almost all IDM systems work with roles. However, only few IDM systems can also provision and synchronize the roles (e.g. automatically create LDAP group for each new role). Good IDM system can also manage, provision and synchronize organizational structures. However, even this feature is still not entirely common.
Synchronization and Reconciliation
Identity provisioning may be the most important feature of an IDM system. However, if an IDM system did just the provisioning and nothing else, it would be a quick an utter failure. It is not enough to create an account when a new employee is hired, or delete that account when an employee leaves. Reality works in mysterious ways, and it can easily make a big mess in a very short time. Maybe there was a crash in one of the applications and the data were restored from a backup. An account that was deleted few hours ago is unexpectedly resurrected. It stays there, alive, unchecked and dangerous. Maybe an administrator manually created an account for a new assistant because the HR people were all busy to process the papers. When the record finally gets to the HR system and it is processed, the IDM system discovers that there is already a conflicting account. The process stops with an error, waiting for administrator to manually resolve the situation. Maybe few (hundred) accounts get accidentally deleted by junior system administrator trying out an "innovative" system administration routine. There are simply too many ways how things can go wrong - and they often do go wrong. It is not enough for an IDM system to just set things up and then forget about it. One of the most important features of any self-respecting IDM system is to make sure that everything is right, and also that it stays right all the time. Identity management is all about continuous maintenance of the identities. Without that continuity the whole IDM system is pretty much useless.
The trick to keep the data in order is to know when they get out of order. In other words, the IDM system must detect when the data in the application databases change. If an IDM system detects that there was a change, then it is not that difficult to react to the change and fix it. The secret ingredient is the ability to detect changes. However, there’s a slight issue with that, isn’t it? We cannot expect that the application will send a notification to the IDM system every time a change happens. We do not want to modify the applications, otherwise the IDM deployment will be prohibitively expensive. The application needs to be passive, it is the IDM system that needs to be active. Fortunately, there are several ways how to do that.
Some applications already keep a track of the changes. Some databases record a timestamp of the last change for each row. Many directory servers keep a record of recent changes for the purpose of data replication. Such meta-data can be used by the IDM system. The IDM system may periodically scan the timestamps or replication logs for new changes. When the IDM detects a change, it can retrieve the changed objects and react to the change based on its policies. The scanning for changes based on meta-data is usually very efficient, therefore it can be executed every couple of seconds or minutes. Therefore, the reaction to the change can be done almost in the real-time. This method has many names in various IDM systems. It is called "live synchronization", "active synchronization" or simply just "synchronization". Sadly, this method is not always available. Applications do not provide suitable interfaces for real-time synchronization very often.
Yet, all is not lost. Even if the application does not maintain good meta-data that allow near-real-time change detection, there is still one very simple way that works for almost any system. The IDM system retrieves the list of all accounts in the application. Then it compares that list with the list of accounts that are supposed to be there. Therefore, it compares the reality (what is there) with the policy (what should be there). The IDM system can react to any discrepancies and repair them. This method is called reconciliation. It is quite a brutal method, almost barbaric. Yet it does the job.
Listing all accounts and processing each of them may seem as a straightforward job. However, it can be extremely slow if the number of accounts is high and the policies are complex. It can take anything from a few minutes to a few days. Therefore, it cannot be executed frequently. Running that once per day may be feasible, especially for small and simple systems. Running it once per week (on weekends) is quite common practice. Some systems cannot afford to run it more frequently than once per month.
There are other methods as well. However, synchronization and reconciliations are the most frequently used ones. The drawback of synchronization is that it is not entirely reliable. The IDM system may miss some changes, e.g. due to change log expiration, system times not being synchronized, network failures or variety of other reasons. On the other hand, reconciliation is mostly reliable. However, it is a very demanding task. Therefore, these two methods are often used together. Synchronization runs all the time and handles the vast majority of the changes. Reconciliation runs weekly or monthly and it acts as a safety net to catch the changes that might have escaped during synchronization.
Identity Management and Role-Based Access Control
There are a lot of users in our systems, every user needs a specific set of permission to access the applications. Managing permissions for every user individually becomes very difficult with populations as small as few hundreds of users. When the number of users goes over a thousand, such individual management of permissions becomes an unbearable burden. The individual management of permissions is not only a huge amount of work, it is also quite an error-prone routine. This has been known for decades. Therefore, many systems unified common combinations of permissions into roles, and the concept of Role-Based Access Control (RBAC) was born. The roles often represent work positions or responsibilities that are much closer to the "business" than technical permissions. A role may reflect the concepts of bank teller, website administrator or sales manager. User has a role, the role contains permissions, permissions are used for authorization - that is the basic principle of RBAC. The low-level permissions are hidden from the users. Users are quite happy when they deal with the business-friendly role names.
|
Terminology
The term RBAC is frequently used in the industry, however the actual meaning of RBAC is not always clear.
The confusion is perhaps caused by the fact that there is a formal RBAC specification known as NIST RBAC model.
When people say "RBAC", some of them mean that specific formal model, others mean anything that is similar to that formal model, and yet others mean anything that deals with roles.
We use the term RBAC in quite a broad sense.
Major identity management systems usually implement a mechanism that is inspired by the formal NIST RBAC model, but the mechanism deviates form the formal model as necessary.
That is what we mean when we use the term RBAC.
|
Most RBAC systems allow for roles to be placed inside other roles, thus creating role hierarchy.
Top layers of the hierarchy are usually composed of business roles such as Marketing specialist.
Business roles contain a lower-level roles.
These are often application roles such as Website analytics or CMS administrator.
These lower-level roles may contain concrete permissions, or they may contain other roles that are even closer to the underlying technology.
And so on, and so on … there are proverbial turtles all the way down.
Role hierarchy is often a must when the number of permissions and users grows.
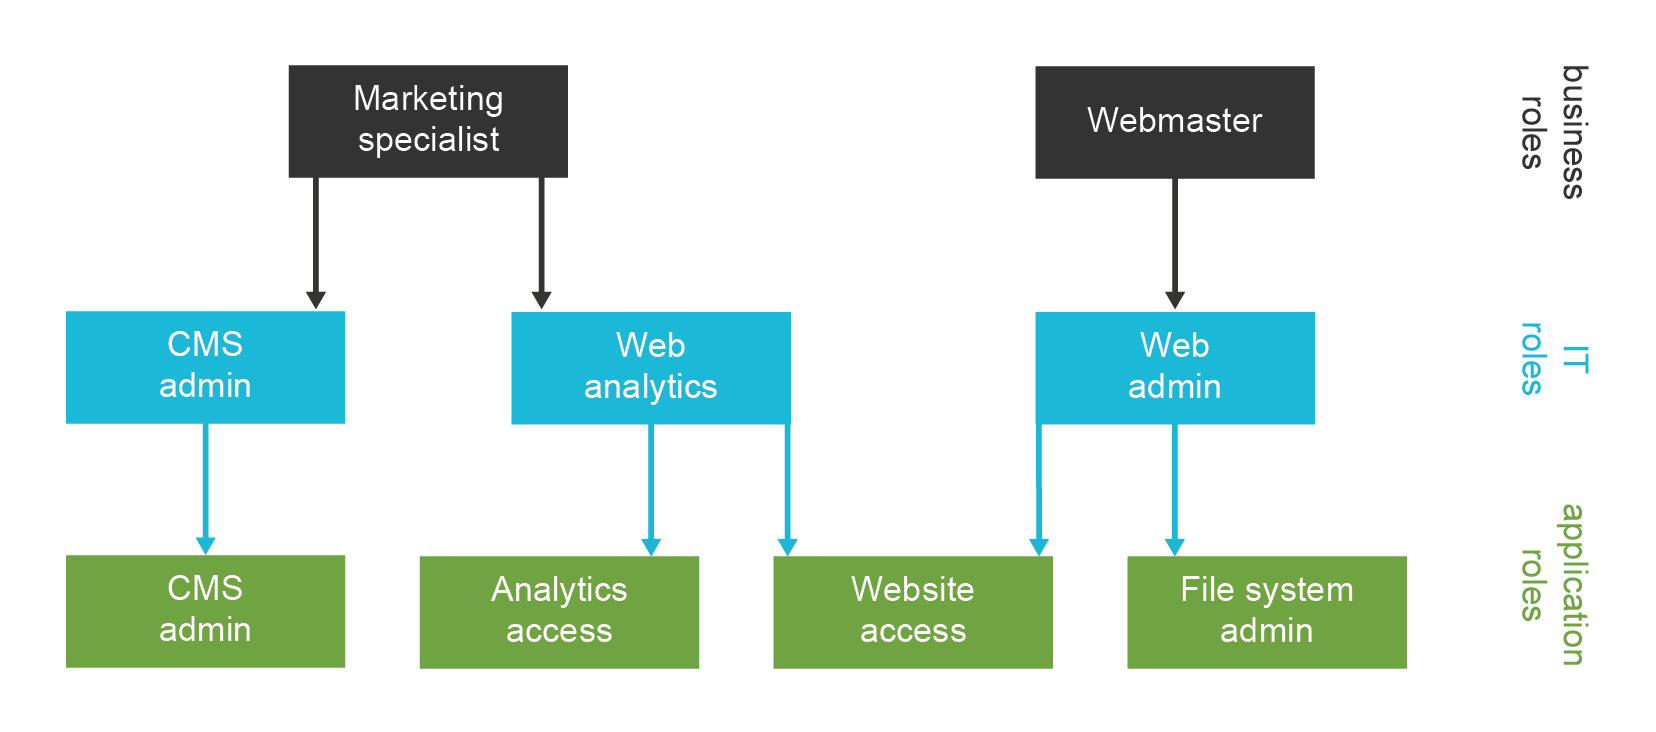
No IDM system can be really complete without RBAC mechanism in place. Therefore, the vast majority of IDM systems support roles in one way or another. However, the quality of RBAC support significantly varies. Some IDM systems support only the bare minimum to claim RBAC support. Other systems have excellent and very advanced dynamic and parametric RBAC systems. Most IDM systems are somewhere in between.
Role-based mechanism is a very useful management tool. In fact, the efficiency of role-based mechanism often leads to its overuse. This is a real danger, especially in bigger and somehow complex environments. The people that design roles in such environment have a strong motivation to maintain order by dividing the roles to the smallest reusable pieces, and then re-combining them in a form of application and business roles. This is further amplified by the security best practices, such as the principle of least privilege. This is understandable and perfectly valid motivation. However, it requires extreme care to keep such RBAC structure maintainable. Even though this may seem counter-intuitive, it is quite common that the number of roles exceeds the number of users in the system. Unfortunately, this approach turns the complex problem of user management to even more complex problem of role management. This phenomenon is known as role explosion.
Role explosion is a real danger, and it is definitely not something that can be avoided easily. The approach that prevailed in the first-generation IDM deployments was to simply live with the consequences of role explosion. Some IDM deployments even created tools that were able to automatically generate and (more-or-less successfully) manage hundreds of thousands of roles. However, this is not a sustainable approach. The systems have evolved since then. Current IDM systems bring features that may help to avoid the role explosion in the first place. Such mechanisms are usually based on the idea to make the roles dynamic. The roles are no longer just a static set of privileges. Dynamic roles may contain small pieces of algorithmic logic used to construct the privileges. Input to these algorithms are parameters that are specified when the role is assigned. Therefore, the same role can be reused for many related purposes without a need to duplicate the roles. This can significantly limit the number of roles required to model a complex system. This is the best weapon against role explosion that we currently have. Moreover, the roles can be assigned (and unassigned) automatically. There are rules that specify when a user should have a role. This approach further simplified and automates role management. As most of the role management is driven by a policy, we call this approach policy-driven RBAC.
Even though the RBAC system has some drawbacks, it is necessary for almost any practical IDM solutions. There were several attempts to replace the RBAC system with a completely different approach. Such attempts have some success in the access management and related fields. However, those alternatives cannot easily replace RBAC in the identity management. Attribute-based access control (ABAC) and policy-based access control (PBAC) are two popular example, using the same principle. The basic idea is based on replacing the roles with pure algorithmic policies. Simply speaking, ABAC/PBAC policy is a set of algorithms that take user attributes as input. The policy combines that input with the data about operation and context. Output of the policy is a decision whether an operation should be allowed or denied. This approach is simple. It may work reasonably well in the access management world where the AM server knows a lot of details about the operation that just takes place, and the policies tend to be quite consistent and relatively simple. However, in the identity management field we need to set up the account before the user logs in for the first time. There are no data about the operation yet, and even contextual data are very limited. Even more importantly, policies used in the IDM field are usually not entirely "pure". Identity management is full of special cases, exceptions, subjective decisions and historical baggage. This is almost impossible to express in a form of an algorithm. That, together with other issues, makes ABAC/PBAC a very poor choice for an identity management system. Therefore, whether you like it or not, RBAC is the primary mechanism of any practical IDM solution - and it is here to stay.
Identity Management and Authorizations
The basic principle of authorization in the information security is quite straightforward: take the subject (user), operation and object (the things that user is trying to access). Evaluate whether the policy allows access for that subject-operation-object triple. If policy does not allow it, then deny the operation. This is quite simple, understandable and proven by decades of information security practice. This principle is rooted very deeply in information security tradition.
However, in the identity management field, we need to think quite differently. We need to work backwards. The IDM system needs to set up an account for a user before the user initiates any operation. When user really starts an operation, it happens in the application. The IDM system will not know anything about it. Therefore, the concept of authorization is turned completely upside down in the IDM world.
IDM system sets up accounts in applications and databases. However, the IDM system itself does not take any active part when user logs into an application and executes the operations. Applications do all than by themselves. Does that mean IDM system cannot do anything about authorizations? Definitely not. The IDM system does not enforce authorization decisions. However, the IDM system can manage the data that determine how the authorization is evaluated. IDM system can place the account in the correct groups, which will cause certain operations to be allowed and other operations to be denied. IDM system can set up an access control lists (ACLs) for each account that it manages. IDM system is not evaluating or enforcing the authorizations directly. However, it indirectly manages the data that are used to evaluate authorizations. This is an extremely important feature.
Authentication and authorizations are two very prominent concepts of information security. They are vitally important for any identity and access management solution. However, authentication is quite simple in principle. Yes, the user may have several credential types used in adaptive multi-factor authentication. While that description sounds a bit scary, the actual implemented is not very complicated. In most cases there is just a couple of policy statements that govern authentication. Also, authentication is typically quite uniform: most users are authenticating using the same mechanism. Authentication is not that difficult to centralize (although it may be expensive). Most applications do not care about authentication at all, they just need to know that the user was authenticated somehow, and know user’s identifier. Applications do don care about authentication details. Which makes authentication relatively easy to manage.
However, it is quite a different story for authorization. Every application has slightly different authorization mechanism. These mechanisms are not easy to unify. One of the major obstacles is that every application works with different objects, the objects may have complex relations with other objects and all of them may also have complex relations with the subjects. The operations are also far from being straightforward, as they may be parametrized. Then there is context. There may be per-operation limits, daily limits, operations allowed only during certain times or when system is in certain state. And so on, and so on. This is very difficult to centralize. Also, almost every user has slightly different combination of authorizations. Which means that there is a great variability and a lot of policies to manage. Then there are two crucial aspects that add whole new dimension of complexity: performance and scalability. Authorization decisions are evaluated all the time. It is not rare to see an authorization evaluated several times for each request. Authorization processing needs to be fast. Really fast. Even a round-trip across a local network may be a performance killer. Due to complexity and performance reasons the authorization mechanisms are often tightly integrated into the fabric of each individual application. E.g. it is a common practice that authorization policies are translated to SQL, and they are used as an additional clauses in application-level SQL queries. This technique is taking advantage of the database engine to quickly filter out the data that the user is not authorized to access. This method is very efficient, and it is perhaps the only practical option when dealing with large-scale data sets. However, this approach is tightly bound to the application data model, and it is usually almost impossible to externalize.
There are approaches that partially address some parts of authorization problems. Policy agents (such as Open Policy Agent) are small software components that are placed on the application side. They integrate with the application, processing authorization policies. The policies are managed centrally, distributed to the agents and cached by the agents. The agent can process policies quickly with acceptable latencies. However, many problems still remain unsolved. It is still very difficult to consider application concepts, data models and object relations using the agents. As the agents are generic, they are usually not capable of SQL rewriting, which requires intimate knowledge of application data model and data storage schemas. Agents can be very useful for some cases, however they are not universal solution, at least not yet.
Therefore, it is not realistic to expect that the authorization could be completely centralized anytime soon. The authorization policies still need to be distributed into the applications. However, managing partial and distributed policies is no easy task. Someone has to make sure that the application policies are consistent with the overall security policy of the organization. Fortunately, the IDM systems are designed especially to handle management and synchronization of data in broad range of systems. Therefore, the IDM system is the obvious choice when it comes to management of authorization policies.
Organizational Structure, Roles, Services and Other Wildlife
Back in the 2000s the IDM was all about managing user accounts. It was enough to create, disable and delete an account to a have a successful IDM deployment. The world is a different place now. Managing the accounts is simply not enough anymore. Yes, automated account management brings significant benefits, and it is a necessary condition to get at least a minimal level of security. However, account management is often not enough to justify the cost of an IDM system. Therefore, current IDM systems can do much more than just a simple account management.
There are many things that an advanced IDM system can manage:
-
Accounts. Obviously. Many IDM systems can fully manage account attributes, groups membership, privileges, account status (enabled/disabled), validity dates and all the other details.
-
Groups and roles. Apart from managing the membership of accounts in groups, the IDM system can take care of the whole group life-cycle: create a group, manage it and delete it.
-
Organizational structure. The IDM system can take organizational structure from its authoritative source (usually HR), use it for governance, and synchronize it to all the applications that need it. Alternatively, the IDM itself may be used to manually maintain an organizational structure.
-
Servers, services, devices and "things". While this is not yet IDM mainstream, there are some experimental solutions that use IDM principles to manage concepts that are slightly outside the traditional IDM scope. E.g. there is an IDM-based solution that can automatically deploy predefined set of virtual machines for each new project. The new IDM systems are so flexible that they can theoretically manage everything that is at least marginally related to the concept of identity: applications, mobile devices, printers, virtual machines, networks … almost anything. This is still quite a unique functionality. However, it is very likely that we will see more stories about this in the future.
While all these features are interesting, some of them clearly stand out. The management of groups and organizational structure are those that are absolutely critical for almost any new IDM deployment. Your organizational structure may be almost flat and project-oriented, or you may have twelve levels of divisions and sections. Regardless of the size and shape of your organizational structure, it needs to be managed and synchronized across applications in pretty much the same way as identities are synchronized. You may need to create groups in Active Directory for each of your organizational unit. You want them to be correctly nested. You may want to create distribution list for each of your ad-hoc team. You want this operation to have as little overhead as possible, otherwise the teams cannot really be managed in ad-hoc fashion. You may want to synchronize the information about projects into your issue tracking system. You may also want to automatically create a separate wiki space and a new source code repository for each new development project. The possibilities are endless. Both the traditional organizations and the new lean and agile companies will benefit from that.
Organizational structure management is closely related to group management. The groups are often bound to workgroups, projects or organizational units. E.g. and IDM system can automatically maintain several groups for each project (admin and member groups). Those groups can be used by applications for authorization purposes. Similarly, an IDM system can automatically maintain application-level roles, access control lists (ACLs) and other data structures that are usually used for authorization.
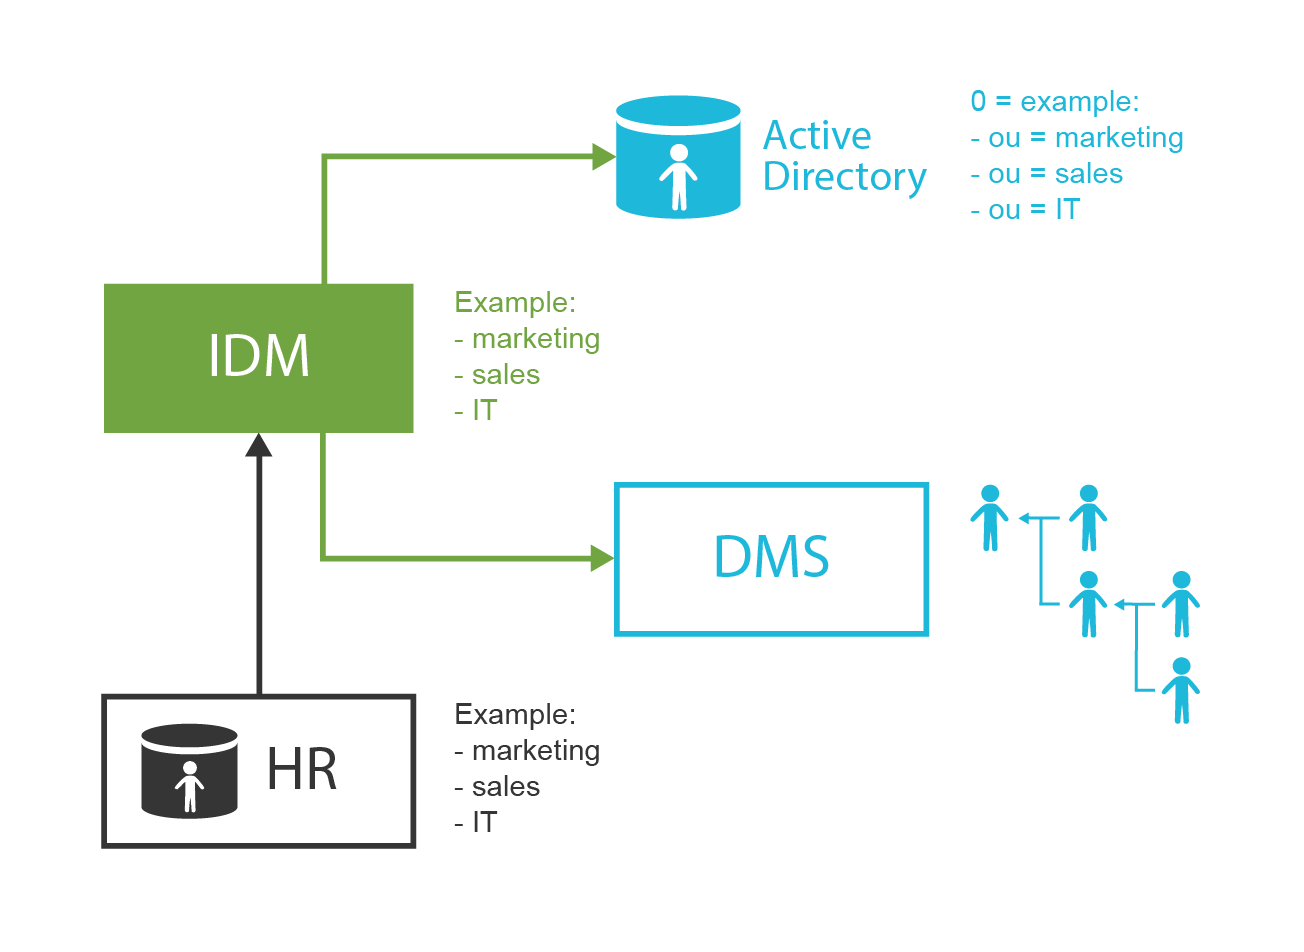
While this functionality provides benefits in almost any deployment, organizational structure management is absolutely essential for organizations that are based on tree-like functional organizational structures. These organizations heavily rely on the information derived from organizational structure. E.g. direct manager of the document author can review and approve the document in the document management system. Only the employees in the same division can see the document draft. Only the employees of a marketing section can see marketing plans. And so on. Traditionally, such data are encoded into an incomprehensible set of authorization groups and lists. That contributes to the fact that reorganizations are a total nightmare for IT administrators. However, an IDM system can significantly improve the situation. IDM can create the groups automatically. It can make sure that the right users are assigned into these groups. It can synchronize information about the managers into all affected applications. And so on. Good IDM system can do all of that using just a handful of configuration objects.
This seems to be almost too good to be true, which it somehow is. It is fair to admit that the quality of organizational management features significantly varies among IDM systems. Group management and organizational structure management seem to be a very problematic feature. Only few IDM systems support these concepts at the level that allows practical out-of-box deployment. Most IDM systems have some support for that, but any practical solution requires heavy customization. It is not clear why IDM vendors do not pay attention to features that are required for almost any IDM deployment. Therefore, when it comes to a comprehensive IDM solution there is one crucial advice that we could give: choose the IDM product wisely.
Everybody Needs Identity Management
Such a title may look like a huge exaggeration. In fact, it is very close to the truth. Every non-trivial system has a need for identity management, even though the system owners may not realize that. As you are reading this book, chances are that you are one of the few people that can see the need. In that case it is all mostly about costs/benefits calculation. Identity management has some inherent complexity. While even very small systems need IDM, the benefits are likely to be too small to justify the costs. The cost/benefit ratio is much better for mid-size organizations. Comprehensive, automated identity management is an absolute necessity for large-scale systems. There seems to be a rule of thumb that has quite a broad applicability:
| Number of users | Recommendation |
|---|---|
Less than 200 |
You may need automated identity management, but the benefits are probably too small to justify the costs. Managing users accounts manually is probably still a feasible option. |
200 – 2 000 |
You need automated identity management, and the benefits may be just enough to justify the costs. However, you still need to look for a very cost-efficient solution. Automating the most basic and time-consuming tasks is probably just enough. |
2 000 – 20 000 |
You really need automated identity management. You cannot manage that crowd manually. If you implement identity management solution properly, the benefits will be much higher than the costs. |
More than 20 000 |
I can’t believe that you do not have any automated identity management yet. Go and get one. Right now. You can thank us later. |
Identity Governance
Identity governance is basically an identity management taken to a higher business level. The identity management proper, sometimes called identity administration, is focused mainly on technical aspects of identity life-cycle such as automatic provisioning, synchronization, evaluation of the roles and computing attribute values. On the other hand, identity governance abstracts from the technical details, focusing on policies, roles, business rules, processes and data analysis. E.g. a governance system may deal with segregation of duties policy. It may drive the process of access certification. It may focus on automatic analysis and reporting of the identity, auditing and policy data. It drives remediation processes to address policy violations. It manages application of new and changed policies, evaluate how is your system compliant with policies and regulations and so on. It may evaluate risk levels, modeling overall organizational risk, identifying risk hot-spots. This field is sometimes referred to as governance, risk management and compliance (GRC).
Almost all IDM systems will need at least some governance features to be of any use in practical deployments. Moreover, many governance features are just refinement of concepts that originated in the IDM field many years ago. Therefore, the boundary between identity management and identity governance is quite fuzzy. The boundary is so fuzzy that new terms were invented for the unified field that includes the identity management proper together with identity governance. Identity governance and administration (IGA) is one of these terms. For us, the governance is just a natural continuation of identity management evolution.
Back in the 2010s, it was a common practice for identity governance features to be implemented by specialized products that are separated from their underlying IDM platforms. Many IDM and governance solutions are still divided into (at least) two products. This strategy brings new revenue streams for the vendors. Yet, it makes almost no sense from customer’s point of view. It perhaps comes without saying that reasonable IDM/IGA solutions should offer both the IDM and governance features in one unified and well aligned product.
Identity Governance Features
Below is a list of features that belong to the governance/compliance category. As the boundary of governance is so fuzzy, there are also features that may be considered governance-related IDM features.
-
Delegated administration. Basic IDM deployments are usually based on the idea of an omnipotent system administrator that can do almost anything. Then there are end users that can do almost nothing. While this concept may work in small and simple deployments, it is not sufficient for larger systems. Large organizations usually need to delegate some administration privileges to other users. There may be HR personnel, people that are responsible for management of their organizational units, administrator responsible for a particular group of systems, application administrators, and so on. Delegated administration allow delagation of parts of system administration tasks to other users. Such delegated privileges are limited in scope. For example, HR staff can edit selected attributes on all employees, or project managers can add/remove users in their projects.
-
Deputies. Delegated administration is very useful, yet it is quite static. It is specified in policies that are not entirely easy to change. However, there is often a need for ad-hoc delegation, such as a temporary delegation of privileges during manager’s vacation. Such a manager could nominate a deputy that would receive some of manager’s privileges for a limited time period. This is all done on an ad-hoc basis, initiated by an explicit action of the manager.
-
RBAC-related policies, such as Segregation of Duties (SoD) policy. Simply speaking SoD policy ensures that conflicting duties cannot be accumulated with a single person. This is usually implemented by using a role exclusion mechanisms. However, it may go deeper. E.g. it may be required that each request is approved by at least two people.
-
Policies related to organizational structure. Organizational structure may look like a simple harmless tree, but in reality it is far from being simple or harmless - or even a tree. In theory, the organizational structure should be managed by business or operations departments such as HR. Yet the reality is often quite different. Business departments lack the tools and processes to efficiently manage organizational structure. Therefore, it is often an IDM system that assumes the responsibility for organizational structure management. In such cases there is a need to police the organizational structure. For example, there may be policies that mandate a single manager for each department. In that case the IDM system may need to handle situations that there is no manager or too many managers.
-
Dynamic approval schemes. Approval processes are usually considered to be part of basic identity management functionality, as they were present in early IDM systems back in the 2000s. The user requests role assignment. The operation is driven through an approval process before being executed. Approvals provide a very useful mechanism, especially in case that role assignment cannot be automated, usually due to a non-existent policies.
Approvals are usually implemented by some kind of general-purpose workflow engine by almost all IDM/governance systems. However, this is often a source of maintenance problems, especially in deployments that are focused on identity governance functionality. In such cases, the approval processes are no longer simple quasi-linear workflows. Approval processes tend to be very dynamic, and their nature is almost entirely determined by the polices rather that process flows. Workflow engines have a very hard time coping with such a dynamic situation. IDM system that implement special-purpose policy-based approval engines provide much better solutions.
Approval mechanisms are very useful. However, they also have a dark side. Approval decisions are often made on a very subjective "looks good" basis. This obviously opens an opportunity for bad decisions and negligence. False denial of role assignment is likely to trigger an immediate (and occasionally quite emotional) feedback from the requester. However, approval of role assignment that should not be assigned is likely to trigger no feedback at all. Yet, such a decision is likely to cause a security risk, a risk that is very difficult to detect. This can be partially solved by a multi-level approval processes, especially for sensitive roles. However, there is trend to "automate" approval decisions based on "artificial intelligence" mechanisms. This may look like a very useful tool and time-saver. However, the artificial intelligence is only as good as are the training data. If the machine is trained using bad decisions, it will also suggest bad decisions. This is further complicated by a very limited visibility and accountability of such decisions. Therefore, such mechanisms have to be used with utmost care. It is perhaps a better idea to replace request-and-approval process with automated policy, which can be validated, reviewed and consistently applied. Even though the access request process cannot be completely replaced, policies should be applied as broadly as it is possible.
-
Entitlement management deals with entitlements of user’s accounts in target systems, such as role or group membership. However, this process can go both ways. Governance systems may provide an "entitlement discovery" features that take entitlements as inputs. This can be used evaluate compliance and policy violations, but it may also be a valuable input for role engineering.
-
Role mining. Identity management systems are seldom deployed on a green field. In the common case, there are existing systems in place, there are application roles, entitlements and privileges. It is not an easy job to create IDM roles that map to this environment. This is usually a slow and tedious process. However, IDM system can retrieve all the existing information and use it to propose role structure. This is not a fully deterministic process, it requires a lot of user interaction, tuning, and it is often based on a machine learning capabilities. It is not a replacement for role engineering expertise. However, machine-assisted role mining can significantly speed up the process.
-
Access certification. Assignment of roles is often an easy task. Request a role, role goes through an approval process, and the role is assigned. Then everybody forgets about it. There is a significant incentive to request assignment of a new role. Yet, there is almost no incentive to request unassignment of a role that is no longer needed. This leads to accumulation of privileges over time. Such privilege hoarding may reach dangerous levels for employees with long and rich job transfer history. Therefore, there are access certification campaigns that are also known as "certification", "re-certification" or "attestation" mechanisms. The goal of those campaign is to confirm ("certify" or "testify") that the user still needs the privileges that were assigned previously. Certification campaigns are designed to be conducted on a large number of users in a very efficient manner. Therefore, there are special processes, and a very specific user interface is provided to conduct such campaigns. Campaigns are planned certification actions that handle many users at once, distributing the work among many certifiers. This is usually a huge amount of work. On the other hand, there are micro-certifications. These are very small certification actions, usually involving just a single user. They are triggered automatically, for example as a reaction of re-assigning user to a different organizational unit, or by accumulating dangerous risk level for one user.
Similarly to approval processes, some identity governance systems offer "artificial intelligence" support for certification processes. Such assistance can be very attractive, as certification campaigns are often quite intimidating due to a large number of decisions that have to be made in each campaign. However, the risks of such "automation" is even more pronounced than it is in the approval case. Certification is often the last defence against dangerous privilege accumulation. Poorly-trained artificial intelligence may cause a systematic build-up of risk in the organization. Artificial inteligence support for certification decisions may be very useful. However, it is essential to understand how the mechanism works before committing to roll it out for all certifications.
Yet again, the best way to handle certification effort is to avoid certification altogether. Policy-based approach relies on roles assigned automatically. Which also means they are unassigned automatically, and there is no need for case-by-case certification. Of course, the policy needs to be created, properly maintained and reviewed. However, the effort to maintain a policy is likely much smaller than certification effort.
-
Role governance is usually quite a complex matter. Typical IDM deployment is likely to have a large number of roles. It is quite hard to define those roles in the first place. Then it is even harder to maintain the roles. Environment is changing all the time, therefore the roles have to change as well. It is usually beyond the powers of a single administrator to do so. Therefore, many role owners are usually nominated to take care of role maintenance. Roles are often grouped into applications, categories, catalogs or functional areas. The IDM system must make sure that the owners have the right privileges to do their job. The IDM system should also take care that each role has at least one owner at any given time, that role definitions are periodically reviewed and so on.
-
Role lifecycle management is a dynamic part of role governance. Role changes are likely to have a serious impact on overall security of the system. Therefore, it may not be desirable to simply delegate role management duties. It may be much more sensible to require that role changes has to be approved before being applied. New roles are also created all the time and old roles are decommissioned. The IDM system may need to make sure that a decommissioned role is not assigned to any new user. Yet, old roles may still be needed in the system during a phase-out period. IDM system has to keep track of them, to avoid keeping outdated roles in the systems forever.
-
Role modeling. A change of a single role often does not make much sense just by itself. The roles are usually designed in such a way that a set of roles works together and forms a role model. Therefore, approval of each individual role change may be too annoying, and it may even be harmful. E.g. there may be an inconsistent situation in case that one change is approved and another is rejected. Therefore, roles and policies are often grouped into models. The models are reviewed, versioned and applied in their entirety.
-
Simulation. IDM deployments tend to be complex. There are many relations, interactions and policies. It is no easy task to predict the effects of a change in a role, policy or organizational structure. Therefore, some IDM systems provide a simulation features that provide predictions and impact analyses of planed changes.
-
Compliance policies, reporting and management. Policies in the identity management world are usually designed to be strictly enforced. This works fine for fundamental policies that are part of simple IDM deployments. However, the big problem is how to apply new policies - especially policies that are mandated by regulations, recommendations and best practices. It is almost certain that significant part of your organization will not be compliant with such new policy. Applying the policy and immediately enforcing it is likely to cause a major business disruption. However, it is almost impossible to prepare for new policies and to mitigate their impact without knowing which users and roles are affected. Therefore, there is a two-step process. The policies are applied, but they are not enforced yet. The policies are used to evaluate the compliance impact. Compliance reports can be used to find the users that are in violation of the policy, in order to remedy the situation. Compliance reports may also be used to track the extent and progress of compliance.
-
Remediation. Good IDM deployments strive for automation. All the processes and actions that can be automated are automated. E.g. if a role is unassigned and user does no longer needs an account, such account is automatically deleted or disabled. However, there are actions that cannot be automated because they require decision of a living and thinking human being. Approvals are one example of such processes. However, there are more situations like that. Many of those require more initiative than a simple yes/no decision. One such example is organizational structure management. There is usually a rule that each department must have a manager. However, what should IDM system do in case that a department manager is fired? IDM system cannot stop that operation, as there are certainly good reasons to revoke all privileges of that manager. The manager and all the associated accounts have to go, as soon as possible. Now there is a department without a manager, and the IDM system itself cannot do anything about it. That is where remediation comes to the rescue. Remediation process is started after the operation that removed the manager. The remediation process will ask a responsible person to nominate a new manager for the department. There may be a broad variety of remediation processes. Simple process will ask for yes/no decisions, or it may ask to nominate a user. Then there are often options to set up generic processes that apply to completely unexpected situations.
-
Risk management automation. Information security is not a project, it is a process. It starts with risk analysis, planning, execution, and then it goes back to analysis and planning and execution, and so on and so on for ever and ever. Risk analysis is the part of the process that takes a huge amount of time and effort - especially when it comes to analysis of insider threat as there is usually a lot of insiders to analyze. However, an IDM system can help to reduce the risk analysis effort. Each role assigned to a user is a risk. If roles are marked with relative risk levels, IDM system can compute the accumulation of risk for each user. As each role gives access to a particular set of assets, the IDM system may provide data to evaluate asset exposure to users.
-
Identity analytics and intelligence (IdA) is mostly an umbrella term. It usually refers to a composition of several identity governance features, integrated into a holistic, risk-based approach. Identity analytics and intelligence starts by a look at the data. The process starts with a very realistic assumption that the data are not in perfect order, that there are inconsistencies, imperfections, risks and all kinds of other problems. Various techniques are employed to detect the problems. Most techniques seems to be based on recognition of anomalies and patters in the data. Outlier detection mechanisms look for users with privileges that are significantly different from the privileges of their colleagues. On the other hand, role mining is used to detect similar privileges assigned to similar users, suggesting new roles. Many of the identity analytics and intelligence techniques are based on risk modeling. There are mechanisms to identify over-privileged users by analysing risk scores of individual users. Similar mechanisms can be used to identify high-privilege entitlements assigned to a low-privilege user or similar risk anomalies.
-
Workflow orchestration is provided by some IGA platforms. Workflow engines drive processes based on simple algorithms, usually containing many manual steps that need to be carried out by different people of teams. IGA platforms use workflow automation mostly to implement approval mechanisms. While use of workflow engine for approvals may look like an obvious choice, workflow engines are perhaps the worst tools possible. Approval processes are usually dynamic process, their form heavily depends on input (request) and policy settings. The list of approvers, approval stages and exit conditions depend on the set of requested roles and other factors (e.g. user risk level), which is not an easy thing to handle in high-level business process modeling language.
Even though workflow orchestration is almost useless for implementation of approval processes, it still has its place in IGA platform. Workflow automation may be useful for driving on-boarding (enrollment) and off-boarding processes. It may also be useful for some remediation cases, although remediation tends to be an unstructured or semi-structured activity that is better handled by case management than workflow automation.
Almost all IGA platforms that support workflow automation are bringing their own (often proprietary) workflow engine. This means that the administrators need to learn how to configure the workflows, users need to adapt to new user interface, notifications need to be integrated and so on. It would be much better to re-use existing workflow engine, an engine that is already used by the organization to drive all its other business processes. Except for approvals which heavily depend on role structure, other IGA processes tend to be very similar to ordinary business processes in the organization. Re-use of existing workflow automation and orchestration platform should be a natural choice. Except for one annoying detail. Most organizations do not have such a system. Therefore, even that strange proprietary workflow engine embedded in the IGA platform may still be quite useful.
Not all IGA platforms will implement all the features. Scope and quality of implementation dramatically vary from system to system. Moreover, individual IGA platforms are using their own terminology, which makes the situation very confusing. This is further obscured by marketing departments, that try to present even the smallest advantage as revolutionary achievement. Most IGA platform are closely guarded commercial closed source software, access to the software and documentation is jealously guarded. This makes comparison of individual IGA platform a very challenging undertaking. Perhaps the best approach is to know what you need: summarize your requirements and priorities. Write down your expectations, select a product, and conduct a proof-of-concept test tuned to your specific needs. That is perhaps the only reliable way to break through the marketing veil.
Identity Management and Governance Terminology
Identity professionals, often motivated by marketing needs, like to invent new names and use them to describe the same thing. Therefore, there are many overlapping, overloaded and similar terms in use.
Identity management (IDM) is usually used to describe the low-level parts (technology), while identity governance is used to describe the high-level parts (business). Yet the boundary is very fuzzy and many IDM systems provide governance capabilities, and many governance systems provide low-level functions. Identity governance and administration (IGA) is a term supposed to describe both parts together. Governance, risk management and compliance (GRC) is a terms that was mostly used in the past to represent the high-level identity governance functionality, later known simply as identity governance. Identity security is a marketing term that roughly covers IGA functionality.
Overall, the terminology is very fluid. Vendors use their own terms, often choosing overloaded or confusing terminology. Industry analysts and consultants also adding their own terms and meanings to existing terms. Marketing terms are invented faster than the documentation can adapt, making the situation quite confusing. We have tried to compile the terminology as precisely as we could, while still making the terms understandable. We have chosen to follow established industry terminology when possible, even though many terms are overloaded and ambiguous. However, we did not want to increase the confusion by re-inventing the terminology. We are pointing out the ambiguities in the text as needed. At the very least, we are trying to use a consistent terminology in this book. When in doubt, please refer to the glossary.
Complete Identity and Access Management Solution
A comprehensive Identity and Access Management solution cannot be built by using just a single component. There is no single product or solution that can provide all the necessary features. As the requirements are so complex and often even contradictory, it is very unlikely that there ever will be any single product that can do it all.
A clever combination of several components is needed to build complete solution. The right mix of ingredients for this IAM soup will always be slightly different, as no two IAM solutions are exactly the same.
There are three basic components that are required for any practical IAM deployment:
-
Directory service or a similar identity store is the first component. This is the database that stores user account information. The accounts are stored there in a "clean" form that can be used by other applications. This database is then widely shared by applications that are capable to connect to it. This part of the solution is usually implemented in a form of LDAP server or Active Directory. However, there is one major limitation: the data model needs to be simple. Very simple. Also, the identity store needs to be properly managed.
-
Access management is a second major component of the solution. It takes care of authentication and (partially) authorization. Access management unifies authentication mechanisms. If an authentication mechanism is implemented in the access management server, then all integrated applications can easily benefit. It also provides single sign-on (SSO), centralizes access logs and so on. It is a very useful component. Of course, there are limitations. Access management system needs access to identity data. Therefore, it needs reliable, very scalable and absolutely consistent identity database as a back-end. This is usually provided by the directory service. Performance and availability are the obvious obstacles here. However, there is one more obstacle which is less obvious yet every bit as important: data quality. The data in the directory service must be correct, up-to-date and properly managed. However, that is still only a part of the picture. As most applications store some pieces of identity data locally, these data also need to be synchronized with the directory database. No access management system can do this well enough. Moreover, there is no point for access management system to do it at all. The access management system has a very different architectural responsibilities. Therefore, yet another component is needed.
-
Identity management is the last, but in many ways the most important component. This is the real brain of the solution. The identity management system maintains the data. It maintains order in the system. It makes sure the data are up-to-date and compliant with the policies. It synchronizes all the pieces of identity data that those pesky little applications always keep creating. It maintains groups, privileges, roles, organizational structures and all the other things necessary for the directory and the access management to work properly. It keeps the entire solution from falling apart. It allows system administrators and security officers to live happily, to breath easily and to keep control over the whole solution.
The following diagram shows how all these components fit together.
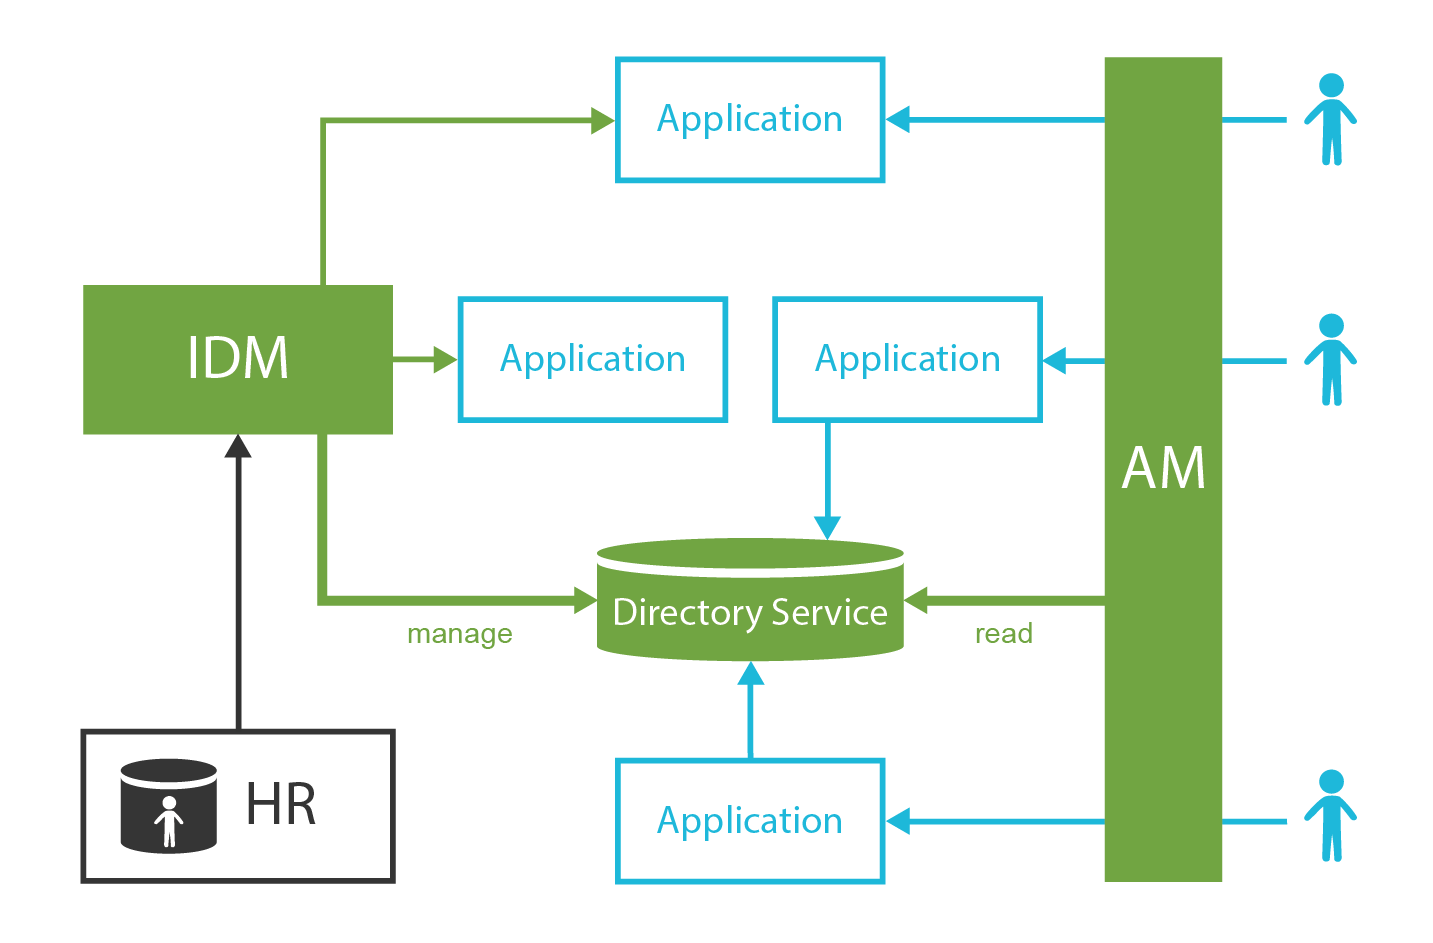
This is truly a composite solution. There are several components that have vastly different features and characteristics. When bound together into one solution, the result is something that is much more than just a sum of its part. The components support each other. The solution cannot be complete unless all three components are in place.
However, building a complete solution may be quite expensive, and it may take a long time. You have to start somewhere. If you have resources for just one product, then choose identity management. It is a good start. It is not as expensive to deploy and integration as access management system is. IDM brings good value, even quite early in the IAM program. Going for open source product will also keep the initial investment down. Staring with IDM is usually the best choice to start the IAM program.
IAM and Security
Strictly speaking, Identity and Access Management (IAM) does not entirely fit into the information security field. The IAM goes far beyond information security. IAM can bring user comfort, reduce operation costs, speed up processes, and generally improve the efficiency of the organization. This is not what information security is concerned with. Even though IAM is not strictly part of information security, there is still a huge overlap. IAM deals with authentication, authorization, auditing, role management and governance of objects that are directly related to the information security. Therefore, IAM and information security have an intimate and very complicated relationship.
It is perhaps not too bold to say that the IAM is a pre-requisite to good information security. Especially the identity management (IDM) part is absolutely critical - even though this may not be that obvious at the first sight. Yet, the evidence speaks clearly. Security studies quite consistency rate the insider threat as one of the most severe threats for an organization. However, there is not much that the technical security countermeasures can do about the insider threat. The employee, contractor, partner, serviceman - they all get the access to your systems easily and legally. They can legally pass through even the strongest encryption and authentication because they have got the keys. Firewalls and VPNs will not stop them, because those people are meant to pass through them to do their jobs.
Vulnerabilities are there, obviously. With the population of thousands of users there is a good change that there is also an attacker. Maybe one particular engineer was fired yesterday. Yet, he still has VPN access and administration rights to the servers. As he might not be entirely happy about the way how he has been treated, the chances are he might be quite inclined to make your life a bit harder. Maybe leaking some company records would do the trick. Now we have a motivated attacker who will not be stopped by any countermeasures, and who can easily access the assets. Any security officer can predict the result without a need for a comprehensive risk analysis.
Information security has no clear answers to the insider threat. This is no easy issue to solve, as there is obviously a major security trade-off. The business people wants to access the assets easily to do their jobs, to keep the wheels of an organization turning. However, security team needs to protect the assets from the very users that are accessing them. There is no silver bullet to solve this issue. However, there is a couple of things that can be done to improve the situation:
-
Record who has access to what. Each user has accounts in many applications through the enterprise. Keep track which account belongs to which user. It is very difficult to do that manually. Yet, even the worst IDM system can do that.
-
Remove access quickly. If there is a security incident, then the access rights need to be removed in order of seconds. If an employee is fired, then the accounts have to be disabled in order of minutes. It is not a problem for a system administrator to do that manually. However, will the administrator be available during a security incident late in the night? Would you synchronize layoffs with the work time of system administrators? Wouldn’t system administrators forget to stop all the processes and background jobs that the user might have left behind? IDM system can do that easily. Security team can simply disable all the accounts by using IDM system. Single click is all that is needed.
-
Enforce policies. Keep track about the privileges that were assigned to users. This usually means managing assignment of roles (and other entitlements) to users. Make sure that the assignment of sensitive roles is approved before user gets the privileges. Compare the policies and the reality. System administrators that create accounts and assign entitlements are not robots. Mistakes can happen. Make sure the mistakes are discovered and remediated. This is the natural best practice. However, it is almost impossible to do manually. Yet even an average IDM system can do that without any problems.
-
Remove unnecessary roles. Role assignments and entitlements tend to accumulate over time. Long-time employees often have access to almost any asset simply because they needed the data at some point in their career. The access to the asset was not removed since. This is a huge security risk. It can be mitigated by inventing a paper-based process to review the entitlements. However, such process is very slow, costly, error-prone, and it has to be repeated in regular intervals. Yet, advanced IDM systems already support automation of this access certification process.
-
Maintain order. If you closely follow the principle of least privilege, then you have probably realized that you have more roles that you have users. Roles are abstract concepts, and they are constantly evolving. Even experienced security professionals can easily get lost in the role hierarchies and structures. The ordinary end users often have absolutely no idea what roles they need. Yet, it is not that hard to sort the roles to categories if you maintain them in a good IDM system. This creates a role catalog that is much easier to understand, use and maintain.
-
Keep track. Keep an audit record about any privilege change. This means keeping track of all new accounts, account modifications, deletions, user and account renames, role assignments and unassignments, approvals, role definition changes, policy changes and so on. This is a huge task to do manually. It is almost impossible to avoid mistakes. Yet, a machine can do that easily and reliably.
-
Scan for vulnerabilities. Mistakes happen. System administrators often create testing accounts for troubleshooting purposes. There is an old tradition to set trivial passwords to such accounts. These accounts are not always cleaned up after the troubleshooting is done. Also, there may be worse mistakes. System administrators may assign privileges to a wrong user. Help desk may enable account that should be permanently disabled. Therefore, all the applications have to be permanently scanned for accounts that should not be there and for entitlements that should not be assigned. This is simply too much work to be done manually. It is not really feasible unless a machine can scan all the system automatically. This is called reconciliation, and it is one of the basic functionalities of any decent IDM system.
Theoretically all of these things can be done manually. However, it is not feasible in practice. The reality is that information security seriously suffers - unless there is and IDM system that brings automation and visibility. Good information security without an IDM system is hardly possible.
Risk-Based Approach To Identity Governance
Risk-based approach to identity management and governance is a very good idea. In fact, it is an excellent idea, one of the best ideas in decades. However, as with many great ideas, there are difficulties and drawbacks.
But wait a moment, what is this "risk-based" thing all about? To answer that question we have to make a quick road-trip through information security landscape.
The concept of risk comes from information security theory. Security practitioners have realized a long time ago that it is all but impossible to create a perfectly secure system. As you try to make a system more and more secure, every step is more expensive than the previous one. Every countermeasure is less efficient than the previous one, it is more intrusive, it is less flexible, harder to adapt to business needs. Eventually, the system gets to the state where it is practically useless for business, yet the system is still not completely secure.
Therefore, the security practitioners came with a concept of risk. Risk is a measure of danger that a particular asset is subjected to. An asset such as a customer database can be in risk with respect to particular threat, for example a hacker trying to steal the database to sell it to your competition. The risk tells about the probability of an asset being compromised. For example, keeping the database in a form of spreadsheet on decades old Windows machine connected to an open Internet is obviously quite a risky thing to do. The risk can be addressed using countermeasures. Countermeasures are all the things that we do to make systems more secure, ranging from operating system updates, through access-control systems up to bomb-proof doors and heavily-armed guards.
As it is not practical to completely secure a system, there is always some amount of risk that we have to accept. This is called residual risk, a risk that we are aware of, yet it is not efficient to reduce or eliminate the risk. Even though residual risk cannot be completely eliminated, there may be risk mitigation plans. For example, we may accept that there is a risk of an operating system vulnerability, and no amount of automated software updates, vulnerability database integrations and watchfulness is ever going to eliminate the risk completely. However, we can mitigate the risk by preparing plans to be executed when we are affected by a zero-day vulnerability. The plan may include disabling network access to vulnerable services as soon as we learn about the vulnerability, investigation that looks for traces of an attacker exploiting the vulnerability, emergency communication and contingency plans and so on. Risk mitigation is focused on making the impact of such an attack less painful, reducing the damage.
In an ideal situation we are completely aware of the risk, so we can implement countermeasures and prepare risk mitigation plans. However, we need to know quite a lot about the risk for the countermeasures and mitigation plans to be efficient. Risk is not just a single number, it is a multi-dimensional and often very complex concept. The amount of risk is evaluated in a risk assessment process, which is often very tedious and demanding exercise. Risk assessment process evaluates assets, to determine the value of the data and services. The process looks at threats, such as skills and motivations of an attacker. The assessment looks at vulnerabilities that attackers can use to gain access to our systems. It is also concerned with existing countermeasures, processes, policies and other details.
This means that the risk assessment process deals with big and complex data that cannot be processed by a human mind alone. The data are usually fed into risk models to determine the risk. Risk models are a set of complex mathematical formulas that transform data on assets, threats, vulnerabilities and all the other inputs into a multi-dimensional representation of risk areas. In theory, the risk model can tell us that we have a high risk in network security, especially when dealing with customer data - and we should really do something about it!
The results of risk assessment are meant to drive the implementation of countermeasures and risk mitigation plans. There are too many countermeasures and mitigation strategies to choose from, we cannot possibly implement them all. We want only the really efficient ones. We do not want to waste time and money on sophisticated encryption of data that are just copies of public information, do we? The risk assessment is supposed to tell us what is important and what is not. This is an important principle of efficient and systematic information security process: never guess, never go blind, let the risk guide you. Base your decisions on data. Implement countermeasures exactly where they are needed, where they are in a good position to address real risks.
However, information systems are not the easiest things to analyze. They never seem to stand still! The data are changing, new integration routes are added, systems are re-configured. Yet, the most annoying of all, user accounts and privileges change pretty much every day. By the time the risk assessment is done, the results are already out of date! How are we supposed to evaluate the risk, when everything around us is changing constantly?
The answer is, of course, automation. There are parts of risk assessment that cannot be automated. For example, there is no magic method to automatically assess business value of your data assets. However, some parts of risk assessment can be automated.
This is where we get back to identity management and governance. Almost all organizations are affected by insider threat, a threat posed by people that are already part of your organization. Employees, contractors, support engineers, cloud service providers - they already have access to your data. They do not need to hack anything, they do not need to overcome any countermeasures. They are already inside. All it takes to reveal your trade secrets are a simple copy and paste keystrokes. One file download is all it takes to sell your customer database. The proliferation of cloud services make such "exploits" entirely trivial. There is no technological countermeasure, no perimeter that could stop an insider to use a privilege that he or she already has.
This means that identity data heavily affect outcome of risk modeling. A system where almost all of your employees have unrestricted access to a customer database is very likely to pose much higher risk than all the network-related risks combined. A single person that has administrator-level access to almost every system in your organization is certainly a very attractive phishing target. There are high risks hidden in the identity data of almost any organization. Yet, such risk can be easily reduced by adjusting the access rights. But how to find such risks? Identity data are often complex, system-specific, distributed in many directories, cloud systems and application databases. Any identity practitioner can certainly see where this leads: identity management system, of course.
Identity management system is an ideal place for evaluation of risks related to identity and access data. Essential data are already in the database of identity management system: users, roles, role assignments, role composition, entitlements, everything is there. Entitlements can be assessed to assign a risk score to them. Then the data can be fed into a risk model, evaluating how are the entitlements combined in roles, how are teh roles assigned to users, identifying high-risk roles and users. The model is evaluated by the machine, quickly and efficiently. The efficiency opens up a whole range of possibilities, that form the essence of a risk-based approach to identity governance.
As we can evaluate a risk posed by any individual user, we can easily identify dangerous accumulation of privileges in the hands of a single user. Then we can focus on addressing this risk, analysing why have the privileges accumulated, whether they are all necessary, removing excess privileges to lower the risk. Perhaps we can consider changing business processes to divide the responsibilities among several users, lowering the risk even further. We can evaluate the risk model after each step, checking whether we have reached acceptable risk levels already.
The risk model can evaluate risk of each role. This allows detection of anomalies, such as assignment of a powerful high-risk role to an ordinary user that is supposed to be low-risk. Such role is likely to be assigned by mistake, or perhaps it was a role assigned during an emergency that was never removed. Unassignment of such role may be a quick way to reduce the risk. Smart system could suggest several types of such outliers, where privileges of an individual users stand out from the surrounding.
Once we have the concept of risk established in our system, we can use it in security policies. For example, it makes sense to require stronger password for high-risk users, or even better, automatically set up a multi-factor authentication for them. It may be desirable to re-certify privileges of high-risk users more frequently than those of low-risk users. Assignment of new role to a high-risk user may need to pass through additional approval stage. The policies can take the risk into consideration. This approach is often referred to as adaptive security.
There are even more advantages when the risk-based approach is applied also to other areas of identity and access management field. For example, it may be a good idea to require strong authentication from high-risk users, while allowing weaker authentication for low-risk users. This can be achieved in many ways, the easiest is perhaps for identity management system to propagate risk scores to access management user profiles.
Risk-based identity management and governance is indeed the right thing to do. However, the devil is in the details, and the reality is much harder than the glossy marketing brochures dare to admit. There are hidden dangers and dark corners on this route:
-
One risk assessment means nothing. Nothing at all. The results are out of date as soon as they are produced by the model. You have to do assessment continually, all the time, since now till eternity. You take the results of an assessment, plan countermeasures, apply them, only to do all the work over again. This is called "security process". It never ends.
-
Risk evaluation is almost always subjective. When evaluating risk of any individual entitlement, you will probably use subjective terms such as "low", "medium" and "high". The subjective terms are often hidden behind scores, numbers that may look like they are exact values. In reality, they are everything but exact.
Subjective risk assessment is pretty much a standard method. Objective risk measures are sometimes tries, such as conversion of risk to a monetary value. However, such "objective" measures are often very misleading, and they are generally frowned upon by information security practitioners. There is nothing fundamentally wrong with subjective risk assessment as long as you are aware of the limitations. Perhaps the most important rule is to keep the assessment consistent and proportional. Entitlements that are assigned "low" risk level should pose approximately the same risk, and it should be significantly lower than all the entitlements marked as "medium" risk.
-
You need risk model appropriate for your organization and situation. When it comes to risk models, one size does not fit all. There are simple risk models appropriate for quick assessments in organizations with low security requirements. Then there are overly complex risk models that are designed for high-security military setting. Even if you find a model that fits your needs, you still need to fine-tune it. You cannot just buy an instant ready-to-serve-in-5-minutes risk model. Such model will never work for you.
-
Model is not reality. Model is meant to be an approximation of reality. However, how well the model approximates reality must not be taken for granted. Risk model may not for you, and you may not even realize it. Bad model will get you into a false sense of security, claiming that you are all green while in fact you can be in grave danger. Do not trust your risk model blindly. Try to validate the results, try to confront model results with reality as much as you can.
Information security is quite a strange field. You can clearly prove that your system is insecure, for example by successfully attacking your system. Yet, you can never completely prove that your system is secure. This limitation is a major source of confusion, and it also opens up opportunities for charlatans, offering their security snake oil on the market. As you cannot buy information security process, you cannot buy a ready-made risk-based approach to identity governance. You have to build it yourself. Having advanced and smart identity governance platform at your side is unquestionably a great help. However, such a platform is only a tool. Even the smartest and most expensive tool will not do all the work. It will make your work more efficient, but you still need to be the one driving it. One size does not fit all. Your organization is different to other organizations. That is what makes you unique, what gives you competitive edge, what makes you survive on the market. You cannot expect to buy a model or a process that fits your needs perfectly. You have to adapt and develop your own models, policies and processes. Having a starting point that is similar to your needs is a huge advantage. Starting from industry-specific frameworks, templates and samples will save you a lot of time. Go for these, whenever they are available. However, you will have to understand how the frameworks work, you will need to know what you are doing, as you will certainly need to adapt them to your needs.
Similarly to information security, "off the shelf" is mostly just an illusion in identity management and governance. Whatever the bold marketing statements say, you cannot just buy it and run it. No, not even in the cloud. You can buy identity governance platform as a service, but you cannot buy identity governance. You will have to learn a lot of things, you will have to dive deep into policies and models, you will have to do a lot of work yourself. Set your expectations realistically.
Zero-Trust Approach
Zero-trust is an approach to design network and application systems. The basic idea is that a system should not implicitly trust any other system, not even systems located on a "secure" corporate network. Simply speaking, zero-trust approach is mostly about removing security perimeter.
For many decades, corporate networks were designed using hard exterior, soft interior approach. Corporate network was protected from the Internet by an army of specialized security systems and techniques, such as firewalls, de-militarized zones, network traffic analysers, intrusion detection systems, network anti-virus scanners and everything else a booming network security market could provide. While the castle gates were heavily protected, the interior of corporate network was very soft. Originally, there were no security measures inside corporate networks at all. Anyone that got inside could connect to any system. Of course, basic authentication and authorization mechanisms were usually there, but the network was not segmented, and the traffic was usually not even protected by basic encryption. This approach created a security perimeter around corporate network. If you want to keep the data secure, you have to make sure nobody gets into the network.
Of course, this approach does not really make much sense in the Internet era. There is no such thing as a network perimeter, not since the invention of WiFi, mobile data and USB keys, anyway. It is ridiculously easy to breach the perimeter by connecting a WiFi device to the corporate network. However, even that was usually not needed, as the data can be copied to USB keys, or easily moved outside the perimeter by using virtual private network (VPN) access. Corporate security professionals tried to address such threats by strictly controlling user’s devices, such as disabling USB ports, disabling access to other networks while the device was part of VPN, and so on. However, none of these countermeasures were really effective, and they were usually very intrusive and inconvenient for the users. Advent of cloud services and mobile devices was the last drop. The traditional corporate information security approach is dead. Even the most traditional security practitioners had to admit what was already obvious: there is no perimeter.
The old approach was replaced by a new one: zero trust. An application should not trust any other application, not even an application on the same corporate network. Network perimeter was replaced by mutual authentication and network traffic protection. Each application must authenticate the other end of the connection, whether it is talking to the party it is supposed to talk to. Network traffic always needs to be encrypted and authenticated (signed), always assuming that it can be passing through an insecure network. Simply speaking, we treat corporate network in exactly the same way as we are treating public Internet. The soft interior turned into hard interior, and the perimeter was no longer needed.
The concept of zero trust is not new at all. It was here pretty much since the very beginnings of information security. Security practitioners are trained not to trust anything or anyone, set up policies, require authentication, deny access by default, encrypt all network traffic, minimize privileges, manage risks, and so on. Therefore, "zero trust" approach is essentially just a thorough application of proper information security principles. This approach is here for decades, it just had different names: defence in depth, perimeterless security, network hardening and so on.
Even though zero trust approach is not new, it dramatically gained on importance in the era of cloud services and remote access. Many functions provided by traditional corporate applications are provided by cloud services now. Such applications need data to work, therefore, the very use of "as a service" applications is by itself a breach of the perimeter. Cloud applications need to work together with on-premise applications. Traditional enterprise integration patterns based on soft interior do not work in this brave new world anymore. All of that is driving the zero trust concepts.
Of course, "zero trust" is more a wish rather than a strict rule. A system that trusts nothing will not be able to work at all. There is always some amount of trust involved, even in zero trust approach. The system must trust that the root keys and certificates are authentic. There is an implicit trust that the developers have not introduced a back door into system code. Zero trust approach should perhaps be called "minimal trust approach". However, "zero trust" is much more attractive in glossy magazines and presentations. Whatever is the approach called, the basic principle remains the same: aggressively minimize implicit trust in the system.
Identity permeates everything, therefore the zero trust approach has an impact on identity and access management as well. Impact on access management technologies is perhaps quite obvious. Access management deals mostly with authentication. The applications need to authenticate to each other in this new zero trust world. Therefore, the access management systems need to handle authentication of non-person identities, such as applications and devices. Many scenarios do not significantly deviate from the usual authentication, perhaps the only difference is that the authentication needs to be completely non-interactive. However, there are also more complex authentication scenarios, such as an application authentication on behalf of a user. Traditional authentication methods (such as password-based authentication) are obviously ill-prepared for such scenarios. Therefore, the zero trust approach is often combined with introduction of new authentication mechanisms.
Impact of zero trust approach on identity management systems is much more subtle. Zero trust approach requires mutual authentication of communication parties. Which means that the identity management system needs to manage non-person identities such as applications and devices. This requirement is not new, therefore most well-maintained identity management products are more than capable in this aspect. The problematic part is usually the connection between the identities, the relationship. If two applications have to communicate, both of them need to know about the other one. API keys, pre-shared secrets, certificates and other cryptographic material needs to be set up before first communication can happen. The credentials need to be updated, keys must be changed periodically, certificates need to be renewed. Such application credentials are much more important than passwords ever were, as application credentials are quite literally the keys to the kingdom. An attacker that gets access to the application keys has access to all the data in cloud applications, which very likely means your payroll data, customer database, internal documents, almost everything that is important to you. Experienced information security professionals know, that it is not encryption that is the most difficult part of cryptography. The key management is. Similarly, it is not the authentication that is the most difficult problem in zero trust approach. Identity and credential management is much harder. Today, application identities and credentials are usually configured manually by system administrators. However, such approach does not scale. The whole idea of "as a service" applications is to make information systems more flexible, more dynamic, and especially less demanding when it comes to system administration. Manual management of application identities goes well against that idea.
What can an identity management system do for zero trust approach?
Firstly, it can do the same thing it normally does. It can manage user identities. In zero trust mode, users have to authenticate everywhere, they have to be authorized everywhere, in every application or service. While authentication can usually be handled by access management or single sign-on systems, authorization is much harder. Identity management system can do it, it can manage entitlements and privileges, it can de-provision unnecessary accounts and access rights. This part is relatively easy, it is what identity management systems do for decades.
Secondly, identity management system can manage access of one application to other application. This means management of application accounts, management of application credentials, privileges, de-provisioning the accounts when application is decommissioned. This may sound simple, but it is all but simple in reality. The most basic requirement is an application inventory, an authoritative list of applications in an organization. However, many organizations do not have that at all. Those organizations that have it, usually have in a form of informal spreadsheet that is not entirely machine-readable. How is identity management system supposed to even start management of application identities, when there is no authoritative source? Therefore, the effort should start with building such a source, which may be a manually-maintained information in the identity management system. Then, application accounts and entitlements (groups) need to be associated with the application. Applications much have owners, which can be maintained in IDM system. As application accounts and entitlements are associated with an application, they can be automatically de-provissioned when application is decommissioned. However, perhaps the most challenging part is credential management. The credentials should be changed periodically. However, this change has to be synchronized on both sides of the communication channel (both client and server part), otherwise there will be an outage. This is difficult to automate, even with the state-of-the-art IDM system.
Overall, current identity management and governance platforms are not ready for full management of applications, application accounts and entitlements. Only a partial functionality is usually available. Even though the concepts of zero trust approach are quite old, they were never applied systematically at scale. Therefore, there was not a sufficient demand to implement required features in identity management systems. The future will tell whether current wave of zero trust hype brings such demand. However, pretty much all IDM systems much evolve and develop new features. Therefore, it is crucial to choose and IDM platform that can evolve.
Building Identity and Access Management Solution
There is no single identity and access management solution that would suit everybody. Every deployment has specific needs and characteristics. Deployment in a big bank will probably focus on governance, role management and security. Deployment in small enterprise will focus on cost efficiency. Cloud provider will focus on scalability, user experience and simplicity. Simply speaking, one size does not fit all. Almost all IAM solutions use the same principal components. However, product choice, solution topology and configuration will significantly vary. Do not expect that you download a product, install it and that it will solve all your problems. It won’t. Customization is the key.
We consider identity management to be heart and brain of any IAM solution. This is one of the reasons why we have started midPoint project. The rest of this book will focus almost exclusively on identity management and the use of midPoint as the IDM component. This is the place where theory ends and practice begins.
2. MidPoint Overview
Chaos was the law of nature; Order was the dream of man.
MidPoint is an open source identity governance and administration (IGA) platform. It is a very rich and sophisticated system that provides many advanced features. MidPoint is maintained by Evolveum – a company dedicated to open source development. All midPoint core developers work for Evolveum. However, there are also partners and other engineers that are contributing to midPoint development.
One of the main differences between midPoint and other IGA systems is that midPoint is designed and implemented with one primary goal in mind: practicality. This goal goes deep into the very foundations of midPoint. To be more concrete, we understand practicality as:
-
Things that are simple or frequently used should be easy to configure. Propagation of password changes, enable/disable of user, account synchronization – these should be as easy as possible. As simple as flicking a switch, or setting few configuration properties.
-
Things that are more complex or used less frequently may be a bit harder. Such as editing XML, YAML or JSON file, or writing few lines of Groovy script.
-
Things that are very complex or very unusual should be still possible. However, these might not be easy. It may require longer scripts, or implementing some Java classes. In extreme case, it may even require forking and modifying the source code. However, it must be possible to do almost anything.
Simply speaking, midPoint is following the Pareto principle: 20% effort brings 80% benefits. There are many mechanisms that support this approach. Some are based in midPoint design, some originate from midPoint development practices and some are even supported by the Evolveum business model.
Simple solutions which do not deviate from the usual requirements must be easy to implement. Good identity and access management programs start simple, solving common problems. The start should be relatively easy, granting benefits early in the project. The project then proceeds in iterations, each iteration improving upon the previous one. Each iteration is bringing tangible results. As the requirements get more complex, the implementation effort may grow. The project may eventually reach a point where the effort outweighs the benefits. This is the right place to stop, maybe return to the project later.
This is known as iterative and incremental process. It is proven to be efficient and practical approach many times over. MidPoint is designed for this process, right from its very beginning. It is at the core of midPoint development philosophy.
MidPoint is an open source system. Therefore, there is no license cost that would offset the initial costs. Even small projects are feasible with midPoint. You can start prototype or proof-of-concept projects today. There is no need for any paperwork. Just download midPoint and start. Right now. You can see for yourself what midPoint can do.
How MidPoint Works
MidPoint does what any identity management system is supposed to do: it manages identities. The very basic functionality of midPoint is the synchronization of identity data that are stored in various applications, databases, directory servers and cloud data stores. We call all these systems identity resources, or resources for short. MidPoint is using connectors to reach the identity resources. MidPoint can propagate a change that happened in one identity resource to other identity resources. E.g. an employee record appears in the HR system, it is picked up by midPoint, processed, transformed and then new Active Directory and CRM accounts are created. This is the process that we call synchronization. It is at the core of everything else that midPoint does.
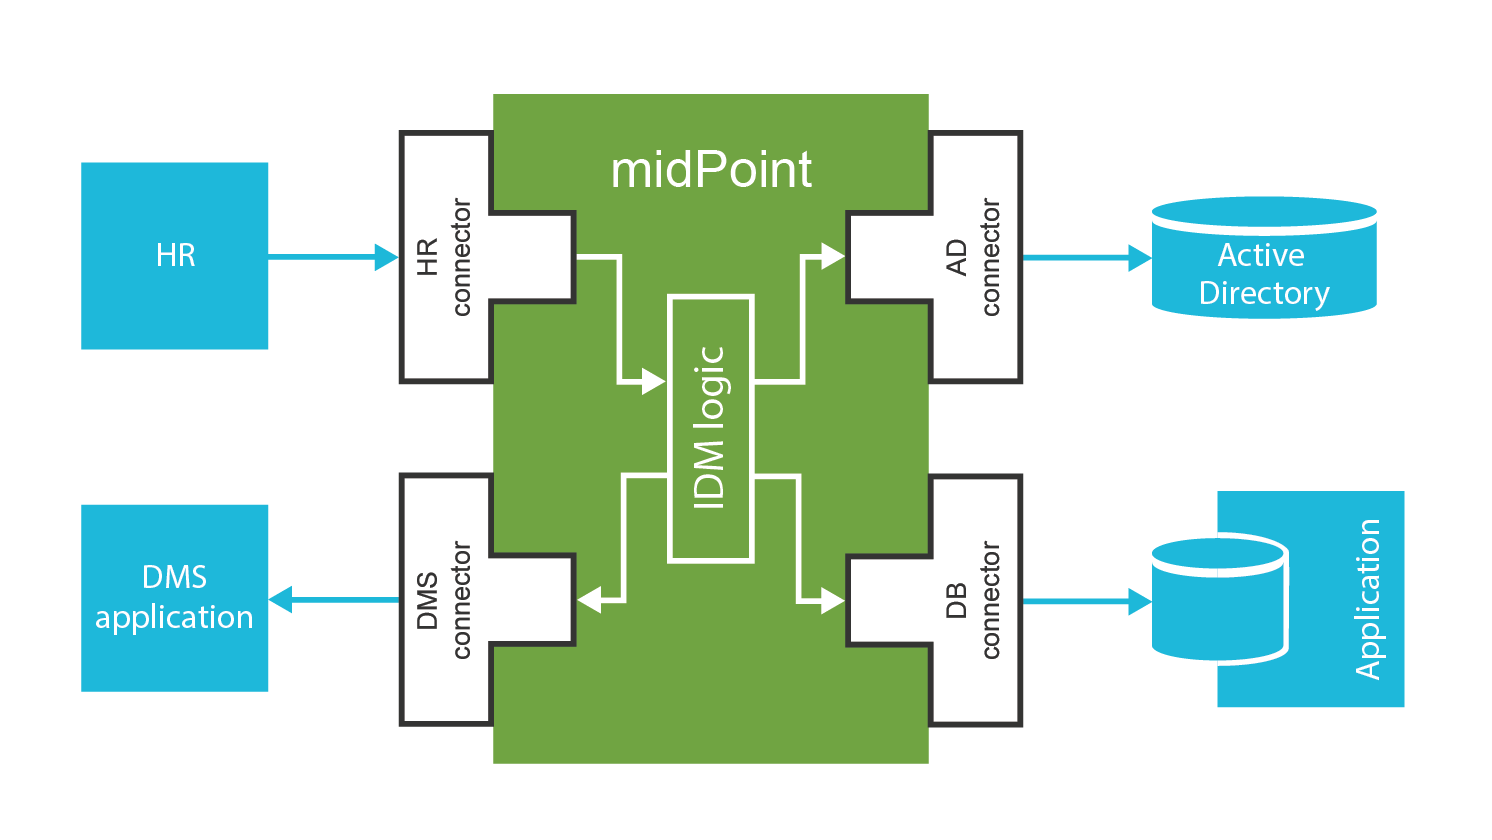
MidPoint has a rich graphical user interface (GUI) that can be used to manage the identities. Changes made by system administrators are automatically propagated to all affected identity resources. E.g. security officer disables a user by clicking on Disable button in midPoint user interface. Then MidPoint makes sure that all accounts that belong to the user are immediately disabled.
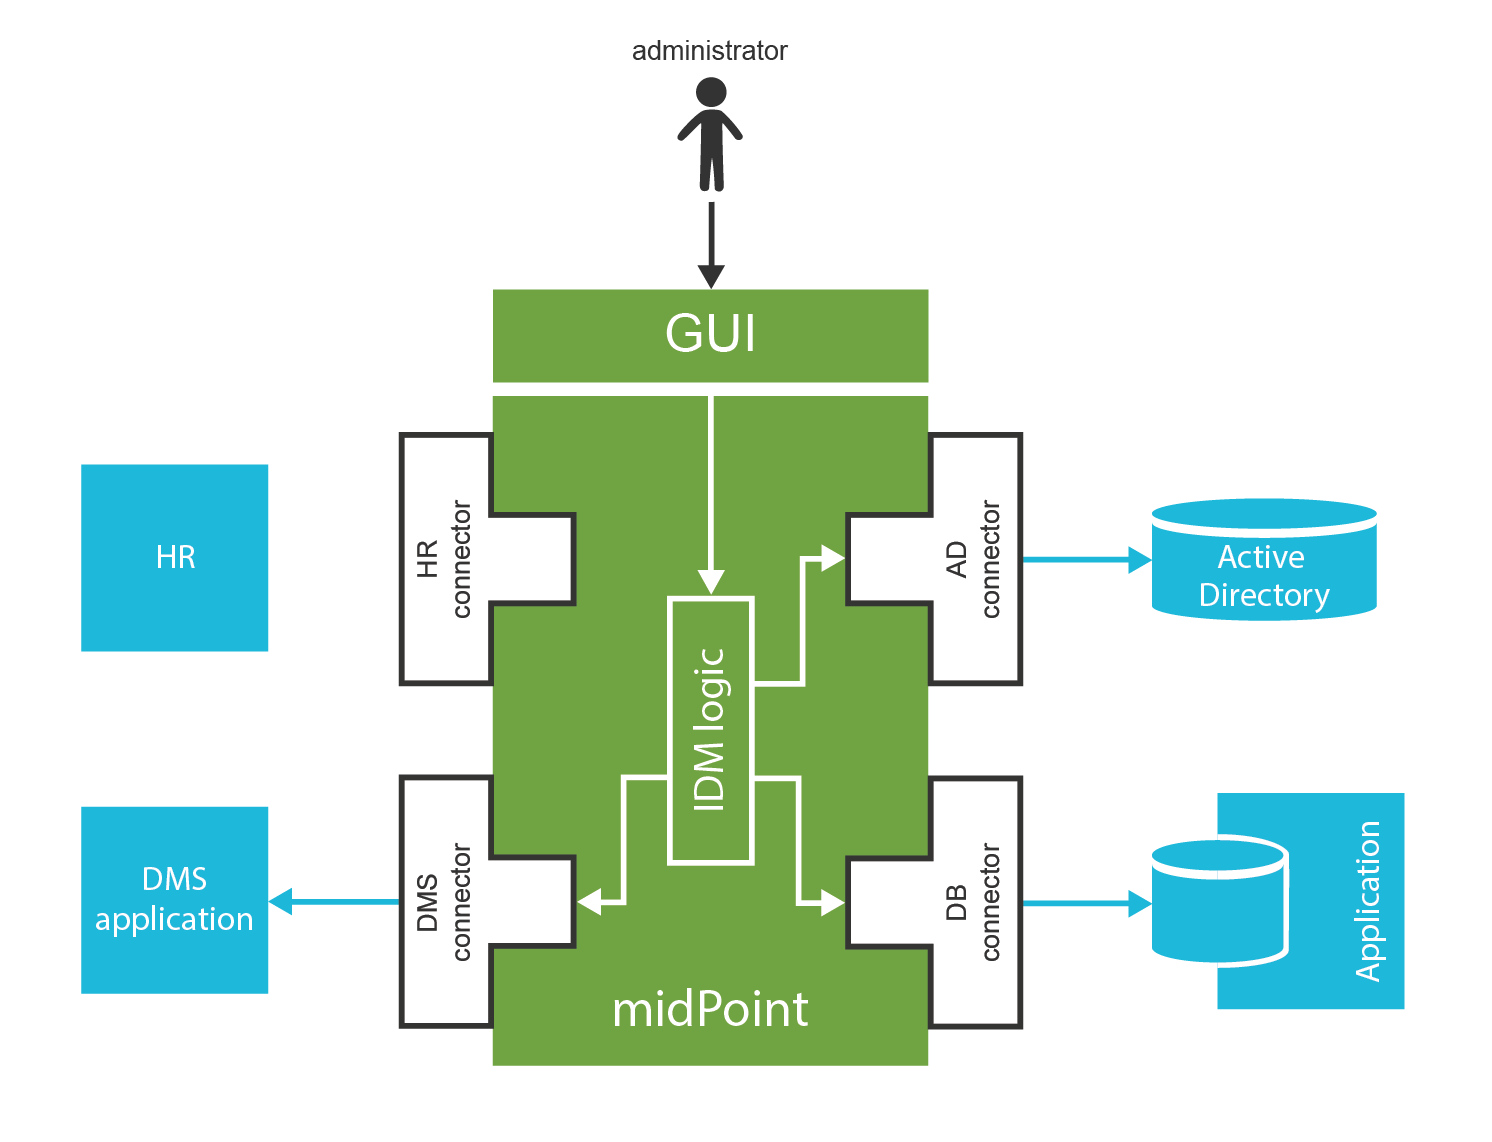
This is the essence of midPoint operation. It sounds simple, because this description is extremely simplified. The reality is much more complicated. Most of the important things happen inside midPoint before the changes are applied to target resources. For each change that midPoint detects it needs to evaluate:
-
Roles: MidPoint computes where the user should have access. This is usually given by the roles that the user has. The role structure is often quite rich and dynamic. There may be role hierarchies, parameters, expressions and policies to consider.
-
Organizational structure: Users usually belong to organizational units, projects, teams or groups. Some of them may give additional privileges to the user, or they may apply policies.
-
Status and life cycle: Accounts can be created, enabled, disabled, archived or deleted. There are many situations in the lifecycle that need to be considered. E.g. we may want to create a disabled account one week before a new employee starts his work, enable the account on his first day, disable the account on his last day and delete it three months after he leaves.
-
Attributes and identifiers: Simple synchronization scenarios assume that attributes and values should be the same in all the synchronized systems. That is a nice theory, but it almost never works like that in real world. In reality there are incompatible attribute names, data formats and conventions to take into consideration. Attribute names need to be translated, values need to be transformed, data types need to be converted. This is different for each system, and even for each instance of each system. Small algorithms in form of scripting expressions are often needed to properly transform the values.
-
Credential management: Password changes need to be propagated to the target systems. Sometimes we want to synchronize password with all systems, sometimes we want just a subset of systems. Password policies need to be evaluated, password history needs to be checked, password may need to be encoded, encrypted and/or hashed before storage.
-
Policy rules: Policies are evaluated, each rule applied to current situation. The rules may prohibit illegal situations, such as dangerous combination of roles. Policy rules may mark the object for later inspection by administrator. The rules may do almost anything to make sure the system is compliant.
-
Authorizations: Some users are more powerful than others. There are midPoint administrators with very powerful privileges, there are delegated administrators that can manage only a small part of the data, and there are end users with access to self-service only. MidPoint has a very flexible authorization mechanism, allowing thousands shades of privileges to be applied to arbitrary subset of data and operations. The authorizations need to be evaluated for every operation that midPoint makes.
-
Consistency: The account in the target application might have changed since midPoint has updated it. The current change may no longer be applicable to the current state of the account. The change that midPoint wants to make may conflict with the native change, the change may be partially applied already, the account may have attribute values that it should not have or the account may not exist at all. MidPoint has to detect such situations and react accordingly, e.g. by re-creating a deleted account before applying the changes.
-
Approvals: MidPoint determines if any of the changes need to be approved before they are applied. If that is the case, then midPoint drives the request through an approval process. There may be multiple stages of approval, approver groups, optional approvers, the request can be escalated if approvers do not take action in time and so on. Approval process may be quite complicated, the actual steps are computed individually for each request, based on approval policies.
-
Notifications: MidPoint can notify users when important events happen. E.g. it notifies the user that he can access a new account, or it notifies the administrator if something goes wrong.
-
Audit: MidPoint records all the changes into an audit trail. This can be used by security officers or specialized analytic engines later to investigate past situations and changes. Audit trails provides accountability.
This is a lot of things to process, evaluate and execute. Some of these steps are quite complex. Indeed, there are many sophisticated algorithms implemented in midPoint. There are algorithms that evaluate role structures, organizational structures, temporal constraints, policy rules, password policies and so on. MidPoint does all that for you. The only thing that is needed is to configure them properly.
However, midPoint does even more than that. MidPoint does not only manage identities, it can also manage any object that is anyhow related to identity management. MidPoint can manage roles, role catalogs, organizational structures, groups, projects, teams, services, devices and almost anything else you can imagine.
MidPoint is also an identity governance system. The job of identity management features is to make sure that the policies are consistently applied through the organization. The governance features assist with the maintenance and evolution of those policies. MidPoint implements access certification process. This is a recurring process that asks managers to confirm that the users still need the privileges that they have previously received. MidPoint contains mechanism to sort roles into hierarchies and categories. That is necessary to maintain order during role engineering and maintenance of role definitions. MidPoint has mechanisms for selective enforcement of role which comes very useful during migrations and when new system is connected to midPoint. MidPoint has support for policy lifecycle, general policy rules and so on. Even more work in that direction is planned in future midPoint versions. We fully understand that it is not enough to simply apply the policies. Policies are living things and they need to evolve.
Last, but certainly not least, midPoint provides visibility. Identity data often look like a huge maze, a labyrinth or users, roles, organizational units, entitlements and policies. It is too easy to get lost there. However, there are treasures in that labyrinth. There are patterns and structures hidden in that huge pile of data. Roles and policies buried there, as well as risks and dangerous anomalies lurking behind the corners. MidPoint provides identity analytic capabilities to uncover them. There are powerful reporting and simulation mechanisms. Recent midPoint versions introduced role mining, a capability to find role patterns in the data. MidPoint gives identity professionals capability to see inside identity data.
Case Study
This book is about practical identity management. Therefore, we will get very close to a practice by demonstrating midPoint features using a case study. This is a case study of a fictional company ExAmPLE, Inc. The name stands for "Exemplary Amplified Placeholder Enterprise". ExAmPLE is a mid-sized financial company. Its operation heavily relies on information technologies, therefore there is a diverse set of applications and information systems ranging from legacy applications to cloud services. As ExAmPLE has few thousand employees and there is a good potential for growth, the management has decided to start an identity and access management program. The first step of the program is deployment of midPoint as the identity governance and administration platform.
Eric is an IT engineer at ExAmPLE, Inc. He has taken the responsibility to install and configure midPoint. Eric spins up a new container with midPoint in it. Couple of minutes later, midPoint instance starts up. Eric logs in to the midPoint user interface.
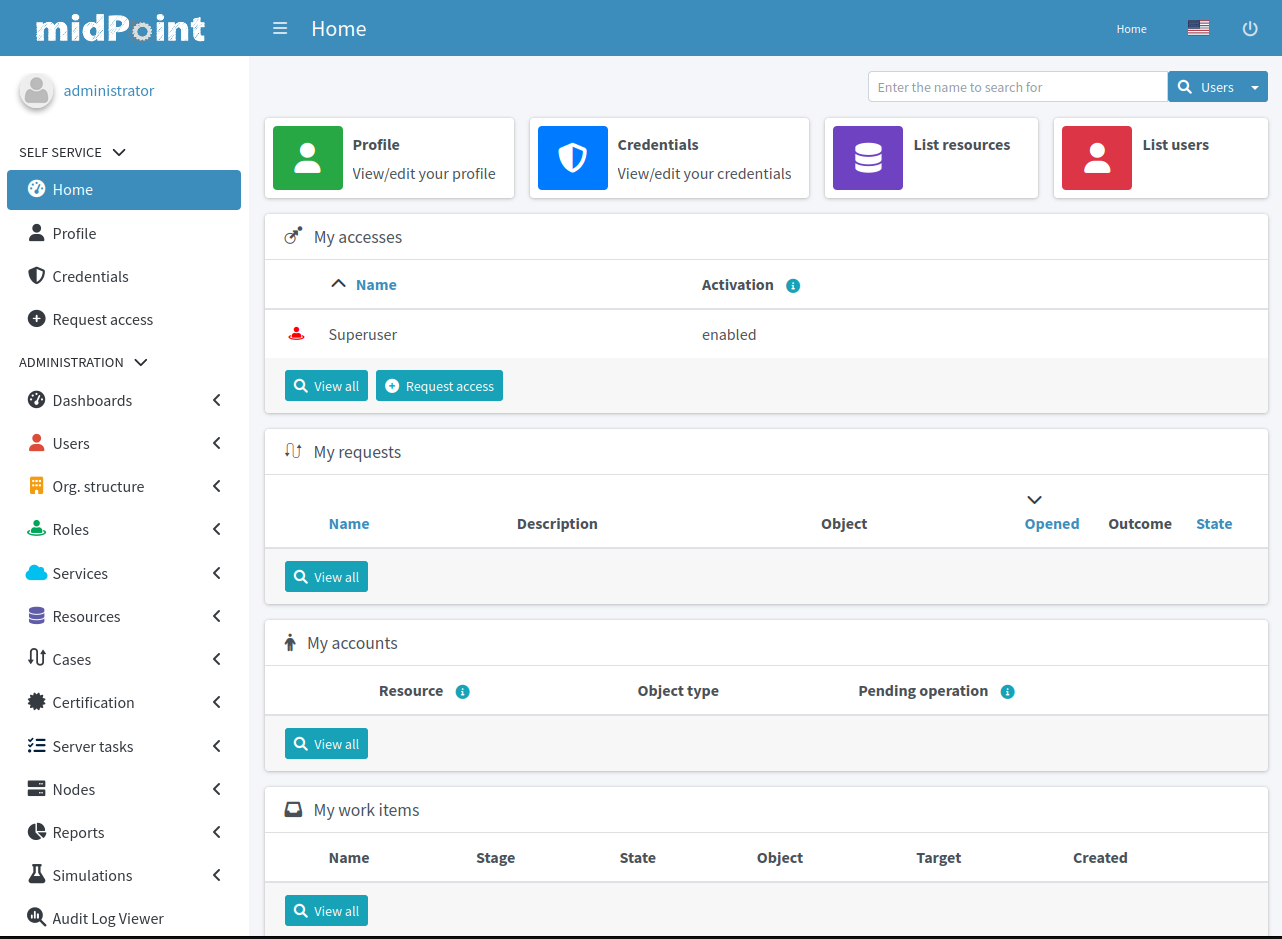
MidPoint instance is almost empty after fresh installation. It contains only a couple of essential objects. Luckily, Eric is a smart engineer. He has already read through this book, and he knows exactly what he needs to do.
First thing to do is to populate midPoint with employee data. The primary source of ExAmPLE employee data is an HR system. The HR system is quite big and not entirely flexible piece of software. It is not easy to connect to that system directly. Fortunately, it is quite easy to get a text export of the employee data in comma-separated (CSV) format. Eric plans to use this file to get employee data to midPoint.
Connectors and Resources
MidPoint communicates with all the source and target systems by the means of connectors.
Connectors are relatively small Java components that are plugged into midPoint.
There is usually one connector for each type of the connected system.
There are connectors for LDAP servers, Active Directory, databases, cloud applications, UNIX operating systems and so on.
The responsibility of a connector is to translate protocols.
E.g. LDAP connector translates midPoint search commands to LDAP search requests.
Database connector translates the requests to SQL language.
Cloud connectors translate midPoint search commands to HTTPS requests for their respective cloud APIs.
The UNIX connector creates an SSH session and translate midPoint create command to the invocation of Linux useradd binary.
And so on.
Each connector talks using its own communication protocol on one side.
On the other side, the connectors translate the information to a common format that is understood by midPoint.
There is no distinction between source and target system when it comes to the connector. The same connectors are used for source and target systems. The difference is only in midPoint configuration.
The connectors are distributed as Java binaries (JAR files). To deploy them to midPoint you just need to place them in the correct directory. MidPoint automatically discovers and examines the connectors during start-up. A handful of frequently-used connectors is even bundled right into midPoint distribution. These connectors do not need to be deployed, they are automatically available.
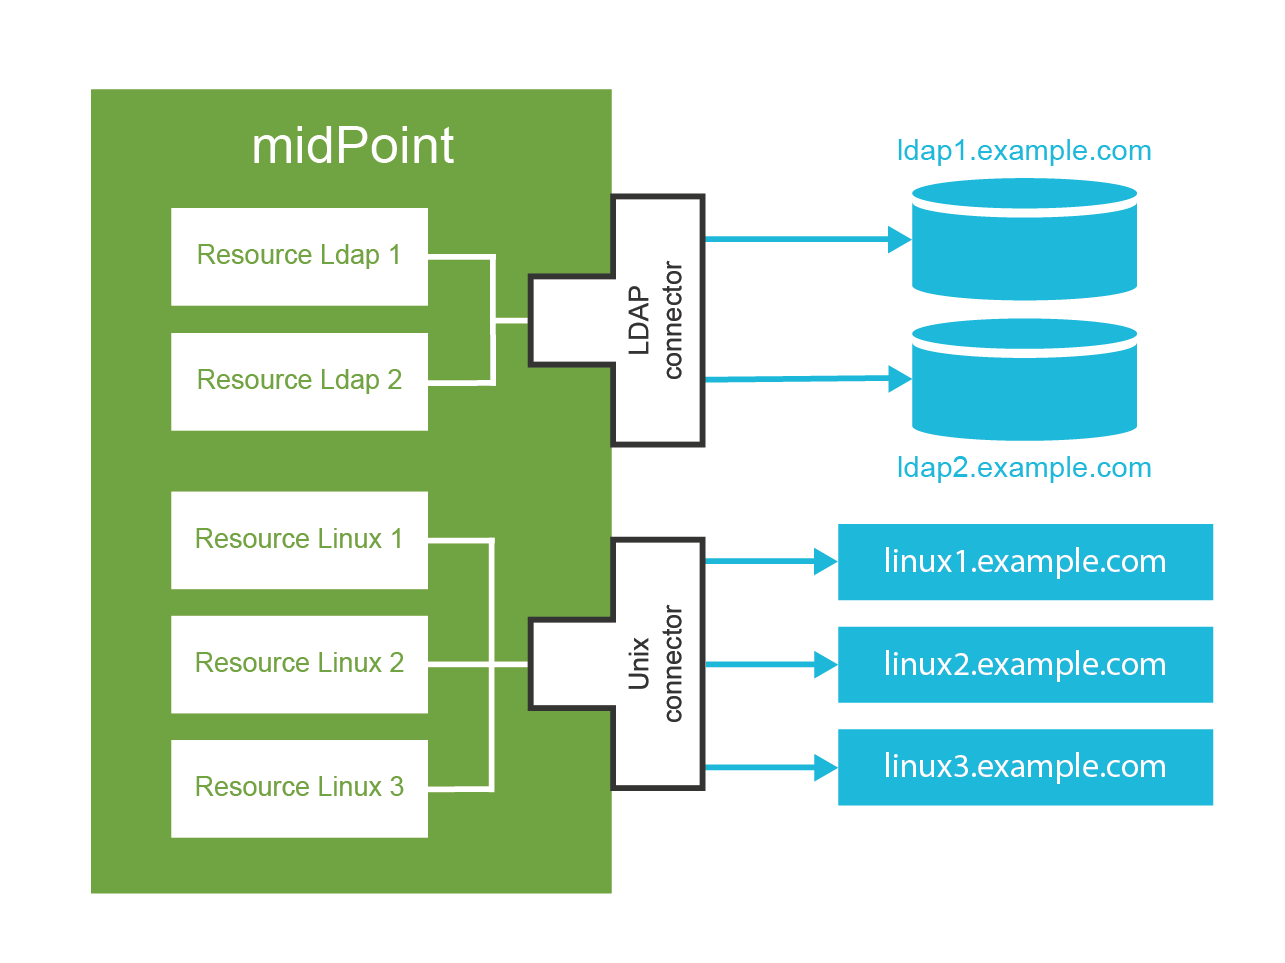
Connector of a specific type works for all the systems that communicate by the protocol supported by connector. E.g. LDAP connector works for all the LDAP-compliant servers. Connector is a very generic piece of code. It does not know the hostname, port or passwords that are needed to establish a connection to a particular server. The configuration that specify connection parameters for individual server is stored in special configuration object called resource. The term resource in midPoint terminology means identity resource, any system which contains identity data and is connected to a midPoint instance.
Therefore, Eric the Engineer needs to define a new resource in midPoint in order to get ExAmPLE employees into midPoint. This resource represents the CSV file exported from the HR system. MidPoint distribution contains CSV file connector already, therefore there is no need to deploy the connector binary package. All that Eric has to do is to create a new resource definition. There are (at least) two ways to do it. Firstly, there is a resource configuration wizard in midPoint user interface. Eric can use the wizard to configure a new resource from scratch. However, Eric is quite an experienced professional, and he is also a little bit impatient. Therefore, he decides to use the other approach: start from an example. There are examples of various resource definitions in the midPoint distribution package, and even more examples are available on-line. Eric quickly locates an XML file that contains a complete example of a CSV resource. He edits the file to change the filesystem path to his CSV file and adjusts the names of the columns to match the format of his file. The very minimal resource configuration specifies just the resource name, connector and connector configuration. The XML file that Eric creates looks approximately like this (simplified for clarity):
resource-csv-hr-bare.xml<resource oid="03c3ceea-78e2-11e6-954d-dfdfa9ace0cf">
<name>HR System</name>
<connectorRef type="ConnectorType"> ...</connectorRef>
<connectorConfiguration>
<configurationProperties>
<filePath>/opt/midpoint/var/resources/hr.csv</filePath>
<fieldDelimiter>,</fieldDelimiter>
<uniqueAttribute>empno</uniqueAttribute>
</configurationProperties>
</connectorConfiguration>
</resource>| If you are a hands-on type of engineer you probably want to follow what Eric is doing in your own midPoint instance. All the files that Eric is using are provided in a form of ready-to-use samples. Please see Additional Information chapter at the end of this book for the details. |
Then Eric navigates to Configuration section of midPoint user interface and imports the XML file into midPoint using Import object tool. Import operation creates new resource definition in midPoint. Eric now navigates to in Administration section of the midPoint user interface. The new CSV resource is there. When Eric clicks on the resource name a resource details screen appears.
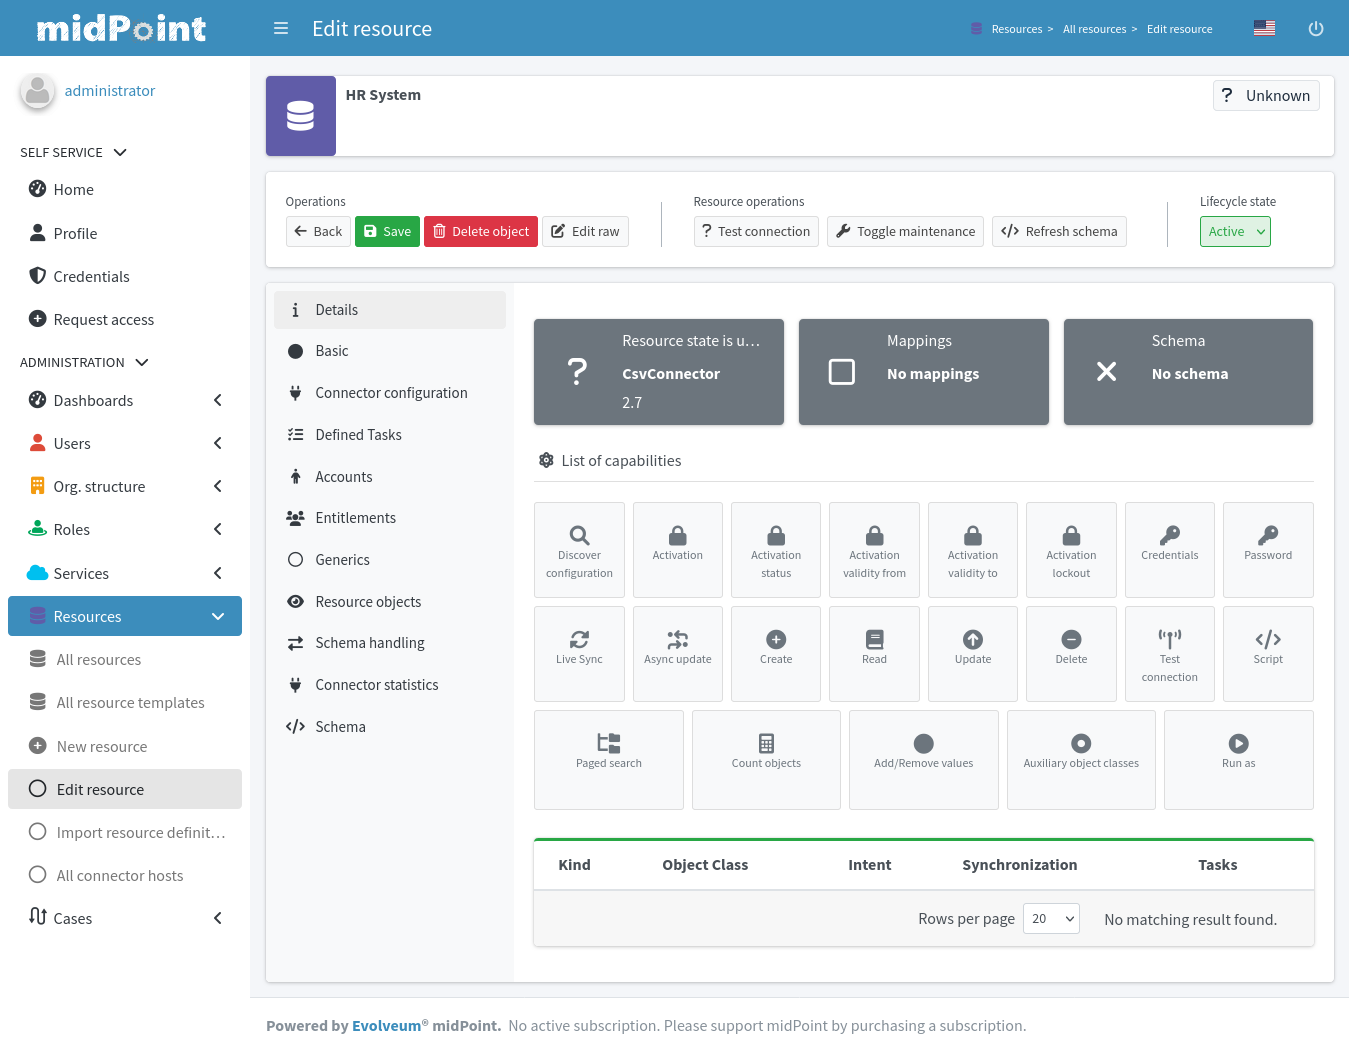
Eric can click on Test connection button to test connection to the resource. As this is a local CSV file, there is no real connection. The test checks that the filesystem path is correct, that the file exists and that it can be opened. The connector reads the CSV file header to discover the structure of the data in the CSV file, and presents the information to midPoint. This is stored in midPoint as resource schema, which describes structure of accounts in this resource. The resource is now prepared for use.
There is not much that Eric can do with the resource yet. We need to explain a couple of essential midPoint concepts before moving forward with our case study.
User and Accounts
The concept of user is perhaps the most important concept in the entire identity management field. The term user represents physical person: an employee, support engineer, temporary worker, student, teacher, customer, etc. On the other hand, the term account refers to the data structure that allows the user to access applications. This may be an account in the operating system, LDAP entry, row in the database table and so on. Typically, one user has many accounts – usually one account for each resource.
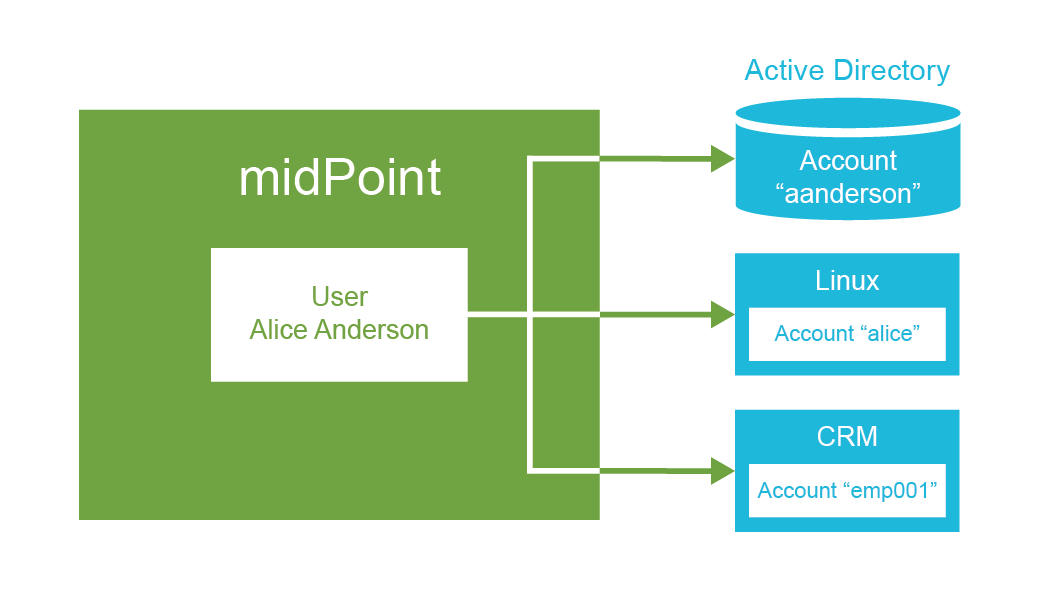
The data that represent users are stored in midPoint, while the data that represent accounts are stored "on the resource side". Which means that accounts are stored in the connected applications, databases, directories and operating systems. Accounts are not stored in midPoint. Under normal circumstances, MidPoint keeps just account identifiers and some meta-data about the accounts. All other account attributes are retrieved when needed. MidPoint is using the connectors to fetch account data.
|
Terminology
We will strictly distinguish the terms user and account in this book.
Such a strong distinction is also made in the midPoint user interface and documentation.
It is very useful to get used to this terminology.
|
Accounts are linked to users that own the accounts. MidPoint knows which account belongs to which user. MidPoint can list all the accounts for any user, it can synchronize the data, it can disable all the accounts of a particular user and so on. This user-account link is almost always automatically established and maintained by midPoint.
MidPoint comes with a built-in data model (schema) for users. It contains properties that are frequently used to describe users such as full name, e-mail address and telephone number. There is a reasonable set of properties that should be a good starting point for most deployments. Of course, as most midPoint objects, the user schema can be extended with custom properties if needed.
However, there is no built-in data model for accounts. Such data model would not be possible. Every resource may support different account attributes. Account attributes may have different names, different types and the values may have different meaning. MidPoint is designed to handle those differences.
Account schema may significantly differ from resource to resource. Yet midPoint must be able to synchronize all the accounts from any kind of resource imaginable. In this case the user schema works as a unifying data model. The schema of each account is mapped to the user schema.
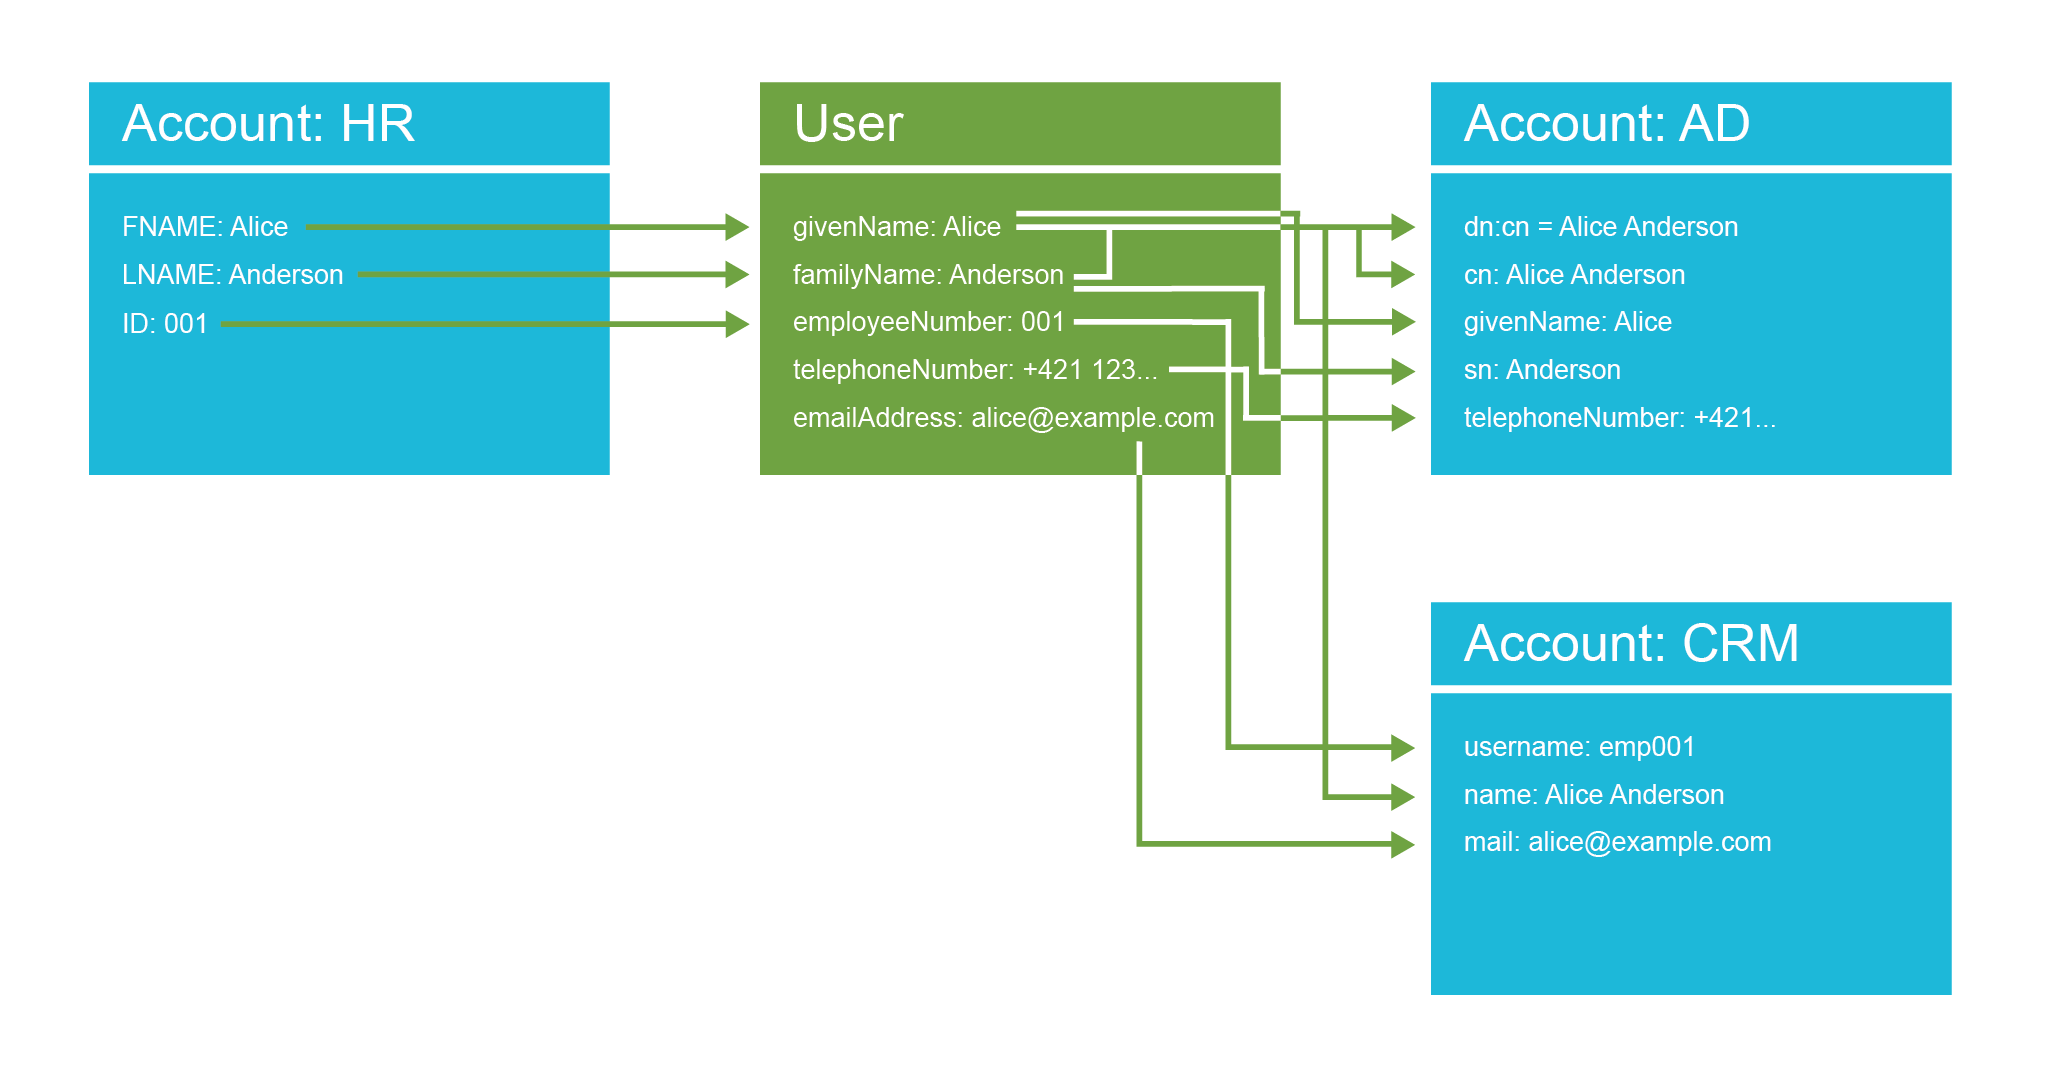
Schema for resource accounts is dynamically discovered when midPoint connects to the resource for the first time. MidPoint interprets the schema and automatically adapts to it. E.g. when midPoint displays information about an account, the user interface fields are dynamically generated from the discovered schema. MidPoint does that all by itself. No extra configuration and no coding is necessary. Except for one thing. We need to tell midPoint which type of account is the right one.
Many systems support variety of object types: accounts, groups, roles, organizational units.
We call such types object classes in midPoint.
Similarly to account attributes, object classes vary from resource to resource.
Therefore, we need to specify which object class is the right one to use for accounts.
Resource definition has schemaHandling section which is designed for this kind of specifications:
resource-csv-hr-minimal.xml<resource oid="03c3ceea-78e2-11e6-954d-dfdfa9ace0cf">
<name>HR System</name>
<connectorRef type="ConnectorType"> ...</connectorRef>
<connectorConfiguration>
<configurationProperties>
<filePath>/opt/midpoint/var/resources/hr.csv</filePath>
<fieldDelimiter>,</fieldDelimiter>
<uniqueAttribute>empno</uniqueAttribute>
</configurationProperties>
</connectorConfiguration>
<schemaHandling>
<objectType>
<displayName>HR Record</displayName>
<delineation>
<objectClass>AccountObjectClass</objectClass>
</delineation>
</objectType>
</schemaHandling>
</resource>This is how we tell midPoint that resource supports object type (using objectType clause) that is interesting for us.
This object type should be labeled as HR Record in midPoint user interface.
The connector will use AccountObjectClass object class when dealing with this type of accounts.
MidPoint now knows how to access our HR records in a form of accounts in HR System resource.
Getting back to our ExAmPLE story, Eric has an HR resource configured. Now he can see the "accounts" that the users have in the HR system. Eric opens the resource detail page in the midPoint GUI and navigates to Accounts panel. There is not much to see yet. We would like to see all the HR records here. However, reading all the accounts may be quite a demanding task, therefore midPoint does not do it automatically. Eric has to click on Reload button to initiate the process for the first time. The list of accounts appears:
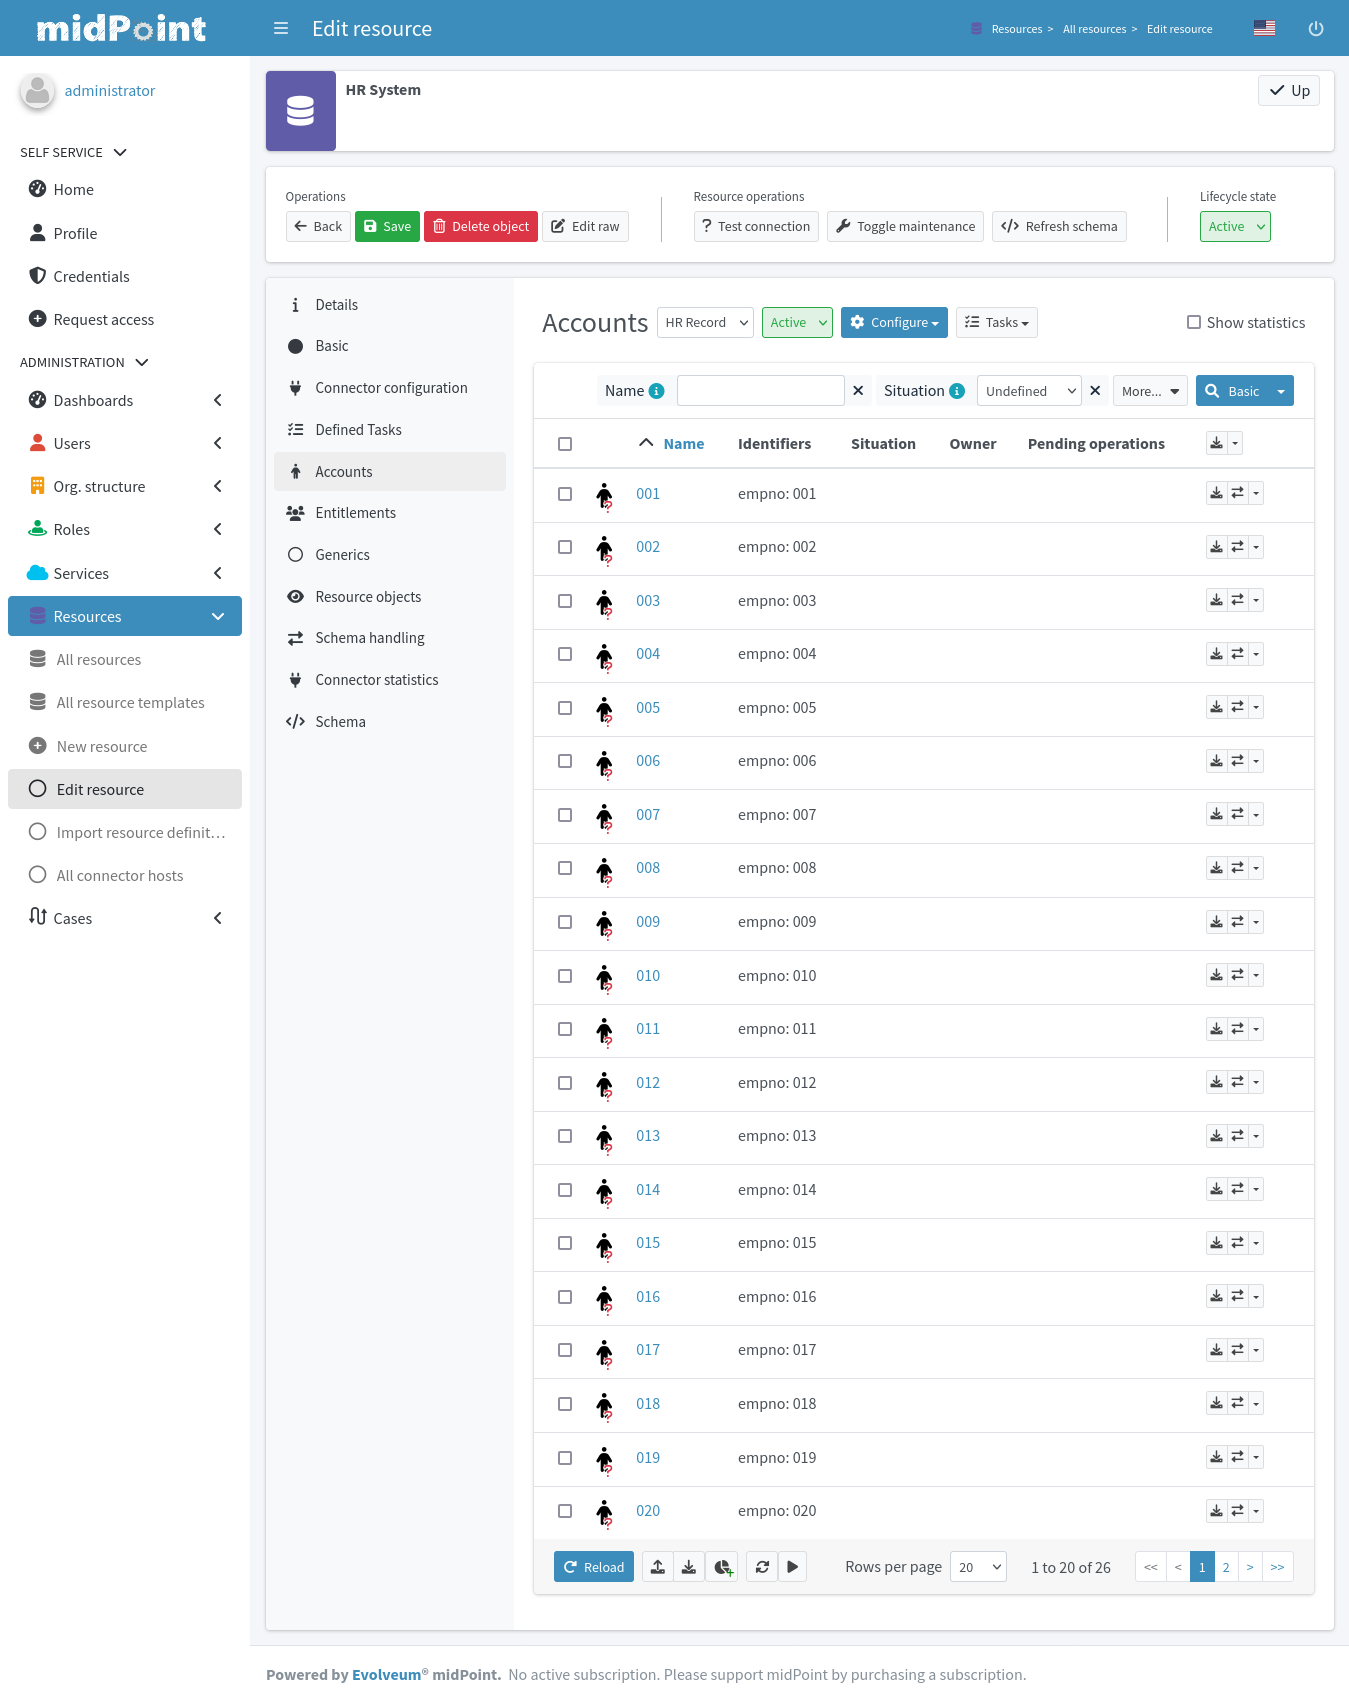
All that can be seen in this list are just employee numbers, because employee number is set as the primary identifier for the HR system. Click on the employee number displays more details about the respective "account". However, these data are not real accounts in this particular case. These are lines in the CSV file exported from the HR database. However, they describe some aspects of user’s identity, therefore midPoint interprets them as accounts. For midPoint, "account" is a generic term used to describe any resource-side data structure that represents the user.
Initial Import
The user is a central concept for any identity management system, and midPoint is no exception. MidPoint needs reliable information about users to work correctly. The HR system is usually a relatively good source of user information. Eric needs to get that information from the HR system into midPoint. He has already set up a resource that connects to the CSV file exported from the HR system. However, the resource does not do anything interesting by default. It has to be configured to pull the information from the HR file into midPoint. What Eric needs is a set of mappings. Mapping is a mechanism for synchronization of attribute values between user and accounts. In this case, Eric needs inbound mappings to import the data. Inbound mappings synchronize the value in the direction from the resource into midPoint. Eric can open the resource definition in the configuration wizard in GUI, and he can add the mappings there. However, Eric likes to know how things work. He looks at the configuration samples again, and he adds the mappings in the XML form. Inbound mapping looks like this:
resource-csv-hr.xml <attribute>
<ref>firstname</ref>
<inbound>
<target>
<path>givenName</path>
</target>
</inbound>
</attribute>This is a mapping that maps the account (HR) attribute firstname to user (midPoint) property givenName.
This tells midPoint to always update a value of user’s given name when the mapped HR attribute changes.
Eric adds similar mappings for all the attributes in the HR export file.
Eric also needs to add synchronization section to the resource definition.
The synchronization section instructs midPoint to create a new user for each new account that midPoint discovers.
This is exactly what Eric wants: create a user for each HR account.
Eric then re-imports the modified XML file into midPoint.
For the curious and impatient readers, complete definition of HR resource is stored in resource-csv-hr.xml file in book samples.
Please see Additional Information chapter for the details.
|
MidPoint is now ready to synchronize the attributes.
MidPoint is ready, however it does not do anything yet.
We still need a task to pull all the data from the HR system.
Eric navigates to the page that shows the list of HR accounts.
There is a Tasks button which can be used to manage tasks that manage the accounts.
Eric clicks on that button and creates a new import task by Create task option in the drop-down menu.
He creates an Import task.
All he needs to do is fill out task name (e.g. HR Import) in the task wizard, everything else is pre-set to reasonable default values.
When Eric clicks on Save & Run button, the task is started, and it runs for a couple of seconds.
After the task is done Eric can look at users in midPoint by navigating in main menu:
Eric can see details about the user by clicking on the username:
This page shows all the details about the user that midPoint knows about.
The details are sorted into several sections. We are going to explain all of that later in this book. For now, we only care about first two sections. The Basic section shows user properties as midPoint knows them. These properties are stored in midPoint repository. MidPoint has quite a rich data model that can be used out-of-the-box, but the GUI only shows those properties that are actually used. The "name", given name and family name were imported from the HR resource and that’s what the page shows.
Let’s have a look at the second tab now, clicking on Projections in the details menu:

The Projections panel shows user’s accounts. Currently, there is only one account. It is the HR record that was used to import the data. Account details are displayed by clicking on account identifier:
The data that are displayed here are really fresh. Account details were retrieved from the resource at the very moment that the account was displayed. This is the difference between user data and account data: user data are kept in midPoint repository, while account data are retrieved from the resource as needed.
The user and the account are linked. MidPoint remembers that this user originated from this specific HR account. If the HR account is modified, then the change is synchronized and applied to the user data. The mappings are not just for the import. They can work continually and keep the account and user data synchronized all the time.
Assignments and Projections
The concepts of an account is all about the reality: it shows the data that are there at this very moment. It shows what is there. However, identity management is all about policies. Policies, by definition, specify what should be there. Policies specify what is right. However, as every citizen knows all too well, the things that are and the things that should be do not always match perfectly. We are no idealists. Therefore, we have designed midPoint from the day one to acknowledge that there may be a difference between reality and policy. It is a prime responsibility of midPoint to manage that difference - and align policy and reality as much as possible in the long run.
This kind of thinking is easy to see in midPoint user interface. There is Projections panel in the user details page. It shows the accounts that the user has right now. It shows the real state in which the accounts are. It shows the reality. Then there is Assignments panel. This panel shows the policy. It shows what accounts, roles, organizations, or services are assigned to the user. It shows what user should have.
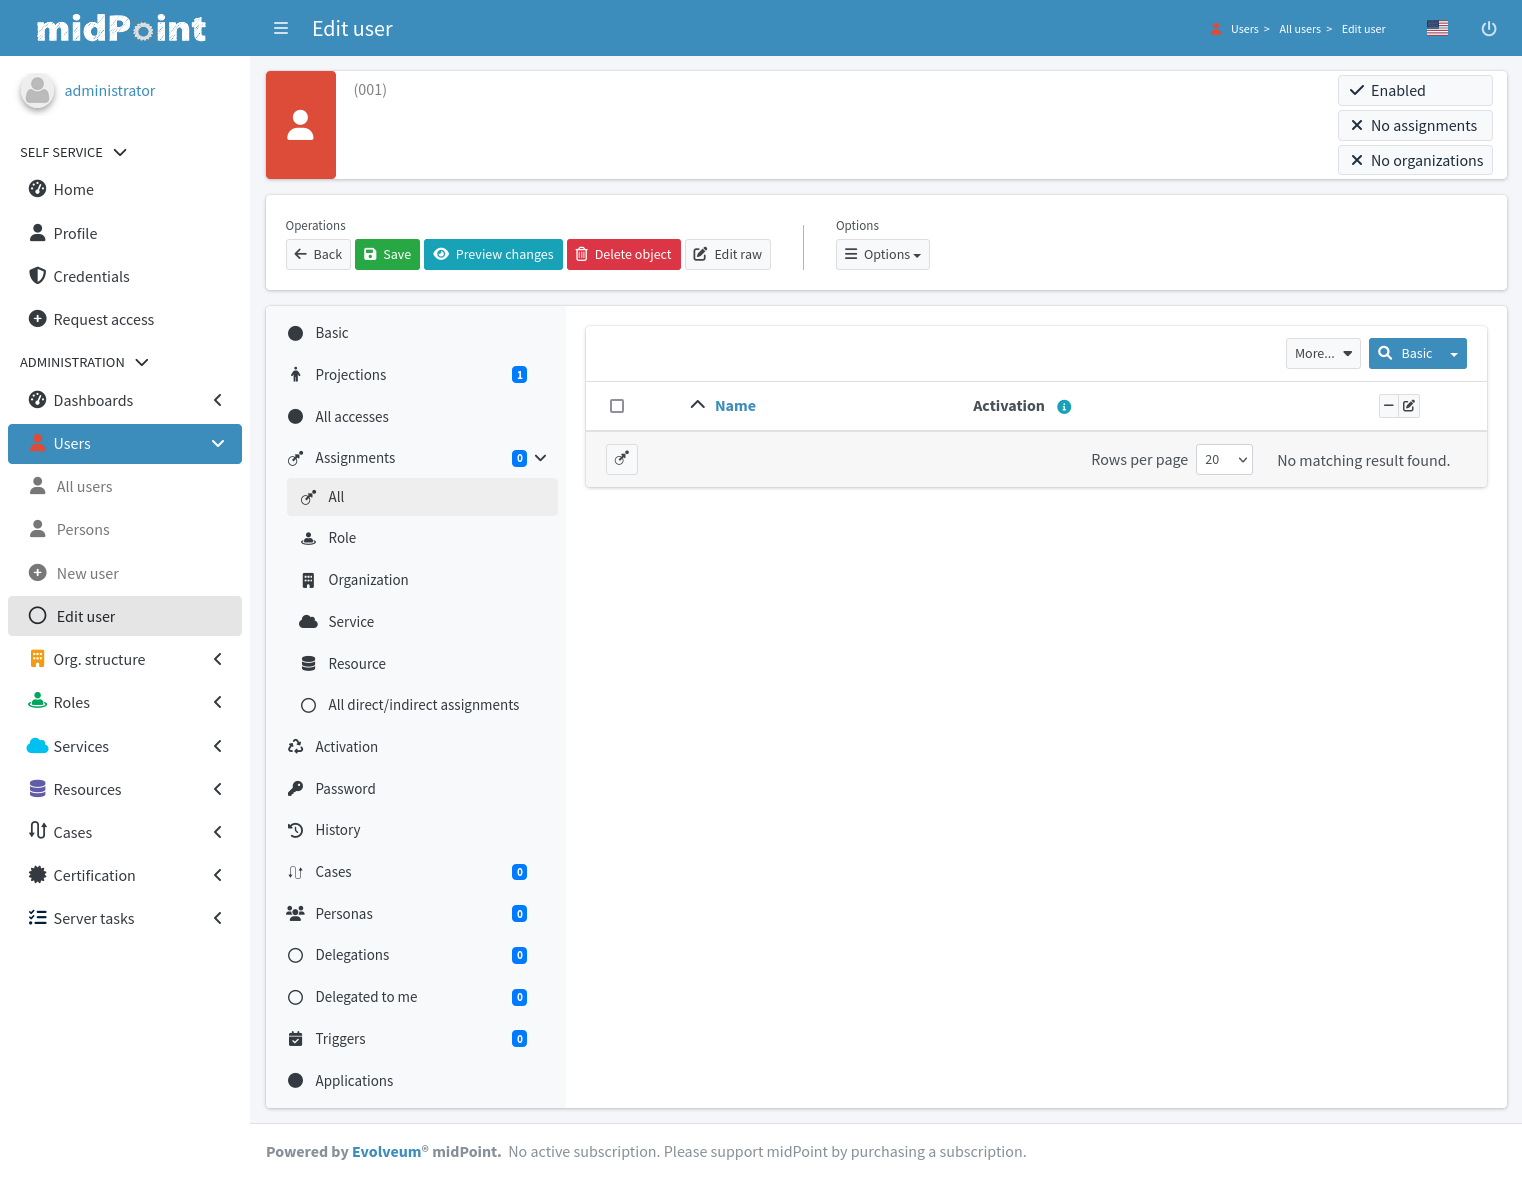
We need a new resource to demonstrate how the assignments work. Therefore, let Eric connect a new resource to midPoint. This time it will be new, clean and empty LDAP server. Eric once again locates the proper example, modifies the configuration and imports it to midPoint. In a while, there is a new LDAP resource. Eric wants to synchronize all the users to the LDAP server. To do that, Eric has to define mappings once again. They will be outbound mappings this time, as Eric wants to propagate data out of midPoint into the (LDAP) resource. We will cover the details of mapping configuration later, let’s just see the results now. We have two resources now:

For the curious, LDAP resource configuration is located in resource-ldap.xml in samples directory.
|
How do we create an account on that LDAP resource? The right way to do this is to let midPoint know that a user should have an account on that resource. In midPoint terminology we say, that we are assigning the resource to the user. Eric needs to edit a user (navigate to user list , select a user), navigate to resource assignments panel by click on the in the details menu, and use unassuming New button on the bottom of empty list to add an assignment for the LDAP resource:
After the click on Save button, a lot of things happen. MidPoint recomputes what the user should have and what the user has. MidPoint detects that the user should have an LDAP account now (because there is a new assignment for it). However, no such account exists yet. Therefore, midPoint creates the account.
When Eric opens the user details again, and navigates to the Projections panel he can see that there are two accounts now:
There is an HR account that was used to create the user in the first place. Then there is an LDAP account that was created as a reaction to a new assignment.
There is reality and there is policy. There are accounts and there are assignments. Ideally these two things should match perfectly. MidPoint will try really hard to make them match. However, there may be exceptions. Careful reader surely noticed that there is HR account, but there is no assignment for that account. Despite that, midPoint has not deleted the HR account. That is because the HR system is what we call a "pure source" system. MidPoint does not write to the HR, it only reads from it. Writes to the CSV export file would be overwritten by the next export anyway, therefore there is no point in writing there. For that reason, the HR resource has an exception specified in its configuration: it allows the HR account to exist even if there is no assignment for it. We can keep the HR account linked to the user by using this method. We can see the data that were used to create the user. This improves overall visibility, and it is a great help for diagnostics of configuration issues.
Roles
It would be a daunting task if Eric had to assign every individual account for every individual resource to every user. Typical identity management deployment has thousands of users and dozens of resources. Such deployment would be very difficult to manage using direct resource assignments only.
There is a better way, of course.
We can use roles.
The concept of role-based access control (RBAC) is a well-established practice.
Indeed, the roles are the bread-and-butter of identity management.
The basic idea of RBAC is to group privileges into roles.
Then the roles are assigned to the users instead of privileges.
Let’s create a Webmaster role.
Then put all the privileges that a webmaster should have into that role.
Let’s assign the role to every user that works as a webmaster.
All of them will get the same privileges.
This simplifies the privilege management.
If there are two webmasters, there is no need to think about the individual privileges that a webmaster should have.
Just assign the role, the role has everything that is needed for a webmaster to do his job.
It is also easy to change webmasters: unassign role from one user, assign it to another user.
It is also easy to adjust privileges if you add a new web server.
Just add the privilege for accessing new server into the Webmaster role.
All webmasters will get that privilege.
That’s the theory. How does it work for Eric? First of all, let’s add a handful of new resources – to get some material for the roles to work on. Now we have four resources: HR, LDAP, CRM and Portal. That’s a good start. Let’s do some role engineering now.
Many organizations have one role that almost every user has.
It is often Employee or Staff role.
This role gives access to all the systems that an employee should have access to: Windows domain login, e-mail, employee portal – things like that.
The ExAmPLE company is no exception.
In this case the basic role should create accounts in two systems:
-
LDAP server: many applications are connected to LDAP and use it for authentication. We want every ExAmPLE employee to have account there.
-
Portal: this is enterprise intranet portal with lots of small services essential for every employee.
It is simple to create such role in midPoint user interface.
Eric navigates to .
Role wizard starts, prompts for a role type.
We cannot create neither application nor business role, as we do not have basic structure for that yet.
Therefore, Eric selects the last option.
He fills in the name of the new role (Employee).
Then he navigates to the panel.
This is where the role definition takes place.
Inducements are almost the same as assignments.
However, inducements do not give access to the role itself.
Inducements give access to the users that have this role.
So they are kind of indirect assignments.
Eric clicks on New button, and adds inducements for LDAP resource into the role, by selecting the Resource tab and selecting LDAP resource.
He repeats the process for Portal resource as well.

Eric clicks the Save button, and the new role is created.
Now it is ready to be assigned to the users.
Eric goes on and assigns Employee role to user Bob by editing the user and adding a role assignment:
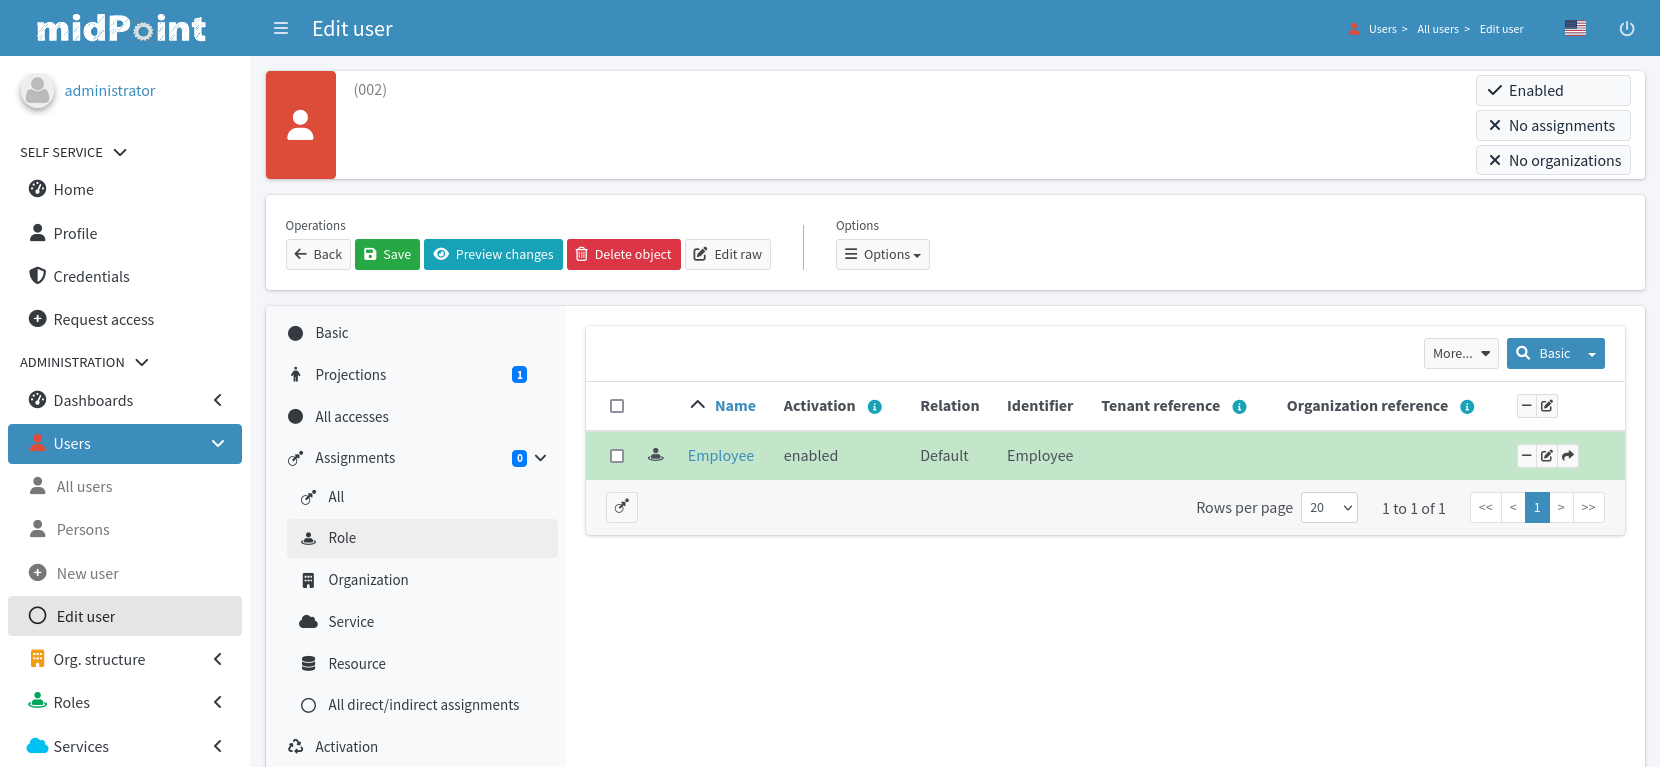
MidPoint automatically creates all the accounts given by the role after the modification is saved:
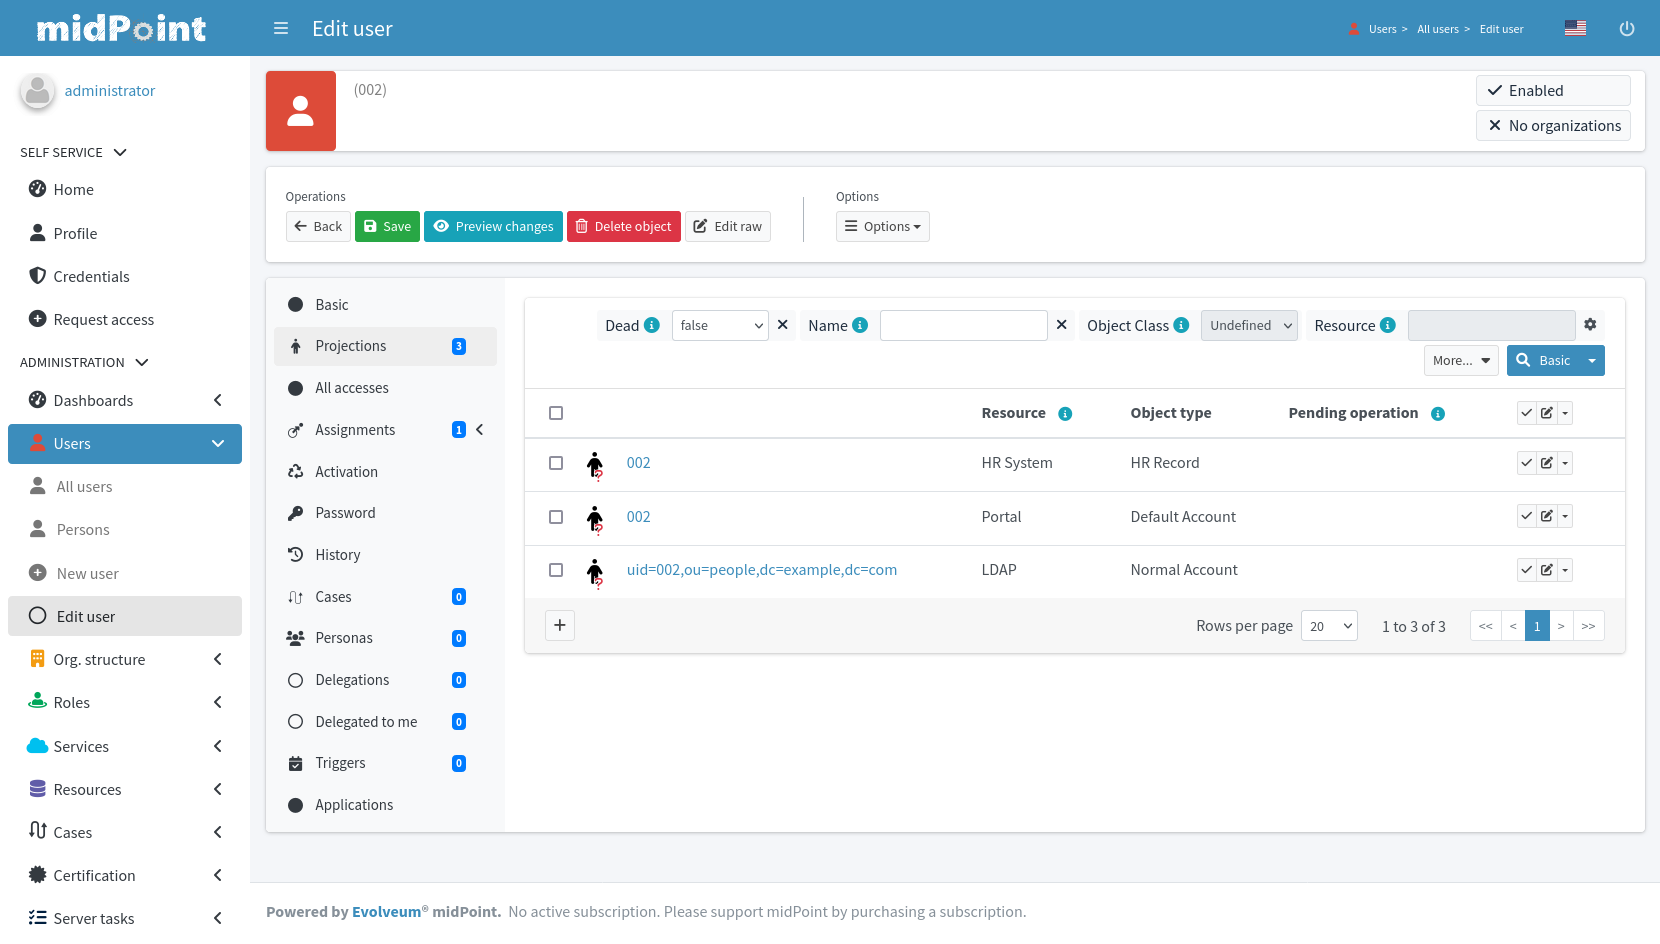
There is the HR account that was used to create the Bob user record in the first place.
Then there are the two accounts that were created because Bob has the Employee role: portal account and LDAP account.
This operation works in both directions: if Eric unassigns the Employee role, the accounts given by the role will be deleted.
Eric can create any number of roles like this: roles for sales agents with CRM access, roles for sales managers with higher CRM privileges, roles for assistants and clerks, roles for everybody.
MidPoint is designed to handle large number of roles.
Each role can have its own combination of resources and entitlements.
MidPoint seamlessly merges the privileges given by all the roles a user has.
E.g. if two roles give CRM access to the user, only one CRM account will be created.
If one of these roles is unassigned, then CRM account remains there.
The account is not deleted yet because it is given by the other role.
Only when the last CRM role is removed, that’s the point where the account gets deleted.
MidPoint takes care of all that logic.
|
Archetype
Strictly speaking, role is not an ideal tool to use for Employee access.
Employee is usually more than a role, it is a type of user.
We would probably want to assign employees their own icon, we want Employee type to appear in quick access menus, and so on.
MidPoint has a very special mechanism to do that: archetypes.
However, you do not need to forget everything that was said about roles so far.
Archetypes work exactly the same as roles do, with assignments, inducements, and all of that.
This is how we do it in midPoint: one generic mechanism, reused for many things.
|
Of course, there is much more midPoint roles can do:
-
Roles can assign accounts to groups, grant the privileges and manage account entitlements.
-
Roles can mandate specific account attribute values, e.g. clearance levels, compartments, etc.
-
Roles may contain custom logic (expressions, scripts).
-
Roles may be hierarchical: there may be roles within roles.
-
Roles may be assigned for a specified time.
-
Roles may be conditional and parametric.
-
… and much much more.
Roles are really the essence of identity management. We will be dealing with assignments, roles and role-like objects in almost all the parts of this book.
There Is Much More
Eric the Engineer has done a few basic steps to configure midPoint as an identity management system for his company.
However, this is still a very basic configuration.
It is only a beginning.
Careful readers have already noticed a lot of things that need to be done.
E.g. employee full name is not automatically generated.
Employee numbers are used as identifiers.
We would like to have something that is more user-friendly instead.
We need to automatically assign the Employee role instead of doing that manually.
And so on.
There are still a lot of things to improve.
Fortunately, all of that is very easy to do with midPoint, once you know where to look.
We will be dealing with all these things in the rest of this book.
New functionality will be administered to the ExAmPLE solution in small doses in each chapter – together with a proper explanation of midPoint principles.
MidPoint is a very flexible and comprehensive platform, and there are still a lot of things to learn.
What MidPoint Is Not
Now you probably have some idea what midPoint is. However, it is also very important to understand what midPoint is not. Identity and Access Management (IAM) field is a combination of many technologies, and it may be quite confusing sometimes. That is perhaps the reason why the midPoint team occasionally gets questions about midPoint functionality that simply do not make much sense.
First of all, midPoint is not an authentication server. MidPoint is not designed to validate your username and password. Yes, midPoint maintains data about users (including passwords). However, the data model that midPoint maintains is quite complex. It is not meant to be exposed to applications directly. That would not be very efficient.
If you want midPoint to manage users, but you also want your applications to have a centralized authentication service there is a solution: publish the data to the LDAP server. Connect LDAP server to midPoint as a resource, and let midPoint populate and maintain the LDAP sever data. The application will not talk to midPoint directly. They will talk to the LDAP server. This is better for everybody: LDAP is a standard protocol, well-supported in many applications. LDAP servers are also extremely fast and scalable. Therefore, use the combination of midPoint and an LDAP server of your choice. That’s what people usually do and it works perfectly.
Of course, we said that LDAP is not authentication server either. That’s right, it is not. However, LDAP can still work for simple authentication scenarios. If you need more than that, connect a proper authentication server to LDAP. That is what most authentication servers expect anyway.
As midPoint is not an authentication server it obviously is not a single sign-on (SSO) server either. If you want SSO, you will need a dedicated SSO server. There are plenty of SSO servers to choose from in both the closed-source and open-source worlds. You will also need a scalable directory system (LDAP) to store the data for the SSO server. MidPoint will be pleased to manage that LDAP server for you.
One of the things that seems to be shrouded in a lot of confusion is authorization. To get the record straight from the beginning: midPoint is not an authorization server. It is not a policy decision point (PDP), and it definitely is not a policy enforcement point (PEP). You cannot rip authorization out of your application and just "use midPoint for that". That does not work.
You can think of midPoint as a policy administration point (PAP). MidPoint has a lot of sophisticated authorization-related logic inside its core. However, that logic is not designed to answer questions such as "Is subject S authorized to execute operation O on object X?". MidPoint logic is different. MidPoint is not concerned with making authorization decisions. It is concerned about managing the authorization policies. MidPoint sets up the authorization policies in target applications. The applications evaluate these policies themselves. This is a much more efficient and more reliable method. Unlike authentication, the authorization decisions are done all the time. Authorization is evaluated at least once per every request. If the application makes these decision internally, then there is no need to a round-trip to the authorization server. Performance is significantly increased. Also, there is no single point of failure. MidPoint failure will not interrupt authorization flow, because the application has all the data inside. One less component to cause a failure. Yet, the policies are centrally managed by midPoint. When a policy changes, midPoint updates all the affected applications. You get all the benefits without the usual drawbacks.
MidPoint does what it is supposed to do: it manages identities, entitlements, organizational structures and policies. MidPoint does not do things that are not necessary. It does not do the things that other technologies already do well. MidPoint does not reinvent the wheel. There is no need for this. MidPoint is not the wheel. MidPoint sits above all the wheels. MidPoint is the chauffeur.
3. Installation and Configuration Principles
The Guide is definitive. Reality is frequently inaccurate.
The Restaurant at the End of the Universe by Douglas Adams
This chapter provides instructions for installation and initial configuration of a midPoint system. Installation instructions provided in this chapter focus on small installations, suitable for evaluation, experiments, and development of midPoint configurations. Most of us are going to start with an environment like this. Deployment of midPoint in a production setting is an entirely different matter, suitable for its own chapter.
Requirements
MidPoint will run on almost any machine. Mid-range laptop is fine for personal use of midPoint. MidPoint needs approximately 4GB of RAM, which is perhaps the only real limiting factor.
Theoretically, MidPoint is platform-independent, it can run on any environment where Java is running. However, devil is in the detail. Individual environments and operating systems have their peculiarities. Therefore, only some environments are supported by Evolveum.
Linux is an operating system of choice for production use of midPoint. However, midPoint will be happy in Windows or macOS environment on your laptop for non-production use. Some midPoint releases have production-grade support for Windows environment as well.
If you look for more formal system requirements definition, then you will find that in midPoint docs (see Additional Information chapter at the end of the book).
Installation
There are several ways to install and use midPoint.
-
Docker: MidPoint can be installed from docker images published on Docker Hub. Docker, being a container platform, simplifies installation to downloading and running the image. Even that is further simplified and automated with Docker Compose. This is ideal method for exploration, experiments, testing and demos. Docker Engine is needed to run the images, which can run on almost any computer. Evolveum provides convenient script to set up and manage midPoint environment for docker-based installation.
-
Kubernetes: MidPoint can be installed to Kubernetes platform. This is a fully cloud-native method to deploy midPoint. Kubernetes deployment is recommended for production use of midPoint. Kubernetes platform or cloud environment (AWS, Azure, Google cloud) is needed for this method. This installation method is not covered in this book.
-
Distribution package: MidPoint is distributed in a form of package, which is built from source code. The package contains binaries, scripts and other files to run midPoint. Java Runtime Environment (JRE) is needed to run the binaries, as well as knowledge of system administration techniques. This method is supported for production use of midPoint. It is recommended for people that prefer the traditional installation approach.
-
Source code: MidPoint is an open source software, complete source code is available. The source code can be built to obtain binary packages. Java Development Environment (JDK) is needed to build and run the binaries, as well as some knowledge of software development and system administration techniques. This approach is recommended for deep experimentation and special scenarios, and for people that need to build their own source code.
It is strongly recommended to start with the Docker method. The descriptions and examples in this book assume that Docker Compose installation is used.
Docker Compose Installation
Docker provides a popular method to distribute and run containerized software. Evolveum is building and publishing docker images for every midPoint version. In addition to that, Docker Compose definition file is provided for easier start. Docker Compose file describes how the necessary containers are assembled, creating a simple environment with all the necessary components.
MidPoint installation described in this chapter is a very basic one. It is ideal for initial exploration of midPoint, development of midPoint configurations, simple testing, demonstrations, exploration and similar purposes. It is a very convenient installation, and it provides all you need to get started.
Following steps are applicable to Linux and macOS environment. Windows users may use Docker Desktop running on Windows Subsystem for Linux (WSL). Please refer to Evolveum documentation regarding Docker Compose for more details.
|
Not for production use
MidPoint installation based on Docker Compose is not meant for production use.
|
You will need:
-
Docker Engine installed on your machine. It is available for Linux, Windows and macOS. Please follow Docker installation instructions. Make sure that Docker Compose is installed as well. Special packages are needed to support compose in some operating systems, e.g.
docker-compose-pluginordocker-compose-v2is necessary in Debian/Ubuntu Linux. -
MidPoint Docker Script (
midpoint-quickstart.sh) downloaded to your machine. The script takes care of initialization of Docker Compose environment for midPoint. The script can be downloaded from Evolveum download page. Detailed instructions about usage of the script can be found on Quickstart page in midPoint documentation.
Once the Docker is installed and the script is downloaded, there is still some preparation to do:
-
Create a new directory for the environment. Any directory would do.
mkdir midpoint-demoChoosing a relatively unique name for the directory would be a good idea, as Docker Compose is using name of the directory as a prefix for container names. Therefore
midpoint-demois better name thanmidpointordemo. -
Copy the script to the new directory:
cp Downloads/midpoint-quickstart.sh midpoint-demo/ -
Enter the newly-created directory:
cd midpoint-demo -
Initialize and start midPoint environment by running the
midpoint-quickstart.shscript:./midpoint-quickstart.sh upThe script needs to be executed from the dedicated directory created in the first step. When started, the script initializes the environments. It creates Docker Compose definition file (
docker-compose.yml) and midPoint home directory (midpoint-home), setting correct permissions for easy management. Then the script starts docker containers.
|
Docker and sudo
The midpoint-quickstart.sh script may ask for your password, as it is using sudo to start Docker containers.
Using sudo is a recommended method to manage Docker containers in a secure way.
There are configurations that allow users to start the containers without sudo, yet these are not considered secure.
As midPoint is designed with security in mind and it is supposed to be secure by default, it uses the sudo method.
|
Once the environment is started, midPoint user interface can be accessed as a localhost service at port 8080.
+
You can start working with midPoint now.
Log in as administrator.
The script has generated a random initial password (remember: secure by default), which can be used to log in.
|
Localhost only
The Docker exposes midPoint as HTTP service on localhost port 8080.
To make things simpler and quicker, this midPoint instance is not secured properly.
It is using HTTP instead of HTTPS.
However, this deployment is still reasonably secure, as it is exposed only on local network interface (localhost).
It is not accessible over network.
This is a very explicit decision to limit the exposure of new midPoint instance until it is properly secured.
|
In case that midPoint does not start, the problems are indicated in the logfile.
The logfile (midpoint.log) is located in midPoint home directory.
In our little Docker Compose environment, the logfile can be found at the following path:
midpoint-home/log/midpoint.log
If there is any problem, it is likely that detailed problem description can be found at the end of the log file. When desperate, please refer to the Troubleshooting chapter.
When not needed, the containers can be shut down:
./midpoint-quickstart.sh down
When shut down, midPoint keeps all the data and state in the repository. The data will be available when the container is started again.
In case that there is a need to purge all data and re-start on a clean playing field, persistent database data can be deleted by using the clean command passed to the script:
./midpoint-quickstart.sh clean
|
Behind the scenes
The script is using Docker Compose to do quite a lot of things behind the scenes.
First of all, the script creates midPoint home directory (midpoint-home), setting correct permissions for both the docker container and you can access it.
Then the script uses Docker Compose starts up midPoint repository, which is a PostgreSQL database instance.
The database is using a persistent volume to store its data, otherwise you would lose all your work on every re-start.
Then the database is initialized with proper configuration and database schema.
Finally, midPoint container is started and connected to the database.
The container generates a random administrator password, which is retrieved by the script and displayed to the user.
While it may look like a single "midPoint" instance to you, it is in fact several cooperating containers, all orchestrated by Docker Compose.
|
Containerized Book Samples
Standard Docker Compose definition for midPoint contains just the basic components: midPoint server and PostgreSQL database.
However, for the purposes of this book, we are going to need a little bit more - to have some fun with midPoint.
We are going to need an LDAP server, CSV files and some additional database tables to play the role of resources.
Of course, the stock docker compose definition can be extended to include all that.
However, the primary goal of this book is to learn midPoint.
Messing around with docker may be a distraction.
Therefore, there are already containers configured to run the environment suitable for trying examples provided in this book.
The containers are located in the docker directory in book samples (see Additional Information chapter for details).
There are two configurations, first one corresponds roughly to the beginning of chapter 5 (Synchronization), the other corresponds to end of chapter 10 (organizational structure).
There are README files in both directories, explaining the details.
The containers have convenient book-example.sh script, which can be used to set up, start and re-set container state.
This script is meant for Linux, as primary author of this book is a hopeless Linux enthusiast.
There are no Windows or macOS versions.
However, this is open source world, contributions are more than welcome.
On-Line Demo
If you want to have just a quick look at midPoint, there is on-line midPoint demo located at the following URL:
The demo has some basic configuration to demonstrate midPoint features. There are several resources configured for synchronization, role-based access control (RBAC) is set up, there is organizational structure, some policies, and many other things. Link to the demo documentation is provided at the login page.
| The demo is shared among all the users, therefore it may not be in a pristine state when you log in. The demo is re-set to the original state once a day. |
MidPoint User Interface
When local midPoint instance is started, use the following URL to access midPoint user interface:
Log in with the following credentials:
Username: administrator
Password: randomly generated at first start, displayed by the start script
|
HTTP
Oh yes, the URL is really using insecure HTTP instead of HTTPS.
This is certainly not suitable for production use, as we have already mentioned several times.
However, it is reasonably safe for local, non-production use.
When using the provided docker configuration, midPoint service is available on localhost only, it is not accessible from the network.
This setup is reasonably secure for use on personal computers.
We did not want to complicate the matter by acquiring TLS certificates for HTTPS use.
However, you will need to do that for production use, in order to secure midPoint.
|
Now you are logged-in as the administrator.
This user has superuser privileges, therefore you can see everything, and you can do anything in the midPoint user interface.
MidPoint user interface is structured. It has the same layout and controls for all the user interface areas:
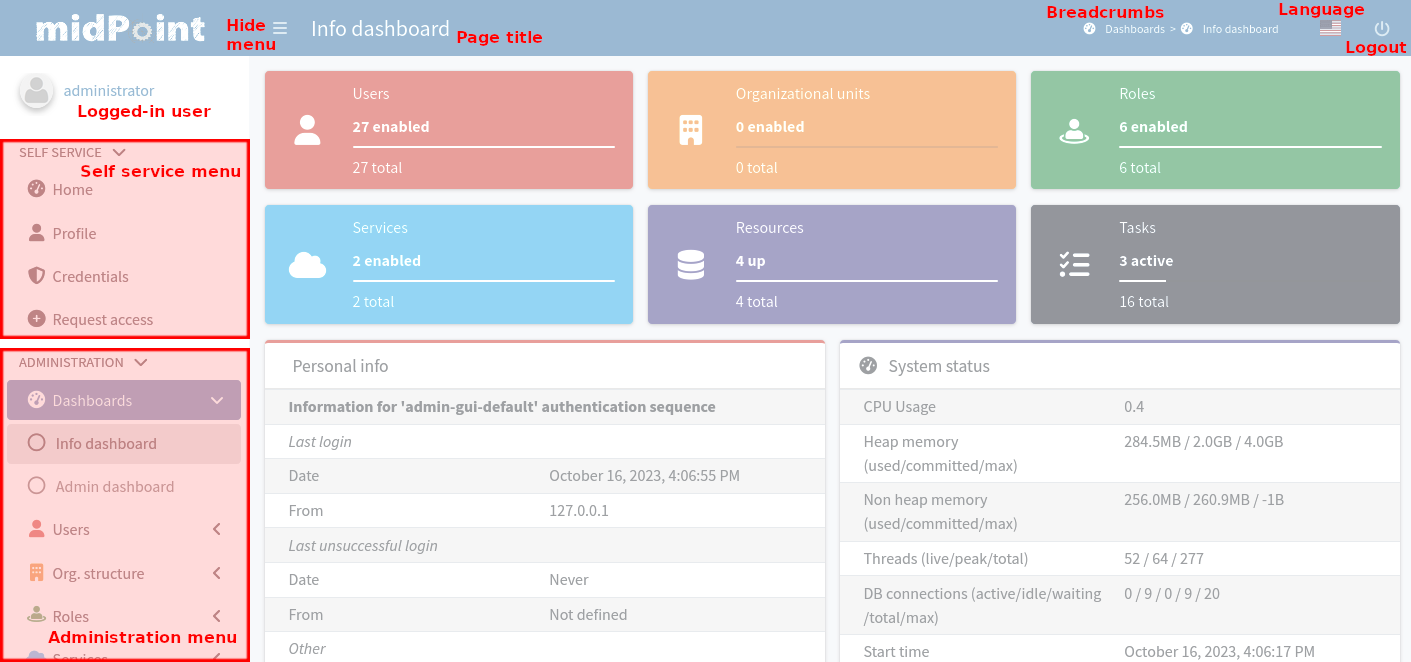
Primary tool for user interface interaction is the menu. MidPoint user interface is functionally divided into three parts, therefore there are also three parts of the menu:
-
Self-service user interface deals with the things that the user can do for oneself: displaying list of account, changing password, requesting a role and so on. This is relatively simple part of the user interface. It is often accessible to all the users.
-
Administration user interface deals with management of other users, roles, organizational structures and similar midPoint objects. This is a very comprehensive and considerably complex part of the user interface. Usually only privileged users have access to this part of the user interface. This part of user interface is often used to support delegated administration and role management therefore it is also meant for security officers, resource owners, role engineers and similar expert users.
-
Configuration user interface deals with configuration of midPoint system itself. It is used to customize midPoint behavior, set fundamental policies and rules that form the foundation of midPoint deployments. This part of user interface is usually used only by identity management engineers.
The menu can be hidden by clicking on the button at the top of the screen. The top bar also contains the title of the current user interface page and breadcrumbs. Breadcrumbs show where you currently are in the user interface and how you got there. The breadcrumbs can be used to "find your way home" and back to the previous page. The use of browser Back button is not recommended. Please use the Back buttons that are present in midPoint user interface, or use breadcrumbs.
User Interface Areas
MidPoint user interface is quite rich. Following list provides short description of the most important parts of the user interface.
-
Home page gives a brief status about users own accounts, requests, work items and so on. This is a page designed to be the first page that will be displayed to the end user after log in to midPoint.
-
Profile page allows users to see or edit their own profile.
-
Credentials page allows users to change their own credentials, such as password.
-
Request access page allows users to select the roles that they need, and then request assignment of the roles.
-
Dashboard pages shows a couple of dashboards designed to provide a lot of useful information at the first sight. The built-in system dashboard shows statistics about midPoint installation. Dashboards can be customized to suit needs of a particular deployment.
-
User pages list users in midPoint, allows to create and edit users.
-
Organizational structure pages show the organizational structure trees. Many parallel organizational structures can be managed here, such as tree-like functional organizational structure, flat project-oriented structure, role catalogs and so on.
-
Role pages allow to list and manage roles. Roles can be defined and maintained in this part of the user interface.
-
Service pages allow to list and define services, such as applications, devices, servers and so on.
-
Resource pages list and manage identity resources. New resource can be defined here, associated with the connector, tested, etc.
-
Cases pages list the things that the users have to do. Work items are created if user has to approve something or if there is some manual step in the process.
-
Certification pages deal with access certification (re-certification, attestation). Certification campaigns can be created and managed here.
-
Server task pages show the tasks that are running on midPoint servers. These may be scheduled synchronization tasks, import tasks, running user requests – everything that runs on the servers and cannot be executed immediately in a synchronous way.
-
Nodes page lists processing nodes in midPoint cluster.
-
Report pages allow defining and running reports. These pages typically deal with scheduled printable reports.
-
Simulation pages allow running simulated operations, predicting operation result without causing any damage.
-
Audit log viewer can be used to look at audit log, reviewing record of all past operations.
-
Configuration area contains many pages that manage midPoint configuration: system default configuration, repository objects, logging, bulk actions and so on.
-
Archetype pages define specific object types that can be used to customize behavior of midPoint objects.
-
Repository object pages for accessing objects in midPoint repository, used for low-level manipulation of midPoint configuration and data.
User Interface Concepts
MidPoint user interface is using the same concepts and controls in all its parts. For example all the lists of all the objects (users, roles, …) look like this:
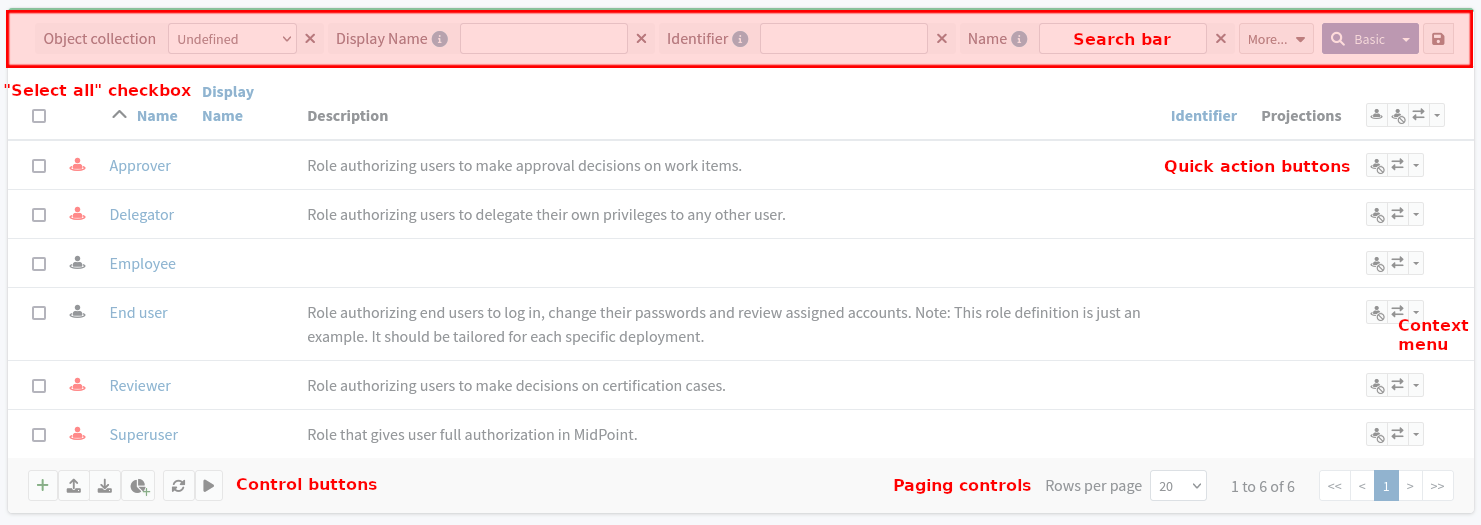
Each row represents one object: user, roles, service, task, etc. There is also a color-coded object icon. The search bar at the top can be used to look for a specific object or to filter the object view. Right side is reserved for action buttons. Buttons in the table header trigger actions that apply to all selected objects. Buttons in each row trigger actions that apply only to that individual object. The buttons in the bottom-left corner execute global actions, such as creating or importing new object, exporting objects and refreshing the view. Paging controls are in the bottom-right corner.
MidPoint has a unified color-code that makes the navigation easier. Users, roles and other object types have their specific color and icon. This indicates the object type, and it is used whenever possible: menu, information boxes, lists, box title accents and so on. The primary colors and icons are shown in the dashboard:
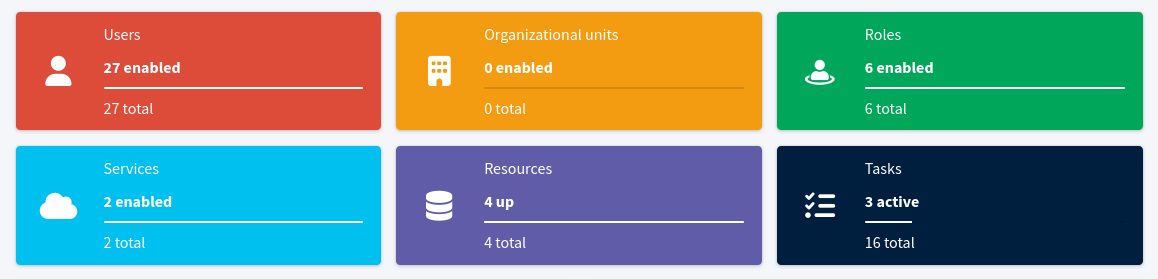
All user-related controls are red, all controls that deal with organizational structure are yellow. Roles are green. And so on. This color code is applied consistently through the midPoint user interface.
Similar color code applies to object icons when displayed in user lists. However, the color that is used there does not indicate object type, but rather an archetype. Archetypes are subtypes that are often used to distinguish similar objects. For example, archetypes can be used to sort users to employees, contractors, customers and so on. Look and behavior of "archetyped" objects is configurable. Default midPoint configuration contains just a couple of archetypes. Those archetypes apply red color to system users and roles.
| All objects are equal in midPoint. MidPoint will handle users, roles, organizational units and services in the same way. The lists used to display these objects are the same, the pages that display object details are the same. All the objects have properties, they can be enabled/disabled in the same way, they are subject to authorizations in the same way and so on. It is a midPoint philosophy to design several powerful principles, and then apply them over and over again. |
Object Details Page
When a user clicks on a name of any object in the object list then object details page appears. The detail pages for common midPoint objects, such as user or role, are very similar to each other. They have the same layout and controls. E.g. user details page looks like this:
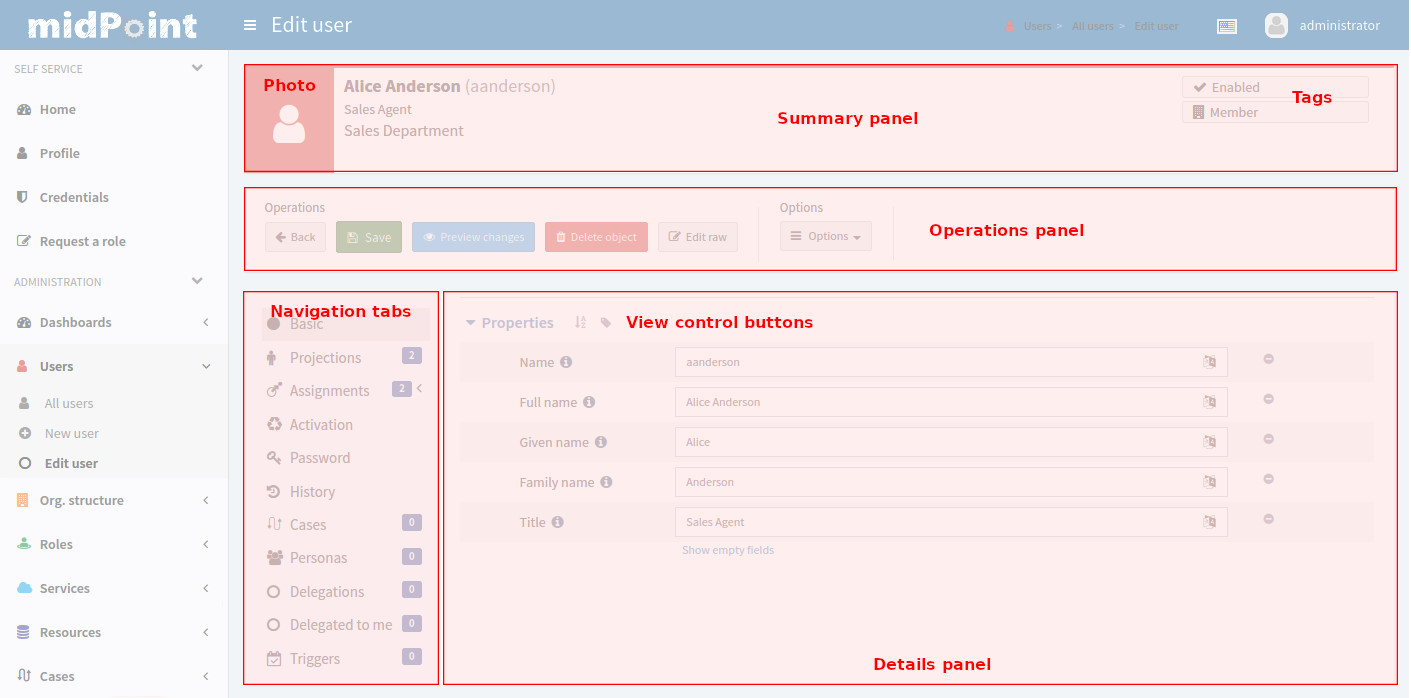
The screen below the information area is divided into several panels. There is a summary panel at the top of the page. This is an information area which shows user photo (or icon) and provides some basic information such as user identifier and title. It also shows where the object belongs in the organizational structure. There is also a couple of "tags" that show interesting details about the object: whether the object is enabled, whether it has special privileges and so on.
Below the summary panel, there is a panel with operation controls. There are buttons to save the changes, go back to the previous page, controls to set operation options and so on.
The data are displayed in details panel. However, midPoint data structures are often quite complex. Displaying the data in their full complexity would make it very difficult to understand. Therefore, the data are divided into several parts, each containing a portion of the data. Navigation menu is displayed left to the main details panel. It allows easy navigation through data structures, each displaying a specialized panel with object details.
The first item is perhaps the most interesting one. It contains fields that show basic object properties: the attributes of the object. Properties are displayed, and they can be edited – depending on the authorizations of currently logged-in user. The other panels shows more complex information about the object. E.g. activation panel shows whether the object is enabled or disabled, it shows the activation dates and other activation details. The password panel provide password management functionality. And so on.
The view control buttons present in the details panel can be used to adjust the way the information is presented. These buttons control sorting of the fields, can toggle metadata display and there may be additional control buttons for more complex fields. MidPoint shows only some fields by default, to make the presentation easier to read. For example, most empty fields are not shown by default. There is a small Show empty fields button under the fields than can be used to display empty fields.
The content of the details panel changes its form, adapting to the type of displayed information. Basic properties are shown as a series of editable fields. Content of some panels is similar to the Basic panel, displaying a set of fields. Other panels provide lists of more complex data structures such as projections, assignments and personas.
MidPoint user interface often needs to present objects that are internally quite complex. It does not make sense to present all the details at once. These objects need to be presented in quite a compact form that can be expanded to show the details. This applies to list of user’s accounts, assignments, role inducements, etc. The objects are initially displayed as in a form of a simple list, displaying only the basic data:
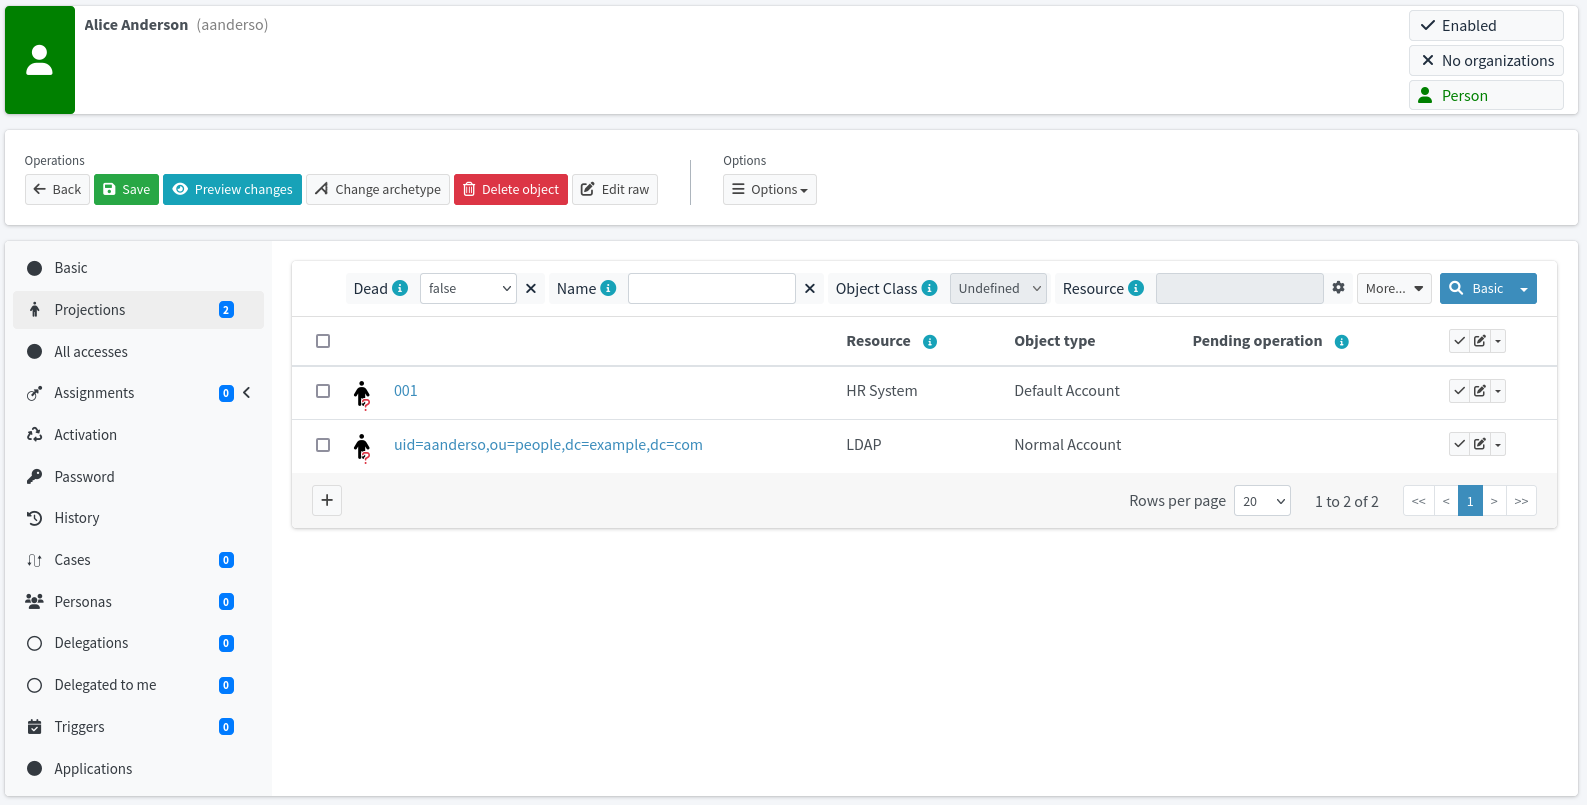
The list above shows user’s projections. Those are usually accounts that are linked to user object. Click on account name shows account details:
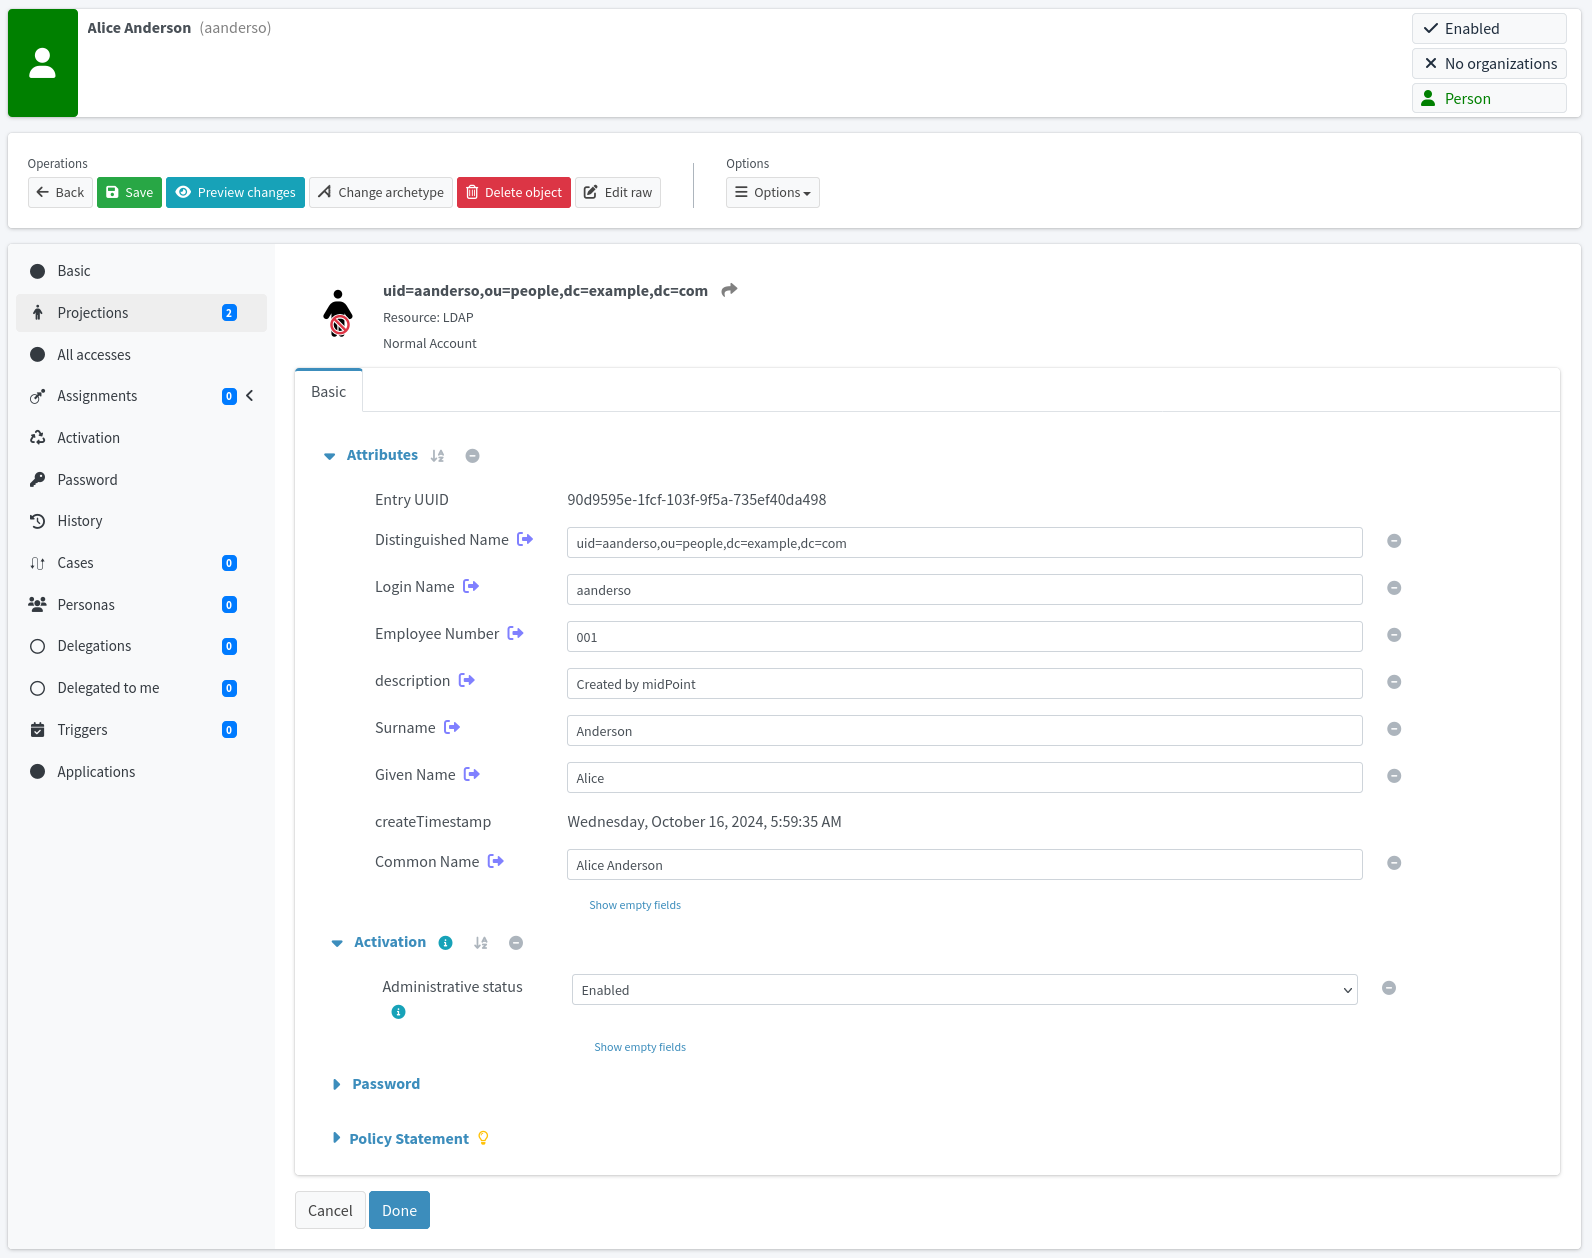
Account details display is shown in place of user details. This may be slightly confusing. However, account details can be often complex, therefore all the available screen space is needed to display them. The Cancel and Done buttons at the bottom can be used to return to list of projections. Click on Done button will not start the operation yet, it only changes the view. Therefore, do not confuse those buttons with Back and Save buttons located in the control panel.
| Perceptive reader is certainly curious about the small red question mark in the corner of the account icon. This corner of the account icon is a place where a special marker would be displayed to indicated disabled accounts. There would be no such marker for enabled accounts. Such visual indicators are very helpful when managing identities of larger user bases. However, this is an LDAP account. There is no standard way to disable an account in LDAP world. Many LDAP servers implement their own proprietary mechanisms, and the OpenLDAP server that we are using has no such mechanism at all out-of-the-box. Hence the question mark, indicating that the activation status of the account is not known. |
Each panel provides the information in an editable way, provided that the user has adequate privileges to edit the information. When the data are edited, the changes can be confirmed by using the Save button in the operations panel. Saving the changes is a universal way how to start almost any operation: change of user properties, assignment of roles, change of password, user disable, etc. When you make edits in any of the panels on the details page, then nothing really happens yet. MidPoint just remembers what you are editing. The operation is executed only when you click the Save button. This is our method to execute several changes in one operation. It may require some time to get used to it. Just do not forget to click the Save button when you are done editing.
Operation options are used to modify the behavior of the operation. These options may force execution of operations that fail to pass midPoint internal checks. There is an option to reconcile the data even if midPoint thinks that reconciliation is not needed. And so on. Checking or unchecking these options influences the way how midPoint executes the operation.
MidPoint Configuration Basics
The principle of midPoint configuration is quite different from what would a typical system administrator expect. There are almost no configuration files in midPoint. MidPoint is storing the vast majority of its configuration in its configuration database. There are several reasons for this:
-
MidPoint configuration is complex. MidPoint configuration is not what a typical system administrator would think of like a "configuration". It contains numerous resource definitions that in turn contains mappings that in turn may contain scripts. There are roles, policies, templates, … and these objects are too complex to be expressed in simple configuration files.
-
MidPoint configuration is scalable. It is no exception that a midPoint deployment has thousands of role definitions or organizational units, tens of resource definitions and a significant number of templates and policies. All of that needs to be stored efficiently, for midPoint to handle deployments that manage millions of identities. The configuration also needs to be searchable. Managing thousands of roles in plain text files simply won’t work.
-
MidPoint configuration needs to be available. There are midPoint deployments with several nodes working together in a cluster. Configuration change done on one node has to be seen by other nodes. Simple configuration files would not work here.
Therefore, midPoint has a completely different approach to configuration. The configuration is stored in a form of well-defined structured objects in the midPoint database. We call that database midPoint repository.
Configuration Objects
Everything is an object in midPoint. Every piece of configuration is represented as a structured object and stored in midPoint repository. Object may look like this:
<role oid="8ebab0bc-7e7e-11e6-a7bc-57de1cd45ecc">
    <name>Basic User</name>
    <description>Basic user role. Almost all users have it.</description>
    <requestable>true</requestable>
    <inducement>
        <targetRef oid="f92e67c2-7e7e-11e6-a306-7bf6aa2e8c61" type="RoleType"/>
    </inducement>
</role>
Every object has its identifier. We call that identifier OID, which stands for "object identifier" (it has nothing to do with LDAP or ASN.1 OIDs). OID is usually randomly-generated universally unique identifier (UUID). OID value has to be unique in a whole system. This identifier is persistent – it is assigned to the object, and it is never changed. OID is used for internal purposes, and it is almost never displayed to midPoint user.
Every object has a name. Name is human-readable, and it can change any time. The value of name is usually displayed to users. This is the values that ordinary users understand as an identifier.
Then there are other object properties - or rather items. Each type of midPoint object has a slightly different set of these items. That’s what we call schema. The items may be simple properties such as string, integer or boolean values. There may be complex structures, and references between objects. MidPoint data model is quite rich. It is in fact so rich that its description will take better part of this book, because description of the data model is also description of midPoint features.
You can see midPoint configuration objects in midPoint user interface by navigating to and selecting object type. The following picture shows objects of type "Role":
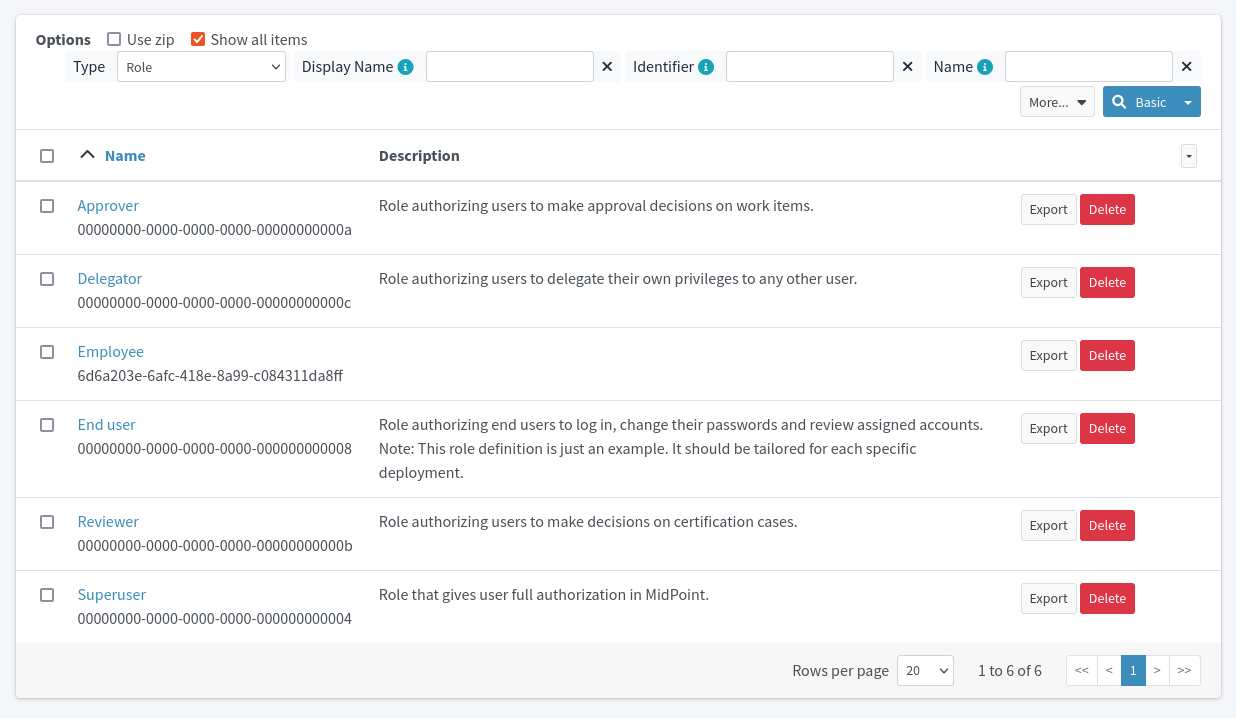
XML, JSON and YAML
The objects are stored in the midPoint repository in a native form which is hidden from midPoint users. However, the objects also have a human-readable representation. They can be represented in XML, JSON and YAML forms. All the objects can be imported into midPoint in any of those forms. They can be exported from midPoint in any of those forms. They can be edited directly in midPoint using embedded editor, in any of those forms. Just click on any object in the Repository objects page:
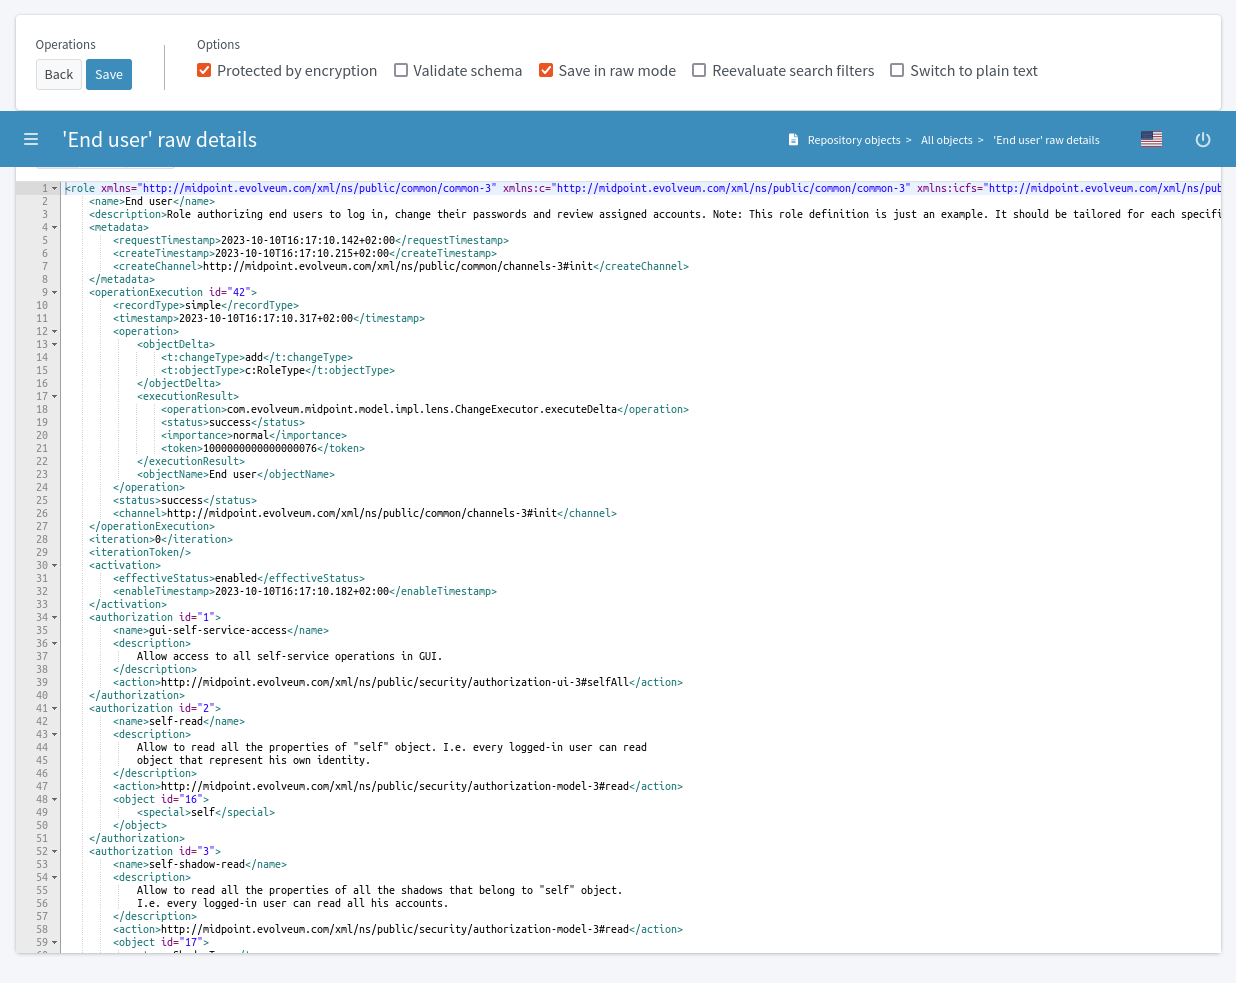
The ability to export, import and edit objects in XML/JSON/YAML form is absolutely essential, because:
-
It is human-readable (or rather administrator-readable). The configuration can be created, edited and maintained in your favorite editor and then imported into midPoint. It can be reviewed. It can be copied and pasted. Especially that. No system administrator can live efficiently without an ability to copy and paste.
-
It is transferable. It can be exported from one system (e.g. development environment) and easily transferred to another system (e.g. testing environment). It can be easily backed-up and restored. It can be easily shared, e.g. in a form of configuration samples.
-
It is versionable. The exported configuration can be easily put under any ordinary version control system. This is essential for deployment projects and configuration management.
Therefore, the midPoint configuration has the best of both worlds. It is stored in repository, therefore it can be processed efficiently, it can be made available and so on. Yet, it also has a text form, therefore it can be easily managed.
The XML, JSON and YAML forms are considered to be equivalent. Objects can be written in any of these forms.
<role oid="8ebab0bc-7e7e-11e6-a7bc-57de1cd45ecc">
    <name>Basic User</name>
    <description>Basic user role. Almost all users have it.</description>
    <requestable>true</requestable>
    <inducement>
        <targetRef oid="f92e67c2-7e7e-11e6-a306-7bf6aa2e8c61" type="RoleType"/>
    </inducement>
</role>{
"role" : {
"oid" : "8ebab0bc-7e7e-11e6-a7bc-57de1cd45ecc",
"name" : "Basic User",
"description" : "Basic user role. Almost all users have it.",
"requestable" : true,
"inducement" : {
"targetRef" : {
"oid" : "f92e67c2-7e7e-11e6-a306-7bf6aa2e8c61",
"type" : "RoleType"
}
}
}
}role:
oid: "8ebab0bc-7e7e-11e6-a7bc-57de1cd45ecc"
name: "Basic User"
description: "Basic user role. Almost all users have it."
requestable: true
inducement:
- targetRef:
oid: "f92e67c2-7e7e-11e6-a306-7bf6aa2e8c61"
type: "RoleType"Most of the examples in this book are in XML notation. The XML form is almost always simplified for clarity: there are no namespace definitions, no namespace prefixes and so on. The complete files with all the details can be found in midPoint distribution package, midPoint source code or in other places. See Additional Information chapter for more details.
Maintaining MidPoint Configuration
When it comes to maintenance of midPoint configuration, there are two practical methods.
First method is to maintain the configuration in midPoint: use midPoint wizards and user interface tools to create new objects and modify them. Export the objects in regular intervals to backed them up. This is an easy method to start with.
However, sooner or later you will probably figure out that you need the ability to copy and paste parts of the configuration, compare differences and review configuration history. You will need to share parts of the configuration with other team members. As we all know, no user interface is ever as efficient as an experienced engineer with a good text editor.
Then there is a second method: maintain the configuration in text form: XML, JSON or YAML. Import the configuration to midPoint as needed. The objects can be imported in midPoint user interface by going to page.
It is much easier to maintain a proper version control and a good teamwork using this method. It also seems to be more efficient once you get used to midPoint: pieces of configuration can be copied from samples, documentation or from other projects. This makes the work efficient. Although work with midPoint is "just" configuration, and there is usually almost no programming, this method of work is quite close to the methods that software developers use. We know that these methods work quite efficiently, as we are using them every day.
However, maintaining configuration in files and importing them individually using midPoint user interface may look a bit uncomfortable. However, there is a better way. There is MidPoint Studio, an integrated development environment (IDE) based on IntelliJ IDEA. MidPoint Studio allows you to maintain the configuration files in a form of a development project. You can edit the files with all the usual luxury of IDE, such as syntax highlight and autocompletion. Studio allows easy download and upload of changed configuration files to midPoint instance. As the IntelliJ platform has good integration for version control systems and other development tools, this seems like an ideal approach, especially for large and complex projects. If you plan to use midPoint professionally, MidPoint Studio is certainly worth trying.
MidPoint Repository
MidPoint needs its own database to work. We call that database midPoint repository. The database is used to store the configuration, users, resource definitions, account links, audit trails and a lot of other things. Proper relational database is needed for midPoint repository, such as PostgreSQL database. Docker Compose deployment makes sure that PostgreSQL is available, properly set up, initialized with database schema and ready to be used as midPoint repository.
MidPoint 4.8.5 supports several database engines. However, only PostgreSQL database fully supports all midPoint features. Support for database engines other than PostgreSQL is currently deprecated. The future of generic repository support (as we call it) is uncertain. Choose PostgreSQL directory (a.k.a. _native repository) to get reliable support for all midPoint features.
|
Embedded database
MidPoint had embedded database engine in the past, in a form of H2 database.
However, proper database engine is needed to support all midPoint features.
While the embedded H2 engine is still present in midPoint, it is not recommended to use it.
Many midPoint features will fail unless a proper database engine (PostgreSQL) engine is used.
|
MidPoint Home Directory
While almost all of midPoint configuration is stored in the database, there are few things that cannot be stored there - such as connection parameters to the database itself.
For that purpose midPoint has a small configuration file called config.xml.
MidPoint also needs a place where to store other data that cannot be in the database, such as cryptographic keys, connector binaries and so on.
MidPoint needs a special directory on a filesystem for that purpose. We call it midPoint home directory. When a new midPoint instance starts for the first time, new midPoint home directory, populated with default configuration. Location of midPoint home directory slightly varies, it depends on your deployment method:
-
Docker-based installation: MidPoint home directory is named
midpoint-home. It is located in directory where themidpoint-quickstart.shscript was started, i.e. at the same level as thedocker-compose.ymldirectory. -
Package-based installation: MidPoint home directory is named
var. It is located in directory where midPoint distribution package was installed, i.e. at the same level as thebindirectory, where midPoint start scripts are located. Assuming that midPoint was installed in/opt/midpointdirectory then default midPoint home will be located in/opt/midpoint/vardirectory.If necessary, the location of midPoint home directory can be changed by using the
midpoint.homeJava system property. This is done by specifying-Dmidpoint.homein the JVM command-line. In case that the default midPoint start scripts are used,MIDPOINT_HOMEenvironment variable can be used to set the location of midPoint home directory.
MidPoint home directory contains several interesting items:
-
config.xmlcontains fundamental configuration, such as location and credentials of repository database. -
logdirectory contains midPoint log files,midpoint.logfile being the most important. -
connid-connectorsdirectory is a place where additional identity connectors may be deployed. Copying a connector into this directory automatically deploys it to midPoint. -
resourcesdirectory is used to store data for file-based resources, such as resources based on CSV connector. This directory is used in this book. The directory does not exist by default, and its name is not hardcoded anywhere in midPoint. It is just a convention to store file-based resources in this directory.
When midPoint starts for the first time, it starts with an empty database.
MidPoint populates the database with a minimal set of configuration objects.
We call them initial objects.
This set contains objects such as the Superuser role and user administrator.
These objects get imported automatically, because if they are not there, you will not be able to log into the new midPoint instance.
These objects are imported only if they are not already present in the database.
If you modify them later, midPoint will not overwrite them.
Logging
Logging is perhaps the most important mechanism to diagnose any issues with midPoint. Logging should be the thing that comes to your mind anytime you cast a puzzled look at midPoint user interface. We try to make midPoint user interface convenient to use, and we pay a lot of attention to good error reporting. However, there are always some practical limits what the user interface can do. The error that the user interface displays may be just a result of a long chain of causes and effects. Error messages in the user interface may not directly point to the primary cause. Perhaps there is no error at all, just midPoint does not do what it is supposed to do. That is the point where logging comes to the rescue.
MidPoint is using Java logging facilities to log its messages.
MidPoint log file name is midpoint.log, and it is stored in the log subdirectory in midPoint home directory (midpoint-home/log/midpoint.log for docker-based deployment, /opt/midpoint/var/log/midpoint.log for package-based deployment).
The default logging level is set up more-or-less to suit normal midPoint operation.
This means that the messages on level INFO and above are logged while the finer levels are not logged.
If you want to diagnose midPoint issues you will need to switch the logging levels to DEBUG, or in extreme cases even to TRACE.
The logging levels can be adjusted in midPoint user interface.
Navigate to .
MidPoint is not a simple system. There are complex interactions, there is usually a lot of custom configuration, customizations, expressions and so on. Diagnostics of midPoint issues is no easy task. Therefore, there is a dedicated Troubleshooting chapter in this book. That chapter is your best friend when things do not go as expected.
Conclusion
We have small and simple docker-based midPoint installation now. It is not much, yet it is more than enough to explore almost all the midPoint concepts and mechanisms. Therefore, let us go ahead and have some fun.
4. Resources and Mappings
The pessimist complains about the wind; the optimist expects it to change; the realist adjusts the sails.
Reading and modifying accounts, account attribute synchronization, mapping of attribute values, their transformation using scripts – these are the very basic midPoint features. These are provisioning features (or rather fulfilment features as analysts like to have it). These features are absolutely essential for any self-respecting identity management deployment. Explaining the very basic mechanisms of identity management deployment is the primary purpose of this chapter. It covers the necessary configuration to use midPoint as a provisioning engine.
The first thing that engineers notice about identity management is that the systems we need to integrate are not exactly homogeneous. It is not very realistic to expect that all the systems will agree on the same interface, communication protocol and schema for identity management. There were several attempts to unify the identity and access management landscape, but none of them was entirely successful. The LDAP protocol was created in the 1990s. However, even for such a mature protocol, the implementations are sill not 100% interoperable. The situation is even worse for identity provisioning protocols. There were several attempts to specify a standard provisioning protocol since early 2000s, but all of them failed to deliver complete interoperability. SCIM version 2 is the latest attempt. SCIM 2 is, quite successfully, used for some cloud applications and simple cross-organizational scenarios. However, as almost all deployments of SCIM are using local variations, the interoperability is quite poor. Moreover, SCIM still lacks capabilities to cover all aspects of a complete provisioning solution.
The worst pain point of identity integration is undoubtedly the schema. Every application has its own data model for representation of accounts, groups, privileges and other identity-related objects. Even if the application tries to expose that data model using some kind of standard schema (such as SCIM schema), there will always be small (but important) differences, special cases and local peculiarities. Such deviations are a major obstacle to interoperability.
Instead of insisting on an idealistic universal schema for all applications, midPoint provides a practical solution to this problem. MidPoint admits the reality: every system and application has its own schema and local variations. Yet, we still need a common schema to be able to understand what is going on, to process and analyze the data. MidPoint has a common identity schema inside. Application schemas with all their peculiarities are aligned or mapped to the common schema. Once the mappings are in place, midPoint automatically translates the data as needed, maintaining a consistent data among all the systems. This chapter will tell you how to do it, how to set up the mappings.
Identity Resource Definitions
Identity resource is one of the most important concepts in midPoint. Any system connected to midPoint is an identity resource. Identity resources (or just resources for short) are typically target systems where midPoint manages accounts. Moreover, source systems, such as HR databases, are also considered to be identity resources. There is no strict distinction between the source and target resource in midPoint. Both source and target resources are defined in exactly the same way. Resource can even act as both source and target at the same time.
MidPoint needs a way to communicate with the identity resource. MidPoint has to know communication protocol, hostname, keys and passwords, and all other communication parameters. For that purpose midPoint has resource definition objects. These are midPoint configuration objects stored in midPoint repository. Resource definition usually contains:
-
Name of the identity resource and its description.
-
Reference to the connector which is used to communicate with the resource.
-
Connector configuration properties that define resource hostname, port, communication settings and so on. Those properties are used to initialize the connector.
-
Definition of object types that are interesting for midPoint. This is typically a definition that describes how a typical account looks like. However, there may be much more than just accounts: groups, entitlements, organizational units, …
-
Object type definitions typically contain mappings. Mappings define how are the attributes moved and transformed from midPoint to resource, or from resource to midPoint.
-
Synchronization settings that define what midPoint should do if it discovers unknown account, if the account is deleted on the resource and so on.
Resource definition looks like this in its XML form (simplified):
<resource oid="b4101662-7902-11e6-9f14-53e18426fe81">
    <name>LDAP</name>
    <connectorRef oid="028159cc-f976-457f-be70-9e9fa079bcf7"/>
    <connectorConfiguration>
        <configurationProperties>
            <host>localhost</host>
            <port>389</port>
            <baseContext>dc=example,dc=com</baseContext>
            ...
        </configurationProperties>
    </connectorConfiguration>
    <schemaHandling>
        <objectType>
            <kind>account</kind>
            <default>true</default>
            <delineation>
                <objectClass>inetOrgPerson</objectClass>
            </delineation>
            ...
        </objectType>
    </schemaHandling>
</resource>
Resource definition is a very rich (and powerful) configuration object. It is maybe the richest configuration object in the entire midPoint platform. Creating resource definition from scratch is usually no easy task. There is a lot of things to consider: connector configuration, identifier conventions, mandatory attributes and attribute value formats to name just few. There are two practical ways to create resource definitions:
-
Start from a sample. Locate a resource definition sample for a similar resource. Then modify the sample to suit your needs. This is the usual midPoint method: edit the XML/JSON/YAML file, them import it to midPoint. Navigate to .
There are many resource samples to start from. Most of them are located in midPoint distribution package. However, there are other places to look for samples. Please see Additional Information chapter for suggestions.
-
Resource wizard. Believe it or not, there are people that do not like XML/JSON/YAML. There are also people that really want to start creating the resource from scratch. For all those people there is a resource wizard in the midPoint user interface. The wizard can be used to create and edit resource using a graphical user interface. Navigate to , select From Scratch option.
|
Resource lifecycle state
Resource wizard is creating resources as proposed by default.
The proposed state is a lifecycle state, specifying that this object is not ready for production yet.
It is just proposed, i.e. it is a candidate, to be commissioned as a production configuration when properly tested.
We will deal with lifecycle states later.
All that is needed for now it to switch the resource to active state to operate correctly.
This can be done in the first step of the wizard, or it can be changed later when editing the resource.
|
However, you need to understand how the resource definitions work to do this efficiently - even if you start with resource wizard. Next few sections will explain the structure and function of resource definitions.
Connectors
Every resource needs a connector to work. Connectors are small pieces of Java code that are used to communicate with the source and target systems. Few popular connectors are part of midPoint distribution package (bundled connectors), other connectors can be downloaded and deployed in midPoint home directory.
MidPoint automatically looks for available connectors. MidPoint creates new configuration object for each connector that it discovers. The list of discovered connectors can be seen in midPoint user interface in , selecting Connector in the type field located at the top of the screen. The connector objects look like this:
<connector oid="028159cc-f976-457f-be70-9e9fa079bcf7">
  <name>ConnId com.evolveum.polygon.connector.ldap.LdapConnector v3.7</name>
  <framework>http://midpoint.evolveum.com/xml/ns/public/connector/icf-1</framework>
  <connectorType>com.evolveum.polygon.connector.ldap.LdapConnector</connectorType>
  <connectorVersion>3.7</connectorVersion>
  <connectorBundle>com.evolveum.polygon.connector-ldap</connectorBundle>
  <namespace>http://midpoint.evolveum.com/xml/ns/…</namespace>
  <schema>
      ...
  </schema>
</connector>
The resource definition needs to point to the appropriate connector object. Therefore, select the right connector from the connector list and remember its OID. Then use the connector OID in the resource configuration like this:
<resource>
    <name>My LDAP Server</name>
    <connectorRef oid="028159cc-f976-457f-be70-9e9fa079bcf7"/>
    ...
</resource>|
Resource wizard
Of course, resource wizard does all that connector stuff for you.
All you need is to select the right connector.
|
This is a straightforward way how to link connector and resource. However, it is not the most convenient one. MidPoint creates connector objects automatically. Therefore, the OIDs of the connector objects are not fixed. Every midPoint instance will have different OID for the discovered connectors. Therefore, if we want a resource that is always using the LDAP connector in all the midPoint instances, we cannot do that by just using OIDs. There is another way. You can use search filter instead of fixed OID:
<resource>
    <name>My LDAP Server</name>
    <connectorRef type="ConnectorType">
        <filter>
            <q:text>connectorType = "com.evolveum.polygon.connector.ldap.LdapConnector"</q:text>
        </filter>
    </connectorRef>
    ...
</resource>
The detailed explanation of the search filters will come later.
For now, it is important to know just few basic principles.
When this resource definition is imported, midPoint notices that there is no OID in the connectorRef reference.
It also notices that there is a search filter.
Therefore, midPoint executes that search filter.
In this case it looks for an object of ConnectorType type that has property connectorType with value com.evolveum.polygon.connector.ldap.LdapConnector.
Therefore, midPoint finds LDAP connector, regardless of the OID that was generated when midPoint discovered that connector.
Then midPoint takes the OID of the object that it has found.
The OID is placed to the connectorRef reference, so midPoint can find the connector directly, and it does not need to execute the search every time the resource is used.
This is the method that is frequently used to bind resource definition to a specific connector type. It has the advantage that it works in all midPoint deployments. Therefore, it is also used in the configuration samples.
Bundled and Deployed Connectors
Each type of resources needs its own connector. There is an LDAP connector that supports all the common LDAP servers. There are connectors that work with generic database tables. These connectors are quite generic. However, most connectors are built for a specific application or software system: Linux servers, SAP, Zoom, etc.
There is a handful of connectors that are so generic that they are used in almost all midPoint deployments. These connectors are bundled with midPoint. It means that they are part of the midPoint application package, and they are always available. These three connector bundles are part of midPoint:
-
LDAP Connector bundle, which contains:
-
LDAP connector that works with common LDAP servers.
-
Active Directory connector that can work with Microsoft Active Directory over LDAP protocol.
-
-
DatabaseTable connector bundle with a connector that can connect to a generic relational database table.
-
CSV connector bundle with a connector that works with comma-separated (CSV) text files.
These connectors are always available in midPoint. Other connectors must be deployed into midPoint. Connector deployment is a very straightforward process:
-
Locate the connector binary (JAR file).
-
Copy the binary into the
connid-connectorsdirectory which is located in midPoint home directory. -
Wait few moments for midPoint to discover the connector.
MidPoint periodically scans the connid-connectors directory.
It discovers any new connectors, and creates a connector configuration objects for them.
Connector Configuration Properties
Connector needs a configuration to be able to work with the resource. This configuration usually consists of connection parameters such as hostname, port, administrative username, password, connection security settings and so on. The connector configuration properties are specified in the resource definition object. In a simplified from it looks like this:
<resource oid="690f9f44-8027-11e6-a248-3b5fe08dea36">
    <name>My LDAP Server</name>
    <connectorRef oid="028159cc-f976-457f-be70-9e9fa079bcf7"/>
    <connectorConfiguration>
        <configurationProperties>
            <port>389</port>
            <host>localhost</host>
            <baseContext>dc=example,dc=com</baseContext>
            ...
        </configurationProperties>
    </connectorConfiguration>
    ...
</resource>
There may be a very broad range of configuration properties - and every connector has its own set.
While working just with the XML/JSON/YAML representation of the resource definition, you will need to find out the names of the configuration properties by looking at the samples, connector documentation or maybe even connector source code.
It may look difficult, but this is a perfectly viable approach.
However, there are other ways.
Firstly, there is the resource wizard.
The wizard knows all the connector configuration properties, and it will present the properties in a configuration form.
The wizard takes the definition of the configuration properties from the connector schema.
The connector schema is a definition of the properties that the connector supports: their names, types, multiplicity and so on.
The connector schema is stored in the connector configuration object in the schema element.
Therefore, even if you are working only with the XML/JSON/YAML files, you can have a look at that schema
to figure out what connector configuration properties are supported.
The connector schema also defines the connector namespace. Generally speaking, namespaces in midPoint are used to isolate schema extensions that might have conflicting element names. The use of namespaces is optional in almost all parts of midPoint - but not in all the parts yet. Connector configuration is one of the few parts where namespaces must still be used. It also makes some sense, as namespaces are used here as an additional safety mechanism. To keep a long story short, the configuration properties should be properly namespace-qualified:
<resource oid="690f9f44-8027-11e6-a248-3b5fe08dea36">
    <name>LDAP</name>
    <connectorRef oid="028159cc-f976-457f-be70-9e9fa079bcf7"/>
    <connectorConfiguration
            xmlns:icfc="http://midpoint.evolveum.com/xml/ns/public/connector/icf-1/connector-schema-3"
            xmlns:icfcldap="http://midpoint.evolveum.com/xml/ns/public/connector/icf-1/bundle/com.evolveum.polygon.connector-ldap/com.evolveum.polygon.connector.ldap.LdapConnector">
        <icfc:configurationProperties>
            <icfcldap:port>389</icfcldap:port>
            <icfcldap:host>localhost</icfcldap:host>
            <icfcldap:baseContext>dc=example,dc=com</icfcldap:baseContext>
            ...
        </icfc:configurationProperties>
    </connectorConfiguration>
    ...
</resource>
The use of namespaces will be completely optional in later midPoint versions. For now, just copy the namespace URIs from the samples. You do not have to completely understand what is going on. Just one thing: the namespace of the configuration properties should be the same as the namespace defined in the connector object. This is a long URI that is composed of connector bundle name and connector name.
If the namespace does not match, then the connector will refuse to work. This is a safety mechanism that prohibits accidental use of configuration from one connector in another connector, where the configuration properties may have the same name but a completely different meaning.
|
Resource wizard
Resource wizard has a very convenient way to specify connector configuration properties.
Resource wizard also support discovery of some configuration properties.
For example, it can discover base context of an LDAP server, by connecting to the server and getting that information from server meta-data.
|
Testing the Resource
Minimal resource definition has just the name, connector reference and connector configuration properties. After that, the resource should show the first signs of life. Therefore, go ahead and select a suitable sample file now. Strip it down to the minimum, modify connector configuration properties and import the resource into midPoint. You should be able to see your resource in the list in . The icon next to your resource is most likely black - not green and not red. Green icon means that the resource is working, red icon means that there is an error, black means "I do not know yet". Click on the resource label. The resource details page appears. There is a Test Connection button at the top of the page. Click on that button. It may take a while now. MidPoint is initializing the connector with the configuration properties that you have specified. Then the connector is used to check connection to the resource. If the parameters were correct, and midPoint can reach the resource, you will see the green lights:
If there are any errors during connector initialization, configuration or network connection you will see the errors here. In that case, correct the configuration properties, and try again. If everything works well, then the resource icon turns green. Now we have a very minimal working resource.
The test connection procedure is testing whether connector can connect to the resource. However, can the connector access the data as well? We would like to see some data now, to make sure that everything works fine. We cannot do that just yet. We have to talk about the schema first.
Resource Schema
The only thing that early identity management systems dealt with was an account. The world have evolved a lot since the early days of identity management in the 2000s. Today, identity management systems need to manage many different types of resource objects: accounts, groups, organizational units, privileges, roles, access control lists and so on. In midPoint, these are the object classes: types of resource objects that are made accessible to midPoint by the connector. A minimal resource supports at least one account object class, but a typical resource supports more object classes. Each object class may have a completely different set of attributes: different attribute names, different data types, some may be mandatory, some optional, single-valued or multi-valued.
The collective definition of the object classes and their attributes is what we call resource schema.
Obviously, resource schema is different for every resource.
Even resources that are using the same connector may have different resource schema.
For example two LDAP servers with different custom schema extensions or two business systems with different customizations.
MidPoint is a smart system, and it is capable of automatic resource schema discovery.
MidPoint reaches out to the resource and retrieves the schema when the resource is used for the first time.
Retrieved resource schema is stored as the schema element in resource definition object.
You can have a look and examine the schema there.
But beware, the schema may be quite rich and big.
Resource schema is an absolutely crucial concept. MidPoint takes advantage of resource schema whenever it needs to work with resource objects such as accounts or groups. MidPoint uses resource schema to validate mappings. The schema is used for automatic type conversions. Most importantly of all: resource schema is used to display resource objects in user interface. MidPoint adapts to resource schema automatically. Not a single line of custom code is needed to do that.
Accessing Resource Data
We would like to have a look at resource data before going on with configuration. It would be nice to make sure that the connector is configured correctly, that there are appropriate access rights in place for the connector to access the data and that everything works fine. However, some resources are very flexible and generic. LDAP servers are a prime example. They have lots of object classes to choose from, their resource schema is quite bit. We need only a couple of object classes from that huge LDAP schema. However, LDAP connector is very generic, it does not know which object classes are the right ones. Therefore, we have to tell midPoint which object class to choose from the schema.
<resource oid="690f9f44-8027-11e6-a248-3b5fe08dea36">
    <name>LDAP</name>
    <connectorRef oid="028159cc-f976-457f-be70-9e9fa079bcf7"/>
    <connectorConfiguration>
        ...
    </connectorConfiguration>

    <schemaHandling>
        <objectType>
            <kind>account</kind>
            <displayName>Normal Account</displayName>
            <default>true</default>
            <delineation>
                <objectClass>inetOrgPerson</objectClass>
            </delineation>
        </objectType>
    </schemaHandling>
</resource>
We will learn about the schemaHandling section later.
For now, this declaration of object type tells midPoint, that there are accounts on this resource.
The accounts are using inetOrgPerson object class.
Now, as midPoint knows what "Normal LDAP Account" means exactly, we can have a look at such accounts.
Navigate to the Accounts panel in resource details page.
This is the place to browse accounts on this resource.
However, the list is empty!
It is empty, as midPoint have not tried to access the accounts yet.
Click on Reload button does the trick.
MidPoint is using the connector to list all the accounts (objects with inetOrgPerson object class) in our LDAP server.
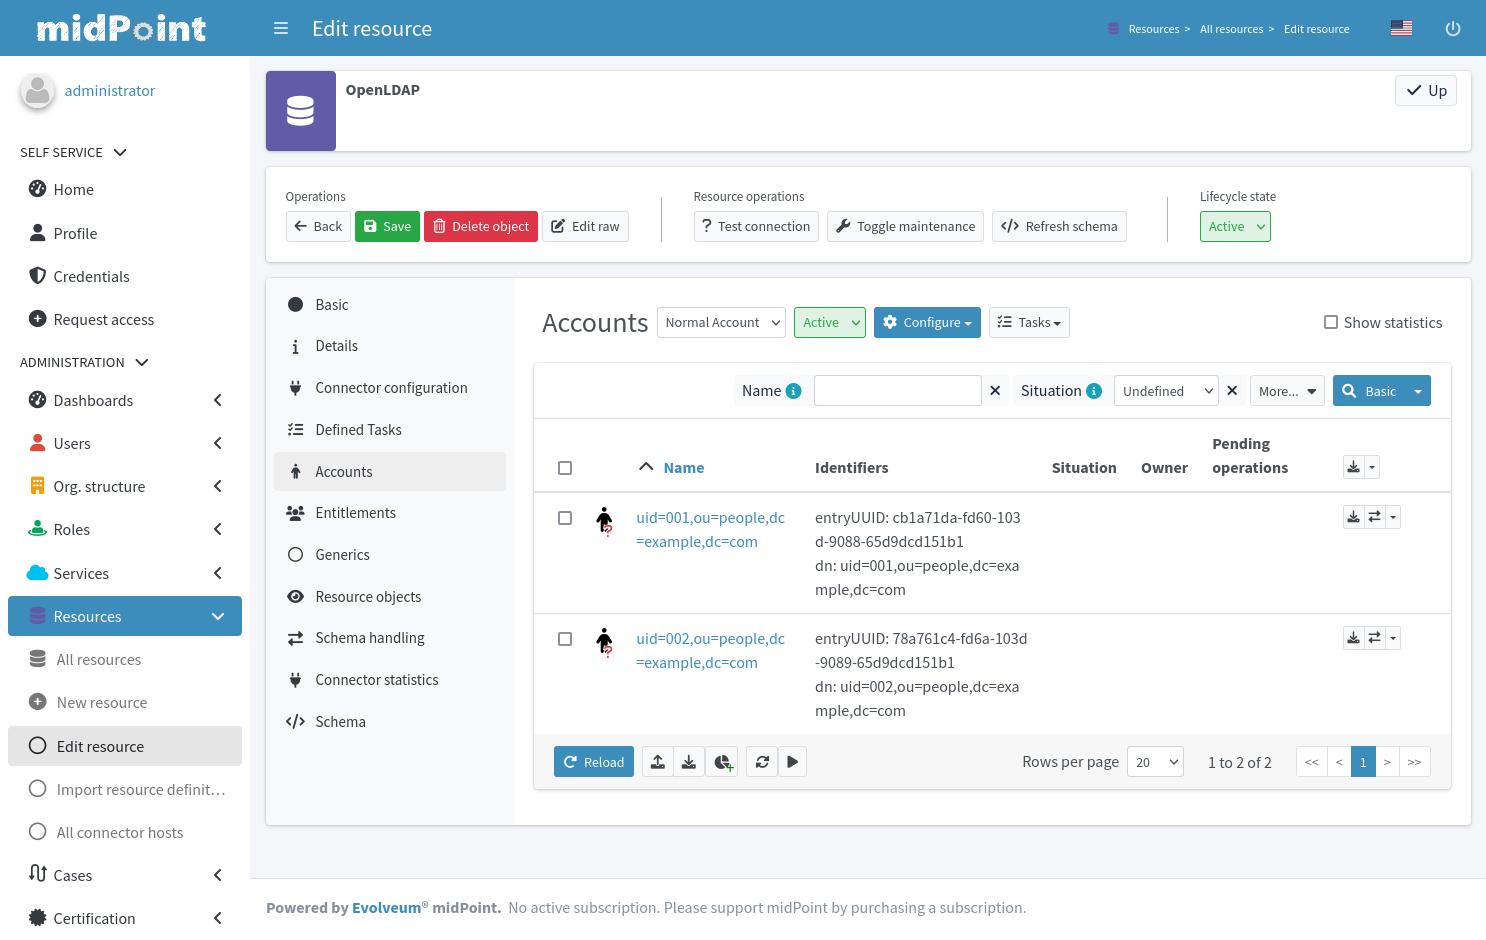
Now you can click on any object to see the details. This is a very useful feature for several reasons. By looking at several objects, you can get a basic overview of how the data are structured: what attributes are used and what are the typical values. You will appreciate that information later on when we will be setting up mappings.
Hub and Spoke
MidPoint topology is a star (a.k.a. "hub and spoke") with midPoint at the center. This is both physical and logical topology of midPoint deployments.
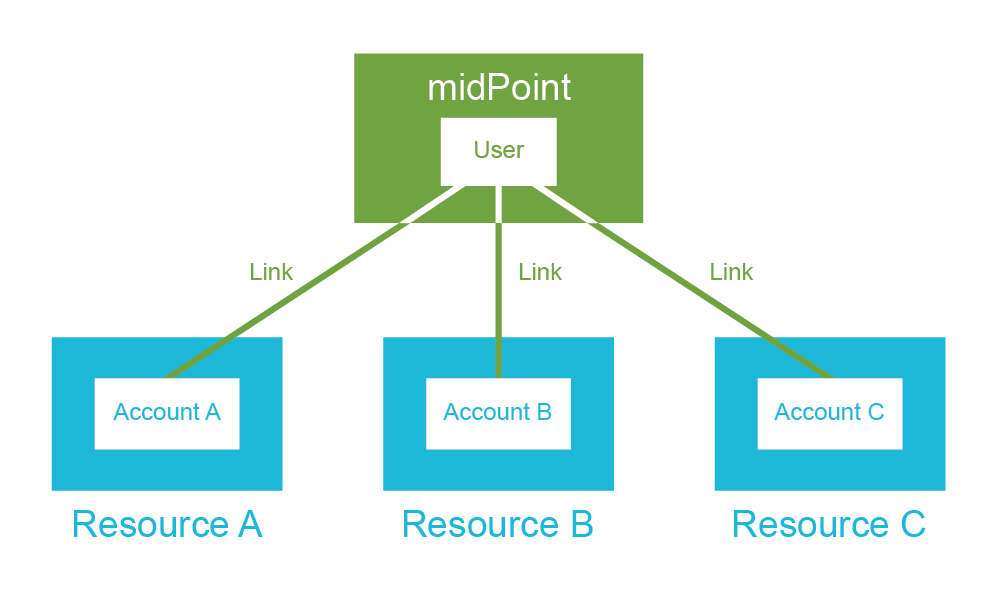
This means that the account A can be synchronized with midPoint user and then midPoint user can be synchronized with account B. However, account A cannot be synchronized directly to account B. This is a deliberate decision that was made very early in midPoint design. We have very good reasons for it.
Accounts and user that represent the same person are linked together. This link is a relation that midPoint creates and maintains. Therefore, midPoint knows who is the owner of a particular account. MidPoint also knows which accounts the user has. That is how midPoint knows which account needs to be synchronized with which user. It is critical for the links to be correct, otherwise midPoint cannot reliably synchronize the data. For that reason, midPoint takes great care to maintain the links. That is not always an easy task. There are strange corner cases, such as renamed accounts, or accounts that were deleted by mistake and re-created. Yet, midPoint is built to handle such cases. The links are always maintained. It is the link that allows midPoint to list all user’s accounts in the user interface.
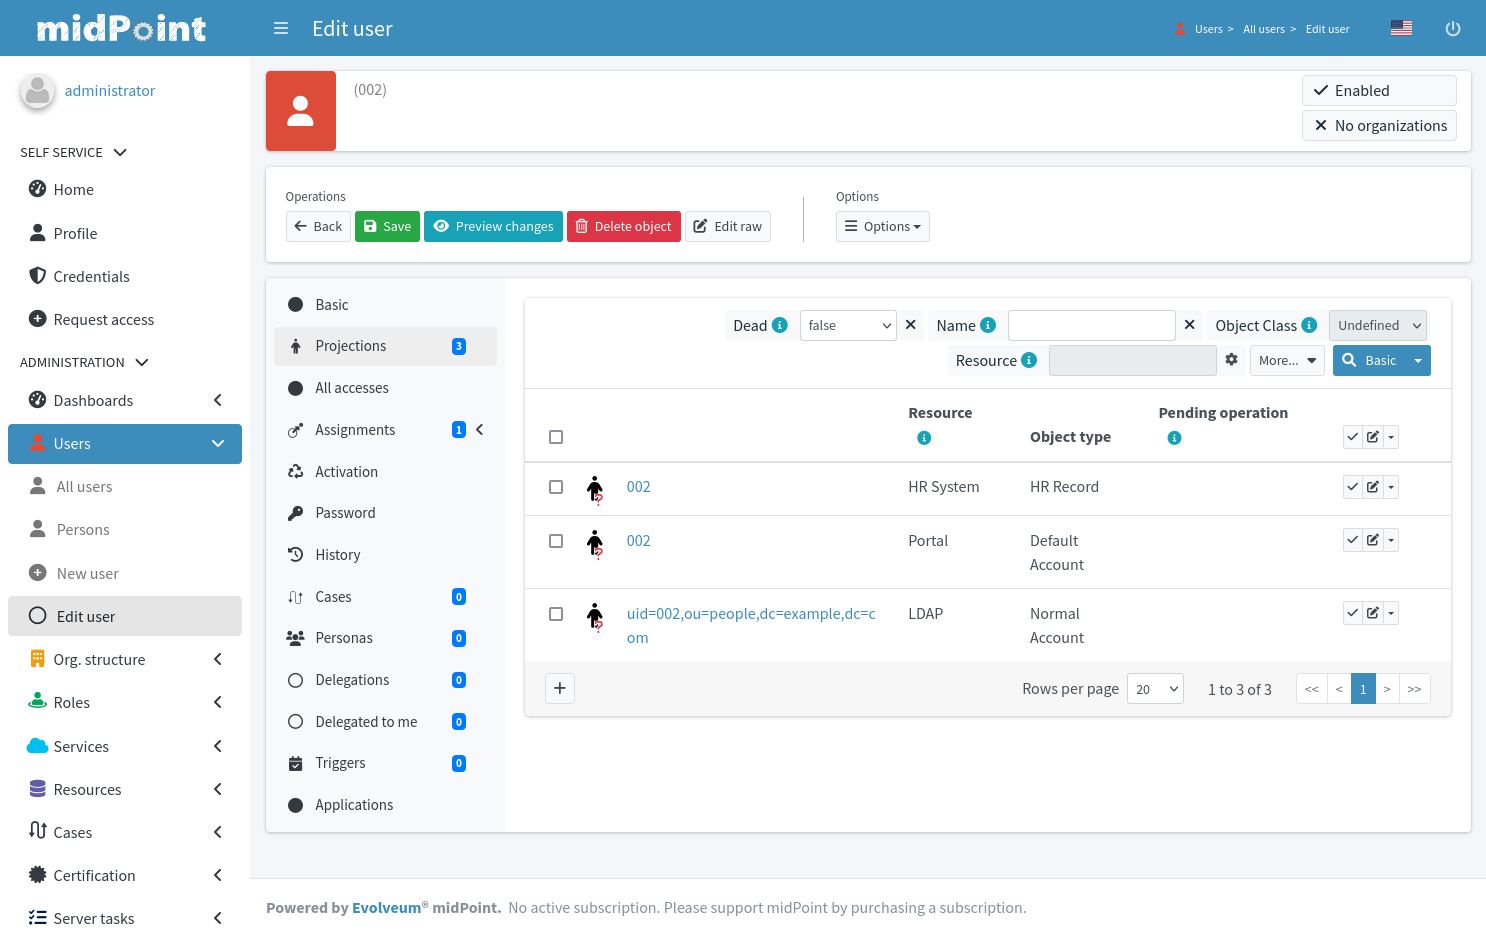
The user in midPoint is known as focus in midPoint terminology. The accounts are known as projections. You can imagine a light projector that sends many light beams from its focal point to create a projection on the screen. This is the metaphor that we have chosen when developing midPoint. For the lack of better words, this terminology remains in use even today. We will get back to the concept of focus and projections many times in this book. For now, you just need to remember that projection means an account.
MidPoint knows which account belongs to which user by following links that it maintains. However, how does midPoint know which attributes to synchronize? How to transform the values? Which side is the authoritative one? Mappings take care of that. Mapping is like a flexible data replication recipe. MidPoint allows to define mappings for each attribute in any direction. The mappings are used to control the synchronization on a very fine granularity.
Perhaps the best way to summarize synchronization principles is to illustrate them using a couple of examples. The first example is a modification of user properties in midPoint user interface. When the Save button is pressed, midPoint user interface sends the modification to midPoint core engine. The synchronization code in midPoint core follows the links to find all the accounts that belong to this specific user. Then the mappings are applied to synchronize the changed user properties to the accounts. Account changes are propagated to the resources, and user changes are stored in midPoint repository.
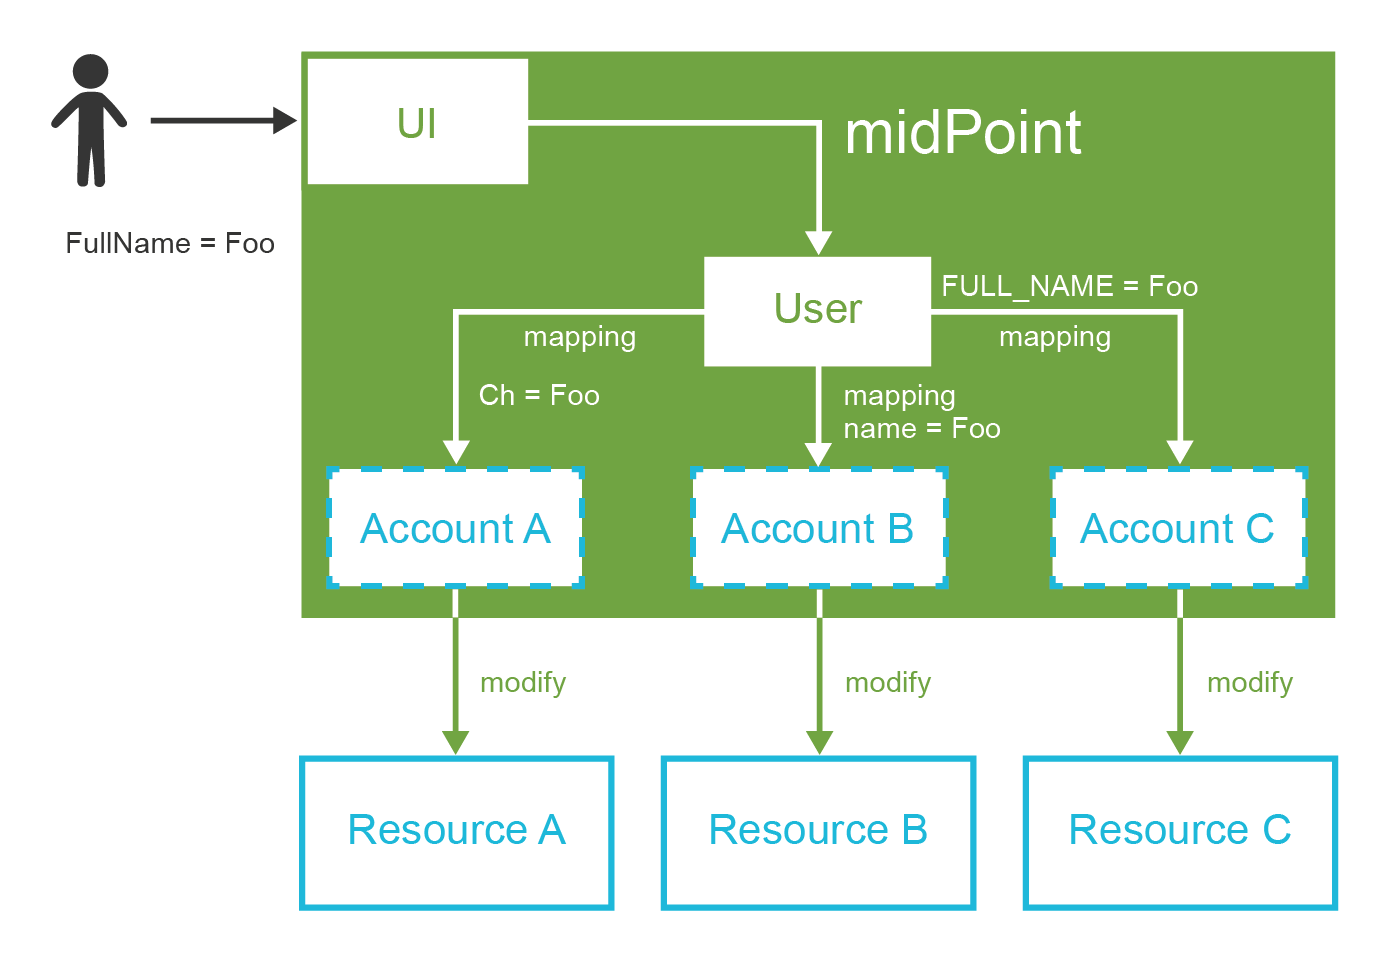
The second example is slightly different. This case starts with a change of account data. This may be a change of an employee record in HR system. MidPoint detects that change, and reads the changed account. MidPoint follows the link to find the user to which the account belongs. Then it follows other links from the user to find all the other accounts that may be affected. Similarly to the previous case, the mappings are applied. The mappings from the HR account to the user are applied first. The result is a modification of user properties. Then a process identical to the previous case takes place. User modifications are automatically applied to all affected accounts.
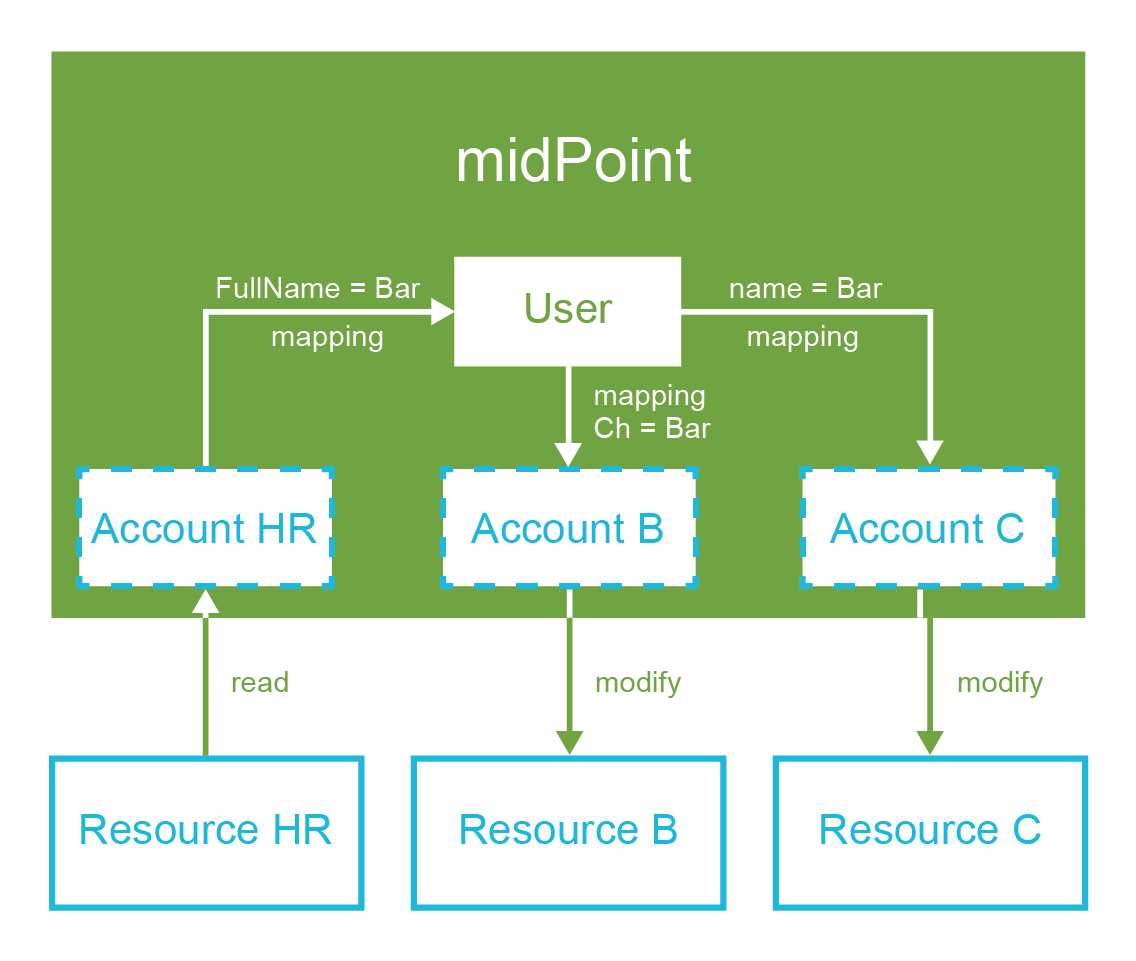
Those two cases might look to be quite different. First case is a manual change of data by system administrator. Second case is an automatic data feed from the HR system. However, as you can see, the principles that are used to implement those two cases are almost exactly the same. This is the consequence of midPoint philosophy: radical reuse of functionality and generic application of principles. You define what you want to do (the policy) by setting up the mappings. MidPoint takes care that it is done when it needs to be done.
|
Why the star topology?
The star or "hub and spoke" were (and still are) the big buzzwords of system integration.
Rightfully so, as the basic idea of star topology makes a lot of sense.
If every node needs to be synchronized with every other node, then the number of required connections grows quite steeply.
It is in fact proportional to the square of the number of nodes.
Mathematicians say that is has O(n2) complexity.
However, if you rearrange the connections so that they all point to the central "hub", then the number of connections is significantly reduced.
It is proportional to the number of nodes: O(n) complexity.
This is a huge difference, especially in deployments with many resources.
However, this approach works well only if the star topology is both physical and logical.
I.e. it makes very little sense to connect all resources to a central “hub” if that hub still internally needs O(n2) policies to synchronize the data.
That would only hide the complexity in a black box, yet the complexity would still be there.
However, midPoint is different.
MidPoint is a real "hub".
This is the reason why midPoint does not support synchronization of accounts directly with each other.
We want to have simple, clean and maintainable system, both externally and internally.
|
Schema Handling
Resource schema is a very important concept. It defines what object classes are supported by the resource and how they look like. Yet, it is important to know not only how the objects look like. It is also important to know what to do with them. That is what the schema handling is all about.
Schema handling is a part of the resource definition object. It specifies which object classes from the resource schema are actually used by midPoint. Most importantly of all, it specifies how they are used. This is the place where mappings are stored. This is the place where account-group associations are defined. This is the place where schema can be augmented and tweaked. Consequently, this is the place where most of the resource-related configuration takes place.
Schema handling section contains definition of several object types. Each object type refers to one "thing" that midPoint works with: default account, testing account, group, organizational unit and so on. Let’s start with something simple. Let’s define just one object type now: default account. It looks like this:
<resource oid="b4101662-7902-11e6-9f14-53e18426fe81">
    <name>My LDAP Server</name>
    ...
    <schemaHandling>
        <objectType>
            <kind>account</kind>
            <default>true</default>
            <delineation>
                <objectClass>inetOrgPerson</objectClass>
            </delineation>
        </objectType>
    </schemaHandling>
</resource>
This may seem trivial, but even such a minimal definition is important for midPoint.
This definition tells midPoint that default account on this resource has inetOrgPerson object class.
Resources such as LDAP servers may have dozens of object classes.
Most of them are not used at all.
There are often several alternative object classes that can be used to create accounts.
It is important to tell midPoint which object class is the right one.
That’s what this definition does.
Once this definition is in place, the accounts appear on the Accounts panel of the resource details page.
This is a sign that the definition works correctly.
A clever reader surely noticed definition of kind in the above example.
Setting kind to account indicates that this object type definition represents (quite surprisingly) an account.
MidPoint supports many types of objects.
However, two types have a special place: accounts that represents the users and entitlements that give privileges to the accounts.
MidPoint can handle the objects in a smart way if it knows that it is either account or entitlement.
The kind definition tells just that.
There is also optional intent setting that can be used to define subtypes - but more on that later.
The schema handling section can also be used to augment (or even override) some parts of the resource schema. E.g. following example sets a display name for this object type. The display name will be used by the user interface when it displays the account.
<resource oid="b4101662-7902-11e6-9f14-53e18426fe81">
    <name>My LDAP Server</name>
    ...
    <schemaHandling>
        <objectType>
            <kind>account</kind>
            <displayName>Default account</displayName>
            <default>true</default>
            <delineation>
                <objectClass>inetOrgPerson</objectClass>
            </delineation>
        </objectType>
    </schemaHandling>
</resource>
However, the most powerful feature that is used in the schema handling is the ability to deal with attributes. Following sections are all about that.
Attribute Handling
Resource objects such as accounts or groups are mostly just a bunch of attributes. Almost all the IDM magic is about setting the correct attribute to the correct value. The schema handling section of the resource definition is the place where that magic happens.
The object type definition contains sections that define behavior of each attribute that we care about:
<resource oid="b4101662-7902-11e6-9f14-53e18426fe81">
    <name>My LDAP Server</name>
    ...
    <schemaHandling>
        <objectType>
            <kind>account</kind>
            <default>true</default>
            <delineation>
                <objectClass>inetOrgPerson</objectClass>
            </delineation>
            <attribute>
                <ref>dn</ref>
                <!-- behavior of "dn" attribute defined here -->
            </attribute>
            <attribute>
                <ref>cn</ref>
                <!-- behavior of "cn" attribute defined here -->
            </attribute>
            ...
        </objectType>
    </schemaHandling>
</resource>
There is an attribute element for every attribute that we need to handle.
The attribute elements are used to set up the attributes that a typical user account has.
They are used to assign identifiers, set up full name, set description and telephone number attributes and things like that.
Lot of details can be defined here: display name of the attribute for use by the user interface, limitations, override settings and so on.
However, the most important things that go there are the mappings.
MidPoint evaluates the mappings in attribute elements to populate account attributes with the correct values.
In the simplest form, a mapping looks like this:
<resource oid="b4101662-7902-11e6-9f14-53e18426fe81">
    <name>My LDAP Server</name>
    ...
    <schemaHandling>
        <objectType>
            <kind>account</kind>
            <default>true</default>
            <objectClass>inetOrgPerson</objectClass>
            ...
            <attribute>
                <ref>cn</ref>
                <outbound>
                    <source>
                        <path>$focus/fullName</path>
                    </source>
                </outbound>
            </attribute>
            ...
        </objectType>
    </schemaHandling>
</resource>
The mapping specifies that the value of the cn attribute will be taken from the fullName property of the focal object (which is typically a user).
This a very simple mapping, there is no value transformation, no condition – nothing complicated at all.
This is how a lot of mappings look like.
However, mappings can also be very powerful and complex.
That will be described in next section.
|
Namespace prefixes
You may have noticed that ri and icfsri and icfs namespace prefixes are used in some sample files when referring to object classes or attributes.
Object classes and attributes are defined in resource schema, and the ri is the namespace prefix used for that schema.
The ri stands for "resource instance", which refers to resource schema.
Similarly, some attributes are defined in fixed schema originating in the old identity connector framework (ICF), a predecessor to ConnId.
Such attributes are denoted by icfs prefix, which stands for "identity connector framework schema".
This is used mostly by older connectors that were not yet fully updated to ConnId standards.
The use of the ri namespace, similarly to almost all other namespaces, is almost always optional.
The prefixes are kept in some sample files mostly due to nostalgic reasons.
The use of icfs and ri prefixes may still be needed in case that attribute names in fixed icfs schema conflict with attribute names in resource schema.
In such case the prefixes are used to resolve the ambiguity.
|
Mappings
Mapping is a very flexible mechanism that takes one or more input properties, transforms them, and puts the result in another property. Mappings are used all over midPoint. However, perhaps the most important use of mappings is in the schema handling part of the resource definition, where they are used to set up account attribute values. We have already seen a very simple mapping that simply copies the values from one place to another. Now it is the time to look at mappings in their entirety.
Mapping consists of the three basic parts:
-
Source part defines the data sources of the mapping. These are usually understood as mapping input variables. Source defines where mapping gets its data from.
-
Expression part defines how the data are transformed, generated or passed on to the "other side". This is the most flexible part of the mapping as it contains the logic. There is a broad variety of possibilities, including support for scripting expressions.
-
Target part defines what to do with the results of the mapping, where the computed values should go. It specifies where mapping output should go.
The three parts of the mapping, as well as the basic principle, is illustrated in the following diagram:
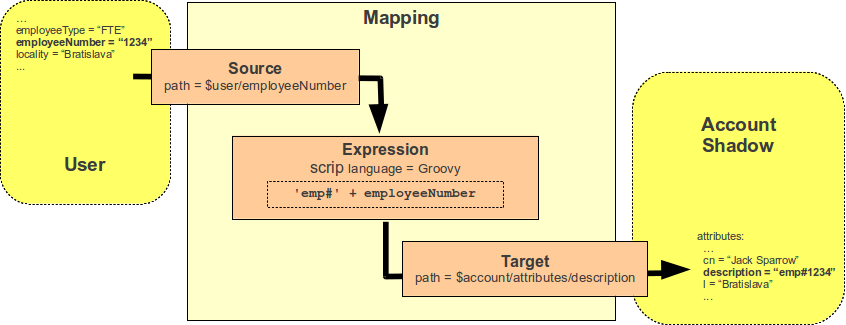
The diagram shows a mapping that takes employeeNumber user property and transforms it to description account attribute by using a simple Groovy script expression.
The source part of the mapping specifies that there is a single source, which is based on employeeNumber user property.
Source definitions are important for the mapping to correctly process relative changes (deltas), resolve mapping dependencies, etc.
The source definition tells mapping that the value of employeeNumber user property should be passed to an expression.
The expression part contains a simple Groovy script that prepends the prefix emp# to the employee number value, specified by the source definition.
The expression part of the mapping is very flexible.
There is a lot of ways that can be used to transform a value, generate new value, use a fixed value, pass a value without any change and so on.
The target part defines how the result of the expression should be used.
In this case, the result is to be used as a new value for description account attribute.
The target definition is necessary, so the mapping can locate appropriate definition of the target property, and make sure that the expression produces a correct data type, and that other schema constraints are maintained (e.g. single vs multiple values).
This mapping can be expressed in XML:
<mapping>
    <source>
        <path>$focus/employeeNumber</path>
    </source>
    <expression>
        <script>
            <code>'emp#' + employeeNumber</code>
        </script>
    </expression>
    <target>
        <path>$projection/attributes/description</path>
    </target>
</mapping>
Not all parts of the mapping are mandatory. If the expression is not present, then "as is" expression is assumed. Such expression simply copies the source to target without any transformation. Some parts of the mapping may be implicitly defined by the surrounding context. E.g. target or source is implicit if the mapping is used to define attribute behavior in the schema handling section. Therefore, it is usually sufficient to define either source or target for mappings in schema handling.
The following example specifies a mapping in element outbound.
There is explicit definition of mapping source, specifying that mapping input is familyName property of a focal object (which is usually user).
The mapping has no expression defined, therefore it defaults to the "as is" expression.
Because the mapping is specified in attribute element, the mapping has an implicit target, which is the sn attribute.
<schemaHandling>
    ...
    <attribute>
        <ref>sn</ref>
        <outbound>
             <source>
                  <path>$focus/familyName</path>
            </source>
        </outbound>
    </attribute>
    ...
</schemaHandling>
In this case, the mapping notation can even be shortened even further.
It is quite clear that the mapping source will be one of the properties of the focal object (user).
Therefore, the $focus prefix can be omitted:
<schemaHandling>
    ...
    <attribute>
        <ref>sn</ref>
        <outbound>
            <source>
                 <path>familyName</path>
            </source>
        </outbound>
    </attribute>
    ...
</schemaHandling>
Those examples are still very simple. Mappings can do much more – as you will learn in a while. However, there is one more thing that we need to explain before going on. Mappings are designed to work with more than just a single source. Following diagram illustrates a mapping that takes two arguments: given name and family name. The mapping produces full name by concatenating these value with a space in between. This is the kind of mapping that is frequently used to construct user’s full name from its components. While the mapping may seem simple, there are some sophisticated mechanisms hidden inside.
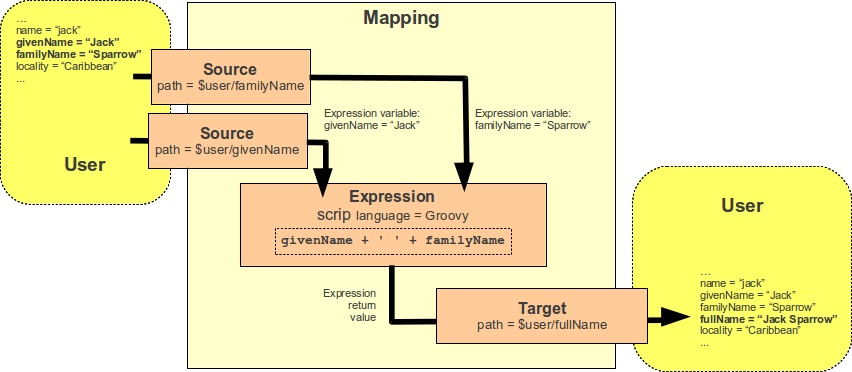
The mapping is represented in the XML form as follows:
<mapping>
    <source>
        <path>givenName</path>
    </source>
    <source>
        <path>familyName</path>
    </source>
    <expression>
        <script>
            <code>givenName + ' ' + familyName</code>
        </script>
    </expression>
    <target>
        <path>fullName</path>
    </target>
</mapping>
There are two sources, specified by the source definitions: user property givenName and another user property familyName.
The mapping is using script expression to combine the values into a single value, which is used to populate user’s fullName property.
This example also illustrates that the mappings are quite smart.
The mapping may be evaluated only if one of the sources changes, or if a full recompute is requested.
In case that neither givenName not familyName changes, there is no need to re-evaluate that expression.
This is one of the reasons for requiring explicit source definition in the mappings.
Without such definitions it is not (realistically) possible to reliably determine when and how the expression should be re-evaluated.
|
Obsolete
Variables $user and $account variables$focus and $projection were introduced way back in midPoint 3.0 as a consequence of the generic synchronization feature.
The objects that the expression works with might not be just user or account.
A much broader range of objects may be used.
Therefore, generic concepts of focus and projections were introduced, and the variable names were changed to reflect that.
The old variables $user and $account can still be used, but their use is deprecated.
Despite that, they are still used in some older examples.
It is never easy to completely eliminate historical baggage, is it?
|
Mappings are used all over midPoint, in many places and situations. Sometimes a mapping needs to be really authoritative. It has to enforce the value to the target. Yet sometimes, we want to provide a default value, and the mapping should never change the target value once it is set. Therefore, mapping can be set to various levels of strength: from weak to strong. Following table describes how that works:
| Strength | Description |
|---|---|
|
Mapping is applied only if the target has no value. Weak mappings are used to set default values. |
|
Mapping is applied only if there is a change in source properties.
Normal-strength mappings are used to implement the last change wins strategy.
If the source value was modified in midPoint, then the mapping is applied, and target is modified.
If the target is modified directly, then the mapping does not overwrite the target value – until the next change in midPoint.
This is the default behavior of mappings.
If no strength is specified, then |
|
Mapping is always applied. Strong mappings enforce particular values. |
The strength can be specified in any mapping, by using the strength element:
<attribute>
    <ref>sn</ref>
    <outbound>
        <strength>strong</strength>
        <source>
             <path>$focus/familyName</path>
        </source>
    </outbound>
</attribute>
When it comes to mapping strength, the following rule of the thumb may be useful: If you want to enforce policy, use strong mappings. If you just want to set a default value, use weak mapping. If you are not sure what you are doing, then normal mappings will probably work just fine.
Expressions
Expression is the most flexible part of the mapping.
There is approximately a dozen different types of expressions ranging from the simplest as is expression, through the scripting expressions, all the way to a special purpose expressions that search through midPoint repository.
Expression type is determined by the element that is used inside the expression part of the mapping.
We refer to those elements as expression evaluators.
You can find detailed description of expression evaluators in midPoint documentation.
We are going to deal only with few popular types:
| Expression Evaluator | Element | Description |
|---|---|---|
As is |
|
Copies the value without any transformation. |
Literal |
|
Stores literal (constant) value in the target. |
Generate |
|
Generates a random value. |
Script |
|
Executes a script, stores script output in the target. |
The simplest expression evaluator is asIs.
It simply takes the source, and copies the value to the target.
It obviously works only if there is just one source.
It is also the default expression evaluator.
If no expression is specified in the mapping, then asIs is assumed.
It is used like this:
<attribute>
    <ref>sn</ref>
    <outbound>
        <source>
             <path>familyName</path>
        </source>
        <expression>
            <asIs/>
        </expression>
    </outbound>
</attribute>
In the example above, the asIs expression was specified explicitly.
As asIs is the default expression evaluator, we can save some typing and shorten the notation:
<attribute>
    <ref>sn</ref>
    <outbound>
        <source>
             <path>familyName</path>
        </source>
    </outbound>
</attribute>
Literal expression evaluator is used to place a constant value in the target.
This expression does not need any source at all.
It always produces the same value.
Following code sets the attribute o to fixed value ExAmPLE, Inc.:
<attribute>
    <ref>o</ref>
    <outbound>
        <expression>
            <value>ExAmPLE, Inc.</value>
        </expression>
    </outbound>
</attribute>
The generate expression evaluator is used to generate a random value.
As such it is used almost exclusively to generate passwords.
We will deal with that expression later when we will be dealing with credentials.
Script Expressions
The most interesting expression evaluator is undoubtedly the script expression evaluator.
It allows execution of arbitrary scripting code to transform the value.
Basic principle is simple: values from source properties are stored in the script variables.
Script is executed, and it produces an output.
Return value of the script is stored in the target.
We have already seen a mapping that has a scripting expression:
<mapping>
    <source>
        <path>givenName</path>
    </source>
    <source>
        <path>familyName</path>
    </source>
    <expression>
        <script>
            <code>givenName + ' ' + familyName</code>
        </script>
    </expression>
    <target>
        <path>fullName</path>
    </target>
</mapping>
There are two sources: givenName and familyName.
The values of these user properties are placed in variables used by the script.
The variables have the same names as the sources: givenName and familyName.
Then the script may do whatever it needs to do.
It may use input variables, or it may use any other data available in the platform.
At the end, the script has to return a value.
The script above is written in Groovy, therefore the return value is the value of the last evaluated expression.
In this case it is the only expression in the script, which concatenates the two variables with a space in between.
Script return value is placed in the target, which in this case is fullName user property.
|
Groovy
Groovy is a scripting language similar to Java programming language.
That is also the reason Groovy is a default scripting language in midPoint.
As midPoint is written in Java, Groovy was an obvious choice.
Groovy interpreter is readily available in Java ecosystem, it has familiar syntax (at least for midPoint developers) and all of midPoint functionality could be re-used in scripts.
Since the early times of midPoint, support for more scripting languages was added, most notably JavaScript and Python.
However, midPoint community seems to like Groovy, therefore it still remains the most popular choice.
|
Scripts are often used to transform the values before they are stored in account attributes.
One very common case is construction of LDAP distinguished name (DN).
The DN is a complex value in the form of uid=foobar,ou=people,dc=example,dc=com.
However, it is easy to construct such value using a simple script:
<attribute>
    <ref>dn</ref>
    <outbound>
        <source>
             <path>name</path>
        </source>
        <expression>
            <script>
                <code>
                    'uid=' + name + ',ou=people,dc=example,dc=com'
                </code>
            </script>
        </expression>
    </outbound>
</attribute>| A clever reader surely has a disapproving look on his face now. Of course, this is not entirely correct way to compose LDAP DN. Please bear with us. We will correct that later. |
Midpoint supports three scripting languages:
-
Groovy: This is the default scripting language.
-
JavaScript (ECMAscript)
-
Python (must be explicitly installed)
All three languages can be arbitrarily mixed even in a single midPoint deployment - although, quite understandably, such a practice is not recommended. The language can be selected for each individual expression by using language URI:
<expression>
    <script>
        <language>http://midpoint.evolveum.com/xml/ns/public/expression/language#python</language>
        <code>
            "Python is %s, name is %s" % ("king", name)
        </code>
    </script>
</expression>|
Escaping
When writing scripting expression, please keep in mind that some characters must be properly escaped in the text format that you are using (XML, JSON or YAML).
E.g. the ampersand character (&) so frequently used for logical operations needs to be escaped as & in XML.
|
Scripting expressions can do almost anything. There is still more to them that meets the eye. This section provides only the very basic description to get you started. Will get back to the scripting expressions many times in this book.
Activation
In midPoint, the term activation is used to denote a set of properties that describe whether an object is active. This includes properties that describe whether the user is enabled or disabled, since when he should be enabled, to what date he should be active, and so on. The simple binary enabled/disabled flag might have been sufficient in the 1990s. That was a long time ago. We need much more than that. Therefore, midPoint activation is quite a rich data structure. We are going to describe just the basic idea now, the details will follow later.
The most important activation concept is administrative status. Administrative status defines "administrative state" of the object (user), i.e. the explicit decision of an administrator whether the user is enabled or disabled. Except for administrative status, there are also validity times, lockout status, various timestamps and metadata. We will get to that later.
The important thing to realize is that both user and the accounts have activation properties - and they are almost the same. The user and account activation are using the same property names, meaning and data formats. This is important, because you would probably want account activation to follow user activation. E.g. if user is disabled, then also all his accounts should be disabled. This is very easy to do in midPoint, because the user and account activation are compatible. Therefore, all it takes is a very simple mapping. There is a special place in the resource schema handling section for that:
<resource oid="b4101662-7902-11e6-9f14-53e18426fe81">
    <name>My LDAP Server</name>
    ...
    <schemaHandling>
        <objectType>
            <kind>account</kind>
            <default>true</default>
            <delineation>
                <objectClass>inetOrgPerson</objectClass>
            </delineation>
            <!-- attribute handling comes here -->
            <activation>
                <administrativeStatus>
                    <outbound/>
                </administrativeStatus>
            </activation>
        </objectType>
    </schemaHandling>
</resource>
It is as simple as that.
Just an empty mapping represented by empty outbount element.
User has administrativeStatus property, account has administrativeStatus property, therefore midPoint knows what is the source and target of the mapping.
We do not need to specify these.
The values of the administrativeStatus property has the same type and meaning on both sides.
Therefore, the default asIs mapping is just fine.
We do not need to specify that either.
All that midPoint needs to know is that the mapping exists at all - that we want to pass the value from user to account.
That is a reason for having outbound element there, even an empty one.
MidPoint will fill in all the details.
When this mapping is in place and the user gets disabled, the account will be disabled as well. When the user gets enabled, the account will follow suit.
|
Lifecycle state
Activation is a common concept.
Accounts could be enabled or disabled since time immemorial.
However, in the 21st century, simple enabled/disabled binary state somehow lacks in expressive power.
There is much more that we would like to say about the user, not just that it is active or inactive.
User may not be fully active yet (e.g. before his first day at work), user may be temporarily inactive (e.g. maternal leave or sabbatical), user may be retired, and so on.
Therefore, midPoint objects support a concept of lifecycle, which is composed of several states, with controlled transitions between them.
However, unlike users, accounts seldom support anything more complex than enabled/disabled binary state.
That is the reason we are ignoring lifecycle for a moment, and we are focusing on activation instead.
Yet, lifecycle and activation are related, as we will see later.
|
Credentials
Credential management is important part of identity management. There are many systems in an organization, almost all of them require a password. Users set up a password, then they forget the password, then they request password reset, setting a new password, which they forget as well. The endless cycle continues. While there is probably no magic formula to completely solve this problem (perhaps except for removing passwords altogether), the situation can be made less painful.
The usual method is to synchronize the passwords among all the systems in one organization. This does not make the problem go away. However, it reduces many set-forget-reset-forget cycles to just one. Moreover, as users are using that one password quite often, they are less likely to forget it. Of course, having the same password on many systems is not exactly the best security practice. However, security is all about trade-offs. Having the same password set for all systems in one organization is an acceptable risk in vast majority of cases.
MidPoint is designed to easily synchronize credentials to many accounts. Similarly to activation, credential data structures of user and account are aligned. Therefore, all that is needed to synchronize password to an account is a simple empty mapping:
<resource oid="b4101662-7902-11e6-9f14-53e18426fe81">
    <name>My LDAP Server</name>
    ...
    <schemaHandling>
        <objectType>
            <kind>account</kind>
            <default>true</default>
            <delineation>
                <objectClass>inetOrgPerson</objectClass>
            </delineation>
            <!-- attribute handling comes here -->
            <credentials>
                <password>
                    <outbound/>
                </password>
            </credentials>
        </objectType>
    </schemaHandling>
</resource>
When the user password in midPoint is changed, the changed password will be propagated to all the resources that have a mapping like this.
|
MidPoint sample collection
Now it is perhaps a good time for you to have a look at some sample resource definitions, to get a feel how a real-world resource definition looks like.
The samples are located in the midPoint distribution package, or you can find them on-line.
See Additional Information chapter for more details.
|
Complete Provisioning Example
This section describes a complete working example of connection to the LDAP directory. The configuration below is used to automatically create accounts in OpenLDAP server. Entire configuration is contained in a single resource definition file. Following paragraphs explain individual parts of the file. Simplified XML notation is used for clarity. Complete file in a form directly usable in midPoint can be found at the same place as all the other samples in this book (see Additional Information chapter for details).
Resource definition begins with object type, OID, name and description. These are self-explanatory:
<resource oid="8a83b1a4-be18-11e6-ae84-7301fdab1d7c">

    <name>LDAP</name>

    <description>
        LDAP resource using a ConnId LDAP connector. It contains configuration
        for use with OpenLDAP servers.
        This is a sample used in the "Practical Identity Management with MidPoint"
        book, chapter 4.
    </description>
    ...
Connector reference comes next. We want to point to the LDAP connector. Here we use dynamic reference that is using search filter to locate the connector:
    ...
    <connectorRef type="ConnectorType">
        <filter>
            <q:text>connectorType = "com.evolveum.polygon.connector.ldap.LdapConnector"</q:text>
        </filter>
    </connectorRef>
    ...
The reference is resolved when this object is imported to midPoint.
The resolution process takes the search filter, and it looks for connector object with the connectorType specified in the filter.
Connector configuration goes next. This block specifies connector configuration properties such as hostname, port, passwords and so on.
    <connectorConfiguration>
        <icfc:configurationProperties>
            <icfcldap:port>389</icfcldap:port>
            <icfcldap:host>localhost</icfcldap:host>
            <icfcldap:baseContext>dc=example,dc=com</icfcldap:baseContext>
            <icfcldap:bindDn>cn=idm,ou=Administrators,dc=example,dc=com</icfcldap:bindDn>
            <icfcldap:bindPassword><t:clearValue>secret</t:clearValue></icfcldap:bindPassword>
            <icfcldap:passwordHashAlgorithm>SSHA</icfcldap:passwordHashAlgorithm>
            <icfcldap:vlvSortAttribute>uid,cn,ou,dc</icfcldap:vlvSortAttribute>
            <icfcldap:vlvSortOrderingRule>2.5.13.3</icfcldap:vlvSortOrderingRule>
            <icfcldap:operationalAttributes>memberOf</icfcldap:operationalAttributes>
            <icfcldap:operationalAttributes>createTimestamp</icfcldap:operationalAttributes>
        </icfc:configurationProperties>
    </connectorConfiguration>
These parts alone should already define a minimal resource. If you define just the name, connector reference and connector configuration you should be able to import the resource to midPoint. The connection test should pass. However, there is absolutely no IDM logic or automation yet. That is what we are going to add next.
Connector configuration is usually followed by schema element.
However, if you look at almost any file that contains resource definition, you will find no such element.
The schema element is automatically generated by midPoint when midPoint connects to the resource for the first time.
Therefore, there is no need to include schema element in the definition.
What we have to include in the definition is the configuration that tells midPoint how to handle the schema.
This is defined in schemaHandling section.
Our schemaHandling section contains just one objectType definition.
We are going to define how to handle ordinary user accounts on our OpenLDAP server.
    ...
    <schemaHandling>
        <objectType>
            <kind>account</kind>
            <displayName>Normal Account</displayName>
            <default>true</default>
            <delineation>
                <objectClass>inetOrgPerson</objectClass>
            </delineation>
            ...
This is the place where we define the kind of objects that we are going to handle.
In this case it is account.
This object is default account.
Which means that it will be used in case that the account type is not explicitly specified.
There is also specification of a display name.
Display name is not used in automation logic.
It is used by the user interface when referring to this definition.
Finally, there is specification of the object class.
The inetOrgPerson object class will be used to create new accounts.
The object class specification determines what attributes the account have.
The objectType definition also includes a specification of attribute handling.
There is one section for each attribute that we want to handle in automated or special way.
It starts with the most important attribute: LDAP distinguished name (DN):
            ...
            <attribute>
                <ref>dn</ref>
                <displayName>Distinguished Name</displayName>
                <limitations>
                    <minOccurs>0</minOccurs>
                </limitations>
                <outbound>
                    <source>
                        <path>$focus/name</path>
                    </source>
                    <expression>
                        <script>
                            <code>
                                basic.composeDnWithSuffix('uid', name, 'ou=people,dc=example,dc=com')
                            </code>
                        </script>
                    </expression>
                </outbound>
            </attribute>
            ...
The ref element specifies name of the attribute that we are going to work with.
In fact, this is a reference to automatically-generated schema part of resource definition.
Definition of display name follows.
Display name is used by the user interface as a label for the user interface elements (fields) that work with this attribute.
This definition sets a nice "Distinguished Name" label instead of cryptic "dn" which would be used by default.
Let’s skip the limitation definition now. We will come back to that later.
The outbound mapping definition follows.
This is where the automation logic is specified.
This is the place where the DN value is computed.
The name property of the user object is the source for this mapping.
The name property usually contains username (login name).
Its value is used by scripting expression in the mapping.
The expression is supposed to create a DN in the form:
uid=username,ou=people,dc=example,dc=com
This expression is a clever one.
It does not do the work all by itself.
It invokes a library function to compose the DN.
It may look like a good idea to use simple string concatenation to construct a DN.
However, that fails in case that the DN components contain certain characters that need to be escaped in the final DN.
The composeDnWithSuffix library function takes care of that, and it creates a proper DN.
The outbound mapping is evaluated whenever we need to construct a DN.
This obviously happens when a new object is created.
However, the same mapping is used when a user is renamed (i.e. his username changes).
This is the reason that the mapping needs specification of source.
Rename is often quite tricky and complicated operation.
It may not be cheap, and in some cases it may not be entirely reversible.
We definitely do not want to trigger DN changes unless they are really needed.
The specification of the mapping source tells us when the DN change is needed.
In this case, it tells us to change the DN if the name property of the user object changes.
Now it is the right time to go back to the limitations section.
The dn attribute is defines as mandatory attribute by the schema.
Strictly speaking, that definition is perfectly correct: LDAP object cannot be created without a DN.
As midPoint is using schema for everything, when midPoint displays a form to edit this LDAP account, it will require that DN has a value, because it is a mandatory attribute.
However, normally we do not want users to enter the DN in the user interface forms.
We want to compute DN automatically - which is exactly the point of the outbound mapping above.
Yet, midPoint does not know when the expression computes a value and when it does not.
The expression is a generic piece of Groovy code, there is no telling what it does until it is executed.
As far as midPoint can see, the expression can produce any value, including empty one.
Therefore, even if there is an expression, midPoint sticks to the schema, and it still requires that DN value is entered by the user.
However, we have written the expression, and we know that it will produce a value for any (reasonable) input.
Therefore, we want to tell midPoint that the DN is no longer mandatory – that the user does not need to enter DN value in user interface forms.
That is exactly what the limitations section does.
This section overrides the automatically generated schema, and it turns the dn attribute from mandatory to optional.
Now we have defined the behavior of the dn attribute.
We can use similar approach to define the behavior of other attributes as well.
E.g. the handling of the cn attribute has similar definition:
            ...
            <attribute>
                <ref>cn</ref>
                <displayName>Common Name</displayName>
                <limitations>
                    <minOccurs>0</minOccurs>
                </limitations>
                <outbound>
                    <source>
                        <path>$focus/fullName</path>
                    </source>
                </outbound>
            </attribute>
            ...
In this case there is outbound mapping, but it has no explicit expression.
Which means that the value is taken from the source without any change ("as is").
Therefore, the attribute cn will have the same value as user property fullName.
It is also possible to define an attribute without any mapping:
            ...
            <attribute>
                <ref>entryUUID</ref>
                <displayName>Entry UUID</displayName>
            </attribute>
            ...
This means that midPoint will not provide any automatic handling for the entryUUID attribute.
This definition is used just to set a user-friendly display name for the attribute.
Mappings and expressions have almost unlimited flexibility.
E.g. the following definition sets a static value for the description attribute:
            ...
            <attribute>
                <ref>description</ref>
                <outbound>
                    <strength>weak</strength>
                    <expression>
                        <value>Created by midPoint</value>
                    </expression>
                </outbound>
            </attribute>
            ...
This mapping has no source, because the source does not make any sense for literal expressions.
Static values are always the same, regardless of the source.
You can also notice that this mapping is weak.
It is used to set the description attribute only if that attribute does not have any value already.
It does not overwrite existing values.
The inetOrgPerson object class has much more attributes than those defined in the schemaHandling section.
Those attributes will be automatically displayed in the user interface.
MidPoint uses the generated resource schema to determine their names and types.
MidPoint displays these attributes, the user can change them and midPoint executes those changes.
However, apart from that, midPoint does not do any special handling on those attributes.
It is all right not to enumerate all the attributes in schemaHandling section.
You only need to define those attributes which you want to handle in a special way.
There are two more definitions to describe, before our example is complete.
First definition is the activation definition.
It is very simple:
            ...
            <activation>
                <administrativeStatus>
                    <outbound/>
                </administrativeStatus>
            </activation>
            ...
This is a definition that specifies handling of the activation administrative status. This status property specifies whether account is enabled or disabled. Activation properties are somehow special in midPoint. MidPoint understands the meaning and the values of activation properties. MidPoint also expects that user activation and account activation are usually mapped together. Therefore, it is enough to tell midPoint that you want such mapping. MidPoint already knows the source (user activation) and the target (account activation). If the user is disabled then the account will get disabled. If the user is enabled than the account will get enabled.
| Clever reader is surely scratching his head now. There is no LDAP standard that specifies how to enable or disable accounts. In addition to this, OpenLDAP does not even have a concept of disabled account at all! Therefore, how can midPoint disable an OpenLDAP account? To tell the truth, midPoint does not know how to do it. We have taken a bit of a poetic license here, as we wanted to demonstrate a simple activation mapping. The configuration will not work just by itself. OpenLDAP resource does not have this capability. However, there is a way. Activation capability can be simulated. We will deal with that later. For now let’s just marvel in the beauty of this very elegant activation mapping that does absolutely nothing. |
The last thing that we need for the resource to work well is to define a mapping for credentials. In this case it is a password mapping:
            ...
            <credentials>
                <password>
                    <outbound/>
                </password>
            </credentials>
            ...
Similarly to activation, the credentials are handled in a special way. MidPoint understands how credentials work, what their values are, and how they are used. MidPoint also expects that user credentials, such as passwords, are usually mapped to the account credentials. Therefore, all that midPoint needs to know is that you want to do that mapping. It can automatically determine the source and target. The account will have the same password as the user. User’s password is used when a new account is created. When user changes his password, the change is also propagated to the account.
That is it. Now you have your first (almost) working resource. You can import the definition to midPoint and test it. Simply assign the resource to a user. The OpenLDAP account will be created - the DN and all the essential attributes will be automatically computed. When midPoint creates an account for a user, it remembers who is the owner of that account. Therefore, it can easily delete the account when needed. Unassign the resource, and the account will get deleted. This is how automated provisioning and deprovisioning works. No hardcore programming is needed, just a declarative specification, and a line or two of very simple scripting. Such configuration can be done in a couple of minutes. It is essentially the same process for all the applications, just the connector is different. The connector has different configuration properties, the attribute names are different - but the principles and the tools are the same. It is easy to connect many heterogeneous applications in this way. The connectors and the mappings are hiding the differences. In the end, all the "resources" look the same to midPoint. The same principles are used to manage them. Therefore, the management can be done efficiently, even at a large scale.
Yet this configuration is still extremely simple. We are just scratching the surface of what midPoint can do. There is much more to see in the next chapters. However, we still need to explain one more fundamental midPoint concept before getting there.
Shadows
Linking users and accounts is one of the basic principle of any decent identity management system. However, it is surprisingly difficult to implement such link. There are numerous methods to reliably identify accounts, and they vary from system to system. Some systems identify accounts only by username - which makes reliable detection of rename operations quite difficult. Other systems improve on that by introducing another identifier, an identifier that is persistent. Identifier value is assigned by the resource, and it never changes. However, username is still used as secondary identifier, and it still has to be unique. Yet another system may have compound identifiers that consist of two or more values. Some system have globally-unique identifiers, while other systems have local identifiers that are only unique in their own object class. Some systems have hierarchically-structured identifiers, others have flat unstructured identifiers. Some identifiers are case-sensitive strings, others are case-insensitive, some identifiers follow complex normalization rules, and yet another identifiers are binary and completely opaque. To make long story short: reliable identification is really complicated.
We do not want to pollute user object with all the delicate details of account identification. Therefore, we have created a separate midPoint object that hides all the resource-related details and identification complexities. We call it shadow, because it behaves as a shadow of the real account. When midPoint detects new account, a shadow is automatically created to represent the account in midPoint repository. When midPoint detects that account has changed (e.g. it was renamed), then midPoint automatically updates the shadow. When the account is deleted, midPoint deletes the shadow. Technically, shadow is still an ordinary midPoint object. Therefore, it has object identifier (OID). Other objects can simply point to the shadow using ordinary object reference. That is exactly how user-account links are implemented:
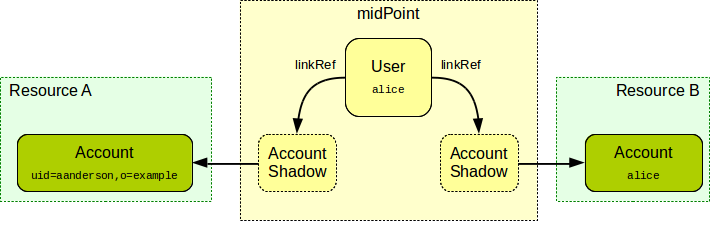
The shadow objects contain all the data that are needed to reliably identify an account - or any other resource object such as group or organizational unit. In addition to the account identifiers, shadow points to the corresponding resource definition, to make the identification complete. Shadows are multi-purpose objects, and they have many uses in midPoint. Shadows record meta-data about resource objects. They are used to hold cached values of the attributes (this functionality is still experimental in midPoint 4.8.5). Shadows can be used to hold the state of the resource objects for which midPoint does not have on-line communication channel and the operations are executed manually (a.k.a. "manual resources"). Therefore, shadows are quite complex objects. Following picture provides more substantial example of a shadow.
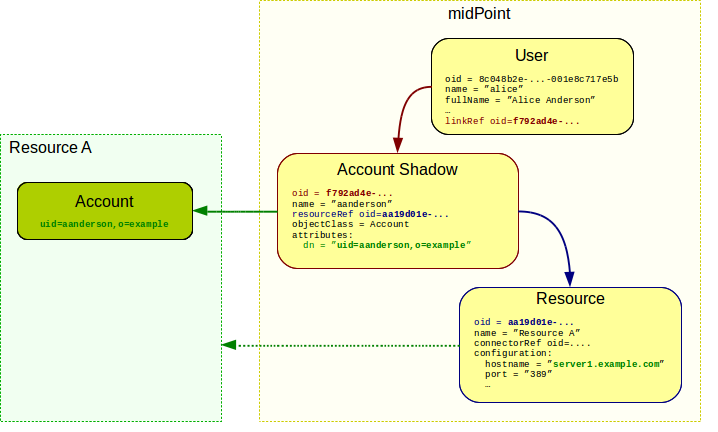
Do not worry if that picture looks a bit scary. Shadows may be complex, but they are almost always invisible to midPoint users. Shadows are automatically and transparently maintained by midPoint core engine. Under normal circumstances, MidPoint does all that is needed to maintain the shadow, and no special configuration is needed for that. We are describing the mechanics of the shadow objects mostly for the sake of completeness. There are situations when this knowledge may be useful. These are usually situations when midPoint was mis-configured, and the shadows were created incorrectly. In that case you may need to update the shadows, or even purge all shadows and start over.
Conclusion
MidPoint is configured as a simple provisioning engine now. We can use midPoint to create, modify and delete accounts on many diverse systems. However, we are still at the beginning. MidPoint is pushing the changes to other systems, but it is not listening for any changes yet. Similarly to people, systems that talk all the time and never listens do not make good companions. Therefore, the next task is to make midPoint a better listener, by configuring synchronization mechanisms.
5. Synchronization
It is a capital mistake to theorize before one has data.
The Adventures of Sherlock Holmes by Arthur Conan Doyle
Data are the lifeblood of any software system. Ensuring proper management of the data is one of the primary responsibilities of all IT professionals. However, data management can be very tricky. One of the important principle of software architecture is often formulated as "do not repeat yourself". This applies to code, as it applies to data: though shall not repeat the data. There is one original, authoritative value. And there should not be any copies of that value. Ever. There is just one universal source of truth. If there are no copies, then the data are always consistent. No copies mean no contradictions. Just one truth, precise and crystal-clear. Keep data in one place, and one place only.
That is the theory.
However, practice has a different opinion to offer. There are many incompatible technologies in practical IT systems. Applications built on relational databases cannot directly use data from directory services. Even relational databases do not fit together easily. Each application is designed with a different data model in mind. Each cloud application has a different interface (API). There are data translation and bridging technologies that work as adapters to resolve compatibility issues. You make a query, the query is intercepted by an adaptor, the adaptor translates the query, executes it in a remote database, gets the results, translates them, and provides them to you. All of that in real time. Those are elegant solutions. Yet, there is a cost to pay. The adapters add latencies, and they almost always have a negative impact on performance. Even worse, transaction handling and data consistency is very problematic. Such adapters are additional components on a critical path, and their failures are very painful. The resulting system is often operationally fragile: failure of even a minor component means a failure of the entire system - not to speak about the enormous complexity and cost of the solution.
On the other hand, copying all the data into my application database is so very convenient. The application can access the data easily, using just one homogeneous mechanism. Failure of other components are not affecting the critical path. It is all so much better for performance. Copying the data solves almost all the troublesome issues. Except for one small detail: the problem of keeping the data up to date. That is where the synchronization mechanisms come in.
However hard you may try, it is almost impossible to avoid making copies of the data. Identity data are no exception. In fact, identity data are often the most heavily affected. That makes a lot of sense. Applications are built for users to use them. Therefore, almost every application keeps some kind of data about users. In addition to that, such data are usually very sensitive from security and privacy point of view.
If we cannot avoid copying the data, the best thing that we can do is to keep the copies managed and synchronized.
Some applications have built-in support for LDAP or directory synchronization. However, those mechanisms are usually quite weak and fragile. For example, many applications provide capability for on-demand synchronization with directory service on login time. It usually works like this:
-
User enters username and password to application login dialog.
-
The application connects to the directory service to validate the password.
-
If the password is correct then the application retrieves user data from the directory.
-
The application stores copy of user data locally.
-
Business as usual. Local copy of the data is used ever since.
New cloud applications provide similar support for single sign-on (usually OpenID Connect or SAML), which is basically the same:
-
No local session exists, therefore user is redirected to identity provider.
-
User enters username and password to login dialog at identity provider site.
-
If the password is correct, then identity provider redirect user back to application, packing user data in the response.
-
The application stores copy of user data locally.
-
Business as usual. Local copy of the data is used ever since.
This approach works quite well at the beginning. The data can be updated every time the user logs in - which may or may not be enough. Yet, after a while, the data begin to stink. Users are renamed, but the local copies are not updated. Users are deleted, but the local copies stay around forever. There are local accounts and privileges that are not reflected back to the directory service or identity provider, and therefore remain undetected for years. Which means that we have a serious security and data protection problem here. Even worse, we do not even know that the problem is there.
Some applications have more advanced synchronization processes that can do better than this. However, an application that does synchronization well is still an extremely rare sight. There is a good reason for this. Synchronization is much harder than it seems. There may be data inconsistencies on both sides. There may be network communication errors and configuration errors. Data models are evolving over time. Policies are changing. It is no easy task to reliably synchronize the data in such environment. Therefore, there is a special breed of systems that specialize in synchronization of identity data: identity management systems.
Synchronization in MidPoint
Synchronization is one of the fundamental mechanisms of midPoint. Synchronization mechanisms are integral part of midPoint design from its very beginning. Many of the things that midPoint normally does are in fact just different flavors of synchronization. There are obvious cases such as reconciliation process, synchronizing account attributes with data in midPoint repository. However, there are also less obvious cases, such as ordinary provisioning operation when midPoint needs to create a new account for a user. Even that case is in fact a synchronization: midPoint user properties are synchronized with a new empty account on the resource. Majority of midPoint operations are directly or indirectly using the synchronization principles.
|
Reuse
Reuse of the mechanisms is one of fundamental principles of midPoint design.
When we have designed midPoint, we have not invented a separate mechanism for every midPoint feature.
We have rather designed few very generic principles that are re-used at many places in midPoint.
Synchronization is one of these principles.
There is one code that implements the core of the synchronization logic.
That code is used whenever we need to "align" objects that relate to each other.
The same code is used for user-account reconciliation, ordinary provisioning, role-based provisioning, live synchronization, opportunistic data consistency … almost everywhere.
|
MidPoint synchronization provides a continuous functionality spectrum that can be tweaked and tuned to match specific needs. Yet, the synchronization mechanisms can be divided to several broad and slightly overlapping categories:
-
Live synchronization is almost real-time synchronization mechanism. MidPoint continually scans the resource for changes. When changes are detected they are immediately processed by midPoint. The actual latencies depend on the capabilities of the resource, but usual numbers range from few seconds to few minutes. Only recent changes are processed by live synchronization. It is a very efficient mechanism, which usually has fast responses even in large-scale deployments. It usually runs all the time.
-
Reconciliation is a process that compares the data and corrects the differences. When an account is reconciled, midPoint computes the attribute values that the account should have. The computed values are compared to the real values that the account has. Any differences are corrected. Reconciliation is quite heavy-weight mechanism, comparing all the accounts one-by-one. It is also a very reliable mechanism. It can correct mistakes that were missed by live synchronization, it can correct data after major failures, corruptions, and so on. Reconciliation is usually executed in regular intervals. However, due to its heavyweight nature, it is usually executed during off-peak times (nights and weekends).
-
Import is usually a one-time process to get data from the resource to midPoint. Import is used to populate midPoint with initial data, or it may be used to connect a new resource to midPoint. Import is almost the same as reconciliation, with only a few minor differences. However, the purpose of import and reconciliations are different, and therefore there may be a slightly different configuration of import policies (mappings). Import is usually not scheduled, it is manually triggered when needed.
-
Opportunistic synchronization is a very special kind of animal which is quite unique to midPoint. Opportunistic synchronization is triggered automatically when midPoint discovers that something is not in order. For example, if midPoint tries to modify an account, but it discovers that the account is not there. Synchronization mechanism is triggered at that point, just for that single account. This usually means that the account is re-created. The opportunistic synchronization is also triggered when midPoint tries to create a new account, but the account is already there. This approach makes midPoint a self-healing system. If midPoint runs into a problem, it can often correct the problem just by itself.
Individual mechanisms differ in a way data inconsistency is discovered: live synchronization actively looks for new changes, reconciliation compares the data one-by-one and opportunistic synchronization discovers inconsistency by chance. Yet, all the mechanisms react to inconsistency in the same way. There is only one policy that specifies how to fix the data. Of course, there may be slight deviations in the behavior. For example, we usually want import to behave in slightly different way than reconciliation. MidPoint allows that. Yet, there is just one common synchronization mechanism. This has a very good reason. It does not really matter how the problem was discovered. What really matters is that the problem gets fixed. We do not want to maintain four separate configurations for every delicate variation of the functionality. Having one policy is much better. MidPoint knows which part of the configuration need to be applied in each specific situation, and it does it automatically. This unifying approach significantly simplifies the configuration of midPoint synchronization mechanisms. That is also a reason why the boundaries of individual synchronization mechanisms are quite fuzzy. In fact, it is just one big mechanism with several facets.
Source Systems, Target Systems And Other Creatures
The tale of idealistic identity management deployment starts with a human resources (HR) system. The HR system is supposed to have records for all the identities, therefore it is authoritative source system. Identity management system pulls in all the data from HR database, recomputes them and creates accounts on target systems. And they lived happily ever after.
Now, let’s get back to reality. The HR database is indeed an authoritative source of data in many real-world cases. However, it is a limited source. It contains data about employees only, and it has only partial information about them. For example, there is no username in the HR record. Username has to be generated by IDM logic. There is no initial password. Organizational structure assignment is often incomplete or unreliable. Therefore, HR database is only a partially-authoritative source. There may be additional authoritative sources for contractors, partners, suppliers, support engineers and other identities that need to access our systems. These are additional source systems. Then there is a directory system, which is often Microsoft Active Directory. It should be a target resource, in theory. Yet, there may be pieces of authoritative information in here. For example, an algorithm to generate a username may be based on the usernames that are already used in the Active Directory. The data in Active Directory may also be needed to create a unique e-mail address. Directory systems are also used as a semi-authoritative sources for telephone numbers, office numbers and similar identity attributes. Therefore, such systems are both target and source systems. Then there are "pure" target systems. These are not supposed to be authoritative in any way. Identity management system will only write to such systems. Or … will it? What happens when a conflicting account already exists on such system, and therefore we cannot create a new account for a new employee? How do we check if there are no accounts that are not supposed to be there? It turns out that even the "pure" target systems contain valuable sources of information after all.
The reality brings a wild mix of source, target, semi-source, target/source and quasi-target systems that are almost impossible to put into a pre-defined boxes. Therefore, midPoint does not bother to define a concept of "source" or "target" resource. Any resource can be both source and target, and the authoritativeness of each attribute can be controlled on a very fine level. Almost every real-world situation can easily fit into this model.
We are still using the terms source system and target system. However, these terms refer to the business purpose of such systems in the identity management architecture. The terms describe how we think about the systems, what is the usual direction of data flow. However, midPoint will read data from target system when needed, and it will be happy to write data to source systems if necessary.
Inbound and Outbound Mappings
MidPoint is firmly based on the principle of reuse. Previous chapter explained that behavior of attributes during provisioning is controlled by mappings. Therefore, it is perhaps no big surprise that the behavior of attributes during synchronization is also controlled by mappings. In fact, provisioning is just a special case of synchronization. Following picture explains the combined mechanism.
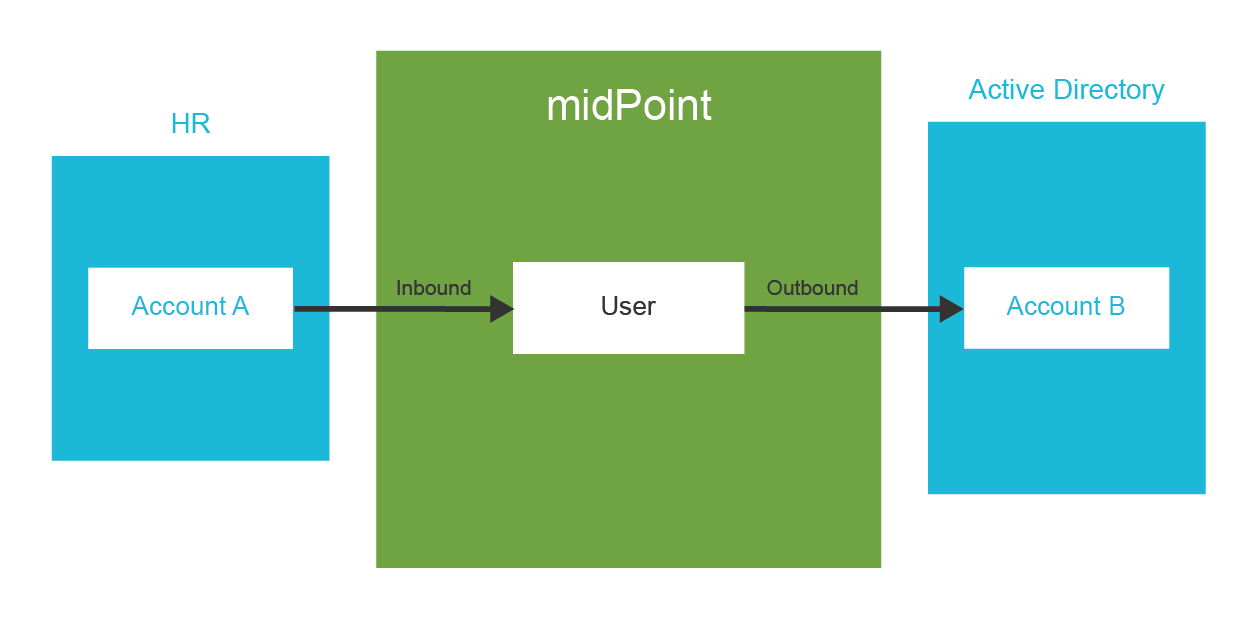
There are two types of mappings:
-
Inbound mappings map data flowing into midPoint. These mappings take the data from the source resources, transform them and apply the result to the user object.
-
Outbound mappings map data flowing out of midPoint. These mappings take user properties, transform them and apply the result to account attributes in target systems.
The mappings themselves are almost the same regardless whether they are inbound or outbound. They have sources, targets, expressions, conditions, etc. Just the sources and targets are reversed:
| Inbound mapping | Outbound mapping | |
|---|---|---|
Direction |
resource → midPoint |
midPoint → resource |
Mapping source |
resource object (e.g. account) |
focal object (e.g. user) |
Mapping target |
focal object (e.g. user) |
resource object (e.g. account) |
That is it. Think about the mappings that were used in previous chapter, just flip the direction. Now the mapping will take data from the account and the results will be applied to user object. Like this:
<attribute>
    <ref>lastname</ref>
    <inbound>
        <target>
            <path>$focus/familyName</path>
        </target>
    </inbound>
</attribute>
This mapping takes the value of lastname attribute from the resource and stores the value in familyName property of midPoint user.
The rest is the same as outbound mappings. All the expressions and evaluators can be used for inbound mappings in the same way as for outbound mappings. For example, a Groovy expression can be used to sanitize the value before it is stored in midPoint:
<attribute>
    <ref>lastname</ref>
    <inbound>
        <expression>
            <script>
                <code>lastname?.trim()</code>
            </script>
        </expression>
        <target>
            <path>$focus/familyName</path>
        </target>
    </inbound>
</attribute>
The same approach can also be taken for activation, and even for password mappings. However, there is one difference for password mappings. Password is usually write-only value. When the password is written, it is usually hashed, and the original value cannot be retrieved any longer. Then there are resources such as HR systems that do not store employee passwords at all, because those are not really accounts that we are reading. Those are just regular database entries that the connector presents as accounts. Inbound password synchronization is almost never easy, and it often requires a lot of planning and ingenuity. However, there is one method that is used quite often. The initial user passwords are usually randomly generated. As this is a very common case, midPoint can do this easily:
<credentials>
    <password>
        <inbound>
            <strength>weak</strength>
            <expression>
                <generate/>
            </expression>
        </inbound>
    </password>
</credentials>
This mapping generates random password for a user.
Both the mapping and generate expression evaluators are quite smart.
The mapping knows that the target is user password, without any need to explicitly specify that.
In addition to that, generate expression evaluator will take password policy into consideration.
It does not make sense to generate any random password.
If we do not consider password policy, then we can generate password that is too short, too long, too weak or too strong to be useful in any way.
Therefore, generate expression looks for password policy, and generates a random password that just matches requirements for password length and complexity.
There are more important details to see here. The inbound password mapping is weak. There is good reason for this. We do not want existing midPoint password to be replaced by randomly generated password. We only want to set a random password in case that it is an initial password, the first password ever. That is exactly what a weak mapping does: it sets new value only if the target does not have any existing value. Therefore, this mapping will not overwrite passwords that are already set.
| There is no direct account-account synchronization in midPoint. As explained before, midPoint follows a star topology (a.k.a. "hub and spoke"). Therefore, the synchronization is either from account to user (inbound) or from user to account (outbound). The effect of account-account synchronization is achieved by combining inbound and outbound synchronization mechanisms. |
Correlation
It is quite easy to import all HR records into an empty midPoint: we have to set up inbound mappings, start import task, wait a bit, and all is done. However, practical situations are much more complex. Synchronization usually does not run on a green field. Live synchronization and reconciliation are supposed to work with pre-existing midPoint users. Import may not be entirely trivial either, for example we may import data from an additional data source into a running midPoint deployment. Some users in the import data set are new, but there may be accounts describing existing users. We need to tell the difference between brand-new account and an account that belongs to an existing user. We need to handle them in a different way. Of course, midPoint has a solution for this: correlation mechanism.
Correlation is a method to connect newly-discovered accounts and existing users. Whenever midPoint discovers new account it will try to link that account to an existing user. MidPoint looks for an appropriate user to represent newly-discovered account. It does so by matching selected account attributes to appropriate user properties. Two things are needed for this to work: correlation rule and corresponding inbound mapping.
Correlation rule, better known as correlator, specifies which properties are used for correlation, and how they are used. In its simplest form, the correlator points to a single user property:
<correlation>
    <correlators>
        <items>
            <item>
                <ref>personalNumber</ref>
            </item>
        </items>
    </correlators>
</correlation>Correlator, as shown above, specifies that the personalNumber property should be used to correlate accounts and users.
If a newly-discovered account has a value that matches the personalNumber of a user, it is assumed that such user is an owner of the account.
Such account and user are correlated, and they will be linked.
Now we know that personalNumber property of midPoint users should be used for correlation.
However, which account attribute should we use to match values of personalNumber property?
That is where the mapping comes in.
MidPoint looks for inbound mapping that maps a value of an attribute to personalNumber property, such as this one:
<attribute>
    <ref>empno</ref>
    <inbound>
        <target>
            <path>$focus/personalNumber</path>
        </target>
    </inbound>
</attribute>
MidPoint knows that it needs to take value of account attribute empno to produce value for user property personalNumber.
This is what midPoint normally does when it synchronizes account data to user data.
The same mapping is used for correlation.
MidPoint takes the value of empno attribute, passes it through the mapping, and compares the result with the personalNumber property of all users.
The user that has a matching value is correlated to the account.
The correlator and the mapping always work together. Mapping transforms the value, correlator matches the value.
We have seen only very simple correlator so far. However, correlator can be quite complex. Correlation may be set up to match several items, correlation may be based on custom search filter or expression, and several rules may be used in composition, using specified weights to tune the process. Correlation can use approximate (fuzzy) matching with human assistance, submitting probable matches for approval by administrator.
Even though correlation mechanism is very rich, the humble item-based correlator remains the most popular one. Therefore, there is simplified method to configure it. Definition of correlation item can be placed directly in account attribute definition:
<attribute>
    <ref>empno</ref>
    <correlator/>
    <inbound>
        <target>
            <path>$focus/personalNumber</path>
        </target>
    </inbound>
</attribute>
The correlator clause in the mapping marks the empno attribute for correlation.
It will be matched with the mapping target, which is personalNumber user property.
This notation is all that is needed to set up simple correlation scheme.
|
Correlation in samples
The simple method of correlator definition is not used in the samples.
Not yet.
We do not have our ExAmPLE configuration done yet, therefore we had to make few compromises.
One of the compromises is username, we do have proper configuration for that yet.
We are abusing employee number to stand in for real username.
That means we need two inbound mappings for empno attribute.
If we marked empno attribute for correlation, midPoint does not know which of the two target properties is the right one for matching.
Therefore, we need to go the long way around in the samples, and specify the correlator using the full notation.
At least for now.
|
We have dealt with correlation for source resources so far, such as the HR systems in our ExAmPLE scenario. However, there is a slightly surprising fact, that correlation is usually not necessary for source systems with a single authoritative source. In such cases, the users are created from the accounts originating in the source systems. The users are automatically linked to the originating accounts at the moment of creation, no correlation is necessary there. The correlation is necessary in case that there is another source of data which overlaps with the primary source, such as second source system or manual entry of user data using user interface. Even though correlation mechanism may not be necessary in some cases, it is a best practice to set it up for production deployments. Having it set up from the beginning lowers the probability that it will be missing when new data source is added, or in case that system administrator manually creates user during HR system outage. It makes the deployment more resilient.
Apart from source resources, correlation is absolutely essential for handling target resources. It is a very rare occasion to connect an empty target system to midPoint. Almost all the target systems that are connected to midPoint contain existing data, existing accounts that belong to users in midPoint. When such target system is connected to midPoint, we have to correlate the account to midPoint users to correctly set up the links. The correlation mechanism is the same, regardless whether it is used for source or target systems - except for one little difference. While we would have a suitable inbound mapping for source systems, we may not have that for target system. Target systems often use outbound mappings only. Therefore, we need to add the missing inbound mapping to be used to correlate target systems:
<attribute>
    <ref>employeeNumber</ref>
    <correlator/>
    <outbound>
        <strength>strong</strength>
        <source>
            <path>$focus/personalNumber</path>
        </source>
    </outbound>
    <inbound>
        <target>
            <path>$focus/personalNumber</path>
        </target>
        <evaluationPhases>
            <include>beforeCorrelation</include>
            <exclude>clockwork</exclude>
        </evaluationPhases>
    </inbound>
</attribute>
In this case, there are two mappings for employeeNumber attribute.
The usual outbound mapping is used for ordinary provisioning, it populates the target attribute employeeNumber with value taken from personalNumber property of midPoint user.
The other inbound mapping is used for correlation.
It takes the employeeNumber account attribute to correlate it with personalNumber user property.
However, we do not want that inbound mapping to be used to copy attribute values, as that could overwrite the authoritative information of personalNumber user property with incorrect data.
Therefore, we are setting up this mapping to be correlation-only, using the evaluationPhases clause.
The clause specifies that the mapping should be used to provide data for correlation (including beforeCorrelation phase), however it should not be used for ordinary synchronization processing (excluding clockwork phase).
Clever reader certainly looks thoughtful now.
Why do we need both outbound and inbound mapping here?
If we had outbound mapping only, we can clearly see how the employeeNumber attribute and personalNumber property relate to each other.
As there is asIs mapping, it could work both ways, we could reverse it, and use it in inbound direction as well.
Well, in theory, clever reader would be right.
It could be possible.
However, it is not implemented yet.
MidPoint is smart, but not yet that smart.
For the time being, both mappings are necessary.
|
It is important to realize, that correlation is always a database search. We have value of account attribute on one hand, and we have the entire user database on second hand. We have to find one specific user in the entire database, based on the value of correlation attribute. Looking for each individual user one-by-one is not a scalable method, we have to utilize database search capabilities to make it efficiently. Therefore, when choosing a correlation property, make sure it is a searchable (indexed) property.
|
Correlation before midPoint 4.6
MidPoint versions before 4.6 used correlation expressions, which were basically a search filters parametrized by expressions.
This was simple and elegant mechanisms for many years, but it was also quite limited.
MidPoint 4.6 introduced smart correlation mechanisms, and the old correlation expressions were deprecated.
|
Corrlators are efficient method to automatically link large number of accounts and users. However, correlators rely on reliable and clean data. If employee numbers were consistently recorded for every account, correlators can do all the work. If usernames were applied consistently across all systems, correlators are going to be a great tool. However, we all know that there is an exception to every rule. Practical data are not perfect, there are omissions, typos and all kind of errors. Therefore, in practical scenarios, there are always some accounts that cannot be correlated automatically. Manual action is necessary to correlate them. The usual approach is to use Change owner button in account list to manually set up owner for an account.
Synchronization Situations and Reactions
Correlation mechanism can be used to find an owner for a new account. That is a part of the solution, but it is not a whole solution yet. If the owner is found, then the action is quite obvious: link the account to the user and proceed as usual. However, what to do if the owner is not found? This resource may be an authoritative resource, and therefore we want to create a new user based on the account. On the other hand, this may be a reconciliation with a target resource, and we have just found an illegal (orphaned) account. We probably want to deactivate such account in this case. Moreover, what to do if more than one owner is found? There are many scenarios, and the situation can become quite complicated. Therefore, midPoint has a concept of synchronization situations to make all the possible cases understandable and manageable.
Whenever midPoint deals with a change on an account, the situation of that account is determined. The situation reflects whether this account is already linked to the user, whether we know the candidate owner, whether we cannot determine the owner at all, and so on. Individual situations are explained in the following table.
| Situation | Description |
|---|---|
|
The account is properly linked to the owner. This is the normal situation. |
|
The account is not linked to the owner, but we know who the owner should be. Correlation mechanism told us who the owner is. MidPoint thinks that the link should exist, but it is not linked yet. |
|
The account is not linked, and we do not even know who the owner should be. The correlation mechanism has not returned any candidates. |
|
The account is not linked, and there are several potential owners. The correlation expression returned more than one candidate. |
|
The account is linked to more than one owner. This should not happen under normal circumstances. This is usually caused by faulty customizations or software bugs. |
|
There was an account, but it was deleted on the resource. |
After synchronization situation is determined, midPoint continues by figuring out what a proper reaction is.
The reaction may be quite clear for some situations (e.g. unlinked), but there is a lot of variability for other situations (e.g. unmatched and deleted).
This variability is a reason that midPoint allows to set a reaction for each situation individually.
There are several pre-defined reactions:
| Action | Keyword | Description | Usual situations |
|---|---|---|---|
Synchronize |
|
Synchronize all the data, using the mappings. This does the "normal thing", it applies the usual processing. No changes in links are made, no users or accounts are created or deleted at this point. |
|
Add focus |
|
New midPoint user will be created, and it will be linked to the account. This is usually a reaction configured for authoritative resources, used in situation when a new account is discovered. |
|
Delete focus |
|
MidPoint user that owns the account will be deleted. This is usually a reaction configured for authoritative resources, used in situations when midPoint detects that an account was deleted. |
|
Inactivate focus |
|
MidPoint user that owns the account will be disabled. This is also used for authoritative resources. This is a milder reaction that deleting the user. |
|
Delete resource object |
|
The account will be deleted. This is the usual reaction when illegal account is detected on non-authoritative resource. |
|
Inactivate resource object |
|
The account will be disabled. Usually a milder reaction to an illegal account. |
|
If no reaction is explicitly configured for a situation, then midPoint does nothing. The situation is recorded in midPoint repository, but no other action is taken. This is part of midPoint philosophy: not to change the data unless an action was explicitly configured.
The reactions can be defined in the synchronization section of object type definition in resource configuration:
<resource>
    ...
    <schemaHandling>
        <objectType>
            <kind>account</kind>
            ...

            <synchronization>
                <reaction>
                    <situation>linked</situation>
                    <actions>
                        <synchronize/>
                    </actions>
                </reaction>
                <reaction>
                    <situation>deleted</situation>
                    <actions>
                        <deleteFocus/>
                    </actions>
                </reaction>
                <reaction>
                    <situation>unlinked</situation>
                    <actions>
                        <link/>
                    </actions>
                </reaction>
                <reaction>
                    <situation>unmatched</situation>
                    <actions>
                        <addFocus/>
                    </actions>
                </reaction>
            </synchronization>

        </objectType>
    </schemaHandling>
</resource>
This is a typical configuration for an authoritative resource. Most of the configuration is perhaps self-explanatory:
-
When all is fine (situation:
linked) then do the usual thing (action:synchronize). -
When the existing account is deleted from the resource (situation:
deleted), then delete the user as well (action:deleteFocus). -
When we find an account which should be linked but is not (situation:
unlinked), then link it (action:link). -
When a new account on the resource is found, and it does not have an owner (situation:
unmatched), then create a new user (action:addFocus).
Perhaps the only thing that deserves special explanation is the synchronize reaction.
In the linked situation, there is not much to do.
Everything seems to be in order.
However, there may still be attributes that are not set correctly.
We may need to fully apply all the inbound and outbound mappings, to make sure that all the data are correct.
This is what the synchronize reaction does, among many other things.
In fact, we want to do the "synchronize" thing as part of all other reactions too.
MidPoint does that implicitly, there is no need to add synchronize to every other reaction.
However, we need to explicitly add synchronize to the linked situation, as it is the only reaction that there is.
If we leaved the linked situation empty, midPoint does nothing.
Putting synchronize action there tells midPoint do to the usual thing.
|
Unlink action
There is a pre-defined unlink action, in addition to other actions specified in the table above.
However, the unlink action is not needed, as midPoint unlinks the account automatically when it is gone.
|
Synchronization reactions are used to configure resource for a variety of scenarios.
The addFocus reaction is used to configure authoritative resources, other reactions may be used to configure target resources, semi-authoritative resources and so on.
Synchronization reactions provide control on account level, while mappings provide control on attribute level.
Together they can be used to implement variety of synchronization scenarios.
Synchronization Flow
Correlation and synchronization actions are just two pieces of much bigger synchronization puzzle. Connector provides account data, correlation looks for an owner, synchronization situations and reaction decide what to do with the account, and so on. Every mechanism has its place in a comprehensive synchronization flow.
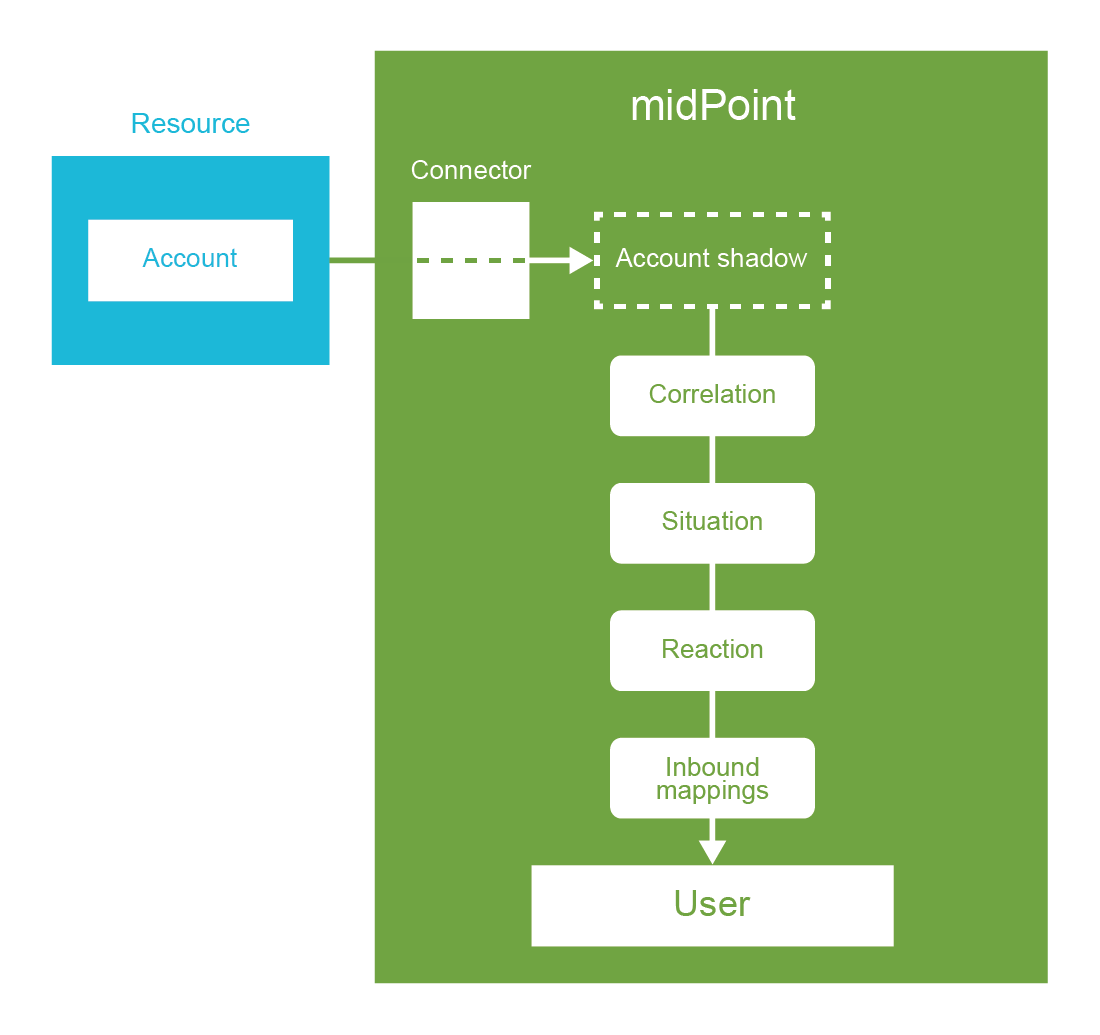
The figure above illustrates the usual sequence of events during inbound synchronization:
-
Account is created in the resource database.
-
Appropriate identity connector is used to read account data.
-
Account shadow is created in midPoint.
-
Correlation mechanism is applied to determine account ownership (unless the account is already linked to a user).
-
Synchronization situation is determined based on account ownership and state of the account.
-
Appropriate reaction to the situation is determined based on resource configuration.
-
Inbound mappings are evaluated to map account values to the user.
| Description of the synchronization process is slightly simplified for clarity. There are also obvious deviations from this process. E.g. some inbound mappings are evaluated before correlation to provide data for correlation, inbound mappings are skipped in case that the user is about to be deleted, the mappings are also skipped if there is no synchronization reaction and so on. However, generally speaking, the sequence above is what usually happens during inbound synchronization. |
When the data are reflected to user, the usual midPoint recompute process starts. This also includes evaluation of object templates, roles, policies and all the other things that will be covered in following chapters. This is the main part of midPoint processing, internally referred to as "clockwork". It is essentially the same processing as if user was modified by an administrator using midPoint user interface.
|
Synchronization before midPoint 4.6
When was midPoint originally created, synchronization configuration was a completely separate top-level part of resource definition.
It made quite a lot of sense more than a decade ago, when midPoint was much simpler.
However, as midPoint evolved, it became obvious that this is not the best way.
It would make much more sense if the synchronization configuration was coupled with resource object type configuration in schema handling part.
This was finally corrected in midPoint 4.6, which gives us the form of configuration that we have today.
|
Synchronization Tasks
Now we know how the inbound synchronization works: midPoint reads the account, then correlation is applied, situation determined and reaction executed. However, we have not yet discussed the details of the very first step: how does midPoint actually gets account data? Nothing happens without a reason, therefore there must be some active component in midPoint that looks for the new, changed and deleted accounts. That component is a synchronization task.
MidPoint task is an active process that runs inside midPoint server. This is the first time that we encounter the concept of a task, but it is definitely not the last one. Tasks are used for numerous purposes in midPoint. They are used to track long-running operations and actions that work on large sets of objects (bulk actions). There are tasks that execute cleanup jobs, compile reports and provide variety of other functions. The concept of a task is a very powerful and flexible one. Tasks can be used to track execution of a short one-off operations. Tasks can be used to execute scheduled actions in regular intervals. Tasks can be used to track long-running processes. We will be using tasks in almost every chapter of this book.
Tasks are used as an active component to "run" almost all synchronization mechanisms:
-
Reconciliation task is listing all the accounts in a specific resource. The task executes reconciliation process for every account that is found. This essentially means that midPoint computes how that particular account should look like, and then the computed values are compared with real account attributes. As reconciliation is processing all accounts one-by-one and recomputes all the data, it is quite a heavyweight task. This task is usually scheduled for regular execution using quite a long execution interval (days or weeks).
-
Live synchronization task is looking (polling) for changes in a specific resource. The task will look for accounts that were created, modified or deleted recently. The task will get a description of the change (delta), and pass that to midPoint synchronization mechanisms. Live synchronization is designed to be fast and efficient, to provide almost real-time reaction to changes. This task is almost always scheduled for regular execution in very short intervals (minutes or seconds).
-
Import from resource task is listing all the accounts from a specific resource. The task will pretend that the accounts were just created. This usually motivates midPoint to create users based on those accounts, or link these accounts to existing users. This task is usually not scheduled, it is almost always executed manually as needed.
Each type of synchronization task is detecting changes using a different mechanism. However, once the task detects the change or reads the account, then the processing is the same for all tasks. All the tasks lead to the same algorithms based on the same configuration and policies. Therefore, it does not matter whether it has all started in reconciliation or live synchronization task, it will all end up in the same correlation-situation-reaction-mapping flow.
The tasks are necessary to initiate the synchronization. They are the active part, the spark that starts the synchronization process. Without the tasks the synchronization does not really work. There are ways the synchronization can "happen" even without a task, e.g. as a reaction to user interface operation, or if a new account is discovered during an unrelated operation. Despite that, practical deployments need at least one synchronization task to work properly. This task takes care of the vast majority of synchronization cases.
Strictly speaking, a task is quite a strange kind of animal. Tasks have their data and configuration as most other midPoint objects have. Unlike other objects, tasks are active, they run. Therefore, there are CPU threads associated with the tasks when the tasks are running. There are mechanisms to monitor task progress. The tasks need to be cluster-aware, they have to fail over to a different midPoint node if one node fails. The tasks are quite complex, and they may be a bit tricky to handle. Fortunately, midPoint is making task handling reasonably simple. Tasks are represented as ordinary midPoint objects. Therefore, tasks can be imported to midPoint in XML/JSON/YAML form as any other object. Tasks can be easily edited in their XML/JSON/YAML form to change the scheduling, modify the parameters, and so on. Of course, there are some special functions that only the tasks have (such as suspend and resume). Such functions cannot be directly controlled using the XML/JSON/YAML format. However, the vast majority of task management can be done using the very same methods that are used to control other midPoint objects.
Tasks can be created by taking the XML/JSON/YAML file and importing that to midPoint. That is the way synchronization tasks are often managed. When an XML-formatted resource definition is created, then there is often an associated synchronization task. Which means that both resource and all the necessary synchronization tasks can be imported together. Synchronization tasks can also be created from midPoint user interface. They are usually created by using special-purpose Defined tasks menu item in resource detail pages.
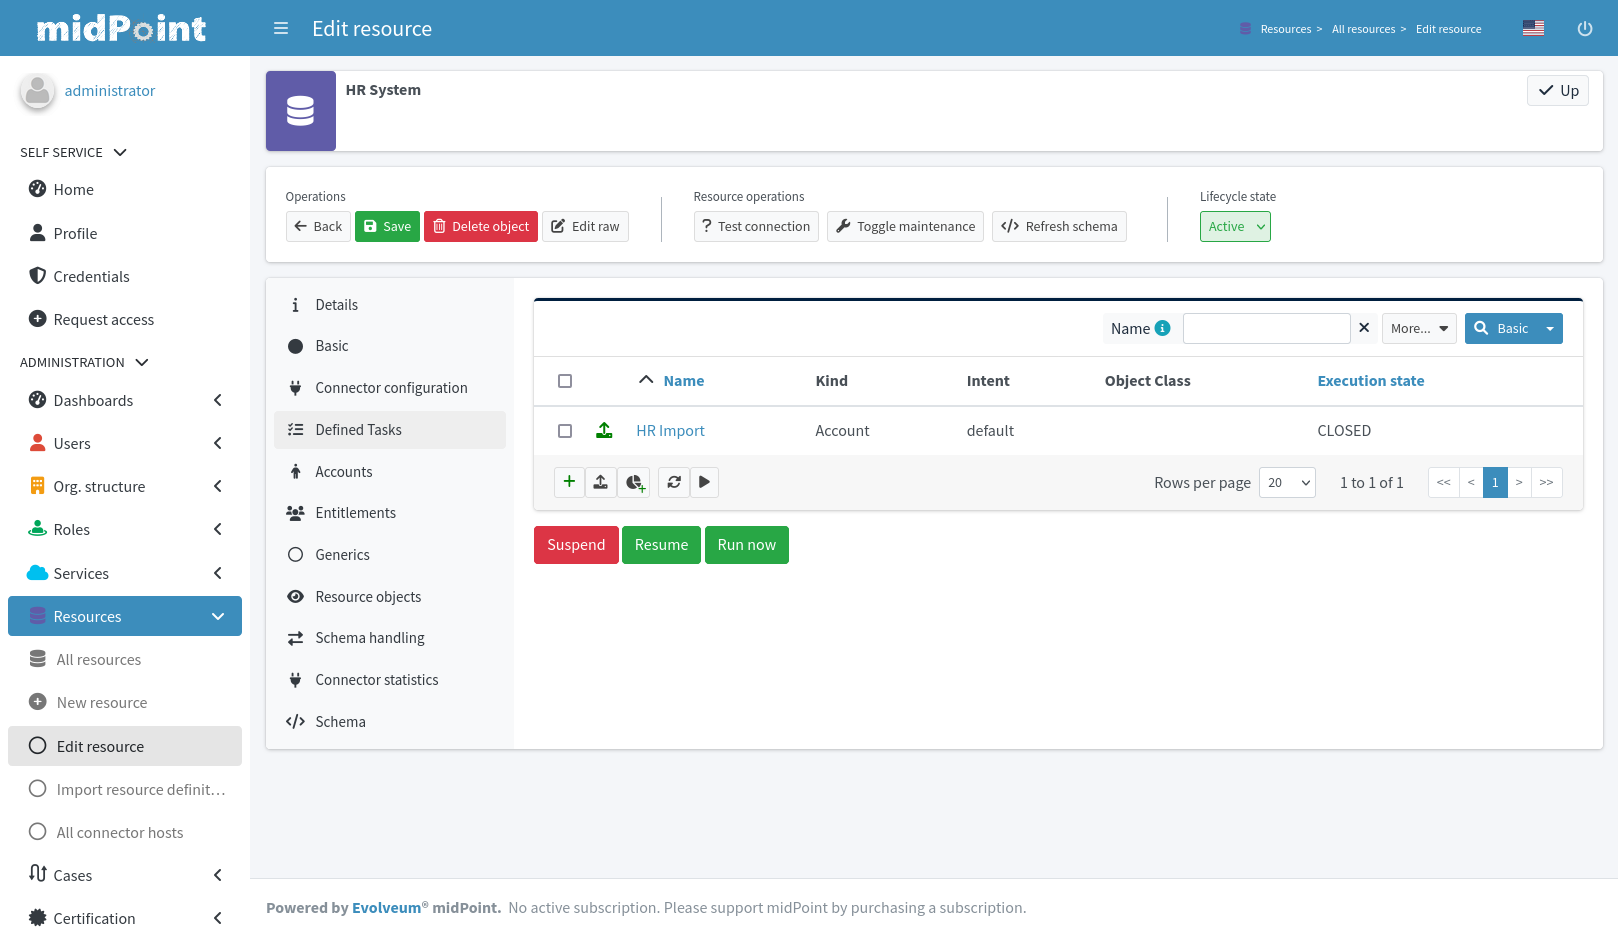
Once the synchronization tasks are created, they can be managed in the same way as other tasks are managed: in the Server tasks part of the midPoint user interface.
Synchronization Example: HR Feed
This section describes complete working example that feeds HR data into midPoint. The HR system used by ExAmPLE company is an old and complex thing. Therefore, the easiest integration method is to use structured text exports. The system can export employee data in a form of a comma-separated text file (CSV). The HR system is set up to export fresh data every night. MidPoint takes this export file, crunches the content, and updates the data about users.
This configuration is done in three steps. First, we create a simple setup to import the data into midPoint. This is an operation that is executed only once. Then the configuration is updated to run scheduled reconciliation task. Reconciliation compares all the data records every time, and it makes any necessary updates. Even though this method would be perfectly acceptable for a company of this size, we are still going set up a live synchronization task, to make synchronization lighter and faster.
The core of the configuration is contained in a single resource definition file. Following paragraphs explain individual parts of the file. There are few additional configuration files for reconciliation and live synchronization tasks. Simplified XML notation is used for clarity. The complete file in a form that is directly usable in midPoint can be found at the same place as all the other samples in this book (see Additional Information chapter for details).
The resource representing HR system is configured as data source. It is used to "pull" the data inside midPoint. However, as we have described previously, there is no fundamental difference between source and target resources in midPoint. Therefore, this HR resource starts in entirely ordinary way. There is a reference to the CSV connector and the connector configuration:
<resource oid="03c3ceea-78e2-11e6-954d-dfdfa9ace0cf">
    <name>HR System</name>
    <connectorRef>...</connectorRef>
    <connectorConfiguration>
        <configurationProperties>
            <filePath>/var/opt/midpoint/resources/hr.csv</filePath>
            <encoding>utf-8</encoding>
            <fieldDelimiter>,</fieldDelimiter>
            <multivalueDelimiter>;</multivalueDelimiter>
            <uniqueAttribute>empno</uniqueAttribute>
            <passwordAttribute>password</passwordAttribute>
        </configurationProperties>
    </connectorConfiguration>
    ...
The next section is schema handling configuration. That is where it becomes slightly more interesting. The schema handling section contains inbound mappings for HR account attributes:
    ...
    <schemaHandling>
        <objectType>
            <displayName>Default Account</displayName>
            <default>true</default>
            <delineation>
                <objectClass>AccountObjectClass</objectClass>
            </delineation>
            <focus>
                <type>UserType</type>
                <archetypeRef oid="00000000-0000-0000-0000-000000000702"/>
            </focus>
            ...
The schema handling section starts with the usual definitions of account object type.
This is a definition of Default account, using the only object class that our CSV-based HR connector provides.
We have seen that before, in previous chapter.
However, there is a new part, definition of focus.
The delineation and most other parts of schema handling definition refer to account or other resource objects.
In midPoint parlance those are seen as projections, the "spoke" part of hub-and-spoke synchronization topology.
However, the focus part is different.
It refers to the objects in midPoint repository, objects that are at the center of the synchronization topology, the focal object.
In our case, user is our focal objects, as we are going to synchronize HR accounts with midPoint users.
The other part of the focus definition specifies an archetype, which defines finer characteristics of focal object.
In this case it points to Person archetype.
User objects that are going to be created during synchronization will have this archetype automatically assigned.
We will learn more about archetypes later, in Archetypes chapter.
Next part of the definition specifies properties and mappings of account attributes:
            ...
            <attribute>
                <ref>empno</ref>
                <displayName>Employee number</displayName>
                <inbound>
                    <target>
                        <path>$focus/name</path>
                    </target>
                </inbound>
                <inbound>
                    <target>
                        <path>$focus/personalNumber</path>
                    </target>
                </inbound>
            </attribute>
            <attribute>
                <ref>firstname</ref>
                <displayName>First name</displayName>
                <inbound>
                    <target>
                        <path>$focus/givenName</path>
                    </target>
                </inbound>
            </attribute>
            <attribute>
                <ref>lastname</ref>
                <displayName>Last name</displayName>
                <inbound>
                    <target>
                        <path>$focus/familyName</path>
                    </target>
                </inbound>
            </attribute>
            ...
The account attribute empno is mapped to midPoint user properties name and personalNumber.
Account attributes firstname and lastname are mapped to givenName and familyName properties respectively.
This is perhaps self-explanatory.
The next part of the configuration specifies mappings for activation and credentials:
            ...
            <activation>
                <administrativeStatus>
                    <inbound/>
                </administrativeStatus>
            </activation>

            <credentials>
                <password>
                    <inbound>
                        <strength>weak</strength>
                        <expression>
                            <generate/>
                        </expression>
                    </inbound>
                </password>
            </credentials>
            ...
Activation is a very specific concept in midPoint, controlling whether accounts is active (enabled or disabled) among other things. MidPoint knows activation attributes and their meaning, they are pre-defined in midPoint schema. Therefore, there is no need to specify a lot of details. That makes activation mapping a very simple thing. The configuration specifies that the administrative status should be mapped in the inbound direction. That is it.
However, the mapping for credentials needs a bit of explanation. What midPoint sees as HR accounts are not exactly accounts, they are usually just records in the HR database. Nobody is using these HR records to log into the HR systems. Therefore, there is no password associated with them. Yet, we need a password for the users in midPoint. Therefore, we are going to generate the passwords. For that purpose, we are going to use the weak mapping with generate expression that was explained above.
Next section specifies correlation settings. The ownership of the accounts that are not already linked is determined by the correlation mechanism.
            ...
            <correlation>
                <correlators>
                    <items>
                        <item>
                            <ref>personalNumber</ref>
                        </item>
                    </items>
                </correlators>
            </correlation>
            ...
In this case, personalNumber user property is used for correlation.
MidPoint knows that personalNumber is mapped from empno account attribute, therefore midPoint compares values of personalNumber user property and empno account attribute.
If the values match then the user is considered to be an owner of the account.
The mappings are undoubtedly important part of synchronization configuration. The mappings specify how are the account data reflected to midPoint user. However, the mappings do not specify whether the accounts should be created or deleted. Mappings control the data, but they do not control the lifecycle. It is the next configuration section that makes this resource really authoritative:
            ...
            <synchronization>
                <reaction>
                    <situation>unmatched</situation>
                    <actions>
                        <addFocus/>
                    </actions>
                </reaction>
                <reaction>
                    <situation>unlinked</situation>
                    <actions>
                        <link/>
                    </actions>
                </reaction>
                <reaction>
                    <situation>linked</situation>
                    <actions>
                        <synchronize/>
                    </actions>
                </reaction>
                <reaction>
                    <situation>deleted</situation>
                    <actions>
                        <deleteFocus/>
                    </actions>
                </reaction>
            </synchronization>
            ...
Given the information in this chapter, this configuration should be quite easy to read.
This a typical configuration for authoritative resource.
If there is a new account on the resource, and we do not have an owner (situation: unmatched), then we create a new user (action: addFocus).
If there is a new account for which we can find existing owner (situation: unlinked), then simply link it (reaction: link).
If the account is linked already (situation: linked), then we just synchronize the data.
In fact, we synchronize data for all the other situations as well.
Except the last one.
If the account is deleted in the HR system (situation: deleted), then we want to delete midPoint user as well (reaction: deleteFocus).
As the user gets deleted there is no point in synchronizing the data.
MidPoint knows that, and it skips application of mappings.
There is one more little detail in this resource definition:
    ...
    <projection>
        <assignmentPolicyEnforcement>none</assignmentPolicyEnforcement>
    </projection>
    ...
This is a setting that adjusts the behavior of midPoint assignments.
As was already mentioned, all resources in midPoint are created equal.
The source resources must follow the same rules as target resources.
One of the fundamental rules of midPoint is that there should not be any account without a specific reason to exist.
In midPoint terminology, every account exists because there is an assignment that justifies its existence.
While this approach is exactly what we want for the vast majority of (well behaving) resources, it is not exactly ideal for resources that are pure data sources.
Those resources work the other way around.
The HR account is in fact a cause for midPoint user existence, not its effect.
Therefore, there is really useful assignmentPolicyEnforcement setting that controls the behavior of assignments.
This setting is used in a variety of scenarios, mostly for data migration, and to tame resources that just won’t behave in a civilized manner.
However, in this case, the setting is used to turn off the assignment enforcement for this resource entirely.
As this resource is an authoritative source, the assignment enforcement does not make much sense.
Behavior of this resource is defined by the synchronization section of resource configuration.
Resource configuration is complete now. This configuration sets up the connector, mappings, correlation and synchronization policies. The configuration is the same for all the synchronization flavors: import, reconciliation and live sync - they will all use the same settings. When it comes to configuration, the only difference between those synchronization flavors is the way how the synchronization tasks are set up. If an import task is set up, then import of resource accounts will be executed. If reconciliation task is set up, the reconciliation will be executed. It is all in the tasks. Synchronization tasks can be easily set up using those convenient buttons in the user interface. However, we like to make our lives a bit painful in our part of the world. Therefore, we are going to go hardcore, and we import the tasks in the XML form.
First task is an import task.
This task lists all the accounts in the HR CSV file.
The task pretends that each of the accounts was just created.
If the task is executed for the first time, then resulting situation of the accounts is going to be either unmatched or unlinked.
Therefore, the task creates new midPoint users, or links the accounts to existing users.
<task oid="fa25e6dc-a858-11e7-8ebc-eb2b71ecce1d">
    <name>HR Import</name>
    <assignment>
        <!-- Import task archetype -->
        <targetRef oid="00000000-0000-0000-0000-000000000503" type="ArchetypeType"/>
    </assignment>
    <ownerRef oid="00000000-0000-0000-0000-000000000002"/>
    <executionState>runnable</executionState>
    <schedule>
        <recurrence>single</recurrence>
    </schedule>
    <activity>
        <work>
            <import>
                <resourceObjects>
                    <!-- HR Resource -->
                    <resourceRef oid="03c3ceea-78e2-11e6-954d-dfdfa9ace0cf"/>
                    <kind>account</kind>
                </resourceObjects>
            </import>
        </work>
    </activity>
</task>
This is a very basic structure of a task.
Similarly to all midPoint objects, a task has a name.
Then there is an assignment of Import task archetype.
We will describe archetypes later.
For now, it is only important to know that this classifies the task as import task, so the user interface can place the task in proper categories.
Task needs definition of an owner.
The owner is a user that is executing the task.
This is important, because authorizations of task owner determine what the task is allowed to do.
This is also the identity that will be recorded in the audit log.
In this case administrator is owner of this task.
Task execution state tells whether the task is running, it is suspended or finished.
Tasks are often executed periodically, therefore they need a schedule.
In this case, we start with task that is executed just once, to test the configuration.
Hence the single recurrence, which specifies that the task runs only once.
Then there is definition of activity.
Activity specifies what the task really does.
In this case the activity specifies that this is a synchronization task which imports accounts from the resource.
The resource is specified by the resourceRef reference in the activity specification.
This points to our HR resource.
As task execution state is set to runnable, midPoint tries to execute the task when the definition is imported.
That means that import of accounts from the HR resource starts immediately.
Progress of the task can be monitored in the Server tasks section of midPoint user interface.
The import task is not a recurring task, it will run only once.
If you need to re-run the task, you can do that from midPoint user interface.
However, the task will not get executed again, unless you explicitly tell midPoint to do so.
This is very typical behavior for import tasks, they are usually executed only when a new resource is connected to the system.
Once everything is set up, correlated and linked, then the import task is not needed any more.
| A clever reader may ask what happens when the import task is executed more than once. The answer is simple: not much. Even if the task pretends that the accounts were just created, midPoint is not fooled easily. In fact, it is hard to believe that the account was just created if midPoint already has shadow for that account, and it is linked to a user, isn’t it? Therefore, midPoint is going to stay calm and carry on. It keeps the user, it keeps the shadow and also the link between them. If there is any change in the account attribute, the change will be reflected to the user. That is it. No big drama here. |
Import task gets the data from the resource into midPoint. As import is not a recurring task, it does not keep the data synchronized. Import tasks are not designed to do so. Fortunately, there are other tasks that are designed for continuous synchronization. Reconciliation task is one of these. Reconciliation task lists all the accounts on a resource and compares that with data in midPoint.
<task oid="bbe4ceac-a85c-11e7-a49f-0f5777d22906">
    <name>HR Reconciliation</name>
    <assignment>
        <!-- Reconciliation task archetype -->
        <targetRef oid="00000000-0000-0000-0000-000000000501" type="ArchetypeType"/>
    </assignment>
    <ownerRef oid="00000000-0000-0000-0000-000000000002"/>
    <executionState>runnable</executionState>
    <schedule>
        <recurrence>recurring</recurrence>
        <cronLikePattern>0 0 1 ? * SAT</cronLikePattern>
        <misfireAction>executeImmediately</misfireAction>
    </schedule>
    <activity>
        <work>
            <reconciliation>
                <resourceObjects>
                    <resourceRef oid="03c3ceea-78e2-11e6-954d-dfdfa9ace0cf"/>
                    <kind>account</kind>
                </resourceObjects>
            </reconciliation>
        </work>
    </activity>
</task>
Definition of a reconciliation task is almost the same as the definition of import task. However, there are crucial differences. First of all, there is different activity. This is what makes this task a reconciliation task. Then, the task is recurring. This means that midPoint will repeat execution of the task. Therefore, there is also execution schedule, so the server knows when to execute the task. Reconciliation tasks are usually resource-intensive, therefore we usually want to execute them at a very specific off-peak times. For that reason the execution schedule is defined using a cron-like pattern. UNIX-friendly readers will be surely familiar with this. The format is:
seconds minutes hours day-of-month month day-of-week year
The string 0 0 1 ? * SAT means that this task will be executed every Saturday at 01:00:00am.
There is also definition of misfire action.
Misfire is a situation when the server is down at the time when the task is supposed to run.
In this case, if the server is down in the early hours of Saturday, this task will be executed as soon as the server starts up.
Reconciliation is a real workhorse of identity management. It can be used for almost any resource. It is very reliable. It is often used to fix data problems, apply new policies, look for missing accounts, detect illegal accounts and so on. It is indeed a really useful tool. Yet, it has its downside. Reconciliation iterates through all the accounts, it recomputes all the applicable policies for every account, one-by-one. Therefore, it may be quite resource-intensive. It may be even quite brutal if the policies are complex, user population is high and the resources are slow. This can take hours or even days in extreme cases. Even for smaller deployments, reconciliation is not entirely easy. The problem is not in midPoint. MidPoint can be usually scaled up to handle the load. However, listing all the accounts often may put unacceptable load on the resources, the source and target systems. Therefore, reconciliation is not executed often. Daily, weekly or even monthly reconciliation seems to be a common approach.
Reconciliation is reliable, but it is not entirely what we would call "real-time". Of course, midPoint has a faster alternative.
Live synchronization is the way to go for real-time synchronization - or rather almost real-time synchronization. Practical latencies for live synchronization are in the range of seconds or minutes, which is fast enough for most practical cases. Live synchronization is also quite resource-efficient. Overall, it is much faster and much lighter than reconciliation. Unfortunately, live synchronization is not available for all resources. Live synchronization depends on the ability to get recent changes from the resource in a very efficient way. Therefore, it is only available for resources that record the changes. The specific mechanism to record the changes may vary from resource to resource. It may be as basic as a simple modification timestamp, or it may be a complex real-time change log. The mechanism has to be good enough for the connector to discover recent changes, and it must be efficient enough for the connector to do that every couple of seconds. If such mechanism is available, and the connector knows how to use it, then setting up live synchronization is easy. All that is needed is live synchronization task.
<task oid="7c57adc2-a857-11e7-83ac-0f212d965f5b">
    <name>HR Live Synchronization</name>
    <ownerRef oid="00000000-0000-0000-0000-000000000002"/>
    <executionState>runnable</executionState>
    <schedule>
        <recurrence>recurring</recurrence>
        <interval>10</interval>
    </schedule>
    <activity>
        <work>
            <liveSynchronization>
                <resourceObjects>
                    <resourceRef oid="03c3ceea-78e2-11e6-954d-dfdfa9ace0cf"/>
                    <kind>account</kind>
                </resourceObjects>
            </liveSynchronization>
        </work>
    </activity>
</task>
This task definition should be easy to understand by now. There is a different activity that makes this a live synchronization task. There is also a different type of scheduling. We do not want to execute this task at a specific time. We rather want to execute it all the time, at regular intervals. In this case the interval is set to 10 seconds. That is all. We have live synchronization running. If the HR CSV file is changed, the changes will get automatically processed by midPoint.
Setting up synchronization flavors such as reconciliation or life synchronization is just a matter of setting up the tasks. The rest of the configuration is the same for all flavors. Therefore, it is very easy to run both live synchronization and reconciliation for the same resource - just create two tasks. In fact, this is quite a common setup. Live synchronization is used to get the changes quickly and efficiently. Reconciliation is used to make sure all the changes were processed and that the policies are applied consistently.
Now we have the HR feed up and running. However, there are still few issues. A clever reader would surely notice that this is not a very good HR resource. MidPoint users created from this HR feed have given name and family name, but the full name field is empty. Do not worry. We will sort that out in later chapters, with the help of object template. Also, the users have employee number as their username. This may be in fact a very good approach for some deployments as it avoids the need to rename accounts. However, it is not a very user-friendly approach. Therefore, most deployments would like to generate more convenient usernames. This is easy to do with midPoint, and we will also address that later. There is still a lot of things to learn before we get to a complete synchronization set up.
HR Feed Recommendations
All resources are created equal in midPoint. However, source resources almost always have a slightly special standing. Even though midPoint mechanisms are the same for all resources, the data coming from the sources often have significant impact on the entire solution. There is this traditional computer engineering wisdom: garbage in, garbage out. An error in data feed may cause a lot of problems everywhere. Therefore, it is important to get the data sources right. This is usually one of the first steps in an identity management project.
Unfortunately, source data feed is usually quite difficult to set up correctly - and it is almost impossible to get it right at the first try. There may be good old configuration problems, which are usually easy to fix. There may be data compatibility problems, such as presence of non-ASCII national characters where they are not expected. Worst of all, source data may be of poor quality, there may be inconsistencies, typos, the data may be out of date, not reflecting the reality very well. These problems are the most difficult to correct, as the right way to correct them is to modify the data at its source - in the source database, HR system or spreadsheet exchanged by e-mail. That takes time, meetings, mail messages, management decisions, processes, excuses, delays and huge amount of patience. Therefore, setup of a data source is usually an iterative process. The process usually goes like this:
-
Set up initial source resource definition based on the information you have. Set up connector and test connection. Check that you can see the accounts. Set up mappings and synchronization policy.
-
Test the import process on a couple of individual accounts. Navigate to the resource details pages, click on Accounts tab to list accounts, choose an account and click on the small Import button in the table row. Import of that individual account starts immediately. Just that one account. It is easier to see the errors (see step 6) by using this method.
-
Fix any errors that you see and repeat step 2.
-
Create an import task and run import of all accounts.
-
Examine task errors. You can use task details page to get the summary.
-
If there are no errors, then examine the users. If everything seems right then it is time to congratulate yourself. You have a good import. However, this is unlikely to happen on the first few attempts.
-
You will probably need to have a look into system logs to learn the details of individual import failures. MidPoint heavily relies on logs for detailed error analysis. See the Troubleshooting chapter of this book to learn how to adjust log levels and how to get understand the log messages.
-
Some errors are likely to be caused by the errors in your mappings and policies. These are usually easy to fix. However, there are usually worse errors as well – errors caused by wrong or unexpected input data. The right way would be to fix the data. However, that is not always possible (in fact it is almost never a feasible option for a quick fix). Fortunately, most of the input data errors can be fixed (read: "worked around") in midPoint with a bit of ingenuity. Just use the power of the mappings. For example, clean up the unexpected characters, white space or data formats using scripting expressions.
-
Rinse and repeat. If the errors you get are not severe then you may simply re-run the import task. This often works just fine. However, if the problem was in a mapping that completely ruined all the data then it is perhaps best to start with a blank slate. We are all just humans and this situation happens quite often, especially in the beginning while you are still learning. Therefore, there is a special feature to help you out. Navigate to . There is a small unassuming expand button in the top-right part of the screen. That button opens a context menu. Select Delete all identities item. That is what we lovingly call "laxative button". A brief dialog will pop up asking you to specify which identities exactly are to be deleted (users, shadows, …). This is a very convenient way how to get back to a black slate, but keep all the configuration (resources, templates, tasks).
-
Goto step 2. Repeat until done.
If the initial identity management deployment step includes an HR feed, we strongly recommend to start with that HR feed. It is significant benefit to have authoritative HR data in the midPoint to start with. It is usually easier to correlate other resources to midPoint users later on, if the users were created from a reasonably reliable HR data. Also, it will usually take some tweaking to get the HR import right. The possibility to easily clean up midPoint and get to a clean slate is extremely useful. However, this "wipeout" approach is possible only if the HR feed is the first resource that is connected to midPoint.
A clever reader would notice, that we assumed that the source feed is taken from a CSV file. This is indeed the case in many deployments. The CSV file is usually produced as an automatic scheduled export of HR system data, running every night. If a new employee or contractor is about to join the company, there is usually no hurry. This information is entered into the HR system at least a few days in advance, therefore daily CSV export is perfectly acceptable. However, there may be cases when we want a faster response. Maybe we do not even want additional burden of dealing with CSV exports. Of course, there is a solution. In theory, any connector can be used for source resource. There are specialized connectors that are taking data directly from the HR system. For example, there is a connector for Oracle HCM system. Unfortunately, there is no connector that can take data from SAP HR system yet.
Synchronization and Provisioning
Synchronization and provisioning are intimately related. Everything that we have explained about provisioning in the previous chapter also applies to synchronization. In fact, provisioning and synchronization are just applications of the same basic mechanisms. Provisioning starts with modification of a user. Synchronization starts a bit earlier: inbound mappings are used to map values from source system to the user. The result of inbound mapping evaluation is modification of the user object. According to midPoint principles, it does not matter how the user was modified. The reaction is the same: accounts are provisioned, modified or deleted.
The synchronization (inbound processing) and provisioning (outbound processing) usually happen in one seamless operation. For example, the HR connector detects update in the last name of an employee. That modification is applied to midPoint user, therefore the family name of midPoint user is updated. The operation continues by evaluating all templates, roles and outbound mappings. The outbound mappings usually map the family name change to the resource attributes. Therefore, the resource accounts linked to the user are immediately updated. All of that happens in a single operation. That is how midPoint works. MidPoint is not a human. It never procrastinates (unless explicitly instructed do to so). MidPoint does not postpone the operation for later if the operation can be executed immediately. MidPoint tries to get the data right on the first try. Therefore, there are no specialized propagation or provisioning tasks that you might know from older identity management systems. MidPoint does not need them.
There are other advantages in doing everything in one operation. It is all one operation, therefore midPoint knows all the details: what was the cause, what is the effect, what exactly has been changed. Such context is extremely important for troubleshooting. Some identity management systems decouple the cause from the effect. Such a divided approach may have its advantages, but it is an absolute nightmare when an engineer needs to figure out why a certain effect happened. For that reason, midPoint has both the cause and the effects bundled together in a single operation. Therefore, it is much easier to figure out what is going on. Having the cause and effect connected in one operation makes it possible to neatly record entire operation in the audit trail. Then there is another huge advantage: midPoint knows exactly what has been changed. This means that midPoint does not only know the new value of a property. MidPoint also knows the old value and values that were added or removed. This is a complete description of the change that we call a delta. This is recorded at the beginning of the operation, and propagated all the way until the operation is done. Therefore the mappings can be smart. This approach enables a lot of interesting behavioral patterns. For example, it is quite easy for midPoint to implement the "last change wins" policy. In this case midPoint will simply overwrite only those attributes that are really changed in operation. MidPoint can leave other values untouched. In fact, this is the default behavior of midPoint. It is a very useful behavior during deployment of a new identity management system.
Careful processing of the operations allows configurations that are not feasible with older identity management systems, e.g. a resource that is both a source and a target. In fact a lot of identity management systems can have resource that is both a source and a target - as long as it is a source for one attribute and a target for another attribute. However, midPoint can live with a resource where the same attribute is both a source and a target. In fact there may be many sources and many targets for the same property at the same time. This is a very useful configuration, indeed. Just think about telephone number property. It is usually something that the user sets up himself. This may be set up by some kind of specialized self-service, it may be updated by a call center call, the user may update that in his Active Directory profile … there are many ways how this information is changed. Yet, we want this property to be consistent. We want telephone number to be the same everywhere. We do not care where it was changed. We just want to propagate the last change from anywhere to all the other systems. MidPoint can easily do this. Just specify both inbound and outbound mappings for the same attribute:
<attribute>
    <ref>mobile</ref>
    <outbound>
        <source>
             <path>$focus/telephoneNumber</path>
        </source>
    </outbound>
    <inbound>
        <target>
             <path>$focus/telephoneNumber</path>
        </target>
    </inbound>
</attribute>
In this case, the change in user property telephoneNumber is propagated to the account attribute mobile (outbound change).
However, also a change in the account attribute mobile is propagated back to user property telephoneNumber (inbound change).
Last change wins.
A clever reader certainly grumbles something about infinite loops now. No need to not worry here. MidPoint can see complete operation context, both inbound and outbound sides. Therefore, midPoint knows when to stop processing the operation. There are even mechanism how to avoid loops caused by connectors detecting changes caused by the connector itself. MidPoint will break those loops automatically.
Mapping and Expression Tips and Tricks
Mappings and expressions provide a very powerful mechanism. In fact, most of midPoint initial configuration is about setting up correct mappings. However, with great power comes great responsibility, and mappings may look a bit intimidating at a first sight. Fortunately, there are some tips and tricks that make the life with mappings and expressions a bit easier.
Most mappings are aware of the context in which they are used. Therefore, paths of mapping sources and targets can be shortened - or even left out entirely. Activation and credential mappings used in the HR feed example are the obvious cases. Yet, even paths in ordinary mappings may be shortened. For example take the outbound mapping source:
    <outbound>
        <source>
             <path>$focus/telephoneNumber</path>
        </source>
    </outbound>
As the mapping knows that its source is a focus (user) the definition may be shortened:
    <outbound>
        <source>
             <path>telephoneNumber</path>
        </source>
    </outbound>
Typical midPoint deployment has tens or hundreds of mappings. Deployments with thousands of mappings are definitely feasible. There are two things that can make maintaining the mappings easier. Optionally, you can specify the mapping name. Mapping name appears in the log files and some error messages. It may be easier to identify which mapping is causing problems, or it may help locate the trace of mapping execution in the log file. It is strongly recommended to provide name for your mappings. Mapping can also have a description. The description can be used as a general-purpose comment or a documentation explaining what the mapping does.
<attribute>
    <ref>mobile</ref>
    <outbound>
        <name>ldap-mobile</name>
        <description>
            Mapping that sets value for LDAP mobile attribute based on
            user’s telephone number.
        </description>
        <source>
             <path>telephoneNumber</path>
        </source>
    </outbound>
</attribute>
Mappings can become quite complex.
There may be multi-line scripting expression in the mapping, it may not entirely obvious what is the input and output.
Therefore, each mapping and each expression have an ability to enable tracing using the trace element:
<attribute>
    <ref>mobile</ref>
    <outbound>
        <name>ldap-mobile</name>
        <trace>true</trace>
        <source>
             <path>telephoneNumber</path>
        </source>
        <expression>
            <trace>true</trace>
            <script>
                <code>...</code>
            </script>
        </expression>
    </outbound>
</attribute>
If tracing is enabled, then the mapping or expression execution is recorded in the log files. Tracing can be enabled at both mapping level and expression level. Mapping tracing is shorter. It provides overview of the mapping inputs and outputs. Expression-level tracing is much more detailed.
However, even this level of tracing may not be enough to debug expression code. Therefore, there is a special expression function for logging. Arbitrary messages may be logged by script expression code:
    <expression>
        <script>
            <code>
                ...
                log.info("Value of foo is {}", foo)
                ...
            </code>
        </script>
    </expression>
Generally speaking, troubleshooting of mappings may be quite difficult as it is often intertwined with midPoint internal algorithms. Still, there are ways how to do it. The Troubleshooting chapter provides much more details on this.
Expression Functions
Expressions in general, and scripting expressions in particular, are the place where most midPoint customization takes place. Scripting expressions are able to execute any code in a general-purpose programming language. Script can transform the data in any way, or it can execute any function. Quite naturally, there are functions that are frequently used in the scripts. Therefore, midPoint provides convenient scripting libraries full of useful methods ready to be used in scripting expressions.
There are two built-in scripting libraries that are used very often:
-
Basic script library provides very basic functions for string operations, object property retrieval, etc. These are simple, efficient stand-alone functions. These functions can be used in every expression.
-
MidPoint script library provides access to higher-level midPoint functions contain identity-management-specific and midPoint-specific logic. This library can be used to access almost all midPoint functionality.
The libraries are designed to be very easy to use from the scripting code.
While the specific details how to invoke the library depend on the scripting language, the libraries are usually accessible by the use of basic and midpoint symbols.
Function norm() from the basic library can be invoked in a Groovy script like this:
    <expression>
        <script>
            <code>
                ...
                basic.norm('Guľôčka v jamôčke!')
                ...
            </code>
        </script>
    </expression>
Invocation of the libraries from JavaScript and Python is almost the same, and we are sure that a clever reader will have no trouble figuring that out. What is more difficult to figure out is which functions the libraries provide. For that purpose there is a page in midPoint docs that lists all the libraries and this page also has a link to library function documentation. Look for Script Expression Functions page in midPoint docs.
Only two libraries were mentioned in this section so far. However, this is not a whole story. A clever reader has certainly figured out that the logging function described in previous section is also a scripting library - and there may be more libraries in the future.
Resource Capabilities
The systems that midPoint connects to are not created equal. In fact, those systems significantly differ in their capabilities. Most systems can create accounts. However, not all of them can delete accounts. There are systems that keep the accounts forever, the accounts can be only permanently disabled. Yet another systems cannot enable or disable accounts. While most systems support password authentication, other system do not. There is a lot of natural diversity in the provisioning wilderness. The connector may introduce additional limitations as well. Even if target system supports a particular feature, connector may not have appropriate code to use it. MidPoint needs to take all these differences into consideration when executing synchronization and provisioning operations.
MidPoint refers to these features of the systems and connectors as resource capabilities. Although capabilities may look quite complex, they are essentially just a list of things that a connector and resource can do. MidPoint is aware of the resource capabilities, and their limitations. Therefore, midPoint can work with resource data correctly. E.g. midPoint will not try to modify account on a read-only resource.
Capabilities are usually automatically discovered by midPoint, and everything just works out of the box. There is usually no extra work to maintain the capabilities. Yet, sometimes there is a need to tweak the capabilities a bit. Maybe the connector cannot detect resource capabilities well enough. Maybe there is a read-only resource, but the connector has no way of knowing this. In that case, the write capabilities have to be manually disabled in midPoint. For that reason there are two sets of capabilities:
-
Native capabilities are capabilities detected by the connector. Those are always automatically generated by midPoint. Those capabilities should not be modified by administrator.
-
Configured capabilities are the capabilities modified by the administrator. Configured capabilities are used to override native capabilities. Configured capabilities are usually empty, which means that only native capabilities are used.
There are many ways to tweak the capabilities by the administrator. Yet, there is one case that is particularly interesting for synchronization and provisioning: simulated activation capability.
MidPoint connectors can be tailored specifically for a particular system. E.g. there are often connectors that are developed specifically for one custom enterprise application. At the other side of the spectrum are generic connectors, that can fit a wide variety of systems and applications. LDAP, CSV and database table connectors are examples of such generic connectors. Such connectors are so useful that they are used in almost every midPoint deployment. However, there is no standardized way to disable an account in database table or a CSV file. Various columns and various values are used to represent account activation status. Quite surprisingly, there is no standardized way to disable an account in LDAP directory either. That is bad news for midPoint. MidPoint takes a significant advantage from knowing whether account is disabled or enabled. We had to do something about this "disable ambiguity". And we did.
There is way to tell midPoint which attribute and what values are used to represent account activation status. Configured activation capability is used for that purpose:
    <capabilities>
        <configured>
            <cap:activation>
                <cap:status>
                    <cap:attribute>ri:active</cap:attribute>
                    <cap:enableValue>true</cap:enableValue>
                    <cap:disableValue>false</cap:disableValue>
                </cap:status>
            </cap:activation>
        </configured>
    </capabilities>
Configured capability above specifies resource attribute active as the attribute that controls account activation status.
If this attribute is set to value true then the account is enabled.
If the attribute is set to value false then the account is disabled.
That is it.
Once this configured capability is part of resource definition, then midPoint will pretend that the resource can enable and disable accounts.
Attempt to disable account will be transparently translated to modification of active attribute.
Moreover, it also works the other way around.
If an account has attribute active set to false value, midPoint will display that account as disabled.
No extra logic or mapping is needed to achieve that.
The capability does it all.
The situation is slightly more complex in our LDAP server in ExAmPLE company.
ExAmPLE is using OpenLDAP server, which does not have any reasonable method to disable users.
Therefore, we have to be very creative.
Perhaps the least bad method is to extend OpenLDAP schema with custom auxiliary object class MidPointPerson which defines new attribute midPointAccountStatus.
The midPointAccountStatus takes values enabled and disabled to represent account status.
No value of midPointAccountStatus attribute means enabled account as well.
As there are two options for representing enabled status, we have to specify that in the definition of simulated capability:
    <capabilities>
        <configured>
            <cap:activation>
                <cap:status>
                    <cap:attribute>ri:midPointAccountStatus</cap:attribute>
                    <cap:enableValue></cap:enableValue>
                    <cap:enableValue>enabled</cap:enableValue>
                    <cap:disableValue>disabled</cap:disableValue>
                </cap:status>
            </cap:activation>
        </configured>
    </capabilities>
This is not an ideal solution as this MidPointPerson object class is quite cumbersome.
However, when combined with some access control list (ACL) magic, it can work quite well.
Synchronization Example: LDAP Account Correlation
Previous example demonstrated the use of synchronization for HR data feed. That is the most obvious use of synchronization mechanisms. However, midPoint synchronization can do more tricks than just feeding data to midPoint. Synchronization is frequently used even for target resources. In that case the synchronization is usually used for several purposes:
-
Initial migration: This is a process of connecting new resource to midPoint. There are usually accounts that already exist in the resource at the time when a resource is connected to midPoint. It is likely that at least some accounts correspond to the users that are present in midPoint (e.g. users created from the HR feed). Therefore, the accounts from the resource need to be correlated to the users that already exist in midPoint. Synchronization is the right mechanism for this.
-
Detection of illegal (orphaned) accounts: Security policies are usually set up in such a way that only those people that need an account on a particular resource should have that account. This is known as the principle of least privilege. However, in typical identity management deployment, there is nothing that would prohibit system administrator to create any accounts at will. This freedom is often even desirable, because there are emergency situations where full control over the system is crucial. Yet, even for emergency cases, we want to make sure that the situation is aligned with policies when the emergency is over. MidPoint can easily do that, by scanning the target systems in regular intervals. Synchronization mechanisms can be used to detect accounts that do not have any legal basis (orphaned accounts) and delete or disable such accounts. Again, synchronization mechanism can do that easily.
-
Attribute value synchronization: Accounts in target resources are usually created as a result of midPoint provisioning action. However, account attribute values are in fact copies of the data in midPoint. Attribute values can easily be changed by users or system administrator, may be set to old values during data recovery procedure, or they can get out of sync by a variety of other means. MidPoint can make sure that the attributes are synchronized and that they stay synchronized for a long time. Synchronization mechanisms are ideal for this purpose.
Older identity management systems used synchronization mostly to get data from the source resources to identity management system. Synchronization in midPoint is much more powerful than that. It can be applied both to source systems and target systems, it can pull data, push data, detect inconsistencies and fix them. Synchronization is a general purpose mechanism, it is a real work-horse of identity management with midPoint. This is the principle of reuse again. Synchronization mechanism can be reused for variety of purposes.
In this example we will be using synchronization to connect existing LDAP server to midPoint. We assume that our midPoint is already connected to the HR system and we have imported the HR data. Now we have midPoint users created for all our employees. Then there is this LDAP server. It is really important LDAP server. This server is used by company enterprise portal and also by a variety of smaller web applications. Those applications are using the LDAP server for user authentication and access authorization. The LDAP server was deployed many years ago. Initially, it was populated by the HR data. However, the LDAP server was managed manually by a system administrator during all these years. Therefore, it is expected that there are some accounts that belong to former employees. Also, it might have happened that some accounts are missing. It is quite likely that a lot of the accounts have wrong data.
First task is to set up the connector for this resource. As LDAP servers are used for identity management purpose all the time, MidPoint comes with a really good LDAP connector. All we need is to set up the resource to use that connector:
<resource oid="8a83b1a4-be18-11e6-ae84-7301fdab1d7c">
    <name>LDAP</name>

    <connectorRef type="ConnectorType">
        <filter>
            <q:text>connectorType = "com.evolveum.polygon.connector.ldap.LdapConnector"</q:text>
        </filter>
    </connectorRef>
    ...
What we can see here is a slightly more sophisticated method to reference the connector.
So far we have seen only a direct connector reference by OID.
This works well for almost all the references in midPoint, because OID never changes.
However, connectors are somehow elusive objects.
Objects that represent connectors are dynamically created by midPoint when a connector is discovered.
Therefore, the OID is generated at random when midPoint discovers new connector.
There is no practical way for a system administrator to predict that OID.
Yet, we still want our resource definitions to refer to a particular connector when we import the definition.
Therefore, there is an alternative way to specify object references.
This method is using a search filter instead of direct OID reference.
When this resource definition is imported to midPoint, midPoint uses that filter and looks for LDAP connector.
If that connector is found, then the OID of that connector is placed in the reference (connectorRef).
Therefore, the next time midPoint is using this resource, it can follow the OID directly.
This is a very convenient method.
However, there are few limitations.
Firstly, the filter is resolved only during import of the resource definition object.
Which means that it is resolved only once.
If the connector is not present at import time, then the reference needs to be corrected manually.
Secondly, this approach works if there is only one LDAP connector deployed to midPoint.
This is usually the case.
However, the connector framework can contain several connectors of the same type in different versions.
This is a very useful feature for gradual connector upgrades, testing of new connector versions and so on.
Yet, in case that the filter matches more than one object, the import will fail.
In that case the connector reference has to be set up manually.
However, this method of connector references is very useful in practice, and it is used all the time.
Once we have proper reference to LDAP connector we need to configure the connection:
    ...
    <connectorConfiguration>
        <icfc:configurationProperties>
            <cc:port>389</cc:port>
            <cc:host>localhost</cc:host>
            <cc:baseContext>dc=example,dc=com</cc:baseContext>
            <cc:bindDn>cn=idm,ou=Administrators,dc=example,dc=com</cc:bindDn>
            <cc:bindPassword><t:clearValue>secret</t:clearValue></cc:bindPassword>
            ...
        </icfc:configurationProperties>
    </connectorConfiguration>
    ...
This is all very similar to the configuration of the other resource that were already presented in this book. It should be quite self-explanatory.
| The XML example above, as all other examples in this book, is simplified and shortened for clarity. You will not be able to import the example in this form into midPoint. For a full importable examples see the files that are supposed to accompany this book. Please see Additional Information chapter. |
The basic resource configuration above is sufficient to connect to the resource. Therefore, the test connection operation on resource details page should be successful. However, LDAP servers support many object classes and midPoint does not yet know which object class represents account. Therefore, we need to add schema handling section to our resource:
    ...
     <schemaHandling>
        <objectType>
            <kind>account</kind>
            <displayName>Normal Account</displayName>
            <default>true</default>
            <delineation>
                <objectClass>inetOrgPerson</objectClass>
                <auxiliaryObjectClass>midPointPerson</auxiliaryObjectClass>
            </delineation>
            ...
This is pretty much the standard definition as we have already seen.
However, there is one new aspect: midPointPerson auxiliary object class.
This is an additional LDAP object class which is going to be applied to all object that midPoint eventually creates.
It is not important for synchronization at this stage, yet we are going to set it up now, so we have a complete working configuration.
We continue with setting up mappings for the attributes:
            ...
            <attribute>
                <ref>dn</ref>
                <displayName>Distinguished Name</displayName>
                <limitations>
                    <minOccurs>0</minOccurs>
                    <maxOccurs>1</maxOccurs>
                </limitations>
                <outbound>
                    <source>
                        <path>$focus/name</path>
                    </source>
                    <expression>
                        <script>
                            <code>
                                basic.composeDnWithSuffix('uid', name,
                                        'ou=people,dc=example,dc=com')
                            </code>
                        </script>
                    </expression>
                </outbound>
            </attribute>
            ...
There should be outbound mapping for each mandatory LDAP attribute for the inetOrgPerson object class.
Such mappings are very typical for a target resource definition.
Once we set up the schema handling, we should be able to conveniently list LDAP accounts in midPoint. However, we need to click on the Reload button. The accounts are stored in the LDAP server and midPoint can access them. However, midPoint have not processed the accounts yet. Therefore, there are no account shadows in midPoint repository yet. Click on the Reload button initiate reading of accounts from the LDAP server.
We are going to import (or reconcile) the resource accounts. However, if we try to do this now, nothing would really happen. The accounts are not linked to users, therefore midPoint would not synchronize the attributes. MidPoint was not told to do anything with the accounts, therefore midPoint does nothing. That is one of midPoint principles: midPoint does not change the accounts in any way unless it is explicitly told to do so. We would rather do nothing than to destroy the data.
Before we can import the accounts, we need to set up the synchronization configuration for this resource.
There are accounts in the LDAP server that should belong to users that already exist in midPoint.
We want to link them.
However, we do not want to do the linking manually.
We would rather set up a correlation mechanism that does this automatically.
We would like to use LDAP attribute employeeNumber to correlate accounts.
            ...
            <attribute>
                <ref>employeeNumber</ref>
                <displayName>Employee Number</displayName>
                <correlator/>
                <outbound>
                    ...
                </outbound>
                <inbound>
                    <target>
                        <path>$focus/personalNumber</path>
                    </target>
                    <evaluationPhases>
                        <include>beforeCorrelation</include>
                        <exclude>clockwork</exclude>
                    </evaluationPhases>
                </inbound>
            </attribute>
            ...
The employeeNumber attribute is configured as correlator by using the correlator configuration element.
The employeeNumber attribute is mapped to personalNumber user property, therefore midPoint knows that values of employeeNumber attribute are to be compared with values of personalNumber.
When midPoint encounters an LDAP account, it takes value of employeeNumber attribute, transforms it using the inbound mapping defined above, and looks for matching value of personalNumber among all the users.
|
Inbound mapping and evaluation phases
Inbound mapping is necessary at this point, even though the LDAP resource is a target resource.
The inbound mapping is used to transform the value for correlation purposes.
Its responsibility is to transform the value of employeeNumber account attribute to the same format as is used by personalNumber user property.
In this case the format is the same, therefore no transformation is used (asIs expression is assumed).
The evaluationPhases configuration limits application of this mapping to correlation only.
It excludes clockwork phase, which is a main synchronization phase.
Therefore, the mapping will be used for correlation, but it will not be used for other parts of synchronization process.
|
If correlation values match, then we assume that the account should be linked to the user.
In that case midPoint decides that synchronization situation is unlinked (they should be linked, but they are not yet linked).
We want midPoint to link the account in this case, therefore we define appropriate reaction:
                ...
                <reaction>
                    <situation>unlinked</situation>
                    <actions>
                        <link/>
                    </actions>
                </reaction>
                ...
Unliked accounts get linked.
This takes care of accounts for whose we can automatically find an owner by using correlation mechanism.
What we should do with other accounts?
We will do nothing about them just yet.
Therefore, we do not need to define any other reactions.
This may be somehow surprising.
We do not want illegal accounts in our LDAP server, do we?
Then perhaps we would like to see a reaction to delete unmatched accounts, right?
That would be a good approach, but it is just too early for this.
We do not want to delete unmatched account just now.
There may be accounts that are perfectly legal, just the employeeNumber attribute is missing or mistyped.
Data errors like those happen all the time, especially when the data were managed manually.
We do not want to over-react and start deleting accounts too early.
Therefore, we go just with this one synchronization reaction for now.
Now it is the right time to start import or reconciliation task for LDAP resource. After the task is finished the situation may look like this:
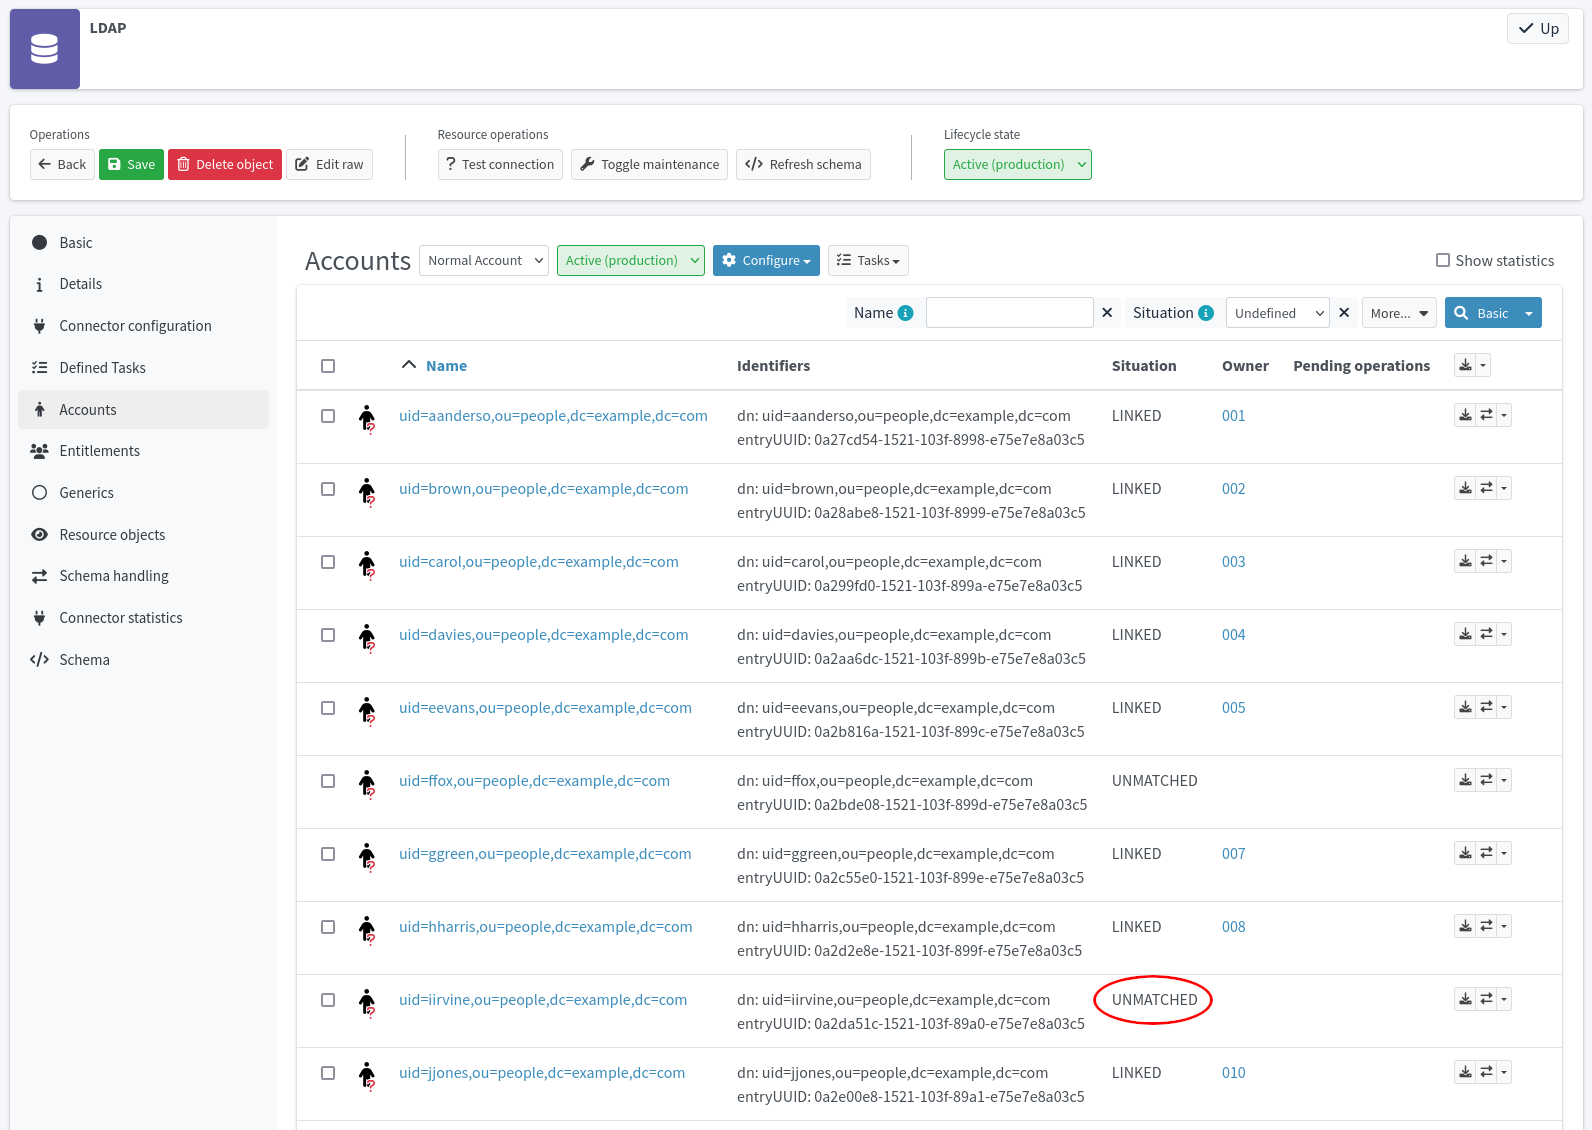
For the curious readers, the LDAP server has data equivalent to the content of ldap-real.ldif file located in book samples.
|
It looks like we have quite a good data in the LDAP server.
Most of the accounts were successfully correlated and linked to their owners.
Yet, there are few accounts that were not correlated.
Those accounts ended up in unmatched situation.
You can resolve this situation by manually linking the unmatched accounts to their users.
Simply click on the small triangle button next to the unmatched entry and select Change owner from the context menu.
Then select the right user (Isabella Irvine) in the dialog that appears.
After that the account is linked to the user.
Repeat this process to link all unmatched accounts.
There is one interesting thing in the screenshot above.
Have a look at the LDAP account identified by uid=carol.
While most other accounts have their uid value taken from the surname of the user, this account is an exception.
Even though the uid value is obviously wrong, midPoint have linked the account to the correct user (Carol Cooper).
The reason is that we have set up midPoint to use employeeNumber for correlation.
Even accounts whose usernames violate the convention can be automatically linked to their owners - as long as there is any reliable piece of information that can be used for correlation.
Search panel on top of account list can be used to make manual linking faster.
The Situation search control can be used to select accounts that are in Unmatched situation.
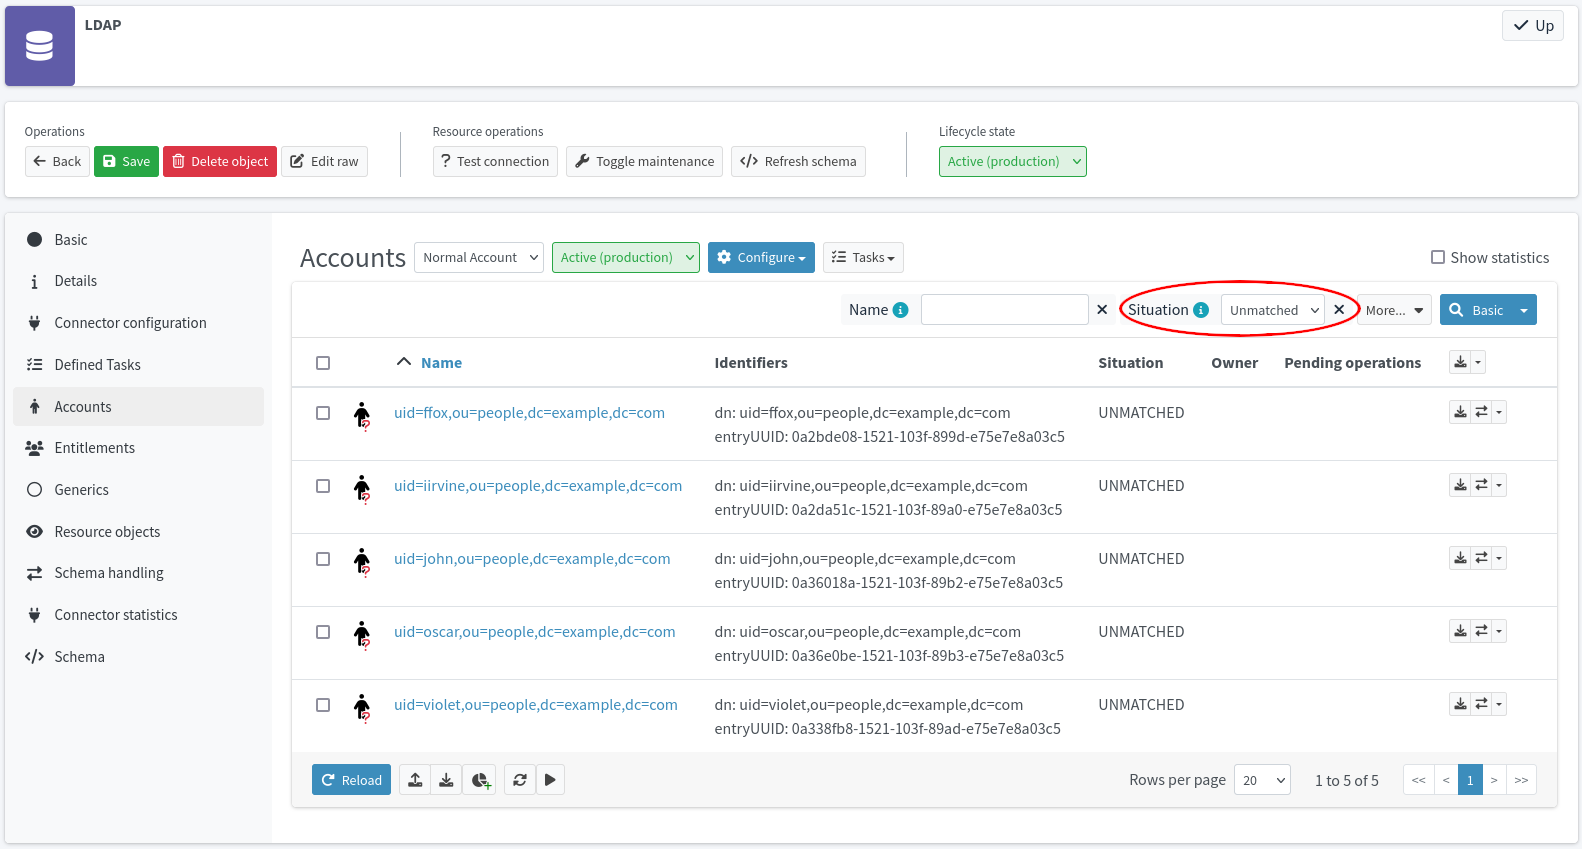
We can quickly handle the obvious unmatched accounts, and link them manually.
When all the accounts are linked to their owners, we end up with two accounts that do not have owners: john and oscar.
In identity management parlance, these are called orphaned accounts.
While having a closer look at the accounts, these two accounts obviously belong to former employee.
John and Oscar do not work for ExAmPLE company for several years.
While John’s account is disabled at the very least, Oscar’s account is still active.
What a deprovisioning disaster this is!
We have illegal account here, still active, still accessible by an employee that might not be entirely happy to be laid off.
Quite obviously, we have to do something about it.
This is the right time to complete the synchronization policy. Once the correlation is complete and all accounts have an owner, detecting an unmatched account means that an illegal account is created in LDAP server. Now we can tell midPoint to delete any unmatched accounts.
                ...
                <reaction>
                    <situation>unmatched</situation>
                    <actions>
                        <deleteResourceObject/>
                    </actions>
                </reaction>
                ...
When reconciliation task is completed, all orphaned accounts are gone. We have reduced our security risks, which is one of the primary reasons for having identity management system in the first place.
|
Disable orphaned accounts
Clever reader is not entirely persuaded at this point. Outright deletion of orphaned account might look nice in security policy documents, yet it looks just too aggressive for practical use. Clever reader is, as always, quite right. We really want to react to orphaned accounts as soon as possible to reduce any security risks, which means we want to react automatically. However, it is much better to just disable the account instead of deleting it. Some orphaned accounts may have benign reasons. The account might have been created by LDAP administrator, because the HR system is temporarily broken and business must go on. Detection of orphaned account may also be a false positive, caused by miscofiguration of midPoint correlation mechanism, or simple caused by wrong HR data. Re-enabling the account is much less work than re-creating the account, especially if there were already some data stored in the account. Even if orphaned account is detected correctly, we still may want to keep it for a while. It may provide good material (and evidence) for investigation of possible security incident. Fortunately, it is easy to reconfigure midPoint to disable the account instead of deleting it.
All that is needed is to change the action from |
We have our accounts partially cleaned up now.
All accounts are linked to owners and orphaned accounts are gone.
However, there may be some accounts in the LDAP server that have wrong attribute values.
By "wrong" we mean that the attributes have different values than the values that are computed by the outbound mappings.
However, midPoint is not correcting those values just yet.
Remember the midPoint principle that it does not change the account unless we have explicitly told to do so?
Those accounts are in the linked situation, and we have not configured any reaction for this situation.
Therefore, midPoint did nothing.
Now we need to tell midPoint to synchronize the values:
                ...
                <reaction>
                    <situation>linked</situation>
                    <actions>
                        <synchronize/>
                    </actions>
                </reaction>
                ...
A clever readers is now surely wondering whether we have forgotten something.
We have, indeed.
Attribute values are synchronized by running reconciliation process.
However, our outbound mappings will not work in reconciliation.
They do not have any explicit definition of strength, therefore midPoint assumes normal strength.
Those mappings are supposed to implement the last change wins strategy.
Therefore, reconciliation cannot overwrite the account data, as midPoint does not know whether it was account attribute or user property that was the last to change.
If midPoint is not sure about something, then it assumes a conservative position and does nothing.
We do not want to destroy the data.
Therefore, what we need to do now is to let midPoint know that we really mean it, that the mappings are really strong:
            ...
            <attribute>
                <ref>cn</ref>
                <displayName>Common Name</displayName>
                <limitations>
                    <minOccurs>0</minOccurs>
                    <maxOccurs>1</maxOccurs>
                </limitations>
                <outbound>
                    <strength>strong</strength>
                    <source>
                        <path>$focus/fullName</path>
                    </source>
                </outbound>
            </attribute>
            ...
Clever reader is uneasy once again.
What is this limitations thing here?
Simply speaking, the limitations specify that the attribute is optional (minOccurs=0) and that it is single-valued (maxOccurs=1).
However, isn’t midPoint supposed to be completely schema-aware and figure that all by itself?
Yes, it is, and midPoint does it all right.
In fact, that is the reason why we need to override the information from the schema using this limitations element here.
The cn attribute is specified in LDAP schema as a mandatory attribute.
However, we have just specified outbound mapping for that attribute.
Even if no value for attribute cn is entered in midPoint user interface, we can still determine that value by using the expression.
Therefore, even though LDAP schema specifies attribute cn as mandatory, we want to present that attribute as optional in midPoint user interface.
Hence the minOccurs limitation.
The maxOccurs limitation is immediately obvious to anyone who is intimately familiar with LDAP peculiarities.
In the LDAP world, almost everything is multi-valued by default.
Even commonly used attributes for account identifiers and names are multi-valued.
Nobody is really using them as multi-valued attributes, because vast majority of applications will probably explode if they ever encounter two values in the cn attribute.
Yet, those attributes are formally defined as multi-valued in LDAP schema, and that is what midPoint gets from LDAP connector.
The maxOccurs limitation is overriding the schema, and forcing midPoint to handle this attribute as if it was single-value attribute.
The last thing that we need at this point is to handle activation. We need a very simple mapping for that:
            ...
            <activation>
                <administrativeStatus>
                    <outbound/>
                </administrativeStatus>
            </activation>
            ...
The mapping is entirely empty (<outbound/>), as it completely relies on default settings.
Source is default ($focus/activation/effectiveStatus), target is default (activation/administrativeStatus of account),
also the expression is default (asIs).
All midPoint needs to know is that we want such mapping at all.
However, there is one more detail to set up. As LDAP does not have any standard reasonable account disable mechanism, we have to tell midPoint which method are we using for this particular case. We do that using configured capability, as we have already seen before:
    <capabilities>
        <configured>
            <cap:activation>
                <cap:status>
                    <cap:attribute>ri:midPointAccountStatus</cap:attribute>
                    <cap:enableValue></cap:enableValue>
                    <cap:enableValue>enabled</cap:enableValue>
                    <cap:disableValue>disabled</cap:disableValue>
                </cap:status>
            </cap:activation>
        </configured>
    </capabilities>
From this point on we can keep reconciliation task running periodically by setting task schedule. Our synchronization policies are in good shape, ready to be continually enforced. Periodic reconciliation runs keeps account attributes updated. Even more importantly, it keeps us protected from serious security risk posed by orphaned accounts.
That is all. Now you can schedule reconciliation tasks to keep an eye on the LDAP server. The task corrects any attribute values that step out of line and deletes any illegal accounts. This is how synchronization tasks can be useful, even in case of pure target resources.
However, there is one last word of warning. Those accounts were synchronized and linked to existing midPoint users. The accounts were not created by midPoint. Therefore, there is nothing in midPoint that would say that those accounts should exist. In midPoint parlance, there are no assignments for those accounts. MidPoint makes clear distinction between policy and reality. Therefore, midPoint is aware that those accounts exist, but there is no policy statement that would justify their existence. By default, midPoint does nothing, and it lets the accounts live. The accounts are created or deleted only if there is an explicit change in the assignments. There is no such change now, therefore the accounts are not deleted. However, this is quite a fragile situation. Accounts that are linked but not assigned can easily get deleted if midPoint administrator is not careful. Of course, there are methods to handle such situations. One way would be to create the assignments together with the links. Those that are interested in this method should look up keyword "legalize" in midPoint docs. However, there are much better methods to handle such situations. Perhaps the best approach would be to utilize the roles (RBAC). This is the topic of the Role-Based Access Control chapter later. Yet, there are still more things to learn about synchronization until we get there.
Peculiarities of Reconciliation
Reconciliation is a process of comparing current state of an account (reality) to a desired state of the account (policy). Reconciliation does not only compare the accounts, it is actively correcting the inconsistencies. Reconciliation can correct wrong data on resources (outbound direction). Yet, it also works the other way. It can correct the data in midPoint (inbound direction). Therefore, reconciliation is one of the most useful tools in the identity management toolbox.
Reconciliation can be used in a variety of ways. Reconciliation can be initiated for one specific user by using midPoint user interface. In that case, midPoint compares the values of all user’s accounts to the values that were computed using the mappings. If there are differences, midPoint corrects account values. This approach is perfect for testing reconciliation setting using just a single user. This feature is also useful for fixing values of one specific user.
Reconciliation of a specific user may be useful, but it is an ad-hoc approach. We usually favor systemic approaches in identity management. Therefore, reconciliation is usually used in a form of a reconciliation task. Reconciliation task lists all the accounts on the resource, and then it reconciles each account, one by one. This is a way to keep all resource accounts continuously synchronized.
There is a couple of things regarding reconciliation that can be somehow surprising. Firstly, reconciliation of an account may cause modification of a user. This happens if there are inbound mappings for that account. This is perhaps quite expected. However, the operation does not stop there. If a user is changed, then such change may propagate to other accounts on other resources, usually by the means of outbound mappings. MidPoint does not like procrastination, therefore it will try to apply all the changes immediately. It means that reconciliation of one account may cause changes to other accounts. Which makes a lot of sense, yet it may be quite surprising. Secondly, reconciliation skips all normal-strength mappings. We have already explained the reasons for that, but this is something that can surprise even an experienced midPoint engineer from time to time. If we are sure that we want the mapped value to be present in the account all the time, then strong mappings are the way to go.
A curious reader that has already explored midPoint user interface has surely noticed recompute function.
To the untrained eye, recompute looks almost exactly the same as reconciliation.
However, there are subtle differences.
Firstly, recompute does not force fetching of account data.
When recomputing, fresh account attributes are not retrieved from the resource, unless midPoint inevitably needs them for the computation.
This usually happens if weak or strong mappings are used, in that case the attribute values are retrieved.
However, if there are normal mappings only, then recompute may skip retrieval of fresh account data.
MidPoint compares and corrects account attribute values only for those accounts that are retrieved from resource during this process.
That is how recompute works.
Correcting account data is more or less just a side effect of recompute.
The purpose of recompute is to correct data of midPoint users, which means evaluation of object templates and other internal policies.
On the other hand, reconciliation always tries to read all the accounts regardless whether they are needed for computation or not. Therefore, all the attributes on all the accounts are corrected. That is the purpose of reconciliation: correct the account data.
There is yet another difference between recompute and reconcile tasks. The purpose of recompute task is to correct user data. Therefore, recompute task iterates over midPoint users. Recompute task does not detect new accounts on the resource, and it may even overlook if an account is deleted. However, reconciliation task is different. In fact, reconciliation task has several stages. Main reconciliation stage lists all resource accounts. It determines owner of each account, compares the attributes and corrects them. As this process iterates over real accounts on a resource, it can easily detect new accounts. When the main stage is completed, the next phase looks at account shadows stored in midPoint. The task looks for shadows that have not been processed in the main phase. Those are accounts that used to be on the resource some time ago, but have disappeared since. That is how reconciliation detects deleted accounts.
Rule of the thumb for the reconciliation versus recompute dilemma is this:
-
Use recompute if you want to update users. For example, use recompute after change of object templates, policy rules or role definitions to apply the changes to all users. Recompute is usually initiated manually, on as needed basis.
-
Use reconciliation to keep accounts synchronized. For example, run periodic reconciliation task to make sure accounts in your LDAP servers are up-to-date. Reconciliation is usually scheduled at regular intervals, to continually maintain data consistency.
Usernames
Usernames take many forms.
Some people like usernames based on first names (john), others prefer last names (smith), many practical solutions end up using a combination of both (jsmith).
Some organizations prefer immutable identifiers, such as employee numbers (1458363), which is not entirely favored by users.
We will discuss that later, in Focus Processing chapter.
Whatever username convention we are going to choose, we have a problem in our current ExAmPLE midPoint deployment: midPoint has usernames based on employee numbers (001), while LDAP has usernames based on names (anderson).
We should use one or the other, not both of them at the same time.
Clean, simple and systematic solution would be to force usernames based on employee numbers from midPoint to LDAP.
This is very simple to do, all we need is to change strength of dn mapping from weak to strong.
Next reconciliation run would change all the usernames in LDAP to match values of user name property in midPoint.
However, this may not be entirely desirable.
This process changes all usernames in the LDAP directory, changing their usernames (uid), but also distinguished names (dn) in the directory.
There are usually other applications connected to the directory, as that is the reasons for directories to exist.
Application accounts are almost always bound to either uid or dn in LDAP directory.
Strictly speaking, there is immutable entryUUID attribute in OpenLDAP directory, which is almost ideal for account binding.
Of course, almost no application is using entryUUID, they all rely on uid or dn.
If uid and dn are changed, account bindings in applications may be lost.
Users may lose their settings, preferences, user profiles, access to data and home directories - and they are not going to like that.
Not to mention the simple fact, that they are not going to like the new numeric usernames in the first place.
It may be a much better idea to keep existing LDAP usernames, and change usernames in midPoint to match them. Fortunately, this is also very easy to do. All we need is one inbound mapping:
            ...
            <attribute>
                <ref>uid</ref>
                ...
                <inbound>
                    <strength>strong</strength>
                    <target>
                        <path>name</path>
                    </target>
                </inbound>
                ...
            </attribute>
            ...
Once reconciliation run is completed, LDAP usernames are applied to midPoint users. Users have user-friendly (although slightly non-consistent) usernames now.
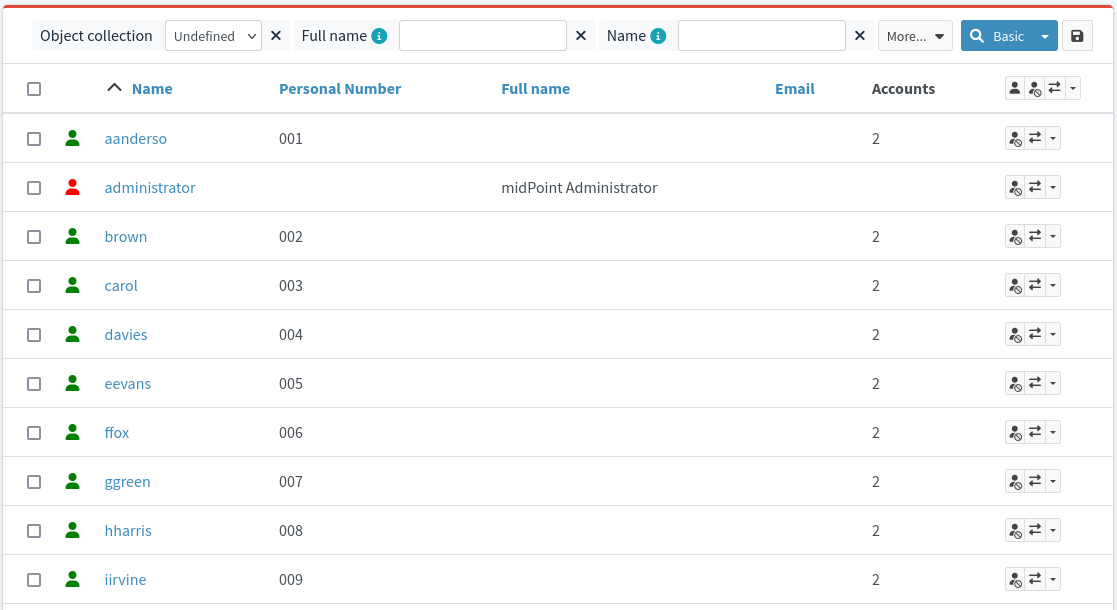
It is a good idea to remove the inbound mapping after midPoint usernames are corrected. We do not need it any more, and it can be quite confusing or even harmful in the long run. We probably want to generate usernames in a systematic and consistent way from now on, which will be described in Focus Processing chapter.
It is also a good idea to disable inbound mapping from empno attribute to user’s name in the HR resource.
If we would leave this mapping active, it can ruin our usernames by replacing them with employee numbers from HR system.
Even worse, as we have configured outbound mappings to LDAP directory, change of user’s name is reflected to LDAP uid attribute, effectively renaming all LDAP accounts.
We definitely do not want that!
Disabling the inbound HR mapping leaves us in a situation in which there is no mapping for user’s name at all.
This means creation of new midPoint user from new HR record is going to fail.
We have to live with that now, as we are not going to risk destruction of all our usernames.
We will fix that later, when we learn how to generate proper usernames.
Deltas
Reconciliation is really useful mechanism. It is reliable and thorough. However, it is also quite slow, and it consumes o lot of computational and network resources. There are good reasons why reconciliation is such a heavyweight beast. Reconciliation works with absolute state of accounts. It means that reconciliation is reading all the accounts with all the values of all relevant attributes. Then it recomputes everything. Even the attributes and values that were not changed are recomputed. This is a very reliable way of computation, and it is also the method used by the majority of traditional identity management systems.
Yet, there is also a better way.
If we know that just one attribute was changed, we can recompute that single attribute only.
We do not need to care about other attributes.
Moreover, if we know that attribute foo has changed in such a way, that there is a new value bar, then it gets even better.
We just need to recompute the value bar, and we need not care about any other values.
This is what we like to call a relative change.
We care just about the values that were changed.
That is how midPoint works internally.
We could say that MidPoint is relativistic system.
This is where delta comes in. Delta is a data structure that describes the change of a single midPoint object. Add delta describes a new midPoint object that is about to be created. Modify delta describes existing midPoint object where some properties have changed. Delete delta describes an object that is going to be deleted.
This is a very powerful mechanism. Just remember that everything in midPoint can be represented as an object: user, account, resource, role, security policy … everything. Therefore, delta can represent any change in midPoint. It may be a change of user password, deletion of an account, change of connector configuration or introduction of a new policy rule. If all the changes can be represented in a uniform way, then they can also be handled in a uniform way. Therefore, it is easy for midPoint to record all the changes in an audit trail – including configuration changes. It is easy to route any change through an approval process. And so on. MidPoint can create a relatively simple mechanisms to handle changes, and then those mechanisms can be applied to any change of (almost) any object.
Let’s have a closer look at an anatomy of a delta. There are three types of delta: add, modify and delete. Add delta is quite simple. It contains a new object to be created.
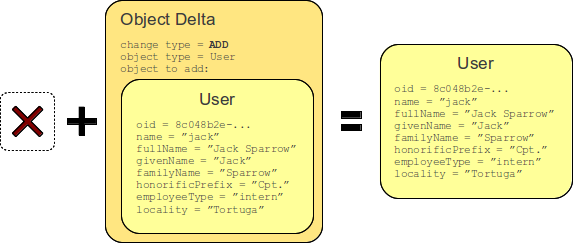
Delete delta is even simpler. It contains just object identifier (OID) of an object to be deleted.
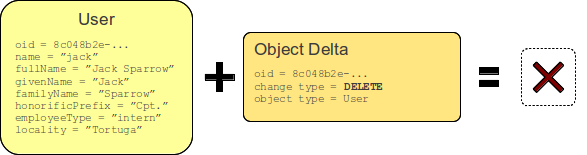
Last one is modify delta.
This delta contains a description of modified properties of an existing object.
As the object can change in a variety of ways, modify delta is the most complex of the three.
Modify delta contains a list of item deltas.
Each item delta describes how a particular part of an object changes.
For example, following delta describes that a new value pirate is added to a user property employeeType.
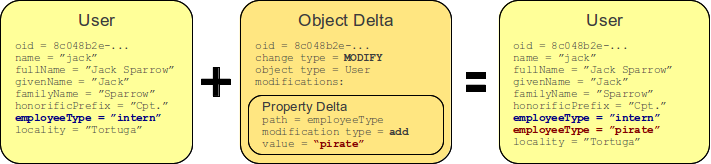
The item delta may have three modification types: add, delete and replace. Add modification means that new value or values are added to an item. Delete modification means that value or values are removed from an item.
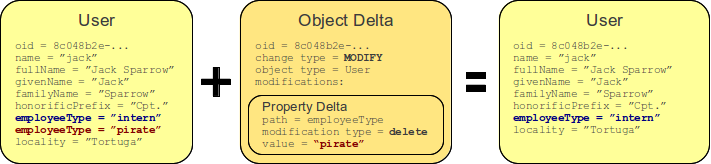
In both add and delete cases, the values that are not mentioned in the delta are not affected. They remain unchanged as they are. However, replace modification is different. This means that all existing values of the item are going to be discarded, and they are replaced with the value or values from the delta.
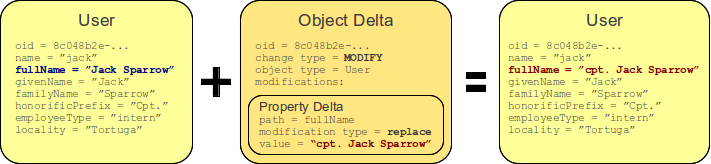
The deltas are designed to work with both single-valued and multi-valued items. In fact, add modification and delete modification deltas are specifically designed with multi-value items in mind. Those deltas can work efficiently even in cases that there is a multi-valued attribute that has a very large number of values. There is a good reason for this. Multi-valued properties are quite common in the identity management field. Just think about how roles, groups, privileges and access control lists are usually implemented. Everyone who ever managed a large group in LDAP server certainly remembers that experience in vivid colors. Fortunately, midPoint is designed to handle situations like these.
Everything in midPoint is designed to work with deltas: user interface, mappings, authorizations, auditing … all the way down to the low-level data storage components. Mappings work in a relativistic ways. That is one of the reasons why we need to explicitly specify sources of the mapping. Mapping source definitions are matched with items in the delta to control execution of the mapping. Deltas permeate entire midPoint computation. Deltas are input to the mappings, and mapping produce other deltas as output. Therefore, we can have a complete chain: deltas that are result of inbound mappings is applied to the user object, but those deltas are also input to outbound mappings. Everything is relativistic in midPoint.
This might seem to be a bit over-complicated at the beginning. But do not worry. You will get used to it. Clearly, this approach has major advantages.
However, a clever reader does not seem to be impressed. How can this relativistic approach conserve any significant portion of computational resources? We usually fetch the entire account from the resource anyway. Therefore, there is no harm to recompute all the attributes. The computation itself is fast, it is the fetch operation that is slow. Isn’t it? The clever reader is, of course, right - or rather partially right at the very least. Most resources indeed fetch all the account attributes in a single efficient operation. For those cases, there is no big increase in efficiency if we go with the relativistic methods. However, there are exceptions. For example, some resources does not return all the values of big attributes, e.g. all the members of a large group. Additional requests are needed to fetch all the values – and there may be a lot of requests if the group is really large. Relativistic approach has significant benefit in those cases. The benefits will be even more obvious when we get to the live synchronization in the next section. Yet, performance is not the primary motivation for the relativistic approach. There is one extremely strong reason to be relativistic: data consistency. Consistency is something that brings ugly nightmares to many engineers who try to design distributed system. Identity management solution is a distributed system, managing data in many independent applications and databases. It is also a very loosely-coupled distributed system. There is no support for locking or transactions in the connectors. Even if there was some support, the vast majority of resource cannot provide those consistency mechanisms on their identity management APIs. This means that midPoint cannot rely on traditional data consistency mechanisms. MidPoint cannot make sure that the data are not changed during computation or between computations. That is why relativistic approach is so useful. Relativistic computation has a very high probability of achieving correct result even without locking or transactions. This is more than acceptable for typical identity management deployments. For those rare cases where relativistic computation can fluctuate, there is always reconciliation as a last resort. Yet, thanks to the relativistic nature of midPoint, the need for reconciliation is significantly reduced.
That was a lot of long words, but clever reader seems to be satisfied now. At least for a while. For the readers that are still scratching their heads, there is quite a simple summary: relativistic approach of midPoint can do miracles. For example, midPoint resource can be both sources and targets, even a single attribute can be both source and target of information. It is the relativistic approach that enables configurations like this. The principle of relativity is relatively simple. Yet, its effect in midPoint is nothing short of being revolutionary.
Live Synchronization
MidPoint has a range of synchronization mechanisms. Slow, brutal but reliable reconciliation is at one end. Live synchronization is on the other. Live synchronization is a lightweight mechanism that can provide almost-real-time synchronization capabilities. Live synchronization is looking for recent changes on a resource. When such changes are detected, live synchronization mechanisms process those changes immediately. The synchronization delay is usually in order of seconds or minutes, provided live synchronization is used properly. Unlike reconciliation, live synchronization is not triggered manually. That would make very little sense. Live synchronization works in a long-running task, repeatedly looking for fresh changes in short time intervals.
If a resource is already configured for synchronization, then all that is needed to run live synchronization is to set up a live synchronization task. MidPoint user interface can be used to do that easily. An example of live synchronization task was provided in the HR Feed section above. Live synchronization task wakes up at regular intervals. Each time the task waves up, it invokes the connector. Connectors capable of live synchronization have special operation that is used to get fresh changes from the resource.
The connector can support any reasonable change detection mechanism – in theory. Yet, two mechanisms are commonly used in practice:
-
Timestamp-based synchronization: Resource keeps track of last modification timestamp for each account. The connector looks for all accounts that have been modified since last scan. This is very simple and relatively efficient method. However, it has one major limitation: it cannot detect deleted accounts. If an account is deleted, then there is no timestamp for that account, and therefore the connector will not find it in the live synchronization scan.
-
Changelog-based synchronization: Resource keeps a "log" of recent changes. The connector is looking at the log, and it is processing all the changes that were added to the log since the last scan. This is a very efficient and flexible method. Yet, it is not simple. Not many systems support it, and there are often hidden complexities.
Those mechanisms are called live synchronization strategies, and they are further explained in following section.
All live synchronization methods need to keep the track of what changes are "recent", i.e. which changes were already processed by midPoint and which were not processed yet. There is usually some value that needs to be remembered by midPoint: timestamp of last scan, last sequence number in the change log, serial number of last processed change and so on. Each connector has a different value with a connector-specific meaning. MidPoint refers to those values as "tokens". The most recent token is stored in the live synchronization task. That is how midPoint keeps track of processed changes. There are (hopefully quite rare) cases when resource and midPoint token get out of alignment. This may happen in cases such as the resource database is restored from a backup, if network time gets out of synchronization and so on. If that happen, then deleting the token from the live synchronization task is usually all it takes to get the synchronization running again.
Live synchronization is fast and very efficient. However, it is not entirely reliable. MidPoint may miss some changes. This is quite a rare situation, but it may happen. Reconciliation can remedy the situation in such a case. Just remember, all the synchronization mechanism share the same configuration. It is perfectly acceptable to run live synchronization and reconciliation on the same resource at the same time. Of course, it would be a good idea to run reconciliation less frequently than live synchronization.
Live Synchronization Strategies
Live synchronization is fast and efficient - in theory. However, as usual, the devil is in the details. There is no one single synchronization protocol or standard that would work for all the resources. Every system has its own way to synchronize data. Some systems (such as LDAP servers) even have several mechanisms to choose from. Then there are source systems that have no practical way to implement efficient synchronization. We would refer to such methods as live synchronization strategies.
Synchronization strategy is configured on connector level, and the details should be, theoretically, hidden inside the connector. MidPoint would not know and would not need to know what synchronization strategy is used. That might work in an ideal world. Yet, we live in a practical world, and there are many details that leak through the connector interface.
Let us use LDAP as an example.
LDAP is, theoretically, a standard.
However, the standard does not specify any synchronization mechanism.
There is experimental RFC 4533, which is not widely adopted.
Yet, synchronization capabilities are necessary, and every major LDAP server provides some synchronization mechanism.
Some mechanisms are quite good, some are not.
There is an ancient "Retro change log" mechanism, going back to Netscape/iPlanet LDAP servers originating in the 1990s.
That mechanism is still used today, in several variants.
Active Directory, in a very typical way, has its own "DirSync" synchronization mechanism.
OpenLDAP has yet another mechanism based on the access log.
There is this RFC 4533 standard, which is used so rarely, that there was no request to implement it in midPoint LDAP connector.
Then there is a catch-all synchronization mechanism that looks for recent changes based on modifyTimestamp attribute.
In theory, all the synchronization strategies above should be equivalent - but they are not.
For example, some variants of "Retro change log" synchronization cannot reliably detect rename operations.
There may be problems with delete operations as well, especially if coupled with rename operations.
Almost every mechanism has its quirks.
Then there is the modifyTimestamp, which is the most problematic of all.
Unfortunately, it is quite common practice to use a synchronization strategy based on last modification timestamp. Not just for LDAP, but also for database tables and other types of source systems. This is perhaps understandable, as this is a very simple mechanism. However, it has a lot of problems. The obvious problems can be caused by de-synchronized time on network, although in the age of Network Time Protocol (NTP) this should not be a problem at all. The other problem is a timestamp granularity. If the timestamp is granular to one second, that can be a big problem. One second is a very long time for a computer. A lot can happen in one second. Therefore, the connector has to include the "boundary" second to both consecutive synchronization runs, which means that the records may be processed twice. Going for millisecond granularity makes the problem less severe, but the problem is still there.
However, the worst problem is that this strategy cannot detect deleted objects. Deleted objects are not there anymore, they do not have last modification timestamp, therefore they will not be included the search. This means that there must be a reconciliation process running together with live synchronization. Wait a minute, it is usually recommended running reconciliation anyway, as a form of "safety net", isn’t it? It is, but the difference is in the timing. It is one thing to run reconciliation once a week to make sure that no records were missed. Yet, it is a completely different thing to run reconciliation every hour to make sure deleted objects are properly handled. This makes a huge difference, especially for deployments with millions of entries. Strategies based on last modification timestamp may look like a good idea at the beginning. However, they usually turn into a major liability in the long run. Avoid them if you can.
The bottom line is, that synchronization strategies are not created equal. In fact, the individual strategies tend to have vastly different characteristics. Our advice is to learn how each synchronization strategy works, what are the limitations and when it fails. Also, avoid the use of strategies based on last modification timestamp if there is any other viable alternative.
Conclusion
Synchronization is one of the most important mechanisms in the entire identity management field. Primary purpose of synchronization is to get the data into midPoint. That is good approach when an identity management deployment begins: feed your midPoint with data first. Get the data from the HR system. Correlate the data with Active Directory. Connect all the major resources to midPoint and correlate the data again. MidPoint does not need to make any changes at this stage. In fact, it is perfectly good approach to make all the resource read-only at this stage. The point is to let midPoint see the data. Why do we need that?
-
We can see what is the real quality of the data. Most system owners have at least some idea what data sets are there. However, it is almost impossible to estimate data quality until the data are processed and verified. That is exactly what midPoint can do at this stage. This is essential information to plan data cleanup and sanitation.
-
We can learn how many accounts and account types are there. It is perhaps quite obvious that there are employee accounts. Are there also accounts for contractors, suppliers, support engineers? Are those accounts active? What is the naming convention? Do system administrators use employee accounts for administration, or are they using dedicated high-privilege accounts? This information is crucial to set up provisioning policies.
-
We can learn distribution of accounts and their entitlements. Do all employees have accounts in Active Directory? Are there any large user groups? How does organizational structure influence the accounts? This information is very useful to design a role-based access control structures and other policies.
-
We can detect some security vulnerabilities. Are there orphaned accounts that should have been deleted long time ago? Are there testing accounts that were left unattended after the last nighttime emergency? Indeed, there is no security without identity management.
This is a good start. Even if this is all that you do in the first step of the deployment, it is still a major benefit. You can get better visibility, and with that comes better security. You have the data to analyze your environment, and plan next step of the identity management deployment. You won’t be blind any longer. That is extremely important. It is indeed a capital mistake to theorize before one has data.
6. Schema
If you have built castles in the air, your work need not be lost, that is where they should be. Now put the foundations under them.
So far we have been discussing the things that influence how midPoint interacts with the outside. Resource definitions, outbound and inbound mappings, even the roles - the primary purpose of those things is to control how data get into midPoint and out of midPoint. Now it is time to discuss how midPoint works internally.
Early identity management systems were little more than smart data transformers. They took data from data sources, modified them in some way, applied access control model such as RBAC, and then they pushed the data out. There was very little crucial information that was stored inside the IDM system itself. However, that was a long time ago. The world is a different place now. Focus of identity management field has shifted towards identity governance and high-level policies. It is not enough to just transform the data. Policies have to be applied. Regulatory compliance has to be evaluated. There are processes to follow, paperwork to do, evidence to collect, reports to compile, notifications, reviews and daily status reports. It is perhaps no big surprise that there is a good deal of management in Identity Management after all.
Many of the following chapters deal with these management concepts. However, we have to start from the basics, the very foundation of midPoint: schema. MidPoint is built for much more that just a mere data transformation. MidPoint is designed to unify the data. Schema plays a crucial part in that ambition.
MidPoint Schema
MidPoint is designed as a schema-aware system, from the bottom to the top. MidPoint has a definition for every bit of data that passes through it. We know whether a particular piece of data is string, integer or timestamp. We know whether it is single-valued or multi-valued. We know whether it is optional or mandatory. We know whether this is a sensitive piece of data that requires extra protection. We know whether it is part of technical meta-data that we usually do not want to show by default. We usually also know what label we should use when we are presenting the data, and how that label translates to other languages. We know quite a lot about the data that we work with. All the objects that midPoint works with are completely defined by the schema. There is a schema for user, role, org, resource, system configuration and everything else.
Such awareness of the schema brings significant advantages to midPoint. The most obvious advantage is in data presentation. We know that we need to render a calendar selector because that particular data property is timestamp. We know that we need to render a text field with a plus button to add values because that particular property is a multi-valued string. We know that some fields should be disabled because those properties are read-only. This behavior is not hard-coded in the user interface code. Vast majority of midPoint user interface is rendered by interpreting midPoint schema.
This approach is absolutely crucial for any serious data management system to operate efficiently, doubly so for identity management. One of the reasons is that the identity management system works with data that are retrieved from other systems (resources). It is not realistically possible to hard-code midPoint user interface for all the various attributes that all the possible resources could have. A different strategy is needed here, a strategy that is much more dynamic.
When midPoint connects to a new resource for the first time it attempts to retrieve resource schema. The resource schema specifies what object classes the resource supports, which attributes the object classes have, what types are those and other details about the data model of the resource. MidPoint transforms this resource schema to its own native format, and stores that in the resource definition. This means that midPoint has the schema available anytime it is needed for dynamic interpretation. That schema is used to display resource data in the most natural and user-friendly way. It is also used by automatic data type conversions, which makes configuration of mappings easier.
Data Unification
MidPoint schema is not just a nice way to describe user, role or organizational structure. It has a much deeper meaning. The primary purpose of a schema is integration, data translation and unification. A clever reader would certainly remember that we have already talked about star topology or hub-and-spoke integration pattern. MidPoint is like a hub of the wheel and all the resources connect to midPoint as spokes. MidPoint is actively discouraging direct resource-to-resource communication. Everything in midPoint is built for resource-to-midPoint and midPoint-to-resource communication. MidPoint is always the center – for a very good reason. All resource data need to be translated to and from midPoint "data language". Thus, midPoint creates a common language that everybody can understand. This is the very purpose of midPoint schema. The schema of user, role, org and service is designed to contain properties that are often used in identity-related integration scenarios. Therefore, an engineer who is designing a mapping is quite likely to find a suitable property in midPoint schema that is prepared to be used.
MidPoint schema forms a lingua franca, a common language that can be translated to various data dialects used by the resources. Even more than that, it also provides a basic framework that can be reused for many midPoint deployments. Therefore, an engineer starting a new deployment does not need to start on a completely green field. The basic schema will always be there to provide a starting point.
| Ever wondered why midPoint is called midPoint? Clever reader would have figured that out already. |
Basic User Schema
When it comes to identity management field, there is one concept that is at the center of everything: concept of user. User is undoubtedly the most important object in the entire midPoint schema. Therefore, it is worth to have a closer look at how this object looks like. This is going to be a really educative lesson, as it will explain several fundamental principles of midPoint.
User is represented by schema datatype identified as UserType.
Adding the Type suffix to data types is a common convention in midPoint, there are UserType, RoleType, OrgType, ResourceType and so on.
This convention is partially historic, partially given by XML Schema conventions, partially a convenience to developers.
Regardless of the origins, this convention is used for all the data types in midPoint schemas.
You will get used to it eventually.
UserType is what we call an object definition in midPoint parlance.
This means that UserType data structure specifies a complete midPoint object with all the things that any self-respecting object needs.
There is object identifier (OID), name that can be presented in different forms and languages, free-form description and so on.
All midPoint objects have those things.
The UserType data structure has many additional properties, containers and references.
Property is a primitive data item such as string, integer or a timestamp.
Container is a complex data structure that contains a bunch of properties or other containers.
Reference is a pointer to another midPoint object.
| Properties are primitive. However, there may be properties that have internal structure, even quite a complex internal structure. This is sometimes given by historic reasons. However, there are also properties that need to be complex, e.g. properties that require localizable presentation, or properties that provide protection of data. Indeed, this may be somehow confusing. Even a clever reader looks puzzled now. However, this distinction is not a big issue, for now. |
Definition of UserType is summarized in the following table:
| Name | Type | Description |
|---|---|---|
|
property |
Human-readable, mutable name of the object.
It is typically a username or some kind of application-level identifier.
The value must be unique among all the users. |
|
property |
Free-form textual description of the object.
This is meant to be displayed in the user interface. |
|
container |
A container for custom schema extensions. We will discuss that later. |
|
container |
Meta-data about object creation, modification, etc. |
|
property |
Lifecycle state of the object.
This property defines whether the object represents a draft, proposed definition, whether it is active, deprecated, and so on. |
|
container |
Set of object’s assignments.
Assignments define the privileges, policies and "features" that this object should have, that this object is entitled to.
Typical assignment will point to a role, or define a construction of an account. |
|
reference |
Set of shadows (projections) linked to this focal object.
E.g. a set of accounts linked to a user.
This is the set of shadows that belongs to the focal object in a sense that these shadows represents the focal object on the resource.
E.g. The set of accounts that represent the same midPoint user (the same physical person, they are "analogous"). |
|
container |
Type that defines activation properties. Determines whether something is active (and working) or inactive (e.g. disabled). |
|
property |
Photo of a user (in a binary form). |
|
property |
The name, identifier or code of the cost center to which the user belongs. |
|
property |
Primary locality of the user, the place where the user usually works, the country, city or building that he belongs to. The specific meaning and form of this property is deployment-specific. |
|
property |
Indicates user’s preferred language, usually for the purpose of localizing user interfaces.
The format is IETF language tag defined in BCP 47, where underscore is used as a subtag separator.
This is usually a ISO 639-1 two-letter language code optionally followed by ISO 3166-1 two-letter country code separated by underscore. |
|
property |
Defines user’s preference in displaying currency, dates and other items related to location and culture.
It has the same format as |
|
property |
User’s preferred timezone.
It is specified in the "tz database" (a.k.a "Olson") format. |
|
property |
E-Mail address of the user, org. unit, etc.
This is the address supposed to be used for communication with the user. |
|
property |
Primary telephone number of the user. |
|
property |
Full name of the user with all the decorations, middle name initials, honorific title and any other structure that is usual in the cultural environment that the system operates in.
This element is intended to be displayed to a common user of the system.
Example: |
|
property |
Given name of the user.
It is usually the first name of the user, but the order of names may differ in various cultural environments.
This element will always contain the name that was given to the user at birth or was chosen by the user. |
|
property |
Family name of the user.
It is usually the last name of the user, but the order of names may differ in various cultural environments.
This element will always contain the name that was inherited from the family or was assigned to a user by some other means.
Example: |
|
property |
Middle name, patronymic, matronymic or any other name of a person.
It is usually the middle component of the name, however that may be culture-dependent.
Example: |
|
property |
Familiar or otherwise informal way to address a person.
Example: |
|
property |
Honorific titles that go before the name.
Example: |
|
property |
Honorific titles that go after the name.
Example: |
|
property |
User’s title defining a work position or a primary role in the organization.
Example: |
|
property |
Unique, business-oriented identifier of the employee. E.g. employee number, student identifier, citizen identifier, ID card number, social security number, etc. Typically used as a correlation identifier and for auditing purposes. Should be immutable, but the specific properties and usage are deployment-specific. |
|
property |
Name or (preferably) immutable identifier of organization that the user belongs to. The format is deployment-specific. This property together with organizationalUnit may be used to provide easy-to-use data about organizational membership of the user. |
|
property |
Name or (preferably) immutable identifier of organizational unit that the user belongs to. The format is deployment-specific. This property together with organization may be used to provide easy-to-use data about organizational membership of the user. |
|
container |
The set of user’s credentials (such as passwords). |
This is a basic outline of the schema for UserType.
This description is slightly simplified.
Not all the items that are defined for UserType are shown in the table above.
Deprecated items are not shown at all.
Only some operational properties are shown.
Some items are simplified or entirely omitted for clarity.
Following example illustrates the use of midPoint UserType schema:
<user>
    <name>alice</name>
    <activation>
        <administrativeStatus>enabled</administrativeStatus>
    </activation>
    <preferredLanguage>en_US</preferredLanguage>
    <assignment>
        <targetRef oid="aaa6cde4-0471-11e9-9b50-c743da469067" type="RoleType"/>
    </assignment>
    <assignment>
        <targetRef oid="4e73ed62-aef9-11e9-a7a8-57334ef1f991" type="RoleType"/>
    </assignment>
    <emailAddress>alice.anderson@example.com</emailAddress>
    <fullName>Alice Anderson, PhD.</fullName>
    <givenName>Alice</givenName>
    <familyName>Anderson</familyName>
    <honorificSuffix>PhD.</honorificSuffix>
    <title>Business Analyst</title>
    <personalNumber>001</personalNumber>
    <organizationalUnit>10010</organizationalUnit>
</user>
Operational, Experimental and Deprecated Items
Most of the items in midPoint schema are quite ordinary and they behave as expected.
Such as the fullName property.
The property can be set and changed by using midPoint user interface.
However, then there are some extraordinary items.
Those are automatically determined and controlled by midPoint core engine.
Those items are essential for correct operation of midPoint.
Therefore, they are called operational items.
Operational items are usually not directly displayed in the user interface.
They are either completely hidden, displayed indirectly or displayed only when user chooses to display them.
MidPoint schema has grown and evolved over time, and it is still evolving. Therefore, it is quite expected that the schema will slightly change over time. However, we do not want to affect midPoint deployments by incompatible schema changes in every midPoint release. Therefore, items are usually not removed from midPoint schema without a warning. An item that we plan to remove is marked as deprecated first. At that point, such item is still working as it was working before. However, it is not displayed in the user interface, to discourage use of that item. Deprecated items are removed in one of the subsequent midPoint releases. This gives enough time for midPoint users to adapt to schema changes.
There is also another kind of schema evolution. Development of most midPoint features is quick and straightforward. Then there are features that are quite complex or features that involve some degree of exploration. Those features cannot be implemented in a single midPoint release. There are also features that are provided to the midPoint community as a "preview", to gather feedback for further development. All such features are marked as experimental. Those features are not officially supported, but you are free to use them at your own risk. Most new features require extensions of midPoint schema. This is also true for those experimental features. However, when going experimental, there is a fair chance that something will change in the future. Therefore, we are explicitly marking parts of the schema as experimental. This is a warning that those parts are likely to change. We are not promising any kind of compatibility for experimental parts of midPoint schema. They may change any time, they may even completely disappear. There will be no deprecation or any other warning. Simply speaking: if you are dealing with experimental features, you are completely on your own. Do not come crying when those things stop working. You have been warned.
Lifecycle and Activation
Time is cruel, everything that we do is in some way temporary. Except perhaps for stupidity, which seems to be utterly endless. Sadly, all other things have a beginning and an end. Employees have hiring date, contracts have end dates, users can be deactivated, roles may get replaced and so on. We use the terms lifecycle and activation to encompass all those things that deal with the questions of digital life and death of the objects.
Lifecycle State
Users, as well as other identity-related objects have their cycle of life. They are enrolled into the system, such as record of new hire is entered into HR system. Then the objects are active, such as user accounts of an active employee. The objects may be inactivated for a while, such as an employee on maternal leave or sabbatical. Employees do not work for ever, they may resign, may be laid off, or retired. Even then, a record of a former employee may be kept for some time.
While the details of the lifecycle may be subtly different for various organizations and types of objects, the basic outline is almost always the same. For that reason the basic lifecycle states are pre-configured in midPoint, as illustrated in following diagram.
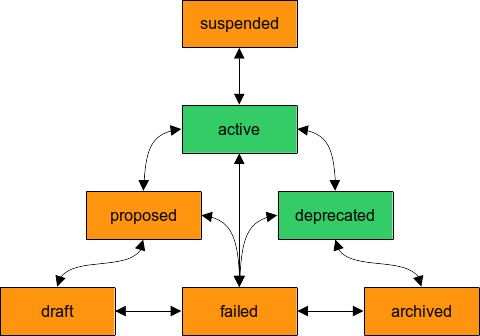
Objects have their lifecycle state specified in lifecycleState property.
If no explicit value is specified, the default value is active.
Pre-defined lifecycle states are described in following table.
| State | Is active | Description | Examples |
|---|---|---|---|
|
No |
Definition of the new object in progress. The definition may change at any moment, it is not ready yet. |
Role definition in preparation (not finished yet). |
|
No |
Definition of a new object is ready for use, but there is still a review process to be applied (e.g. approval). The definition should not change in this state. |
Finished new role definition in approval process. |
|
Yes |
Active and working definition. Ready to be used without any unusual limitations. |
Active employee. |
|
No |
Suspended definition, temporarily disabled. It is expected that the object will return to active state eventually. |
Employee on temporary leave (maternal leave, sabbatical). |
|
Yes |
Active definition which is being phased out. The definition is still fully operational, but it should not be used for new assignments. E.g. it should not be requested, it should not be approved, etc. |
Deprecated role: still working, but not intended to be assigned any more. |
|
No |
Inactive historical definition. It is no longer used. It is maintained only for historical, auditing and sentimental reasons. E.g. some systems require that the account exists to maintain referential consistency of historical data, audit records, etc. It may also be used to "block" the user or account identifier to avoid their reuse. |
Retired employee, keeping minimal record for accounting reasons and to avoid identifier recycling. |
|
no |
Unexpected error has occurred during object lifecycle. Result of that event is that the object is rendered inactive. The situation cannot be automatically remedied. Manual action is needed. |
Role definition rejected during approvals, without obvious continuation of the process. |
Lifecycle state of an object determines whether it is considered active or inactive, among other things.
This is perhaps the most important effect of lifecycle state on the system.
User in suspended state is inactive, accounts are disabled, user cannot log in.
Role in draft state is also inactive, the definition is not complete yet, it is not ready for use.
Objects in active state operate normally.
When it comes to users, lifecycle state is meant to be controlled automatically, if possible.
The usual method is to synchronize user lifecycle states from the data source, such as HR system.
Candidate user record is meant to be proposed, the changed to active when hired, temporarily set to suspended during maternal leave, and finally end up in archived state until the object is deleted.
Users are not the only objects that are affected by lifecycle state.
Many object types in midPoint have lifecycle states.
Interpretation of the states are still almost the same.
However, unlike users, lifecycle states of other objects are usually controlled manually.
E.g. a business role begins its life in draft state.
Role manager builds up role definition while in draft state, looking for appropriate combination of application roles to include in the definition, consulting with colleagues.
This may take some time.
In the meantime, the role is in draft state, inactive, without any risk of unintentional use.
When role definition is done, it is switched to proposed state, reviewed, approved and finally set as active.
When in active state, the role is fully operational, assigned to users, maybe even modified a bit to adapt to changed circumstances.
Sooner or later the role becomes obsolete.
However, we cannot simply delete the role, as it is still assigned to users.
We have to be careful, we do not want to disrupt the business.
First, we switch the role to deprecated state.
The role is still active, everything works fine, just the role cannot be requested and it should not be assigned to any users.
Then we can take our time to clean up all existing role assignments, replacing deprecated role with newer equivalents.
Finally, when all assignments are gone, we can switch role to archived state.
Lifecycle state can be applied to many configuration elements in addition to objects.
When lifecycle state is applied to parts of configuration, it controls whether the respective configuration is applied.
E.g. setting a mapping to draft lifecycle state effectively disables the mapping.
This approach can be used to temporarily deactivate parts of configuration.
Lifecycle state provides elegant, systematic, unified and controlled mechanisms to control how active an object is. It guides an objects from its digital cradle to its eventual binary death. As such, it is one of the essential mechanisms of identity management.
Activation
Identity management is all about the rules, policies and principles applied at scale. However, the world around us is not always completely systematic and elegant. There are always exceptions, special cases, data errors and other circumstances that do not entirely fit into our elegant identity management universe. For that reason, midPoint has activation mechanism, which provides ability for finer control as compared to simple lifecycle state. Activation also provides ability for manual overrides by administrator in case of need.
The activation in itself is multi-dimensional and a bit complex data structure. It is composed of several properties that may change in somehow independent and somehow inter-dependent way. Following list provides a quick summary of activation properties:
-
Administrative status defines administrative state of the object, usually manually set by system administrator.
-
Validity properties specify when the object should be active. There is activation date and deactivation date.
-
Effective status is a computed operational property that shows the current effective status of the user. It is computed from lifecycle state and other activation properties.
-
Lockout status is used for automatic temporary inactivation of user, e.g. in case of numerous failed authentication attempts.
-
Additional operational properties provide (meta) data about the past changes of administrative status.
The best way to explain how activation works is to describe the meaning and behavior of individual properties.
Administrative status defines the "administrative state" of the object (user),
i.e. the explicit decision of the administrator.
If administrative status is set, this property overrides any other constraints in the activation type (but not the lifecycle state).
E.g. if this is set to enabled and the user is not yet valid (according to validity below), the user should be considered active.
If set to disabled the user is considered inactive regardless of other settings.
Therefore, this property does not necessarily define an actual state of the object.
It is a kind of "manual override".
In fact, the most common setting for this property is to leave it unset and let other properties determine the state.
If this property is not present then the other constraints in the activation type should be considered (namely validity properties, see below).
| Administrative Status Value | Description |
|---|---|
no value |
No explicit override. Other activation properties determine the resulting status. |
|
The entity is active. It is enabled and fully operational (if lifecycle state permits). |
|
The entity is inactive. It has been disabled by an administrative action. This indicates temporary inactivation with an intent to enable the entity later. It is usually used to temporarily disable account for security reasons. |
If the administrative status is not present, and there are no other constraints in the activation type, or if there is no activation type at all, then the object is assumed to be "enabled", i.e. that the user is active - provided that the lifecycle state of the object allows it.
The archived state of administrative status should not be used.
Lifecycle state archived should be used instead.
This administrative status value is one of the leftovers from midPoint history, from the dark ages when lifecycle state did not exist yet.
|
Validity refers to times when the object is considered legal or otherwise usable.
In midPoint, the validity is currently defined by two dates: the date from which the object is valid (validFrom) and the date to which an object is valid (validTo).
When talking about users, these dates usually represent the date when the contract with the user started (hiring date) and the date when the contract ends.
The user is considered valid (active) between these two dates.
The user is considered inactive before the validFrom date or after the validTo date.
It is perfectly acceptable to set just one of the dates or no date at all.
If any date is unset then it is assumed to extend to infinity.
E.g. if validFrom date is not set, the user is considered active from the beginning of the universe to the moment specified by the validTo date.
The validity is overridden by the administrative status. Therefore, if administrative status is set to any non-empty value then the validity dates are not considered at all.
Lockout status defines the state of user or account lock-out. Lock-out means that the account was temporarily disabled due to failed login attempts or a similar abuse attempt. This mechanism is usually used to avoid brute-force or dictionary password attacks and the lock will usually expire by itself in a matter of minutes.
This value is usually set by the resource or by midpoint internal authentication code. This value is mostly used to read the lockout status of a user or an account. This value is semi-writable. If the object is locked then it can be used to set it to the unlocked state. However, it does not work the other way around. It cannot be used to lock the account. Locking is always done by the authentication code.
| Lockout Status Value | Description |
|---|---|
no value |
No information (generally means unlocked user or account) |
|
Unlocked and operational user or account. |
|
The user or account has been locked. Log-in to the account is temporarily disabled. |
Please note that even if user of account are in the normal (unlocked) state, they still can be disabled by lifecycle, administrative status or validity which will make them efficiently inactive.
There is also an informational property lockoutExpirationTimestamp that provides information about the expiration of the lock.
However, not all resources may be able to provide such information.
Lifecycle vs Activation
Lifecycle state and activation work together, although the interaction between them might look slightly mysterious. Object lifecycle specifies phases of object’s life, separated by important life-changing events. Therefore, lifecycle state is the most important aspect when considering whether object is active or inactive. When lifecycle state specifies that object is inactive, then the decision is final. Such object is inactive, regardless of any other activation setting.
This makes perfect sense.
E.g. when an object is in draft state, it is just being prepared for use.
Such object may have validity dates or administrative status that would normally make it active.
However, we do not want draft objects to be active yet.
Such object may need a review and approval to transition to active lifecycle state.
Only then it will really become active.
If lifecycle state indicates object as active, the the activation part is considered. Administrative status, validity dates and lockout status are computed, which determines state of the object.
This may look complicated. However, it matches the needs of identity management reality quite well. As the rule of the thumb, it is usually lifecycle state which is synchronized from data source. E.g. the HR system makes computation whether employee is in hiring process, whether the employee is active or retired. MidPoint takes that HR status and translates it to the pre-defined lifecycle state values. However, the HR system may not be able to provide such aggregate status. In that case midPoint inbound mappings should be used in a creative way to supplement that functionality. Unfortunately, the details are always deployment-specific, as the specific solution depends on the data that the HR system can provide. E.g. it is quite a common practice to map validity dates from HR system, and let midPoint do the validity calculations. The specific mappings of lifecycle state and validity dates is always somehow tricky in practice. It heavily depends on specific characteristics and capabilities of the data source (HR system). However, it is strongly recommended to control lifecycle state by using inbound mapping from the data source (HR system), and do not control administrative status. Administrative status should remain as a "last resort" mechanisms when user needs to be quickly disabled by manual action, e.g. in case of security incident.
The concepts of lifecycle and activation are not limited to users. Many midPoint objects have lifecycle state and activation. Roles can expire, organizational units can be disabled and so on. Lifecycle and activation are a concepts that have a very broad application in midPoint. Even assignments have activation, which is a crucial element in some configuration (e.g. multi-affiliation). Assignments are often used to model employment contracts, student affiliations, service contracts and similar concepts that have time boundaries. This is usually achieved by a clever use of assignment activation.
Activation Operational Properties
Lifecycle state and activation are somehow complex and spread out in several dimensions.
Therefore, it may not be entirely obvious which objects are active and which are not.
For that reason midPoint provides an operational property effectiveStatus which shows the computed "effective state" of the object.
Simply speaking, it is a read-only property which tells whether the user should be considered active or inactive.
The effective status is the result of combining lifecycle state and several activation settings (administrative status, validity dates, etc.).
The effective status holds the result of a computation, therefore it is an operational property that is recomputed every time the status changes. The effective status should not be set directly. The effective status can be changed only indirectly by changing other activation properties.
| Effective Status Value | Description |
|---|---|
no value |
Not yet computed. This should not happen under normal circumstances. |
|
The entity is active. |
|
The entity is inactive (temporary inactivation). |
|
The entity is inactive (permanent inactivation). |
The effective status is the property that is used by majority of midPoint code when determining whether a particular object is active or inactive. This property should always have a value in a normal case. If this property is not present then the computation haven’t taken place yet.
Similarly to effective status, there is yet another operational property validityStatus.
This property reflects the state of validity constraints with respect to current time.
The values are before, in and after, meaning the states before the validity intervals started, inside the validity interval and after the validity interval ended respectively.
There also other operational properties in the activation data structure that provide operational data about user activation:
| Name | Type | Description |
|---|---|---|
|
URI |
URL that identifies a reason for disable.
This may be indication that that identity was disabled explicitly, that the |
|
dateTime |
Timestamp of last modification of the activation status to the disabled state. |
|
dateTime |
Timestamp of last modification of the activation status to the enabled state. |
|
dateTime |
Timestamp of last modification of the activation status to the archived state. |
|
dateTime |
Timestamp of last modification of the effective validity state, i.e. last time the validity state was recomputed with a result that was different from the previous recomputation. It is used to avoid repeated validity change deltas. |
Those properties are operational, therefore from the user point of view they are read-only. The values are automatically computed by midPoint and stored in the database.
Activation and Lifecycle Examples
Let’s see how that works on few examples.
The simplest example is perhaps not even worth mentioning.
A user without any lifecycle state or activation data structure is considered to be active (enabled).
When such user is stored in midPoint repository, midPoint will automatically compute effectiveStatus:
<user>
    <name>alice</name>
    ...
    <activation>
        <effectiveStatus>enabled</effectiveStatus>
    </activation>
</user>
The user can be temporarily inactivated by setting lifecycleState to suspended.
Property effectiveStatus will indicate that user is inactive now.
<user>
    <name>alice</name>
    <lifecycleState>suspended</lifecycleState>
    ...
    <activation>
        <effectiveStatus>disabled</effectiveStatus>
    </activation>
</user>
Changing lifecycleState back to active re-activates the user:
<user>
    <name>alice</name>
    <lifecycleState>active</lifecycleState>
    ...
    <activation>
        <effectiveStatus>enabled</effectiveStatus>
    </activation>
</user>
Lifecycle state is usually maintained automatically, using inbound mapping from the HR system.
If an administrator would try to change lifecycle state manually, synchronization may reset the state back to its previous value.
However, administrator can manually disable user by using administrativeStatus property:
<user>
    <name>alice</name>
    <lifecycleState>active</lifecycleState>
    ...
    <activation>
        <administrativeStatus>disabled</administrativeStatus>
    </activation>
</user>
When such user object is stored after the modification, midPoint computes the value of effective status:
<user>
    <name>alice</name>
    <lifecycleState>active</lifecycleState>
    ...
    <activation>
        <administrativeStatus>disabled</administrativeStatus>
        <effectiveStatus>disabled</effectiveStatus>
    </activation>
</user>
Even though the lifecycle state of the user is active, the user is manually inactivated using administrativeStatus.
The use of administrative status is usually quite harsh, and lifecycle state may be quite simplistic. MidPoint deployments are often using validity constraints in addition to lifecycle state. For example, an employee that has employment contract for a year would look like this:
<user>
    <name>bob</name>
    ...
    <activation>
        <validFrom>2019-01-01T00:00:00Z</validFrom>
        <validTo>2019-12-31T23:59:59Z</validTo>
        <validityStatus>in</validityStatus>
        <effectiveStatus>enabled</effectiveStatus>
    </activation>
</user>
Given that this chapter was written in 2019, such user will be active. It will automatically switch to inactive state after the last day of 2019. However, if there is ever a need to explicitly disable the user, administrative status can still be used:
<user>
    <name>bob</name>
    ...
    <activation>
        <administrativeStatus>disabled</administrativeStatus>
        <validFrom>2019-01-01T00:00:00Z</validFrom>
        <validTo>2019-12-31T23:59:59Z</validTo>
        <validityStatus>in</validityStatus>
        <effectiveStatus>disabled</effectiveStatus>
    </activation>
</user>
In this case the user is still in its validity interval.
Hence the in value of validityStatus.
However, the administrative status is explicitly set to disabled.
Therefore, the resulting effective status is also disabled.
Activation operational properties are very useful, not just for troubleshooting.
These properties are often used in reports, dashboards and search filters.
E.g. the best way to search all active users is to search for activation/effectiveStatus = "enabled".
Similarly, filter activation/effectiveStatus = "disabled" looks for all inactive users, regardless whether they are inactive due to lifecycle state, administrative status or validity constraints.
Schema Definition
So far we have talked mostly about the user schema (UserType data type).
However, midPoint schema much broader than that.
There are many types of objects, and there are thousands of data types overall.
It would be almost impossible to manage such a big schema if it were hard-coded in midPoint code.
Therefore, the schema is defined in special definition files that are used by midPoint in several ways.
Schema definition used by the user interface to automatically render form fields.
It is also used by midPoint expression engine to automatically convert data types.
It is even used by midPoint build process (compilation), to make sure that midPoint code is using the schema properly.
MidPoint is completely schema-aware system, from the bottom to the top.
Schema obviously plays a crucial role in everything that midPoint does. Therefore, it may be interesting to have a closer look at schema definition. This can be particularly useful for engineers that are deploying midPoint professionally, and that often needs to extend and customize the schema.
MidPoint schema is specified in XML Schema Definition (XSD) format.
MidPoint schema is defined in several parts, but the most important is the "core" schema definition.
The schema files reside in midPoint source code in schema component in the infra subsystem.
Therefore, schema files can be found in the resources part under the infra/schema subdirectory of midPoint source code.
Schema files are also included in midPoint distribution package for convenience.
| Why XSD? Why did we choose to use the XML Schema Definition format for midPoint schema? There are historic reasons and there are pragmatic reasons. Back in early 2010s when midPoint was born, XML was perhaps the only sensible choice to build a complex system. Alternatives such as JSON were young, and their schema languages ranged from very limited through useless to non-existent. Therefore, XML and XSD were a natural choice. We needed to extend XSD with custom features. Fortunately, XSD allowed that. We also needed to rewrite parts of the XML/XSD-processing code. Unfortunately, the XML ecosystem was not designed for this, and we have also hit other limitations of XML and XSD. We have to invent a new way to use XSD to describe generic data structures (a.k.a. "Prism objects") that can be represented in XML, JSON and YAML. Due to that innovation, XSD did not really hold us back that much. Despite all its limitations, XSD worked for us quite well during all those years. However, we are getting very close to the very limits of what XSD (or any similar schema language) can do. We are already working on a replacement: Axiom data modeling language. Axiom is a next-generation language, supporting not just a data schema, but also meta-data schema. Axiom is still very young, it needs more work and time to mature. However, it is certainly a future for midPoint. |
Every deployment engineer that takes midPoint deployments seriously should be aware of the schema. Hardcore engineer will surely open the XSD files in their favorite text editor in the terminal and analyze the definitions line-by-line. Developers could open the XSD files in their IDEs and have a nice organized look at the schema. However, even an ordinary engineer could benefit from learning the basics of XSD and having a look at a few important data types in midPoint schema.
Schema definition is not just about the properties, containers and data types. Crucial part of the schema definition is in-line documentation. Most of the data types and items are documented by using XSD in-line documentation mechanism. Therefore, a huge amount of details about midPoint can be learned by exploring the schema. We have tried to make that process easier by developing schemadoc mechanism. Schemadoc is a process that takes raw midPoint schema and generates HTML documentation out of that. This task is part of midPoint build process and generated documentation is a result of midPoint build. Schemadoc is also available online. Just search for "schemadoc" in midPoint docs.
Schema is not just a description how midPoint works. MidPoint schema is part of midPoint itself. It is used when midPoint is compiled. It is parsed when midPoint starts. It is used by midPoint core and user interface. MidPoint is complex, and even the experts can be sometimes wrong about midPoint functionality. MidPoint documentation is quite extensive, therefore it may be misleading or out of date at places. But not the schema. Schema is always right. Otherwise midPoint won’t work at all. In midPoint world, schema is the law. When in doubt, look at the schema.
Schema Extensibility
MidPoint schema is quite rich. Many of the properties that are frequently used in identity management deployments are already part of midPoint schema. Given name, family name, full name, additional names, honorific titles, job title, personal number - it is all there, ready to be used. However, reality has always a way to bring unexpected things. Therefore, midPoint deployments won’t get far if midPoint schema cannot be extended.
Vast majority of midPoint schema is available at compile-time. This means that such schema is used during compilation (build) of midPoint. That "static" part of schema is somehow hardcoded into midPoint itself, and it would be very difficult to change. Therefore, we have developed a mechanism to extend the schema at deployment-time. Small parts of the XSD definition can be provided when midPoint is deployed. MidPoint reads those definitions when it starts up. The static part of the schema is extended with those definitions. From that point on, the extensions are part of midPoint schema. The extensions are naturally used by midPoint user interface, expression-processing code and all other parts of midPoint.
Our ExAmPLE company was quite happy with the progress of their identity management deployment so far.
Mappings were used to synchronize values of user names and all other common attributes.
There is plenty of suitable properties for that in midPoint schema such as givenName and fullName.
Even personalNumber came very handy.
However, now they need to customize midPoint schema to better suit their very specific needs.
The company management decided that the people are going to look really cool in fancy hats.
Therefore, they are going provide a hat for every employee.
Which means that the identity management system needs to track hat size for all users.
Hat size is not used in the identity management deployments very often, therefore it is not a part of standard midPoint schema.
Fortunately, it is quite easy to extend the schema.
First step to extend midPoint schema is to prepare a small XSD file:
<xsd:schema targetNamespace="http://example.com/xml/ns/midpoint/schema">
    ...
    <xsd:complexType name="UserTypeExtensionType">
        <xsd:annotation>
            <xsd:appinfo>
                <a:extension ref="c:UserType"/>
            </xsd:appinfo>
        </xsd:annotation>
        <xsd:sequence>
            <xsd:element name="hatSize" type="xsd:string"
                         minOccurs="0" maxOccurs="1"/>
        </xsd:sequence>
    </xsd:complexType>
</xsd:schema>
This file defines a new data structure UserTypeExtensionType.
The name of this data structure does not really matter.
What matters is that it is bound to an extension of UserType in the annotation part of the type definition.
When midPoint reads this file, it extends the definition of UserType with this data type.
The extension specifies just a single property: hatSize.
This is an optional single-valued string property, which is specified by the minOccurs and maxOccurs clauses.
Every user in midPoint can have this property.
When this schema extension is applied, user interface is going to automatically display text input field of this property for every user.
MidPoint administrator puts this XSD content into example.xsd file.
Name of the file can be chosen arbitrarily as long as it has .xsd file extension.
Administrator copies that file to schema subdirectory of midPoint home directory and restarts midPoint.
From that point on the schema extension is active.
The users can be extended with custom property now:
<user xmlns:exmpl="http://example.com/xml/ns/midpoint/schema">
    <name>alice</name>
    <extension>
        <exmpl:hatSize>M</exmpl:hatSize>
    </extension>
    ...
</user>
There is a couple of important remarks to be made here.
Firstly, all the extension properties are always placed in a special extension container in the objects.
Even though the properties are placed inside a container, the user interface will present them in the same way as the other midPoint properties originating from the static midPoint schema.
In midPoint, all schema items are treated equally, regardless of their origin.
Secondly, a clever reader surely noticed that we have used XML namespace here. We have omitted XML namespaces from the majority of other examples, as they are not that important when working with midPoint objects. However, schema is different. Namespaces are handled quite strictly when working with the schema. Namespaces must be declared and namespace prefixes must be properly used in all XSD definitions. This is how the XSD language was designed. The most important namespace in this case is the target namespace of the extended schema. The URI for this namespace should be chosen in such a way that it is globally unique. The use of your DNS domain is the recommended technique.
Namespaces also should be used when working with extension container in users and other midPoint objects.
This requirement is not that strict, as midPoint can usually figure out the namespace.
However, this may be a problem in case that several schema extensions are combined.
Such schema combinations are fully supported by midPoint.
MidPoint simply parses all the XSD files in the schema directory and applies all of them as extensions.
These files may contain conflicting definitions of the same items.
The namespace is used to differentiate between them.
Therefore, if there is an expectation that several schema extensions will be used in the same deployment, then the use of namespaces in object extension is more than recommended.
|
Extension container
Why is there an Theoretically, XML is completely extensible.
However, when XML Schema is applied to XML, some extensibility scenarios do not work very well.
That is also the case for mixing of static XML elements and dynamic XML elements.
We are hitting what is called "Unique Particle Resolution" limitation of XML schema.
This was further amplified by limitations of Java XML libraries.
The easiest and perhaps even most correct way to resolve this limitation was to create a dedicated XML element for schema extensions.
That is what we have done in early midPoint versions.
The schema processing code in midPoint has significantly improved since, and now we are almost at the point where we could remove the |
MidPoint schema does not just specify the "core" data model. MidPoint schema goes a bit further, and it can also specify the details of data presentation. This means that the schema can specify a label that should be used for particular data item, help text, tooltip and other characteristics. The XML Schema (XSD) cannot do this out-of-the-box. Fortunately, XSD schema can be extended by annotations. Those annotations can be used to define the presentation properties of an items:
    ...
    <xsd:element name="hatSize" type="xsd:string"
                 minOccurs="0" maxOccurs="1">
        <xsd:annotation>
            <xsd:appinfo>
                <a:displayName>Hat size</a:displayName>
                <a:help>
                    Your hat size, in whatever mysterious units the hatters
                    are using for measuring hats.
                </a:help>
            </xsd:appinfo>
        </xsd:annotation>
    </xsd:element>
    ...
This works fine, if your system works in a single localization environment. Yet, this is not enough in case that you need to support more than one language. MidPoint was born in Europe, and here at the old continent we know quite well all the pain that comes with multi-language environments. Therefore, MidPoint is designed to be localizable. You can simply use localization keys instead of actual text:
    ...
    <xsd:element name="hatSize" type="xsd:string"
                 minOccurs="0" maxOccurs="1">
        <xsd:annotation>
            <xsd:appinfo>
                <a:displayName>UserTypeExtensionType.hatSize.displayName</a:displayName>
                <a:help>UserTypeExtensionType.hatSize.help</a:help>
            </xsd:appinfo>
        </xsd:annotation>
    </xsd:element>
    ...
The actual text to be used for the label can be looked up in the localization catalog. However, using localization catalogs is a matter of its own. It will be covered by later chapters.
PolyString and Protected String
Majority of midPoint schema is pretty standard stuff. When you walk through the jungle of midPoint schema definition, you can see all the usual wildlife: strings, integers, booleans, timestamps and binary values. Yet, there are few species that are quite strange. However strange they might look, they are immensely useful. Their names are PolyString and protected string.
PolyString (PolyStringType) is the stranger one of those two.
Its name came from polymorphic string, which means a string that can take a variety of forms.
In its simplest form, PolyString is just a simple string that can be normalized.
Normalization means that we convert the original string into some standard form, e.g. by removing leading and trailing whitespace (trimming), converting all letters to lower case, simplifying national characters and so on.
Many ordinary midPoint properties are PolyStrings.
Object name and user’s givenName, familyName and fullName and all PolyStrings.
However, not even a clever reader have noticed anything suspicious about these properties so far.
This is because normalization is almost transparent in midPoint PolyStrings, it happens on its own in the background.
However, now it is a time to have a peek inside.
Let’s import a user that looks like this:
<user>
    <name>semančík</name>
    ...
    <fullName>Radovan Semančík,  PhD. </fullName>
    ...
</user>
What is really stored in midPoint repository is this:
<user>
    <name>
        <orig>semančík</orig>
        <norm>semancik</norm>
    </name>
    ...
    <fullName>
        <orig>Radovan Semančík,  PhD. </orig>
        <norm>radovan semancik phd</norm>
    </fullName>
    ...
</user>
This all happens transparently. PolyStrings are displayed as strings in the user interface. They are handled (almost completely) as strings in the mappings. Ordinary midPoint user has no idea that the normalization happens at all. If everything is so transparent, why do we bother to normalize strings at all? PolyString normalization has many practical uses. Two of them are embedded quite deep in the way how midPoint works.
Firstly, normalization is used to provide reliable uniqueness mechanism.
Usually we do not want a user with username semancik and another user with username Semancik or even Semančík.
This may lead to confusion, and it even totally breaks some applications.
As midPoint has uniqueness constraints on both the orig and norm parts of the name, such situation is completely avoided.
All those usernames have the same normalized form semancik, therefore the uniqueness constraint on norm part of the name prohibits the use of all those forms at the same time.
Secondly, normalization is simple and elegant way to conveniently search for objects in international environments.
When PolyStrings are searched, the value from the query is normalized.
Then the norm part of the PolyString is searched.
Therefore, whether the query contains semancik, Semancik or semančík, it will always find the user entry above.
Default normalization algorithm in midPoint should be a good fit for most environments.
However, there are always deployments that are different.
For example, characters such as hyphens (-) are usually not considered to be significant.
Yet, some deployments may consider aliceanderson and alice-anderson to be two different usernames.
The default midPoint normalization mechanism removes hyphens, therefore attempt to have two such users will end up with an error.
Fortunately, the normalization algorithm is customizable.
There are several algorithms to choose from and they can even be parameterized.
In the extreme case, there is a way to develop a completely custom algorithm.
Therefore, the PolyString normalization should fit pretty much every deployment scenario.
PolyString still has more tricks to do. Simple normalization is not much of a polymorphism yet. PolyString becomes a real shape-shifter when used in fully localized environments. PolyString is designed to store values that can have individualized representations in national environments. E.g. in international deployments we probably want to provide localized role names. Like this:
<role>
    <name>
        <orig>System administrator</orig>
        <lang>
            <en>System administrator</en>
            <sk>Systémový správca</sk>
            <cz>Správce systému</cz>
        </lang>
    </name>
    ...
</role>
This is a mechanism to display midPoint to end users in their own language, complete with localized content of midPoint.
The other strange animal in the midPoint jungle is protected string (ProtectedStringType).
Identity management systems often work with sensitive data such as user passwords.
All the identity-related data usually need protection, but those sensitive data items need even better safeguards.
This usually means that some kind of cryptographic technique needs to be employed.
E.g. we do not want to store passwords in the cleartext form.
Want them to be either hashed or encrypted.
That is what protected string is for.
Protected string is basically just a simple string, but it has extra cryptographic protection.
If you have ever dealt with cryptography, you will probably know that cryptography is not simple. Even such a seemingly simple thing as password hashing is quite complex when it comes to all the details. E.g. we do not want to store plain hash, as that would not provide sufficient protection. We want salted hash. Which means that the salt value needs to be stored together with the string. Many algorithms are parametric, and the parameters used during the hashing also need to be stored. Most importantly, we do not want to hard-wire midPoint to any specific algorithm. Cryptographic algorithms often do not age well, and they need to be replaced eventually. Therefore, we also need to store algorithm identifiers with the value. If the value is encrypted, we also need to store key identifier, as several keys may be active at the same time. Nothing is simple in cryptography. The cryptographic devil is in the tiny and often counter-intuitive details.
Protected string is a data structure that is designed to handle all those pesky cryptographic details, and still pretend that the content of the data structure is just a string.
Similarly to PolyString, the basic usage of protected string is quite simple.
Data can be imported into midPoint by using clearValue element:
<user>
    <name>alice</name>
    ...
    <credentials>
        <password>
            <value>
                  <clearValue>sup3rSECRET</clearValue>
            </value>
        </password>
    </credentials>
</user>
The data are automatically protected when the object is imported into midPoint:
<user>
    <name>alice</name>
    ...
    <credentials>
        <password>
            <value>
                <t:encryptedData>
                    <t:encryptionMethod>
                        <t:algorithm>http://www.w3.org/2001/04/xmlenc#aes128-cbc</t:algorithm>
                    </t:encryptionMethod>
                    <t:keyInfo>
                        <t:keyName>1z0N17tv6hNQh5CAJ+jWHWDXeBM=</t:keyName>
                    </t:keyInfo>
                    <t:cipherData>
                        <t:cipherValue>g6Neg3ZEXY/ga00SpEa9w5MlJ9/IR+M1vEjdceni6bM=</t:cipherValue>
                    </t:cipherData>
                </t:encryptedData>
            </value>
        </password>
    </credentials>
</user>
Protected string data type supports cleartext representation, encryption using a symmetric algorithm and hashing. However, the protected string data type is just a mechanism for storing the data, it is just a place where the values can be stored. Whether specific protected string in the schema gets encrypted or hashed, and at which point that happens, is not controlled by the protected string data type itself. It is controlled by midPoint configuration and policies. For example, whether user password is encrypted or hashed is determined by midPoint security policy.
Advanced Schema Concepts
This section describes schema concepts that goes deeper into midPoint mechanisms and implementation. Awareness of those concepts will provide insight into how midPoint works. However, we have already talked about the schema quite a lot, and this chapter was quite low on practical examples. Feel free to skip the rest of this chapter if you want to get your hands dirty as soon as possible. However, please make sure to come back later. You will have to learn those schema concepts eventually, to get the best of midPoint functionality.
Type Hierarchy
So far we have presented midPoint schema as a simple set of data types.
There is UserType for users, RoleType for roles and so on.
However, all the midPoint objects have something in common.
For example, all of them have object identifier (OID), name, description and so on.
We could simply copy definitions of those properties to all the data types.
However, that is not the best way to do data modeling.
The proper way is to create a type hierarchy.
Therefore, there is an ObjectType data type that specifies all the items that all the object types share.
However, midPoint schema is substantial and one common ancestor won’t be enough.
MidPoint type hierarchy was evolving during midPoint development, and now it forms quite a rich structure.
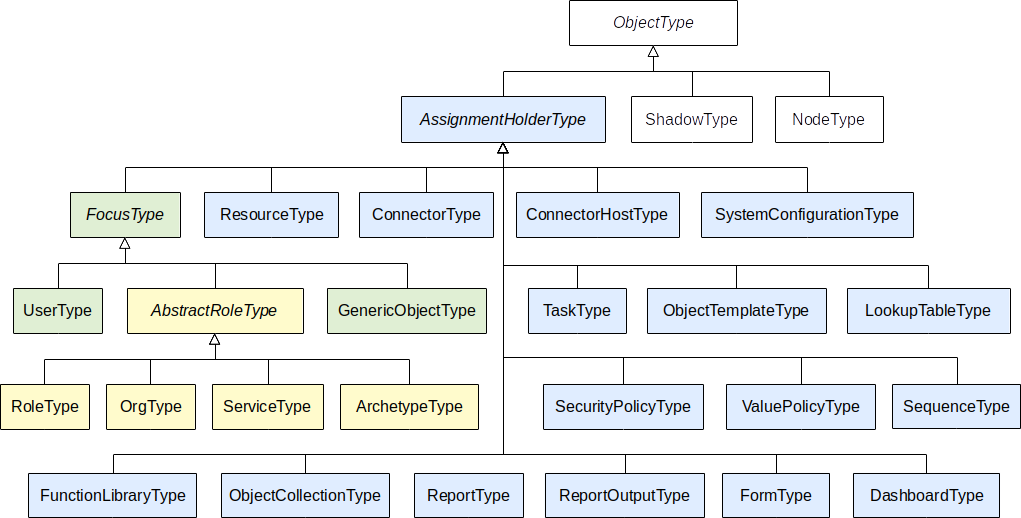
Following table is summarizing midPoint data types and their purpose.
| Data type | Description |
|---|---|
|
Common (abstract) data type for all midPoint objects. Specifies basic items that all midPoint objects have: name, description, metadata and so on. |
|
Abstract supertype for all object types that can have assignments. |
|
Abstract supertype for all object types that can be focus of full midPoint computation. This basically means objects that have projections (accounts). Focal objects also have activation, they may have personas, etc. |
|
User object represents a physical user of the system. Properties of user object typically describe the user as a physical person. Therefore, the user object defines handful of properties that are commonly used to describe users in the identity management solutions (employees, customers, partners, etc.) |
|
Abstract data type that contains the "essence" of a role. Roles and other objects that behave like roles are derived from this data type. All abstract roles may "grant" accounts on resources, attributes and entitlements for such accounts. The role can also imply (induce) organizational units, other roles or various identity management objects that can be assigned directly to user. |
|
A role in the role-based access control (RBAC) sense. The roles specify privileges that the user (or other object) should have. Roles are intended to give privileges to users and other objects. |
|
Organizational unit, division, section, object group, team, project or any other form of organizing things and/or people. The OrgType objects are designed to form a hierarchical organizational structure (or rather several parallel organizational structures). Orgs are intended to group objects. As orgs are abstract roles, they can also behave as roles. |
|
This object type represents any kind of abstract or concrete services, or devices such as servers, virtual machines, printers, mobile devices, network nodes, application servers, applications or anything similar. |
|
Archetype definition. Archetype defines custom object (sub)type. I.e. it defines specific behavior, look and feel of objects of a particular type, such as "employee", "project", "application", "business role" and so on. |
|
Resource represents a system or component external to midPoint system which is managed by midPoint. It is sometimes called identity resource, IT resource, target system, source system, provisioning target or by variety of their names. MidPoint connects to the resource to create accounts, assign accounts to groups, etc. Resource may also be an authoritative source of data, database that contains organizational structure and so on. |
|
Description of a generic connector. Connector in midPoint is any method of connection to the resource. This usually describes a ConnId identity connector. |
|
Host definition for remote connector, remote connector framework or a remote "gateway". This usually specifies the detail of a ConnId remote connector server. |
|
System configuration object. It holds global system configuration setting. There is just one object of this type in the system. It has a fixed identifier (OID). |
|
Object that contains information about a task. This can represent active running task, it may be a scheduled task waiting for execution, or the object may contain a results of a finished task. |
|
An object that contains mappings and other configuration intended to apply to other object types. E.g. it may be used as “user template” to set up basic properties of new user objects. |
|
An object that represents lookup table. The lookup table can be used for two purposes: value enumerations (e.g. for GUI or validation) and value mapping (translation). Simply speaking it is a set of key-value pairs that can be efficiently stored and used in midPoint user interface, mappings and so on. It is designed to hold a large number of key-value pairs. |
|
System that contains definitions of overall security policy. It contains configuration of authentication mechanisms, credentials management (such as password resets) and so on. |
|
Policy for values of properties. This is almost always used to store password policies. |
|
Object that contains a set of reusable functions. Those functions can be used in mappings and expressions in all parts of midPoint. |
|
Object that specifies a collection of other objects. It is mostly just a named search filter that can be reused in other parts of midPoint. However, there are also some advanced functions that can be used in dashboards, for compliance purposes and so on. |
|
Specification of midPoint report. This specification defines what the report should contain, how it should look like, output format and so on. This object contains a report definition. It is a report “template” that can be executed, and it produces data. The output data are referred to by report output objects. |
|
Object that refers to data of the report. This is usually an output of a report, but it may also refer to input data that are to be imported to midPoint. It also contains metadata, e.g. timestamp of report was creation, what definition was used, etc. |
|
Definition of a sequence object that produces unique values. The sequence state is persistently stored in the repository, therefore it can efficiently produce unique identifiers in a controlled and predictable manner. |
|
Form definition. Forms define how a certain user interface form or dialog is presented in the user interface. It is used for user interface customization. |
|
Object that specifies a look and a behavior of a dashboard. This is used for user interface customization. It can also specify some aspects of midPoint reports. |
|
Generic type for any other object type that do not fit into any other category. However, support for this data type is extremely limited. We generally do not recommend to use it at all. |
|
Shadow of a resource object. Local copy of any object on the provisioning resource that is related to provisioning. It may be account, group, role (on the target system), privilege, security label, organizational unit or anything else that is worth managing in identity management. |
|
Node describes a single installation of midPoint. MidPoint installations can work in cluster. The Node objects are the way how the nodes in cluster know about each other. |
Type hierarchy is a principle that is used in many software systems.
This principle is probably quite obvious to all software developers, but it may need some time to get used to for other engineers.
However, the basic idea is quite simple.
E.g. AbstractRoleType has all the items that are needed for an object to behave like a role.
RoleType, OrgType, ServiceType and ArchetypeType are subtypes of AbstractRoleType.
Therefore RoleType, OrgType, ServiceType and ArchetypeType can all behave like a role.
This may sound quite strange, why would we want an organizational unit to behave like a role?
Yet, the answer is quite obvious.
Membership in an organizational unit may imply some privileges.
Other identity systems need complex rules such as "if user belongs to organizational unit A then he will also have role `X`".
That is not needed in midPoint.
Organizational unit is like a role, therefore it can simply include all the roles that are needed.
This means that the role-based access control (RBAC) principles can be applied to several object types.
This approach illustrates a very typical trait of a midPoint philosophy: reuse of generic principles.
We reuse existing principles instead of complicating the system by inventing a new single-purpose mechanism.
As you will see later, this makes midPoint both elegant and powerful.
Item Path
MidPoint configuration often needs to reference a particular item in a particular object.
For example, mapping sources and target are references to properties and containers.
However, midPoint data structures can be quite complex.
For example, password is stored in property value that is located in container password which is in container credentials defined in FocusType data type.
It may be difficult to find a way in this little maze.
There may be even some unambiguous situations.
For example, user status is controlled by property administrativeStatus that is in the activation container.
However, assignment also has an activation container, and there is an assignment administrativeStatus.
Therefore, referencing an item by a simple name would not be enough.
We need something more sophisticated.
MidPoint is using the concept of item path to reference items in the schema. In its simplest form, item path is just a sequence of item names concatenated by slash characters. For example the path of user administrative status is
activation/administrativeStatuswhereas the path of assignment activation status is
assignment/activation/administrativeStatusItem path provides an unambiguous reference to a specific item in midPoint schema. The path can be used in all the places where there is a need to reference a particular item. It is often used in mappings to specify sources and target. Search filters are often using item paths to form search queries. The path is also used in other places that we will mention in later chapters. The concept of item path is deeply embedded in all midPoint operations. For example, modification deltas are using item path to precisely pinpoint the places in the object that are modified.
The path is used to locate a particular item in midPoint schema. It is also used to reference a specific value in midPoint objects. In that case the path often looks simple, as we have seen it above. As long as we are dealing only with single-value containers, the path can unambiguously point to a specific item. However, we may get into trouble in case that multi-valued containers are used, which are often used in midPoint schema. Assignment is one of those multi-valued container. User can have many assignments. If we want to disable one particular assignment, how do we do it? If we would use the path above, then it is not clear which assignment should be disabled. Therefore, in case of multi-valued containers, the path is extended with a container identifier in square brackets:
assignment[123]/activation/administrativeStatusThis path is unambiguously referencing administrativeStatus property in an activation container in a very specific assignment - an assignment container with identifier 123.
This form of the path is used mostly in the deltas, and user should not need to ever enter those paths manually.
However, this form is often recorded in midPoint log files and other diagnostic output.
Therefore, it is quite useful to be familiar with it.
You might wonder why there is an identifier for assignment but there is no identifier for activation.
Both are containers, aren’t they?
The clever reader already knows the answer.
assignment is a multi-valued container.
Therefore, identifier is needed to pinpoint a specific value of that container.
However, activation is a single-valued container.
There is no danger of ambiguity.
Therefore, the identifier is not needed in this case.
This form of item path works fine if we need to identify an item in a particular object. However, sometimes we have a lot of objects and other data structures to choose from. For example, a mapping can have several sources and expression variables. Therefore, using simple paths would be ambiguous, as it would not specify where the path starts. In such case the path can start with an optional variable identifier:
$focus/activation/administrativeStatusThe path above explicitly states that it should be applied to the content of variable focus.
Therefore, there is no danger that this path could be applied to a shadow object which also has the activation container.
This form of item path is often used in path expression evaluators.
Clever reader is surely wondering about QNames now. The XML schema defines the elements in a form of QNames, which basically means "names in a namespace". Therefore, element names are supposed to be QNames, and item path should use QNames as well. Yet, so far all the names in the path looked like simple strings. In fact, they indeed are simple strings, but they point to elements in the schema. While the path is correct and unambiguous, midPoint does not need the namespaces. Simple string (known as local part of QNames) are enough to navigate through the schema and automatically determine the namespaces. The same principle is used for parsing XML, JSON or YAML document without namespace definitions. However, there may be ambiguities in case that several custom schema extensions are used. Those extensions may have elements with conflicting local parts. In that case an alternative form of item path can be used:
declare namespace exmpl="http://example.com/xml/ns/midpoint/schema"; extension/exmpl:foo| This alternative form is based on XPath specification, that was used in early midPoint versions and it was an inspiration for the concept of item path. |
Clever reader may have also noticed that there are two types of namespaces that are often used in midPoint:
http://prism.evolveum.com/xml/ns/public/...http://midpoint.evolveum.com/xml/ns/public/...Indeed, the schema is divided into two big parts:
-
Prism schema is used to express basic concepts that deal with objects, deltas, item paths, queries and similar mechanisms. Those are concepts of our data representation library that we dubbed Prism. Prism concepts are very generic mechanisms that (theoretically) have nothing to do with identity management or midPoint. Prism is supposed to be a general-purpose data representation library that can be reused to build other applications.
-
MidPoint schema is used to express all the objects and data types that midPoint works with. All the concepts specific to identity management are there: user, role, org, assignment and many, many others. This is the data model of identity management as it is implemented in midPoint.
Conclusion
This is all about midPoint schema that you need to know right now. There is still much more to learn, as the entire midPoint schema is big and complex. Understanding of midPoint schema is absolutely crucial for advanced use of midPoint, as the schema is a foundation of everything that midPoint does. Yet, the best way to do the learning is to do it on the go. You will learn more about midPoint schema as you will explore midPoint functionality.
7. Role-Based Access Control
Simplicity is the most complex of all concepts.
Dune: House Corrino by Brian Herbert and Kevin J. Anderson
Basic idea of role-based access control (RBAC) is very simple: instead of assigning the same privileges to users over and over again, let’s group such privileges into roles. Then assign roles to users. Such RBAC roles often align with organizational roles such as manager, assistant or analyst. Therefore, roles are quite easy to understand even on an intuitive level. RBAC should make your life easier - at least in theory.
Role-based access control principles are present in almost all identity management systems. Therefore, it is no surprise that RBAC is one of the basic midPoint access control mechanisms. MidPoint supports all the usual RBAC features, such as role hierarchies, an automatic assignment of roles and entitlement definition. However, midPoint goes beyond traditional RBAC. MidPoint roles can be smart. There may be dynamic expressions inside midPoint roles, such as attribute mappings. The roles may be conditional: one role is included in another role, but only in case that a specific condition is satisfied. The roles may be parametric: the role can determine the specific set of entitlements based on the user data or a parameter of a role assignment. Traditional concept of roles is enhanced with policy: rules, expressions and constraints applied to roles. MidPoint advanced RBAC mechanism, together with role auto-assignment capabilities and other policy mechanisms create a very powerful combination to express complex policies. This creates policy-driven RBAC, a mechanism that is quite unique to midPoint. Although midPoint policy mechanisms are based on RBAC principles, its capabilities are similar to other popular access control models, such as attribute-based access control (ABAC) or policy-based access control (PBAC). For the curious, there is a discussion of midPoint approach in light of other access control models at the end of this chapter.
Role dynamics in midPoint goes even one step further. The RBAC system can be applied to the roles themselves, thus creating meta-roles. It is quite common that the roles are divided into several types: application roles, business roles, technical roles and so on. However, all the business roles have common characteristics such as common approval processes, common life-cycle policies etc. Instead of copying the common parts into each and every business role, the business roles may be assigned a common archetype which acts as a meta-role. Archetype defines all the common characteristics of all business roles, therefore the RBAC system is much easier to maintain. More on that later.
Powerful RBAC mechanisms in midPoint are flexible enough to handle very complex scenarios. However, we will start small. We begin with simple scenarios, building our way up. This chapter describes basic midPoint RBAC mechanism. It provides enough information to start with the usual role-based approach. Following chapters will build on that, describing more and more advanced use of the RBAC mechanism.
|
Terminology
The term RBAC is many things to many people.
We use the term RBAC in quite a broad sense.
We do not strictly mean NIST RBAC model.
What me mean by RBAC is a generic mechanism that is based on the concept of roles.
Although the basic principles of midPoint RBAC are very similar to NIST RBAC model, we take the liberty to deviate from NIST model when needed.
As you will see later, such deviation is really necessary.
|
Reality vs Policy
Previous chapters were focused on account provisioning and synchronization. Their primary focus was an account (or a similar resource object). This is what we call reality in midPoint way of thinking. Accounts are objects that exist in the databases and files on the resources. In that aspect they are almost tangible things. Existence of an account allows user to access a particular system, to execute operations and so on. Therefore, we consider an account to be something real.
However, how do we know whether an account should exist or it should not exist? The situation would be quite clear if midPoint is the only source of truth. In that case, if there is a linked shadow, then account should exist, if there is no shadow, then account is illegal. However, reality is almost never that simple. In real deployments, MidPoint is not the only source of truth. It is usually human resource (HR) system that is the source of the truth – but only for some types of users, usually employees. Then there are external users, temporary workers, special personas for user administrators, services, devices and so on. Some of them may have their own authoritative source systems similar to HR database. However, for some users it may still be midPoint which is the ultimate source of truth. Moreover, that "truth" may be in fact only partial information, or it may be compiled from several sources. To keep long story short: reality is messy and complicated. It is often quite difficult to figure out which accounts particular user should have and which he should not have. Yet, this distinction is absolutely crucial for cybersecurity. Various identity management systems came with broad range of mechanisms to handle this problem, and sadly, those mechanisms are often not very good. Fortunately, midPoint was designed from the beginning with a full awareness of this problem. Therefore, there is a clean distinction between reality and policy in midPoint.
Accounts, shadows and links are what we refer to as reality. Those describe what exists, what is. Then there is a separate mechanism to describe policy. Policy, in midPoint parlance, means definition of what should be. In the ideal world, reality and policy should be in accord. They should describe the same state of things. However, we do not live in ideal world. Perfectly good accounts may be deleted by mistake, illegal accounts may be created, entitlements may get mixed up, attribute values may get destroyed – there are many dangers in the big wild world out there. Then there are scenarios when we actually want reality to be different from policy for a given period of time. Those may be migration scenarios when a new system is being connected to midPoint and the data needs to be cleaned up. Reality and policy do not match exactly in practice. We all know that only too well. Therefore, midPoint is designed in such a way that it can graciously handle the differences between reality and policy.
Assignment
When it comes to policy, the most important concept is an assignment. Simply speaking, assignment is a data structure which specifies that a particular user should have something. The simplest case is account assignment. This type of assignment states that the user should have an account on a particular resource.
The mechanism that midPoint uses to define that a particular user needs an account, entitlement or other resource object is called construction. The simplest case is a construction that specifies to create an account (a.k.a. account construction):
<user>
    ...
    <assignment>
        <construction>
             <resourceRef oid="8a83b1a4-be18-11e6-ae84-7301fdab1d7c"/>
             <kind>account</kind>
        </construction>
    </assignment>
    ...
</user>
The term construction means that object on that particular resource should be constructed. In this case, the object on OpenLDAP resource should be constructed for this particular user. If no construction parameters are specified then a default account will be constructed. Which means that outbound mappings in the OpenLDAP resource definition will be used to set up the account.

Construction can be quite a complex data structure describing object types, object classes, attributes and so on. However, it is unlikely that they will be placed directly in assignment like in the above example. More on that later. What is important for now is that assignments specify policy.
After the assignment is added to a user, and all the processing and provisioning takes place, the situation looks like this:
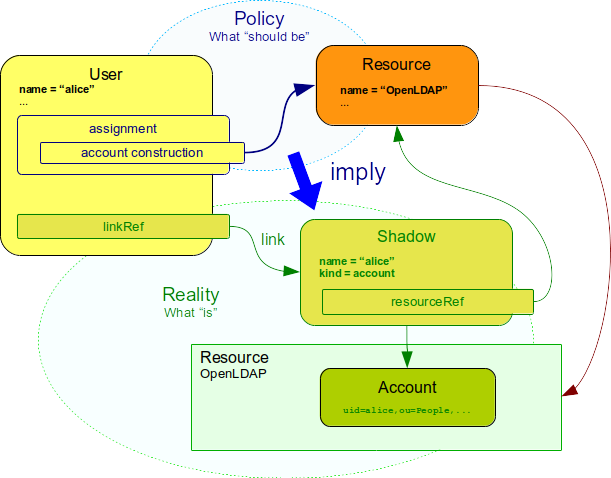
Assignment is a definition of policy which states that an OpenLDAP account should exist for Alice. When such assignment is added to Alice, there is suddenly a discrepancy between reality and policy. The assignment states that Alice should have an account, but no such account exists on OpenLDAP resource yet. It is a nature of midPoint to align policy and reality as much as possible (unless it is told otherwise). Therefore, midPoint tries to create missing account. Once that account is created, reality and policy are aligned once again.
This may look like a very complicated method to do something simple. However, this kind of thinking is really necessary to handle complex cases. There may be several assignments that mandate the same account. There may be assignments for the same accounts, but each assignment mandates different attributes or values. The account that the assignments mandate may exist already, e.g. it may be linked by previous reconciliation with the resource. There may be several accounts for the same user on the same resource (e.g. "ordinary" account and "testing" account). And so on. We will deal with various cases in this book. Yet, the basic principle is always the same: assignments are policy and midPoint is trying to align reality to match the policy.
Roles
There is much more in the concept of an assignment than just the very simple account assignment. Assignment is a generic mechanism that is used in midPoint for wide variety of cases, from simple account provisioning to really complex identity governance policies. One specific assignment type is particularly interesting with respect to the topic of this chapter: role assignment.
The basic idea of role-based access control (RBAC) is simple: Instead of assigning account to users directly, let us group all accounts that a particular group of users need into a role. Then assign the role to users. Later on you may add new application to your system, and you probably want existing the users to have account there. In that case all that is needed is to add that account to a role and recompute the users. All the users that should have the account will get the account. This principle is reused for many purposes in midPoint: accounts, privileges, authorizations, policies …
Role is a special type of object in midPoint. Yet, as all midPoint objects, role has a very familiar structure:
<role oid="aaa6cde4-0471-11e9-9b50-c743da469067">
    <name>Business analyst</name>
    ...
</user>
Role object has its object identifier (OID) and name. The rest of the role usually specifies the privileges that the role gives to the users. We can assign the role to a user by creating an assignment:
<user>
    <name>alice</name>
    ...
    <assignment>
        <targetRef oid="aaa6cde4-0471-11e9-9b50-c743da469067" type="RoleType"/>
    </assignment>
</user>
User alice has role Business Analyst assigned.
The assignment is using the familiar style of object references in midPoint, referring to the role by its object identifier (OID).
This is very useful, as the assignment stays valid in case that the role or the user are renamed - and both of those events are much more frequent that one would think.
Roles and Provisioning
Provisioning is the bread and butter of identity management.
Therefore, it is quite understandable that the most natural usage of roles in midPoint is to automate provisioning.
Provisioning roles are usually combining several construction statements.
The idea is that a provisioning role should specify all the privileges that users of that role need.
Therefore, a Business Analyst role may look like this:
<role oid="aaa6cde4-0471-11e9-9b50-c743da469067">
    <name>Business analyst</name>
    <inducement>
        <construction>
             <!-- OpenLDAP resource -->
             <resourceRef oid="8a83b1a4-be18-11e6-ae84-7301fdab1d7c"/>
             <kind>account</kind>
        </construction>
    </inducement>
    <inducement>
        <construction>
             <!-- CRM resource -->
             <resourceRef oid="04afeda6-394b-11e6-8cbe-abf7ff430056"/>
             <kind>account</kind>
        </construction>
    </inducement>
</user>
The usual case is that every employee need to have basic access to company functionality. In our case, that access is granted by an account in central OpenLDAP directory. In addition to the basic LDAP account, business analysts need access to the CRM system. The role combines all the accounts that a business analyst needs. Assign that one role, and the user has all that is needed to do the job.
The key to the functionality of roles is inducement. Think of inducement as indirect assignment. Assignments give privileges directly to the object in which they are placed. The assignment in the previous section gave account to the user, because it was placed in the user object. However, here we do not want the accounts to be created for a role. We want accounts to be created for all the users that have the role. That is one order of indirection down the line. Therefore, we (usually) do not want to use assignments in roles. We want to use something that reflects this indirect relation. That is exactly what inducement is. Inducement is very similar to assignment - in fact it has exactly the same structure. However, while assignment is direct, inducement is indirect.
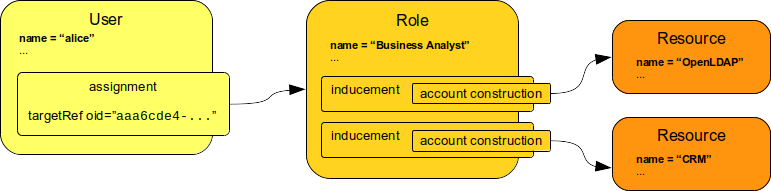
MidPoint user interface can show a nice summary of the inducements:
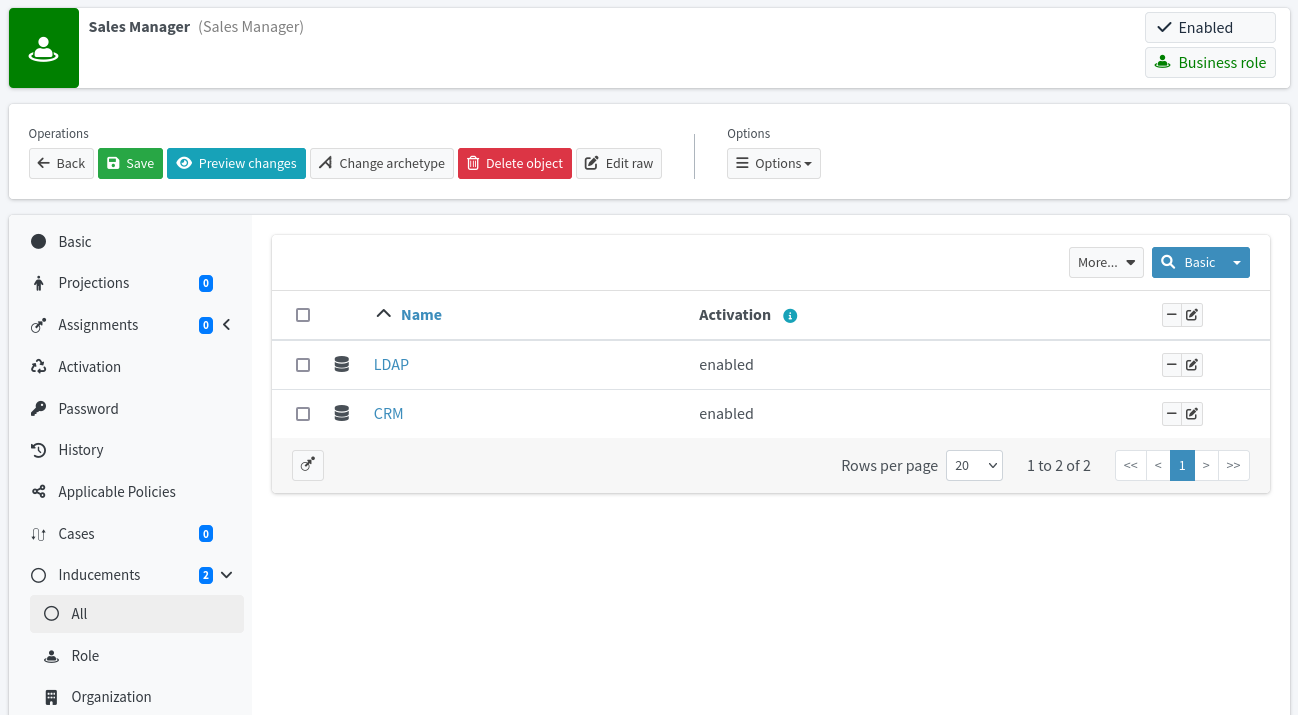
It is perhaps worth explaining what happens if this Business analyst role is assigned to a user.
When Business analyst role is assigned to a user, midPoint processes all the parts of role definition.
MidPoint takes the inducements from the role, and applies them to the user.
In fact, midPoint behaves in almost the same way as if those construction statements were specified directly in user’s assignment.
This results in a familiar situation: policy mandates that two accounts should exit, but in reality there are no such accounts.
Therefore midPoint creates the accounts.
Of course, midPoint also creates appropriate shadow objects and links them to the user.
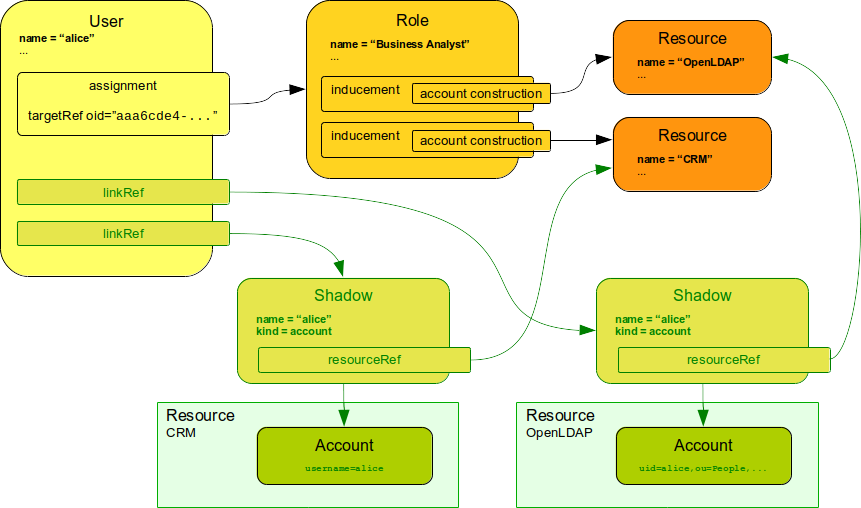
This is how midPoint implements role-based access control (RBAC) for provisioning purposes.
Roles, Accounts and Attributes
We have already seen how outbound mappings can be used in resource to set up account attributes. Roles can also contain outbound mappings, therefore they can be used for a similar purpose:
<role oid="aaa6cde4-0471-11e9-9b50-c743da469067">
    <name>Business analyst</name>
    <inducement>
        <construction>
             <!-- OpenLDAP resource -->
             <resourceRef oid="8a83b1a4-be18-11e6-ae84-7301fdab1d7c"/>
             <kind>account</kind>
             <attribute>
                 <ref>ri:title</ref>
                 <outbound>
                     <expression>
                         <value>Business Analyst</value>
                     </expression>
                 </outbound>
             </attribute>
        </construction>
    </inducement>
    ...
</role>
When the above role is assigned to a user, an account on OpenLDAP server is created.
The account is provisioned in a usual way - all the outbound mappings from resource definition are applied to set up the account.
However, there is one difference.
The role specifies one additional outbound mapping for the account.
This mapping is included in the set of usual account mappings when the account is provisioned.
Therefore, the account has attribute title set to Business Analyst.
This is a very typical pattern used by many midPoint deployments:
-
Common and usual attribute values are specified by outbound mappings in the resource definition (in
schemaHandling). Usually, those mappings that take user properties as their source, producing values for account attributes. Many of those mappings do not even transform the value at all (asIsmappings). Common identity attributes such as username and full name are provisioned this way. -
Attributes that are specific to roles are defined in the roles themselves. Those mappings often do not have any source at all. They just set a static value (literal
valuemappings). Entitlement associations such as group membership are also provisioned this way. More on that later.
At the time when midPoint is about to provision an account, all the mappings are merged and processed together. It is quite common that more than one role has a construction for the same account. All those constructions from all such roles are merged together, and they are added to the mappings specified in resource definition. All those mappings are used to compute final values of account attributes.
Most account attributes are single-valued. Attempt to set more than one value for such an attribute ends up with an error. Therefore, it does not make sense to specify more than one mapping for single-valued attribute. The mapping can be specified in a resource definition or in the role, but only one of those should be active at any time. Mapping conditions and strength can be used to selectively deactivate some mappings in more complicated cases. However, it still means that only one mapping is supposed to set the value.
Some account attributes are multi-valued. In that case, midPoint merges the values from all the mappings. Several roles may contribute to the final set of attribute values, as can the mappings in resource definition. This is the usual case of attributes that specify privileges, such as permissions, authorization codes, access control list (ACL) entries and so on.
Merging of multi-valued attributes is an easy way how to manage simple privileges in resources. However, midPoint contains sophisticated mechanism for managing entitlements such as groups. There is an entire chapter in this book dedicated to entitlement management.
|
Additive principle.
MidPoint is built on a principle of merging.
Assigned roles are merged together, further merged with outbound mappings, entitlements are merged and so on.
MidPoint always adds, it never subtracts.
E.g. there is no simple way how one role can "eliminate" a value given by another role.
If a role specifies that an account should have value A, that account will have value A.
That’s it.
It can also have values B and C given by other roles.
However, A will always be there, no matter what other roles do (unless those roles are involved in some really dark magic).
This may seem quite limiting.
However, it is sufficient for the vast majority of cases.
It only needs a change in your way of thinking about privileges.
Do not think about removing a privilege.
Think about not adding a privilege.
There are many ways how that can be achieved.
There is a role hierarchy, mappings can be conditional and whole assignments and inducements can be conditional too.
We are trying really hard to avoid concept of "removing" privileges, because that requires ordered processing.
E.g. if role X adds something and role Y removes it, the final result depends on the order in which such roles are processed.
This creates ambiguities, it limits parallelism and overall it is a huge complication.
Therefore, we try to avoid it.
And so far we have been successful.
|
Role Hierarchy
Ability to group privileges into roles is somehow useful. However, it is still not good enough unless your access control policy is extremely simple. Most practical policies require placing roles into roles, thus creating role hierarchy.
Let’s consider two work positions: clerk and supervisor. We are going to create roles for both work positions. Clerk has some basic set of privileges. Supervisor can do everything that a clerk can do, but supervisor has some additional privileges. A naive way would be to simply copy all the clerk’s privileges in supervisor’s role. However, privileges are seldom static. Access control policies tend to change and evolve as much as the environment changes. It is likely that a clerk’s privileges will change in the future. In that case, we would need to update the supervisor’s role as well. This would be a maintenance burden. Now imagine hundreds or thousands of related roles that need constant maintenance. Any person maintaining such a structure would need superhuman precision and patience to do that.
A better idea is to include clerk’s role into a supervisor’s role. If clerk’s privileges change, then also supervisor’s privileges are automatically updated. Maintenance is much easier. This is the basic idea of role hierarchy. Basic privileges are placed into low-level roles. Low-level roles are combined to create a higher-level roles. Then those roles may be combined as well. The process is repeated until there are all the roles that are needed for assignment to users.
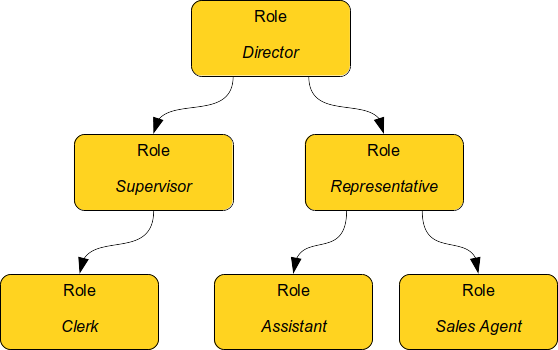
Creating role hierarchies in midPoint is quite easy. A clever reader would already expect that this has something to do with inducements - and clever reader would be absolutely right. Role hierarchy is nothing more than a set of inducements between roles:
<role oid="48d4ef98-20e3-46ab-cd78-548d38364a6b">
    <name>Clerk</name>
    <!-- Privileges needed to do clerk’s work will be here. -->
</role>
<role oid="86e58643-d5e7-36a8-04f6-38dc3754f04e">
<name>Supervisor</name>
<!-- Privileges that are unique to supervisor’s work will be here. -->
<inducement>
<!-- This "includes" all the clerk’s privileges in this role -->
<targetRef oid="48d4ef98-20e3-46ab-cd78-548d38364a6b" type="RoleType"/>
</inducement>
</role>The inducement includes Clerk role in Supervisor role.
When midPoint evaluates the Supervisor role, it gets all the inducements from both the Supervisor and Clerk roles.
This process is almost transparent, it works almost as if the clerk’s privileges were copied in the supervisor’s role.
All the constructions in all the inducements in both roles are processed.
Therefore, supervisor will get all the accounts that a clerk would get, plus few extra privileges.
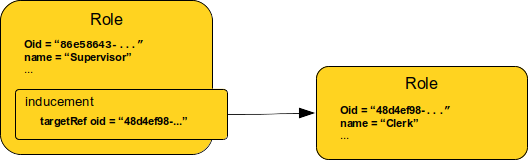
Both Clerk and Supervisor roles are likely to have construction for the same account.
This is quite natural, as both clerk and supervisor would probably work with the same applications.
However, their privileges are different.
This is where the merging mechanism becomes very useful.
When a supervisor role is processed, then privileges of clerk are merged with privileges of supervisor:
<role oid="48d4ef98-20e3-46ab-cd78-548d38364a6b">
    <name>Clerk</name>
    <inducement>
        <construction>
             <!-- Record management system -->
             <resourceRef oid="84de003e-014f-2040-efbc-482e009ed2bcf"/>
             <kind>account</kind>
             <attribute>
                 <ref>ri:priv</ref>
                 <outbound>
                     <expression>
                         <value>read</value>
                         <value>create</value>
                     </expression>
                 </outbound>
             </attribute>
        </construction>
    </inducement>
</role><role oid="86e58643-d5e7-36a8-04f6-38dc3754f04e">
<name>Supervisor</name>
<inducement>
<construction>
<!-- Record management system -->
<resourceRef oid="84de003e-014f-2040-efbc-482e009ed2bcf"/>
<kind>account</kind>
<attribute>
<ref>ri:priv</ref>
<outbound>
<expression>
<value>approve</value>
<value>modify</value>
<value>delete</value>
</expression>
</outbound>
</attribute>
</construction>
</inducement>
<inducement>
<targetRef oid="48d4ef98-20e3-46ab-cd78-548d38364a6b" type="RoleType"/>
</inducement>
</role>When supervisor’s role is processed, midPoint figures out that those two construction statements are referring to the same account.
Therefore, they are merged together.
Supervisor gets an account that has priv attribute set to values read, create, approve, modify and delete.
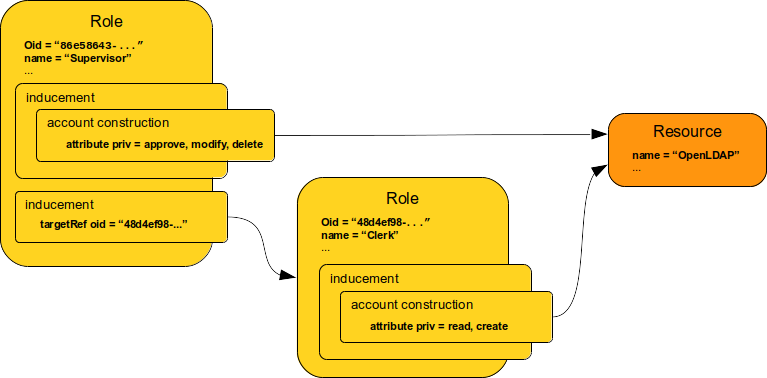
|
Assignments in roles.
So far we have seen only inducement in the roles.
But what about assignment?
Assignment is indeed used in the roles, but it has different meaning.
Inducement means that role A has to be included in role B.
However, assignment means that role A has to be applied to role B.
In that case, role A is in fact a meta-role.
More on that later.
For now, it is good to remember a rule of the thumb: role hierarchy is always created by inducements.
|
Role Universality
MidPoint role is a very useful kind of animal, therefore it is used for almost everything in midPoint. MidPoint role can be used as:
-
Provisioning role: The role can include constructions that control provisioning and deprovisioning of accounts.
-
Entitlement management: The constructions can include specification of entitlement associations such as membership in groups, resource-side roles, possession of privileges and so on.
-
Internal authorization: The roles give access to data in midPoint itself. E.g. a role can allow reading selected user properties. Authorizations in a role can also allow access to particular parts of midPoint user interface, remote network services and so on.
-
Policy specifications: Roles (and especially meta-roles) are the places where important parts of policy management is specified. Roles include policy rules that can apply segregation of duties (SoD) policies, approval policies, compliance policies and so on.
All those aspects can be combined into a single role. Therefore, such role can specify everything that is needed for the role holder to live a complete digital life: access to systems (accounts), entitlements, access to midPoint itself (e.g. for self-service), apply policy constraints and so on. Everything in one place.
Role universality may seem mundane and completely natural, but in fact it is quite unique and incredibly powerful idea. As you will see later, roles can be driven through approval process, lifecycle management can be applied to role, roles can be subject to policies, role compliance can be evaluated and so on. All of this applies to ordinary (provisioning) roles. However, the same mechanism can be applied also to roles that govern the administration of midPoint itself - even to meta-roles that specify high-level policies. Which means that in a strange post-modern way, midPoint can be applied to itself. MidPoint can be its own manager.
| Surprisingly, role universality is quite a unique concept in the identity management field. The common approach of traditional identity management systems is to separate provisioning roles, authorization roles, governance roles and so on. Each of them was different, and it was managed in a different way. It was quite difficult to create a unified and consistent policy. This is one of many aspects where midPoint provides a seemingly simple mechanism, but that mechanisms simplifies a lot of things and provides an elegant solution to a difficult problem. |
Role Engineering
There are many ways how a role hierarchy can be structured.
One way is to create all roles as "end user" roles that are supposed to be directly assigned to user.
The clerk-supervisor example above is that case.
The low-level roles (e.g. Clerk) should contain all the privileges necessary for that role to function in an organization, such as all the necessary access to all the applications, networks, services and devices.
Then combine the elemental roles into a bigger roles, combining business responsibilities as needed.
Repeat the process until the entire access control landscape is covered with beautiful roles.
That is the theory.
It is perhaps no big surprise that the practice is quite different. There is one big problem with the theoretical approach described above. It assumes that the person who defines roles knows what privileges should be included in that role. I.e. it assumes that business processes and especially business responsibilities are clearly defined. It is a very reasonable assumption. It is also an assumption that is almost always utterly false.
Oh no! How can we proceed if one of our fundamental assumptions is false? Is role-based access control (RBAC) doomed to failure? Certainly, there are people who eagerly proclaim that role-based approach is useless, suggesting many innovative approaches that are usually even more useless in practice. Role-based access control is not dead, not even close. RBAC practice is just much harder than it may seem.
Yes, it is true that nobody knows exactly what privileges a clerk should have. However, it is known what privileges Harry Harris needs to do his day-to-day work. Harry is a clerk. Therefore, it is perhaps fair to assume that the privileges that Harry has are pretty much the same privileges that should be included in clerk role. This bottom-up approach may not be perfect for business analytics puritans, but it is a practical approach, favored by many pragmatic organizations.
However, it is not practical to start with roles that have business meaning.
I.e., it is not practical to start with Clerk role, as we do not yet know what privileges should be in that role - because we do not know what privileges Harry has yet, and we may not even know that Harry is a clerk.
There are too many missing pieces to start solving the business puzzle yet.
Application Roles
We start by creating application roles. Those roles deal with access to a single application. An application role may be quite broad, as giving access to the entire application, or it may be quite narrow giving access to small parts of the application.
The usual starting point is to create an application role for every group in Active Directory or a similar central directory system. Groups are very good starting material. They tend to be the right granularity, not too broad, not too narrow. Users are already assigned to groups, as they need the privileges given by the group membership to carry out their work. Therefore, the groups form some kind of basic vocabulary to start access control conversation among application administrators, business people and role engineers. Starting with groups makes sense from a business continuity perspective as well. Good starting point, indeed.
Let us create application role for every Active Directory group. Such application role grants account in Active Directory, as well as membership in one specific group. MidPoint entitlement mechanism is an ideal tool to do this.
|
Entitlements and synchronization of application roles
Indeed, midPoint entitlement mechanism is an ideal tool for building application roles.
Unfortunately, the Entitlements chapter of this book is not written yet.
MidPoint reference documentation can provide the necessary information in the meantime.
Similarly, generic synchronization is an ideal tool to keep groups and application roles consistent.
There are some information about generic synchronization in the Organizational Structure chapter.
|
Strictly speaking, application roles are not meant to be assigned directly to users. They are supposed to be abstract, to be the base "material" used to create higher-level roles. However, we are not at that maturity level yet. We have to accept that application roles are assigned directly to users, at least for now. Although we are not strictly doing any serious role-based access control yet, we can already do some role-based magic with application roles only. Once we have application roles, users can request them, we can review and approve the request, assign some roles automatically and so on. We can keep track of who has what and why, when it was assigned and how (requested, approved) - these are very useful data. Owners can be assigned to application roles, keeping an information who is responsible for each particular group. There is still a lot of value even at this point.
|
Misery of application roles
Obviously, there are some downsides to using application roles.
Application roles duplicate the information that is already present in the resource.
E.g. there is one application role for each Active Directory group.
When an information is duplicated, there is potential for the copies to become inconsistent.
As there is usually a huge number of application roles, automatic synchronization is an absolute must to make long-term maintenance of application roles feasible.
Strictly speaking, application roles may not be necessary in midPoint.
MidPoint has a clean concept of construction that can refer to entitlements, which can be directly used in business role.
However, this method is difficult to combine with the bottom-up approach, therefore it is not used often.
During the early years of midPoint we had hope to avoid using application roles at all.
Even earlier versions of this book advocated such approach.
However, the practice of application roles seems to be well established already.
Even though application roles may not be perfect, they are very practical.
We have to admit that.
|
Business Roles
Once we have the application roles, we can start combining them into roles that have a business meaning. Those higher-level roles are called business roles, as they reflect the needs of the business, such as specific job or responsibility in a business process.
Here comes the Clerk role at last.
The Clerk role is created by combing several application roles.
How do we know what roles to combine into Clerk role?
We have a look at Harry Harris, who is a clerk.
Application roles that Harry has are probably the application roles that should be included in Clerk business role.
This is the way we can create our business roles, working from the bottom up.
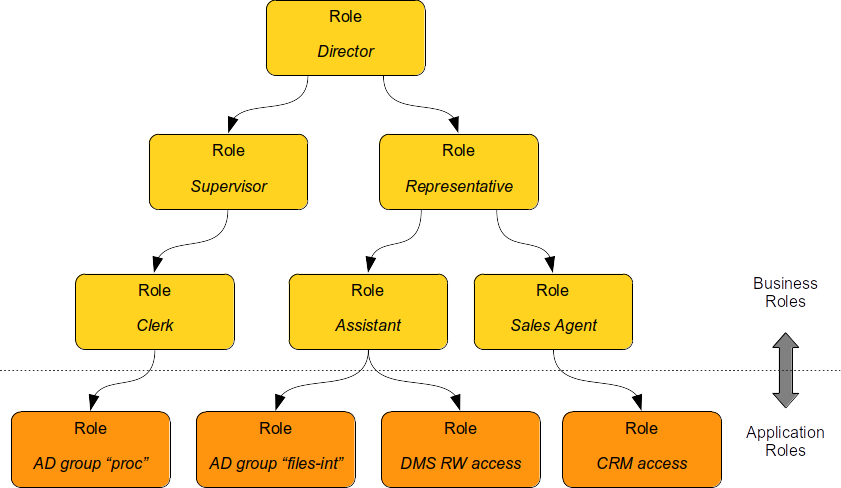
This sounds easy, yet it never really is that simple.
Harry may have other responsibilities besides being a clerk.
Therefore, the Clerk role is not supposed to contain all the Harry’s application roles.
We may need to have a look at the roles of Violet Vickers who is doing similar job in the same organization unit and compute an intersection of Harry’s and Violet’s application roles.
Even that may not be entirely precise, as both Harry and Violet may have other responsibilities, and they may share a common application role purely by chance.
Also, there may be roles that Harry and Violet have, and they do not actually need them.
It is very difficult to get this exactly right.
However, it is perhaps better to have not entirely precise yet somehow manageable system than to have no system at all.
It may be daunting task to do this analysis for every user (or combination of users), manually, with just a rudimentary tooling. This smells like huge spreadsheets that gets outdated even sooner than the analysis is done. In fact, it is usually feasible to define just a small subset of business roles, leaving many application roles assigned directly to users. This is not entirely right, not right at all. Yet, it is feasible, while complete business role coverage is usually not. Once again, it is better to have working partial solution than to have non-working perfect solution.
Yet, there is some hope. So-called "artificial intelligence" methods have quite improved lately, creating practical tools. Such techniques can be applied to role engineering as well, usually in a form of role mining. Role mining is an automated process that detects similarities in role assignments. It can detect that a specific combination of application roles is assigned to a specific group of users. Such combination could make a good candidate for a business role. Role mining can do this at scale, analyzing many users and roles in one session. This is a great tool to speed up role engineering process. The tooling is quite rudimentary for now, and it may look somehow complex to use. Yet, it is practical, for those that have the courage to try it. MidPoint 4.8 has a role mining capability that is worth trying.
Role Types
In some deployments, there are more types of roles, not just application and business roles. The other roles are much less common, yet they are used from time to time. The table below summarizes role types:
| Role type | Description | Content | Should be assigned to users? | Example |
|---|---|---|---|---|
Application role |
Role describing access to a single application. Usually represents one specific entitlement in the application, such as application group, privilege or role. It is bound to one specific application (hence the name). Application roles are often created automatically by importing/synchronizing entitlements, e.g. by importing Active Directory groups. |
Access to a single application. MidPoint |
No. Yet, they are quite often assigned to users. |
Active Directory Domain Administrators Company Website Editors Database |
Technical role IT role |
Combines several application roles or low-level privileges into one unit that is easier to manage. Often used for application roles that depend on each other, e.g. when operating system access is needed to perform database administration. They are considered to be somewhere between application roles and business roles. They are not application roles, as they can give access to several applications. They are not business role either, as they do not describe a complete business responsibility, and they often use very technical and non-business-friendly terminology, which makes them a separate species on their own. They are not used very often. |
Access to a couple of application that depend on each other, or make sense together. Several midPoint `construction`s, referencing couple of resources. |
In exceptional cases, e.g. very specific and complex IT responsibility. |
Database Backup/restore management |
Authorization role |
Provides internal authorizations or privileges in the system where it is defined. In midPoint, these are roles that provide access to parts of midPoint itself. Authorization roles do not grant access to any other systems. |
MidPoint |
No. Yet, some roles may be assigned to users in early stages of the deployment when business roles are not fully formed yet.
Especially the |
MidPoint MidPoint |
Business role |
Business role represent a business responsibility, function in a business process, business-related work position or similar business concept. Business roles are supposed to be a combination of smaller "elemental" roles. |
Any other role type, including other business roles. |
Yes |
|
There are pre-defined archetypes for application and business roles in midPoint 4.8. As we will explain later, archetypes give character and behavior to objects. The two pre-defined role archetypes are ready to use in midPoint. Role wizards are prepared to create new application and business roles to match the archetypes.
Overall, role engineering is an art rather than a science. It is not strictly a technological job. Entire identity management and governance is about business-IT cooperation, which is never easy. Role engineering is even harder, as there is even bigger overlap to business. Much more cooperation, patience and persistence is necessary to get practical results. However, the results are well worth the effort. More on that later, in future versions of this book.
Assignment Gets Complicated
At the first sight, the concept of assignment may seem quite mundane, maybe even over-complicated. In fact, it is a very powerful concept, and it has been a crucial part of midPoint design from the very beginning. Assignment is so much more that just a simple user-role connection:
-
Assignments can have validity period. This can be used to assign roles for a temporary period of time. It can also be used to assign roles that will be activated in the future.
-
Assignment have administrative status that can be used to manually disable or enable a particular assignment. This can be used to manage exceptions from the policies or it can be very useful in emergency situations.
-
Assignments can contain parameters that are used to support parametric roles.
-
Assignments are subject to policies, governance and compliance mechanisms. Assignments have their lifecycle, they are subject to re-certification campaigns, there can be policy exception recorded for an assignment and so on. More on that in later chapters of this book.
For example, assignment validity period can be used to assign a role only for a temporary period:
<user>
    <name>bob</name>
    ...
    <assignment>
        <!-- Deputy Cheerleader role -->
        <targetRef oid="0c87d8f8-c9a4-11e9-81b8-e7d43e9f9a2b" type="RoleType"/>
        <activation>
            <validTo>2019-12-31T23:59:59Z</validTo>
        </activation>
    </assignment>
</user>
As assignment and inducement are in fact the same data structure, similar approach can be used to disable parts of role hierarchy:
<role>
    <name>Marketing Research Undersecretary</name>
    ...
    <indudement>...</indudement>
    <indudement>...</indudement>
    ...
    <indudement>
        <description>
            Employee access to the lab is disabled because the lab burned down
            during an ugly accident. Will be re-enabled when the lab is rebuilt.
        </description>
        <!-- Experimental Research Lab Access role -->
        <targetRef oid="e8ef819c-c9a4-11e9-80a8-1bddb446391e" type="RoleType"/>
        <activation>
            <administrativeStatus>disabled</administrativeStatus>
        </activation>
    </inducement>
</user>
Many types and variants of assignments can be combined in a single user. Assignment validity periods may overlap, there may be disabled assignments and enabled assignments for the same role at the same time, there may be several assignments to the same role with various parameters and so on. All reasonable combinations are supported, which allows modeling very complicated schemes such as multi-affiliation, multiple employment contracts and so on. Assignment is a crucial data structure for midPoint platform, and we will be dealing with it in almost every chapter in the book.
Dynamic Roles
RBAC is a nice and elegant method to create and maintain access control policies. However, there is a serious danger: roles can be quite explosive. The role structure can easily get out of control, and the roles may start to multiply. This is known as role explosion, and it is one of the nastiest drawbacks of access control system based on static roles. It is not uncommon for an organization to have much more roles than it has users. This creates a recurring maintenance nightmare. Fortunately, midPoint has a very powerful support for dynamic roles that can significantly reduce or even completely eliminate the impact of role explosion.
To understand dynamic roles, we first need to understand what is the problem with static roles.
Many organizations have jobs that are very similar, they just differ is some small detail.
For example, all bank tellers are similar, the difference is just the branch office where they work.
Similarly, all the assistant jobs are pretty much the same.
The difference is the department or section that they work for.
Therefore, there is Sales Assistant, Engineering Assistant, Logistics Assistant - and a hundred or so similar roles.
Almost all the privileges in those roles are the same.
Of course, we can create an (abstract) role Assistant that will have all the common privileges.
However, we still need those hundreds of specific assistant roles as sub-roles of the common Assistant role.
And then it gets even worse, because there may be Senior Sales Assistant, Trainee Sales Assistant, Senior Engineering Assistant, …
The key to the role explosion is a realization that those "exploded" roles are created in an algorithmic way.
Maybe we do not need Sales Assistant, Engineering Assistant and Logistics Assistant roles at all.
Maybe we need just one Assistant role.
The organizational unit (sales, engineering or logistics) is just a parameter to that role.
Then the number of roles can be significantly reduced.
This is what we call parametric roles.
Parametric roles are not your ordinary garden-variety roles that contain a fixed set of privileges.
Parametric roles need to be much smarter.
E.g. the Assistant role needs an algorithm, that takes the organization unit as an input, and it outputs privileges that are appropriate for that organizational unit.
This may be a simple expression that determines correct group name based on organizational unit name.
Yet, it may be quite a complex code that determines most efficient location of home directories and other resources based on office location.
There is no free lunch.
The algorithm that was used to generate the number of "exploded" roles is not going to magically disappear.
In case of parametric roles, that algorithm needs to be placed in the role itself.
However, it may still be easier to maintain a couple of expressions in few smart roles than to maintain thousands upon thousands of ordinary roles.
The usual problem with parametric roles is, quite obviously, the presence of the parameters. The parameters cannot be stored with the role, as they are different for each assignment of the role. The parameters also cannot be stored directly with the user, as the user may have the same role assigned with a different set of parameters. Fortunately, midPoint was designed with this problem in mind. This was one of the big motivations to create a concept of assignment in the first place. Assignment is the right place to store the parameters, as it is the data structure that associates user with a specific role.
ExAmPLE is a very progressive company.
Similarly to other corporations, they have functional organizational structure.
However, their employees are also organized in teams.
Each team can have a manager and ordinary members.
The team membership is represented by custom attributes in LDAP server.
Each user has two custom multi-value attributes: exampleTeamMember and exampleTeamManager.
Both attributes expect team name as their value.
The naïve way to handle this would be to create two roles for each team.
However, there are hundreds of team, and this approach would create a maintenance nightmare.
A smarter solution is to use parametric roles.
There are only two roles: Team Member and Team Manager.
Those roles take custom property teamName as parameter.
But where does this property comes from?
It comes from assignment extension.
Each time the team role is assigned, there needs to be a parameter in the assignment:
<user>
    <name>alice</name>
    ...
    <assignment>
        <extension>
            <exmpl:teamName>x-force</exmpl:teamName>
        </extension>
        <!-- Team Manager role -->
        <targetRef oid="aaa6cde4-0471-11e9-9b50-c743da469067" type="RoleType"/>
    </assignment>
</user>
This is the first part of the solution.
The second part are the roles.
The roles need to be a bit smarter to use the teamName parameter:
<role oid="aaa6cde4-0471-11e9-9b50-c743da469067">
    <name>Team Manager</name>
    ...
    <inducement>
        <construction>
             <!-- OpenLDAP resource -->
             <resourceRef oid="8a83b1a4-be18-11e6-ae84-7301fdab1d7c"/>
             <kind>account</kind>
             <attribute>
                 <ref>ri:exampleTeamManager</ref>
                 <outbound>
                     <expression>
                         <path>$assignment/extension/teamName</path>
                     </expression>
                 </outbound>
             </attribute>
        </construction>
    </inducement>
</user>
Resulting LDAP account looks like this:
dn: uid=alice,ou=people,dc=example,dc=com
objectclass: inetOrgPerson
...
exampleTeamManager: x-force
...
This setup is illustrated in the following diagram:
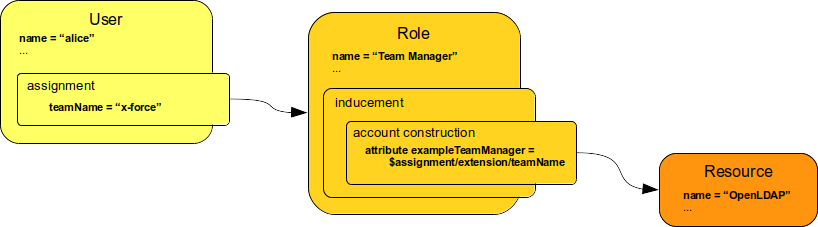
This is the basic mechanism of parametric roles.
It is incredibly powerful mechanism.
Unfortunately, current implementation of parametric roles in midPoint is quite limited.
While midPoint was designed with parametric roles in mind, the implementation is not yet finished.
MidPoint core engine supports parametric roles quite well.
Assignment parameters and mappings should work perfectly.
However, the support for assignment parameters in midPoint user interface is very limited.
In fact, the production-quality support is limited only to the couple of hardcoded parameters (orgRef and tenantRef) and even that leaves a lot to be desired.
While we would like to improve support for parametric roles in midPoint, we have to listen to what midPoint subscribers are saying.
Our development priorities are influenced by midPoint platform subscribers.
So far platform subscribers prioritized other features and therefore there was not sufficient funding to completely finish user interface support for parametric roles.
| Roles may also explode due to other reasons. Application roles that were mentioned above may significantly contribute to role explosion. Also attempts to "atomize" the low-level roles as an attempt to create enough "material" to compose higher-level roles may lead to explosion. MidPoint has some mechanism that limit those effects. However, perhaps the best approach for those cases could be summarized as "do not overdo it". |
Metaroles
MidPoint roles are usually applied to users. However, midPoint roles are universal. The roles can be applied to almost any midPoint object. Roles can be applied to users, organizations, services and even to roles themselves. Roles applied to other roles (and other objects) are meta-roles.
Meta-roles may seem similar to a role hierarchy. However, meta-role is a completely different animal. The crucial difference is that the meta-role is applied to the role, and not to the user. The inducements in the meta-role often contain policies such as approval policy, or construction clauses that create groups or organizational units. We usually do not want to create a group for each user. Yet, we often want to create a group for application role. That’s what meta-role can do.
Meta-roles can specify behavior and apply policies to broad classes of other objects. This makes meta-role mechanism very flexible and powerful, one of the most important mechanisms in midPoint.
Archetypes are the most common objects that work as meta-roles. Therefore, we will explain the details about meta-roles in Archetypes chapter.
RBAC, ABAC, PBAC And Other Wildlife
This section is where we will get all thoughtful and philosophical. The people that are bored with philosophical questions should skip the rest of this chapter. We will also throw some dirt on almost every access control model in existence. Therefore, the people that maintain dogmatic beliefs about identity and access management mechanisms should skip this section as well. On the other hand, open-minded people are quite likely to enjoy it.
Role-based access control (RBAC) is just one of many access control models. There are many variants of RBAC, and there are other access control models that are based on a completely different paradigms. One such popular model is attribute-based access control (ABAC). ABAC is based on an idea that access to the systems can be determined dynamically, just based on "attributes". Simply speaking, we can imagine ABAC as a one big algorithm that takes "attributes" as an input and decides whether access should be allowed or denied.
Policy-based access control (PBAC) is similar to ABAC. PBAC extends the notion of attribute-based decisions to an abstract concept of policy. Access decisions are still supposed to be algorithmic, although the algorithm is not limited to attributes.
ABAC is very popular in the access management (AM) community because of its simplicity. PBAC, as an extension of the idea, is also gaining traction. It all makes much sense, as it is much simpler and faster to evaluate one policy expression than to sift through a mountain of roles. The problem with ABAC and PBAC is manageability. ABAC and PBAC assume that all access control decisions could be based on algorithms, that they can be made anytime a decision is needed. However, that is almost never the case in larger practical deployments.
Too many identity professionals dream about complete automation of access control. It would be a marvel if an access control system could automatically determine the privileges of every person simply based on the organizational unit, work responsibilities or any other attributes of that person. It would be perfect to get that information from an HR system, process it through a set of algorithms and automatically provision correct privileges to everybody. That is a very nice dream, indeed. However, reality has a different idea. Such automated approach never really works in practice.
First problem is at the very start: HR data are almost never correct. There is very little motivation for the HR data to be completely correct. It is not a big issues if someone has a wrong job code or organizational unit code in the HR system. The business goes on, the salary is paid, everybody is happy. There is no efficient feedback loop that would force corrections in HR data - until the identity management system is deployed, that is. It takes years or even decades for a typical company to deploy an identity management system. At that point the HR data are beyond repair. The corrections that need to be done in the HR system are substantial. It is very difficult to correct HR data manually, even in small organizations. Bigger deployments absolutely require proper tooling to do that job. However, even with good tooling, it usually takes a lot of time to get the data right. Many identity management deployments were significantly delayed, or even canceled, because of data quality problems. Reliance on correct input data is dangerous. Identity system should be able to handle wrong input data.
The identity management deployment should not be delayed because of wrong input data. That would be like refusing to use your reading glasses because the text you are reading is misspelled. Identity management systems are essential tools that assist you in the process of data clean-up. The identity management system should be deployed using whatever data are available, and it should be used to manage data quality on day-to-day basis. It is naive to think that once the data are cleaned-up they will stay clean. The processes that crated data errors are still there, therefore data errors are going to appear all the time. The crucial insight is to accept that there are (and will be) data errors, and to design the mechanisms to detect and correct them.
There are many manual and ad-hoc decisions that need to be made in practical identity management deployments. This is not limited to identity management deployment project. Many ad-hoc decisions must be made during routine day-to-day operation of deployed system. Privileges need to be assigned manually to compensate for missing input data. Privileges need to be corrected, input data need to be temporarily overridden, policy exceptions has to be made. There are many things that need to be done manually, almost on day-to-day basis. For ABAC, PBAC and similar models this would mean that a policy needs to be updated on a day-to-day basis. However, these systems are not designed for such flexibility.
Then there is another big problem: the data are incomplete. Even if HR are data are correct, the data usually do not provide all the information needed to completely provision the user with privileges. The HR data are often limited to organizational unit and formal code of the work position. However, this is often miles away from the job that user really does. The usual solution to this problem relies on the users to request the privileges that are needed to do their jobs. Such request is routed through appropriate approval process. That request is a big problem for ABAC and PBAC. What exactly should the user request to get the privileges? Should the user request a change in the "policy"? That would not be practical. Should the user request a new value for an attribute? Which attribute? What value that would be? Users will need a way to choose what they are requesting from a list of options. Can we somehow create a catalog of the things that a user can request? Once again, ABAC and PBAC are not designed for this. Yet, all those problems are very easy to solve in RBAC. User is expected to request a role. It is quite easy to create a role catalog. Role is a concept that users are familiar with. However, as ABAC and PBAC do not rely on roles, there is nothing that a user can get a grip on. There is no "handle" that would allow the user to make much sense from the abstract policies.
This is all a consequence of yet another ABAC/PBAC problem. While ABAC/PBAC policy may be easy to set up, it is quite difficult to analyze and maintain. There are simple and obvious questions that are very difficult to answer in ABAC/PBAC world. What are the privileges of this specific user? Which users are entitled to access this particular application? Which users are affected by this particular policy statement? How many users will be affected if I make this change to policy? ABAC/PBAC systems would need a complex simulation algorithms to answer those questions. However, answering such questions is quite easy in RBAC model. In RBAC, policies are encapsulated into roles. Therefore, only the users that have those roles are affected. The roles also divide the policy to a smaller, manageable pieces. Each of the roles can have its own state and lifecycle. Therefore, it is not that difficult to work with two versions of the same role at the same time. Old version is still assigned to some users, but we are deprecating that and slowly migrating to a new version. Such continuous processes are difficult to do in ABAC.
Then there is still one crucial problem when ABAC/PBAC is used in provisioning scenarios. The "policies" often benefit from the fact that complete data about the user accessing the system are available when the access control decision is made. The crucial part of that data is called context. This includes data such as time of day, network location of the user, recent events related to the user, real-time estimate of the risk and so on. However, such data are simply not available in provisioning scenarios. Accounts are usually provisioned long before the first access to the account is made. Therefore, many of the advantages of ABAC/PBAC are useless in identity management scenarios that rely on provisioning.
However, ABAC and PBAC are not complete failures. They are very useful in customer-oriented identity and access management (CIAM). Customer identities are usually "lightweight", and the policies are simple. However, when there is a need to manage employees, teachers, contractors and similar "heavyweight" identities then ABAC/PBAC approach almost always fails.
The fact that ABAC/PBAC fails in complex practical identity management deployments does not mean that RBAC is ideal. Quite the contrary. RBAC has problems of its own, and the applicability of pure RBAC in practical identity management deployments is very limited. Many of the problems of RBAC model motivated engineers to develop ABAC, PBAC and similar models. In fact, the "algorithmic" idea of ABAC/PBAC is not entirely bad. Only if we had a way how to combine ABAC/PBAC and RBAC … oh, but there is a way! We did it already.
MidPoint combines RBAC and ABAC/PBAC by putting expressions into roles. We have seen that already. When role is assigned, the expressions in the role gets evaluated. There can be any complex algorithm in the expression, even a complete ABAC/PBAC policy. At least in theory. MidPoint expressions do not make access control decisions, because it is not the job of an identity management system to make such decisions. Identity management system should set up the account. It provides the "material" for an authorization system to make a correct decisions. Therefore, midPoint goes as close to ABAC/PBAC as a provisioning system can go. In an extreme case the entire ABAC/PBAC policy can be implemented in outbound expressions in resource definition. Yet, there are a good reasons nobody does that.
Dividing the policy into smaller parts brings substantial advantage. Therefore, many midPoint deployments are very RBAC-like. There are many roles and rich role hierarchies. Role expressions are used in moderation. Yet, there are also deployments that are using parametric roles and role expressions extensively. In such cases there is a smaller number of roles, almost no role hierarchy, but the roles are smarter. Those are more PBAC-like deployments. Yet, roles are still there. The roles act as "handles" for users to understand the policies, to give names to relevant parts of the policy. This combined approach works surprisingly well.
Of course, this idea is not new. Many RBAC-like systems use some kind of "smart" behavior inside the roles. However, so far we haven’t seen anything as comprehensive as midPoint dynamic role-based access control model. Therefore, we had to invent an impressive marketing name for our creation. Due to a momentary lapse of imagination we dubbed it policy-driven RBAC (PD-RBAC). Whatever you choose to call it, the fact is that this approach is very useful in practice. It can transform apparent chaos into something that can be efficiently managed. After all, that is the whole point of identity management and governance.
Conclusion
Role-based access control (RBAC) means many things to many people. Some consider it a cure-all, the only viable access control standard, others consider it cumbersome, yet others proclaim its death. Whatever is said about RBAC, the fact is, that RBAC is here, and it is here to stay. When it comes to midPoint, RBAC has its place as a very useful concept and essential tool. The truth is that the policy-driven RBAC variant that midPoint is using is miles apart from the traditional static RBAC models of the past. MidPoint would not be able to work efficiently without major innovation of the RBAC model.
Role-based access control as well as dynamic policies are at the heart of midPoint. Similarly, identity management systems such as midPoint are at the heart of IT infrastructure. Many applications implement at least some aspects of RBAC or similar access control models. However, almost all the applications limit the applicability of RBAC to the application itself. I.e. roles in an application can contain only those privileges that apply to that particular application. The roles cannot have privileges from other application. However, identity management systems are different. Identity management systems such as midPoint are reaching out to many applications (resources). Therefore, a single midPoint role can give access to many applications at once. No other application can do that. This properly alone make identity management systems indispensable.
8. Archetypes
All generalizations are dangerous, even this one.
MidPoint has many types of objects hard-coded: users, roles, orgs, services and many more. However, no amount of hard-coded types could ever be enough to describe the vast diversity of the world around us. Hence, there are archetypes, providing a mechanism to describe objects in finer details.
Focal Objects
There are five basic types of focal objects:
-
User (
UserType) represents users, usually as physical persons or personas. -
Org (
OrgType) represents groups of other objects, such as organizational units, teams, projects or locations. -
Role (
RoleType) represents roles, responsibilities or policies that can be applied to other objects. -
Service (
ServiceType) represents non-human actors and assets, such as network services, applications and devices. -
Generic object (
GenericObjectType) can represent anything else.
These are focal types, because they can be a focus of midPoint computation. They are the center of start topology, the hub of the hub-and-spoke data mapping model that midPoint is using. E.g. User has several linked accounts. In midPoint parlance, user is the focus, accounts are projections. User data can be mapped to accounts, account data can be mapped to user, but account cannot be mapped to another account. That is the principle of the star topology.
We have already seen that. However, focal objects are meant to be much more than a mere center of data synchronization topology. These objects are meant to have business meaning, to represent entities and concepts from the real world around us. Almost every practical object, entity or concept can be classified to the first four types. Physical persons, personas and other human-like identities can be represented as users. Groups of other objects can be represented as orgs, such as organizations, organizational units, various types of teams, projects, classes, interest groups and task forces. Even concepts that do not immediately come to mind can be represented as orgs, such as locations or nationalities. Concept of service can represent almost any thing, such as devices, network services, applications, databases, documents - even non-tangible assets such as datasets or workspaces. MidPoint roles can be, quite obviously, used as roles for role-based access control (RBAC) purposes. However, they can also represent business concepts, such as jobs, work positions and responsibilities. Roles can even represent very abstract concepts such as policies, classifications and clearances. Almost anything that you can think of, anything which would be described as identity, could be classified in those four types: user, org, role or service. In a very rare case when a concept does not fit in any of these categories, there is always generic object as a last resort. However, the user-org-role-service quartet works so well, that the generic object was not really needed for years and years.
The four types are not just cosmetics, they have specific features that allow them to represent real-world concepts.
-
User has several naming properties, such as full name and given name, which are typical for natural persons. It also has credentials (e.g. password)
-
Org can form hierarchies. There can be orgs in orgs, which is very useful for building organizational structures, or hierarchies of locations.
-
Role is meant to grant privileges to users.
-
Service has credentials, similarly to users. Therefore, service can represent machine agents, robots and similar active things that behave like humans. However, service is meant to represent non-human identities, therefore it does not have human-like names.
This description is somehow simplified. In reality, things are a bit more generic in midPoint. Roles are not the only type of objects that can grant privileges. All role-like objects (known as abstract roles in midPoint) have this ability, which means orgs and services can grant privileges too. Also, all the four focal types can have credentials, at least in theory. There is a significant overlap among the capabilities of the four object types. However, the description above is a nice summarization of the purpose for which the object types were created.
|
Policy
MidPoint 4.9 is introducing another focal object type: policy (PolicyType).
While policies can be represented by roles (RoleType) in midPoint 4.8 and earlier, the new policy type brings clarity.
In midPoint 4.9 and later, there is a clear distinction between quite concrete role and very abstract policy.
This is a nice improvement, which improves thinking about roles and policies by optically separating them.
It also looks very good in user interface.
Other than that, roles and policies work exactly the same.
It is a curious thing, that sometimes even such apparently cosmetic change makes a big perceived difference.
We strongly recommend midPoint 4.9 to anyone who plans to heavily use policies, e.g. in deployments that need to address complex
regulatory compliance scenarios.
|
Archetypes
The four basic object types can represent almost anything we are likely to encounter in identity management world. However, it does not mean that the four types fit all object types perfectly. We often need to distinguish various nuances among object types. E.g. we may want to use colors or icons to distinguish between applications, mobile devices and workspaces.
Basic structure of archetype definition is simple:
<archetype oid="00000000-0000-0000-0000-000000000702">
    <name>Person</name>
    <archetypePolicy>
        <display>
            <label>Person</label>
            <pluralLabel>Persons</pluralLabel>
            <icon>
                <cssClass>fa fa-user</cssClass>
                <color>green</color>
            </icon>
        </display>
    </archetypePolicy>
</archetype>
There is a special archetypePolicy container which is very specific to archetypes.
This container specifies characteristics of archetyped objects, which are objects that have this archetype.
In the case illustrated above, the Person archetype is supposed to apply to users who are physical, natural persons (as opposed to virtual personas).
Archetype policy specifies that the archetyped objects have green icon defined by fa fa-user CSS classes.
Each archetyped object has to be referred to as Person.
Plural form Persons is going to be used in lists and collections of archetyped objects.
This is quite a minimal definition of archetype.
|
Font Awesome icons
MidPoint is using Font Awesome icons, which is a nice collection of icons to choose from.
Font Awesome icons are referred to by their CSS classes.
Readers that have some web design experience would understand.
For the others, just search the web for "font awesome icons", choose an icon and look for snipped of HTML code such as <i class="fa fa-user"></i>.
The value of class HTML attribute is supposed to go to the cssClass property of archetype definition.
Of course, midPoint is open source software, therefore it contains only free Font Awesome icons.
|
We have nice little archetype definition now. However, it does not do much just by itself. Archetype has to be applied to midPoint objects to be useful. As we are in midPoint, archetypes are assigned to objects, of course.
<user oid="00000000-0000-0000-0000-000000000702">
    <name>anderson</name>
    ...
    <assignment>
        <targetRef oid="00000000-0000-0000-0000-000000000702" type="ArchetypeType"/>
    </assignment>
    ...
</user>
When archetype is assigned to an object, the object gains characteristics specified in the archetype policy specified in the archetype.
This means that persons are shown using green color in midPoint user interface, as that is specific in the Person archetype.
Archetypes can be managed and create in midPoint user interface as well. Navigate to .
Archetypes can specify several aspects that affect look, feel and behavior of archetyped objects:
-
Icon, color, labels and similar presentation properties.
-
Object template, which specifies mappings and other details about individual data items of the object.
-
Provisioning defaults, e.g. specifying that all employees should have an account in enterprise directory.
-
Policies to be applied to archetyped objects.
-
Collecting the objects, providing ability to quickly look them up in searches, menu shortcuts, and so on.
Archetypes can significantly influence archetyped objects, as you will see in the rest of this chapter. This ability makes archetypes very useful. Due to their usefulness, archetypes permeate midPoint configurations. Many archetypes are provided as pre-configured (initial) objects out-of-the-box. Archetypes are also seen in prominent places in midPoint user interface. They also provide prime opportunity for customization. Overall, archetypes are to the core of every midPoint deployment.
Structural vs Auxiliary
An object can have more than one archetype, as long as following rules are followed:
-
At most one structural archetype can be applied to object. Structural archetype provides structure to the object, it specifies icon, color, and presentation of the object. In the future, structural archetype may define schema for the objects.
-
Any number of auxiliary archetypes can be applied to object. Auxiliary archetypes provide additional information, functionality and policies to the objects.
Structural archetypes should be used to represent nature of the objects, characteristics that are unlikely to change.
Good examples are Person or Application.
On the other hand, auxiliary archetypes are more like the roles.
They usually represent characteristics that might change, or characteristics that could be combined.
For example, Employee, Student and Volunteer are good examples, as a Person could theoretically be student and employee of a school at the same time, as well as volunteer for certain activities.
Definition of auxiliary archetypes is almost the same as definition of structural archetypes, except for archetypeType property.
<archetype oid="8070c13e-73ff-11ef-b9ac-7beb1c83f753">
    <name>Employee</name>
    <archetypeType>auxiliary</archetypeType>
</archetype>|
Limited UI support
User interface support for auxiliary archetypes is quite limited in midPoint 4.8.
This is the reason auxiliary archetypes are not used often in midPoint 4.8.
In fact, use of birthright roles is still recommended in midPoint 4.8, instead of using auxiliary archetypes such as Employee.
More on that in next chapter.
|
Pre-configured Archetypes
Archetypes are very useful mechanism for setting up presentation of behaviour of objects. Therefore, midPoint contains a set of pre-defined archetypes, ready to be used. Following table describes the most interesting pre-configured archetypes:
| Archetype | Holder type | Description |
|---|---|---|
Person |
User |
Archetype for natural persons. |
System user |
User |
Archetype for system users, i.e. non-person users that are needed for system to work, such as |
Application |
Service |
Archetype for applications, as a basic building blocks for access control. |
Application role |
Role |
Archetype for roles that directly grant access to applications. |
Business role |
Role |
Archetype for roles that represent business concepts. |
System role |
Role |
Archetype for roles that are essential from the system point of view, such as |
There are other pre-defined archetypes as well, mostly for tasks, cases, reports and marks. These are not important for now. There are no pre-defined archetypes for organizational units in midPoint 4.8. More on that later, in a chapter dedicated to organizational structures.
Life with Archetypes
Archetypes influence many aspects of "life" for midPoint objects.
Therefore, it is a best practice to set proper archetype for object as soon as the object is created.
This approach makes it easier to customize behavior of objects later on.
For this reason, we have set Person archetype for all users created by synchronization from HR system.
This is going to be very useful, as we will see in next chapter dealing with object templates.
Similarly, it is recommended to properly set archetypes for new roles, services, orgs and other objects.
Choosing the right archetypes is quite important, as change of (structural) archetypes is a serious matter. Archetypes define many aspects of object character, presentation and behavior. Change of archetype means quite a substantial change of object nature already. In the future, it is very likely that archetypes could define object schema as well, influencing the way the object is composed and stored. Therefore, change of archetypes would mean a change of its very structure. As object schema changes, new mandatory properties would need new values and values of removed properties should be removed. Therefore, there is already a special method to change an archetype in midPoint. In midPoint user interface, there is Change archetype button on object details page that starts a special action of archetype change.
Archetypes naturally work as object collections. Therefore, archetypes can be used to conveniently search for all archetyped objects. Simply use the Object collection control in the search bar and select archetype you are looking for. Moreover, archetypes can be used to customize midPoint menu, object details panels and other parts of midPoint user interface. Menu items regarding archetypes are already pre-configured in some cases (e.g. ).
|
archetypeRef
Archetypes are assigned to objects.
While archetype assignment is limited, it is still quite a complex object to deal with.
As archetype searches are common, midPoint needs to execute them as quickly as possible.
Therefore, there is special archetypeRef reference in archetyped objects, point to applied archetype(s).
However, this reference is operational, it is managed by midPoint internally, it should never be changed by midPoint users.
Archetypes should be managed solely by changing assignments.
Yet, the archetypeRef may still be useful, e.g. when searching for archetyped objects using scripts or midPoint REST interface.
|
Archetypes as Roles
Archetypes are abstract roles.
Similarly to orgs and services, archetypes behave like roles.
Inducements in the archetype apply to all archetyped objects.
This is very convenient method to apply default settings to broad classes of users.
Pre-defined Person archetype is especially suitable for this purpose.
Inducements added to Person archetype can be used to set up default accounts and roles for users.
Our deployment at ExAmPLE company goes quite well. We have HR synchronization set up. We have also connected LDAP server and correlated the accounts. However, the LDAP setup is not complete. When new employee is hired, midPoint takes the HR record and creates a user. However, the user is not going to get an LDAP account, as every employee should.
As archetypes work as roles, and all employees have Person archetype, we can easily do what we need.
Setting up default accounts for employees is a simple matter of adding an inducement to the Person archetype.
<archetype oid="00000000-0000-0000-0000-000000000702">
    <name>Person</name>
    ...
    <inducement>
        <construction>
             <!-- OpenLDAP resource -->
             <resourceRef oid="8a83b1a4-be18-11e6-ae84-7301fdab1d7c"/>
             <kind>account</kind>
        </construction>
    </inducement>
</archetype>
When HR record is synchronized to midPoint, user is created, Person archetype is applied, inducement is processed and LDAP account created.
This configuration almost works, except for one little detail.
New user’s username is generated from employee number.
This is not very convenient for users.
However, we still need one more trick to get there, which is explained in the Focus Processing chapter.
In addition to accounts, archetypes are useful for setting up default roles and privileges.
E.g. Person archetype can be used to grant access to midPoint user interface to all users by adding inducement to End user role.
<archetype oid="00000000-0000-0000-0000-000000000702">
    <name>Person</name>
    ...
    <inducement>
        <targetRef oid="00000000-0000-0000-0000-000000000008" type="RoleType"/>
    </inducement>
</archetype>
Archetypes are ideal for provisioning birthright privileges, access rights that are automatically given to users based on their type.
Archetypes as Meta-roles
Simply speaking, meta-roles are roles applied to other roles. Ordinary role applies its characteristics to a user. Meta-role applies its characteristics to another role. This is perfectly possible in midPoint, as role can be applied to almost any midPoint object. Then why not apply a role to another role? This may seem like a pretty useless exercise, but the truth is that meta-roles are tremendously useful.
History is repeating, they say. The fact is that repetition is daily bread in almost all identity management deployments. E.g. many business roles have something in common. For example, the business roles have similar approval process. There may be role classes that have similar exclusion policies that are part of global segregation of duties (SoD) policy. There are roles that are tied to entitlements in a systematic way, and so on. Roles, organizational units, services and other role-like objects tend to be quite similar. Therefore, applying meta-roles to them can be very useful.
Archetypes are a prime example of meta-roles.
Business role archetype is a meta-role that applies its policies to all business roles.
<archetype oid="00000000-0000-0000-0000-000000000321">
    <name>Business role</name>
    <inducement>
        <!--
            Policies, rules, constructions and other things
            that should be applied to all business roles.
        -->
    </inducement>
</role>
Statements in the inducement above are applied to business roles, as opposed to ordinary role where inducements are applied to users.
Similarly, Application archetype applies its inducements to services.
This ability makes archetypes ideal for addressing slight differences in behavior of various object types.
For example, we probably would like to synchronize applications with enterprise application inventory system.
However, that does apply to applications only, and not to other services.
Therefore, Application archetype is ideal place to configure this policy.
|
Reuse in midPoint
Meta-roles are one of the stranger concepts of midPoint, but it goes well with midPoint philosophy.
Meta-roles are roles that are applied to themselves.
This is a reuse of an existing mechanism to create something new.
This is very typical for midPoint.
We always try to reuse an existing mechanism instead of reinventing a new one.
The result is quite unexpected and surprising sometimes.
When we have designed the role-based access control system for midPoint, we haven’t thought about meta-roles at all.
The meta-roles just appeared as a consequence of the design, a consequence that was absolutely unexpected.
Fortunately, we have quickly realized the potential that meta-roles have, and we have put them to a full use.
|
It may be difficult to understand the concept of meta-roles from such a short and very abstract description. Do not worry. As meta-roles are often used in midPoint, we will get back to the meta-roles on several occasions. Meta-roles often allow simplification of complex problems by creating a very elegant solutions. For now, it is enough to remember that roles can be applied to almost anything in midPoint, including themselves.
Assignment Relation
Archetypes are very flexible, even perhaps a little bit too flexible.
Theoretically, an archetype can be assigned to anything, any type of object.
However, it does not make much sense to use Person archetype on roles or services.
Therefore, midPoint has to constraint the ability to use archetypes.
MidPoint has assignment relation mechanism that can be used to fine-tune the application and use of archetypes.
This mechanism can be configured by using assignmentRelation clause.
<archetype oid="00000000-0000-0000-0000-000000000702">
    <name>Person</name>
    ...
    <assignment>
        <identifier>holderType</identifier>
        <assignmentRelation>
            <holderType>UserType</holderType>
        </assignmentRelation>
    </assignment>
</archetype>
In the example above, the assignment relation clause specifies holder type for archetype.
Simple speaking, this is the type that an archetype can apply to, a type that can hold assignment to the archetype.
In this case, the holder type is constrained to user (UserType).
Hence, Person archetype can be applied to users, and no other object type.
Assignment relation is important for maintaining some sanity in the vast flexibility of midPoint platform.
As we know that Person archetype should be applied to users, we can easily detect errors when the archetype is accidentally applied to other object type.
Assignment relation is even more important for the user interface.
Due to the assignment relation specification above, midPoint user interface knows that it makes sense to offer Person archetype as an option for creating new user, but this archetype does not make sense not for org or role.
Several parts of midPoint user interface adapt to assignment relation specified in archetypes.
Clever reader has surely noticed that assignment relation clause is enclosed in an assignment.
This has certainly some deeper meaning.
Clever reader is right once again.
As assignment relation is placed in assignment, it applies to the archetype itself.
In the case above, specification of the holder type applies to the archetype.
Archetype Person can be applied to users (UserType).
On the other hand, we can put assignment relation clause in inducement.
In that case, the clause would apply to archetyped objects instead.
Let’s consider an example of Business Role archetype.
<archetype oid="00000000-0000-0000-0000-000000000321">
    <name>Business Role</name>
    ...
    <assignment>
        <assignmentRelation>
            <description>This archetype can be assigned to role.</description>
            <holderType>RoleType</holderType>
        </assignmentRelation>
    </assignment>
    <inducement>
        <assignmentRelation>
            <description>Business role can be assigned to users.</description>
            <holderType>UserType</holderType>
        </assignmentRelation>
    </inducement>
    ...
</archetype>
There are assignment relation clauses both in assignment and in inducement. The clause in assignment applies to the archetype itself. It states that the archetype is supposed to be applied to roles. We have seen that already. The other clause is placed in inducement. This clause applies to all archetyped object, which means to all business roles. It states that business role can be given to users only, it cannot be given to orgs or services.
This is the principle of meta-roles in practice.
Archetypes are meta-roles, applied to roles.
In this case Business Role archetype is a meta-role that applies to roles, which gives these roles character of business roles.
Assignment relation is an important mechanism to maintain order in amazing flexibility of midPoint platform, especially when this mechanism is coupled with archetypes. Together, this two mechanisms can form variety of object types and relations between them. This is the foundation allowing midPoint to describe vast diversity of identities in the wold around us.
Future of Archetypes
While the underlying mechanism of meta-roles is part of midPoint for a very long time, archetypes were added a bit later. Archetypes embrace the meta-role mechanism, making it nicer and easier to use, while adding some features of their own. While archetypes in midPoint 4.8.5 are already quite powerful, there are still plans for improvement.
Archetypes are supposed to exert tighter control over character of the archetyped object in the future. This means that archetype should control lifecycle of the object and further details of its presentation and behavior. However, perhaps the most important future function of archetypes is to control schema of archetyped objects. As we have seen in Schema chapter, midPoint schema can be extended with custom properties. However, such schema extension is global, it applies to all objects of a given type. Vision for future midPoint gives similar ability to archetypes. In later midPoint versions, archetypes should be able to specify schema extension for archetyped objects. This could make schema management more elegant, cleaner and much more manageable. However, there are also downsides. As archetypes can change, this means that object schema can change as well. New schema applied by new archetype may include mandatory properties, which need values. Scheme of old archetype might have included properties that are not part of new schema. Values of such properties must be discarded, which means destructive operation. There are other complications as well - none of them unsolvable, but none one them easy to solve either.
That is one of the reasons why change of archetype is a special operation in midPoint user interface. This operation is quite simple in midPoint 4.8.5, however we expect that it will get much more complex later on. Possible consequences of archetype change also led us to limit the application of archetypes. While archetypes are abstract roles, unlike other abstract roles, archetypes can only be assigned to objects directly. Archetypes can only be referenced from an object in a plain, non-conditional, direct assignment, just like we have seen at the beginning of this chapter. Indirect use of archetypes (e.g. referencing archetypes from inducements) is not supported, and it may lead to unforeseeable behavior. When it comes to archetypes, perhaps the best strategy is to keep things simple. At least for now.
Conclusion
Archetypes make midPoint nicer and more elegant. Icons, colors and other nuances that archetypes bring make it easier to navigate midPoint user interface. However, most importantly, archetypes make midPoint data more descriptive. Archetypes can be used to describe variety of identity types, including all the flavors and nuances of the diverse world around us.
Archetypes are build on deep underlying principles of midPoint platform, such as the meta-role mechanism. Yet, archetypes are giving such deep mechanisms a nice human-friendly form.
9. Focus Processing
Scientists study the world as it is; engineers create the world that has never been.
Identity management systems are often seen as integration engines that move data from one system to another system. This is indeed a very important part of the identity management functionality. However, the things identity management systems do internally are crucial to all identity management solutions - especially those that deal with identity governance and regulatory compliance.
MidPoint does quite a lot of things that may not be entirely obvious on the outside. There are rules to apply, processes to drive and policies to enforce. Those things are gaining utter importance at that strange boundary where identity management becomes identity governance. MidPoint has powerful mechanisms to support identity governance. We will get to them later. We need to explain the basic mechanisms of midPoint internal processing first.
This chapter is about processing of focus, which is a midPoint term for object that is at the center of computation. The focus is usually a user, therefore this chapter is about the internal processing about the user object itself. It deals with handling of user properties such as determining username, e-mail address and composing full name. Moreover, it deals with other aspects of internal processing, such as automatic assignment of roles.
Object Templates
Data that flow into midPoint are seldom complete and clean. Quite the contrary. The data coming from the "feeds" are often incomplete, they are not very precise, and sometimes several sources may not even agree on a value for a particular data item. Inbound mappings can be used to sort out some of these problems. However, inbound mappings are designed to work in isolation. They work only for one particular resource and one particular attribute. We often need to gather data from several resources, and then look at all of them at once. Inbound mappings cannot do that very well, as they are tied to the resource. However, inbound mappings can be used to gather all the relevant data in the user object. Then we can have a look at user object, where those data are gathered, and process them all together. That is what object templates do. Object template can be used to do variety of things to all kinds of midPoint objects.
Simply speaking, object template is a set of definitions and mappings that is applied to a particular midPoint object. For example, user template is applied to all user objects. The mappings in the object template can produce new values for the object. For instance, a very typical use of object template is computation of user’s full name:
<objectTemplate oid="22f83022-b76d-11e9-8a30-6ffc11b23016">
    <name>User Template</name>
    <item>
        <ref>fullName</ref>
        <mapping>
            <strength>weak</strength>
            <source>
                <path>givenName</path>
            </source>
            <source>
                <path>familyName</path>
            </source>
            <expression>
                <script>
                    <code>givenName + ' ' + familyName</code>
                </script>
            </expression>
        </mapping>
    </item>
</objectTemplate>
The mapping above computes the value of user’s fullName property from givenName and familyName by using a simple Groovy expression.
It is a weak mapping, therefore it computes the full name only in case that it is not present already.
Import of object template definition into midPoint does not do much. The template is not used yet, it just stored in midPoint repository. There can be several object templates for different types of objects, archetypes or organizations at the same time. MidPoint does not know how to use the template, unless it is specified in a configuration. The simplest and most common way to use an object template is to configure use in the archetype.
<archetype oid="00000000-0000-0000-0000-000000000702">
    <name>Person</name>
    <archetypePolicy>
        ...
        <objectTemplateRef oid="22f83022-b76d-11e9-8a30-6ffc11b23016"/>
    </archetypePolicy>
    ...
</archetype>
Alternatively, object template can be configured globally in system configuration object:
<systemConfiguration>
    ...
    <defaultObjectPolicyConfiguration>
        <type>UserType</type>
        <objectTemplateRef oid="22f83022-b76d-11e9-8a30-6ffc11b23016"/>
    </defaultObjectPolicyConfiguration>
    ...
</systemConfiguration>
This configuration activates the object template for use by all objects of UserType type.
Therefore, this template is applied to all midPoint users.
Even though object templates can be set globally, it is usually better to apply object template using archetypes.
Use of archetypes provides finer control over content of individual objects.
E.g. we want to generate full name by concatenating given name and family name for persons (users with Person archetype), yet we do not want to do that for non-person users (such as administrator).
User interface can be used to set up and activate object templates as well.
Navigate to , create a new policy using the btn:New[] button.
Specify reference to your template, select User in type field and click btn:Save[].
|
Object template is applied every time an object is created, changed or explicitly recomputed (e.g. on reconciliation). Object template is applied after all the inbound mappings are processed. Inbound mappings often copy important data to the object, therefore the template can work on data that are summarized from all the resources.
Item Definitions
We have already seen an example of object template used to apply a mapping on fullName property of midPoint users.
This was a very simple example.
Object template can also do other tricks.
The processing of an object template is usually focused on particular items of an object.
Therefore, almost all the functionality of object template is located in item element that references a particular item by its path:
<objectTemplate oid="22f83022-b76d-11e9-8a30-6ffc11b23016">
    <name>User Template</name>
    <item>
        <ref>fullName</ref>
        ...
    </item>
    <item>
        <ref>assignment</ref>
        ...
    </item>
</objectTemplate>
The most common use of object template is to evaluate mappings on items, such as the mapping to determine user’s full name above. Therefore, the mappings evaluated by the template are pre-configured with convenient default settings. Target of the mapping is automatically set to the item for which it is specified. Sources of the mapping need to be defined explicitly. The basic idea is, that the user template should take properties of user as inputs. In other words, the template works on the same object both as input and output.
Unlike inbound and outbound mappings, object template mappings often use static (literal) values or a very simple expressions to determine the value. However, in object templates, mapping conditions are often used to control application of the value. The easiest way to explain this is to use an example:
<objectTemplate>
...
<item>
<ref>description</ref>
<mapping>
<source>
<path>extension/hatSize</path>
</source>
<expression>
<value>WARNING: Big brain!</value>
</expression>
<condition>
<script>
<code>hatSize > 60</code>
</script>
</condition>
</mapping>
</item>
...
</objectTemplate>This mapping is applied to description property of the user.
The mapping sets a fixed warning text specified as text literal using value expression evaluator.
However, the mapping is not setting that value for all the objects.
The mapping is applied only for objects that satisfy the condition.
The condition is set to trigger for all the users that have hat size larger than 60.
Mappings are made to be relativistic. This means that mappings react to changes. The same principle applies to mapping conditions - they are relativistic too. Therefore, the mapping reacts to changes in its sources, as well as changes in the condition state. When user’s head grows, and the hat size changes to a value over 60, then the mapping adds the warning. When the user’s head shrinks, then the warning is removed.
It may look that this mechanism is unnecessarily complicated, if you look at single-valued properties only. It all starts to make sense in case of multi-value items, such as the assignments. We will get to that in the next section.
Schema
Mappings are the things that object template does almost all the time.
However, the template can also do other interesting things.
First of all, object template can tweak the schema.
MidPoint comes with quite a rich schema, ready to be used.
However, the schema is not a perfect fit for all the deployments.
Schema chapter described a method to extend the schema with custom items.
However, what we should do if we want to change the built-in schema of midPoint?
The schema is hard-coded to midPoint, even compiled into midPoint source code.
It is not that easy to change the built-in schema.
Yet, object template provides a mechanism to customize the use and presentation of built-in schema.
The item specification can be used to modify the way how midPoint applies the schema:
<objectTemplate>
    ...
    <item>
        <ref>givenName</ref>
        <displayName>First Name</displayName>
    </item>
    <item>
        <ref>additionalName</ref>
        <displayName>Middle Name</displayName>
    </item>
    <item>
        <ref>familyName</ref>
        <displayName>Last Name</displayName>
    </item>
    ...
</objectTemplate>
The "additional name" is a nice and generic term that can fit many cultural environment. However, it is not very usual or intuitive in cultures that are not used to such a generic term (which means pretty much all the cultures). Therefore, almost all midPoint deployments that chose to use this property would like to rename it to something that feels more natural. Similarly, "given name" and "family name" do not fit well in all the cultures. We have expected that. Therefore, object template can be used to modify some aspects of built-in schema, such as the display labels.
Object template can also be used to override object multiplicity, especially to change mandatory item into optional.
MidPoint insists on having name property set for all the users.
However, we may be able to compute value of name property from other properties, such as other names of the user, employee number or other identifiers.
Therefore, we do not want to present name item as mandatory in the user interface.
Therefore, we would allow midPoint administrator to leave name field blank in the user interface when creating a new user.
However, user interface is strictly driven by the schema, as are all the other midPoint components.
As name is mandatory in the schema, the user interface insists that the name field must be filled in.
This behavior can be changed in the object template:
<objectTemplate>
    ...
    <item>
        <ref>name</ref>
        <limitations>
            <layer>presentation</layer>
            <minOccurs>0</minOccurs>
        </limitations>
        <mapping>
            ...
        </mapping>
    </item>
    ...
</objectTemplate>
This configuration makes the name property optional for the presentation purposes.
This means that the user interface treats name as optional field.
However, core midPoint engine still requires name property to have a value.
This gives object template a chance to generate the value for name property.
However, the name field is still rendered as read-write item in the user interface.
We do not want that, as name is supposed to be immutable identifier in our deployment.
We do not want anyone to change the name once it was generated.
Therefore, we would like to present name as read-only item in the user interface.
This can also be achieved by object template, by using access configuration:
<objectTemplate>
    ...
    <item>
        <ref>name</ref>
        <limitations>
            <layer>presentation</layer>
            <minOccurs>0</minOccurs>
            <access>
                <read>true</read>
                <add>false</add>
                <modify>false</modify>
            </access>
        </limitations>
        <mapping>
            ...
        </mapping>
    </item>
    ...
</objectTemplate>| Even immutable identifiers may need to change occasionally. There may be a bug in the identifier generator, or we may need to manually change identifier to match the reality. Theoretically, every piece of the solution should play by the rules. Yet, we know that rules have exceptions in the practice. Therefore, privileged users such as system administrator should be able to change the identifiers when it is really needed. The proper way how to do this would be to use authorizations, and not object template. Unfortunately, we do not know how to use authorizations yet. Therefore, this solution will have to do, at least for now. |
Perhaps the most extreme measure to change presentation of midPoint schema is ability to eliminate certain item entirely. In fact, this happens quite often. MidPoint schema is rich, and many deployments do not use all the items defined in midPoint schema. It makes little sense to present the items that are not used, therefore there is a way to tell midPoint that we want to completely ignore an item:
<objectTemplate>
    ...
    <item>
        <ref>organization</ref>
        <limitations>
            <layer>presentation</layer>
            <processing>ignore</processing>
        </limitations>
    </item>
    ...
</objectTemplate>
Object template can be used to do further tricks. It can be used to associate value enumeration with an item, e.g. to apply lookup table to a particular item. Object templates can be used to set up a validation expression for items - and a couple of other things. More on that later.
Includes
There are many ways to apply an object template to an object. The template can be set globally in system configuration, it can be set by an archetype or even by an organizational unit. However, only one object template can be active for any particular object at one time. Yet, there are often mappings that need to apply universally. For example, we may want to generate full name using the same algorithm for all users, regardless of their archetype. We may also want to automatically assign some roles to all users regardless of their organizational units. For that reason there is mechanism to include one object template in another:
<objectTemplate oid="22f83022-b76d-11e9-8a30-6ffc11b23016">
    <name>Default User Template</name>
    <item>
        <ref>fullName</ref>
        <mapping>
            ...
        </mapping>
    </item>
</objectTemplate>
<objectTemplate oid="60eab6a8-ba87-11e9-b9a3-bbb8418de4d5">
<name>Special User Template</name>
<includeRef oid="22f83022-b76d-11e9-8a30-6ffc11b23016"/>
<item>
<ref>employeeNumber</ref>
<mapping>
...
</mapping>
</item>
</objectTemplate>In this case, the special user template includes all the mappings from default user template.
Therefore, both mapping for employeeNumber and mapping for fullName will be processed.
Automatic Role Assignment
In traditional role-based access control (RBAC) models, roles are supposed to be manually assigned to users. That’s the whole point of traditional RBAC: simplify access control by using roles instead of low-level permissions. However, current access control models are all but traditional - they can be described as flexible, dynamic, adaptive, or by any similar term that a marketing team invented yesterday. Whatever are the access control models called, they all rely on dynamism: ability to control privileges automatically as a reaction to changing environments.
Even though midPoint started with role-based access control mechanism, we have always considered this to be dynamic form of RBAC. MidPoint RBAC is not fixed to static roles. Roles can be assigned and unassigned automatically and dynamically. This is a crucial element in all midPoint deployments, therefore this is the right place to describe the mechanisms.
Automatic Role Assignment in Object Template
Object templates are very flexible, they can be used for a lot of different things. Yet, there is one particular usage of object template that appears in almost every deployment. It is an ability to assign roles automatically.
The basic idea is quite simple.
When it comes to midPoint schema, an assignment is just an ordinary item.
Therefore, we can use object template mapping to populate that item with appropriate value.
When done properly, it gives us automatic assignment of roles.
Like this:
<objectTemplate>
    ...
    <item>
        <ref>assignment</ref>
        <mapping>
            ...
        </mapping>
    </item>
    ...
</objectTemplate>
The trick here is to set up the mapping properly.
The simplest case is a conditional assignment of a role.
Let’s suppose that we want to assign a Hatter role to everybody that has provided a hat size in user profile.
We already know how to do that, we can use mapping condition:
<role oid="c38a5e6e-b783-11e9-b82f-ebb94fb5b6ec">
    <name>Hatter</name>
    ...
</role><objectTemplate>
...
<item>
<ref>assignment</ref>
<mapping>
<source>
<path>extension/hatSize</path>
</source>
<expression>
<value>
<targetRef oid="c38a5e6e-b783-11e9-b82f-ebb94fb5b6ec" type="RoleType">
</value>
</expression>
<condition>
<script>
<code>hatSize as Boolean</code>
</script>
</condition>
</mapping>
</item>
...
</objectTemplate>Simple, isn’t it?
The value part in the expression is a content of a new assignment that we want to create.
The assignment will be created when hatSize property has a non-null, non-empty and non-zero value (that is a built-in evaluation of booleans in Groovy).
The real trick here is the relativity of mapping conditions.
Assignments are multi-valued.
We do not want to ruin all the other assignments that the user has.
We just want to add (or remove) one particular value, leaving other values untouched.
When it comes to multi-valued items, it is extremely important to know when to add a value and when to remove one.
Therefore, midPoint evaluates the condition twice.
The condition is evaluated for an object before a change is applied (old object) first.
The condition is evaluated for an object after the change is applied (new object) once again.
When the condition changes from false to true, Hatter role is assigned (added).
When the condition changes from true to false, Hatter role is unassigned (removed).
Other assignment values are not changed by this mapping.
Therefore, many assignment mappings can happily coexist.
However, this is a very simple case. Typical midPoint deployments have large number of roles. It is (theoretically) possible to create mappings like this for each and every role that has to be assigned automatically. However, that would be a lot of repetitive work. Even worse, it is likely to become a major maintenance nightmare in the future. We engineers are creative people, we do not really like repetitive work - and we really hate maintenance nightmares. Therefore, it is perhaps no big surprise that there is a better way to do this.
The most common use case for automatic role assignment is to look up the role using some of its properties.
For example, let’s suppose that our HR system provides job codes for our employees.
Therefore, we have extended midPoint schema with a custom property jobCode:
<xsd:schema targetNamespace="http://example.com/xml/ns/midpoint/schema">
    ...
    <xsd:complexType name="UserTypeExtensionType">
        <xsd:annotation>
            <xsd:appinfo>
                <a:extension ref="c:UserType"/>
            </xsd:appinfo>
        </xsd:annotation>
        <xsd:sequence>
            ...
            <xsd:element name="jobCode" type="xsd:string"
                         minOccurs="0" maxOccurs="1"/>

            ...
        </xsd:sequence>
    </xsd:complexType>
</xsd:schema>
A user object that is created from an HR record looks like this:
<user>
    <name>jones</name>
    <extension>
        <exmpl:jobCode>S007</exmpl:jobCode>
    </extension>
    <fullName>Jack Jones</fullName>
    ...
</user>
Then we do similar extension for roles.
We extend role schema with custom autoassignJobCode property:
<xsd:schema targetNamespace="http://example.com/xml/ns/midpoint/schema">
    ...
    <xsd:complexType name="RoleTypeExtensionType">
        <xsd:annotation>
            <xsd:appinfo>
                <a:extension ref="c:RoleType"/>
            </xsd:appinfo>
        </xsd:annotation>
        <xsd:sequence>
            ...
            <xsd:element name="autoassignJobCode" type="xsd:string"
                         minOccurs="0" maxOccurs="1"/>

            ...
        </xsd:sequence>
    </xsd:complexType>
</xsd:schema>
Then we set up the roles:
<role oid="a1572de4-b9b9-11e9-af3e-5f68b3207f97">
    <name>Sales Manager</name>
    <extension>
        <exmpl:autoassignJobCode>S006</exmpl:autoassignJobCode>
    </extension>
    ...
</role>
<role oid="b93af850-b9b9-11e9-8c2c-dfb9a89635a0">
<name>Sales Agent</name>
<extension>
<exmpl:autoassignJobCode>S007</exmpl:autoassignJobCode>
</extension>
...
</role><role oid="b9d2b604-b9b9-11e9-bbc4-17d8e85623b4">
<name>Sales Assistant</name>
<extension>
<exmpl:autoassignJobCode>S008</exmpl:autoassignJobCode>
</extension>
...
</role>We are almost there.
The final part of this puzzle is an object template mapping that automatically assigns the roles according to job code.
Naive solution would be to create one mapping for each job code.
We do not want that, we want something smarter.
We want a single mapping that can work for all these roles.
Such mapping needs to dynamically look up the role when it is evaluated.
Of course, it is possible to create such mapping in Groovy script.
However, that is not entirely straightforward.
As this use case is a very common one, there is quite an easy method to do that in midPoint.
Role autoassignment is a part of almost every identity management solution in one form or another.
Therefore, we have created a special expression evaluator to make this job easy.
Enter assignmentTargetSearch:
<objectTemplate>
    ...
    <item>
        <ref>assignment</ref>
        <mapping>
            <source>
                <path>extension/jobCode</path>
            </source>
            <expression>
                <assignmentTargetSearch>
                    <targetType>RoleType</targetType>
                    <filter>
                        <q:text>extension/autoassignJobCode = $jobCode</q:text>
                    </filter>
                </assignmentTargetSearch>
            </expression>
        </mapping>
    </item>
    ...
</objectTemplate>
This may look a bit confusing at the first sight, but do not panic.
Not yet, anyway.
It all makes perfect sense once it is explained.
The code above is a part of user template.
It is a mapping that is producing assignments.
This mapping has an ordinary source which is user’s jobCode property.
This mapping also has an expression, even though that expression is somehow extraordinary.
It is not the usual script, path or value expression.
The expression evaluator is assignmentTargetSearch in this case.
This is a special evaluator that looks for assignment target (e.g. a role), creates a complete assignment from that target, and provides that assignment as an output.
The interesting part here is the way how assignmentTargetSearch looks for assignment target.
First of all, there is a targetType clause, which tells the expression to look for roles as assignment target.
Then there is a search filter.
We have already seen midPoint search filters a couple of times, for example as a method to look up connector reference.
This is yet another use for search filters.
In this case, the filter is used to look up suitable role in midPoint repository.
The filter looks up the roles by the autoassignJobCode value.
However, what value are we looking for?
Static value, such as S007, is not going to help here.
We need to make this query dynamic and smarter.
We simply use a variable instead of static value.
In this case, we use $jobCode variable.
Job code is a source for this mapping, therefore it is present as a variable in all the expressions of the mapping, including the assignmentTargetSearch expression.
When the expression is processed for Jack Jones, value S007 is substituted.
That filter is used to look for a role, which results in the Sales Agent role.
This role is used to construct an assignment with the role as its target:
<assignment>
    <targetRef oid="b93af850-b9b9-11e9-8c2c-dfb9a89635a0" type="RoleType"/>
</assignment>
That is it! That assignment is added to the user object. Which means that Jack Jones has that role assigned:
<user>
    <name>jones</name>
    <extension>
        <exmpl:jobCode>S007</exmpl:jobCode>
    </extension>
    <assignment>
        <targetRef oid="b93af850-b9b9-11e9-8c2c-dfb9a89635a0" type="RoleType"/>
    </assignment>
    <fullName>Jack Jones</fullName>
    ...
</user>
This single mapping works for all the cases of all the current job codes, and even for all future job codes. That is how we like it. One simple mapping solves many problems.
|
Why not Groovy?
Of course, this could all have been done with one smart groovy script instead of assignmentTargetSearch expression.
You are free to do it in Groovy, if you prefer it that way.
It will work.
However, as assignment is a complex data structure, the assignmentTargetSearch expression makes work with assignment much easier.
It can set up validity constraints, relation and other assignment details.
It can also create the target on demand in case the target is not found.
It is quite powerful.
Perhaps the most important detail is that assignmentTargetSearch expression implements the use cases that are common in almost every identity management deployment.
Functionality of assignmentTargetSearch expression is maintained and tested as a native part of midPoint.
Therefore, you can simply reuse it in every midPoint deployment, instead of copying, adapting, testing and bugfixing one big groovy script over and over again.
|
So far we have been talking about automatic assignment of roles.
However, the mapping works both ways.
It can automatically assign the roles, and it can also automatically unassign them.
This is an effect of relativity of midPoint mappings.
When mapping input changes, midPoint knows how it was changes, as it has a delta.
Therefore, midPoint can use the mapping to compute both the values that were added as well as values that were removed.
When jobCode of Jack Jones changes from S007 to X001, midPoint evaluates the expression for both values, old and new.
Evaluation of the expression with old value S007 produces assignment for Sales Agent role.
MidPoint knows that value S007 was removed, therefore it also removes assignment of Sales Agent role from the user.
When it comes to security, automatic unassignment of roles is even more important than automatic assignment. Principle of least privilege dictates that a users should have minimal access rights necessary for conducting their duties. MidPoint autoassignment mechanism take care of that, applying a rule to assign a role when it is necessary, while also using the same rule to unassign the role when it is no longer necessary. This mechanism is one of the building block of policy-driven RBAC mechanism, a dynamic role-based access control model which is a native part of midPoint.
MidPoint automatically assigns and unassigns the roles when there is appropriate autoassignment mapping. This works very well, it even works when there are several mappings that manage roles automatically. MidPoint executes them all and merges the results. However, roles that are managed automatically may clash with roles that are managed manually. Therefore, if a mapping specifies that a role should be unassigned, midPoint unassigns that role even if the role was assigned manually. MidPoint 4.8 does not really know the difference between role that was assigned automatically and manually.
There is a mechanism that can be used to make sure that manually-assigned roles are never automatically removed. Clever use of assignment subtype together with configuration of mapping range can be used to separate assignments that are managed manually from those that are managed automatically. However, the specific configuration is not entirely simple. Luckily, future versions of midPoint bring a significant improvement. midPoint 4.9 is using value meta-data to record origin of values. Such meta-data can be used to determine whether assignment was created automatically or manually. Mappings in midPoint 4.9 are set up in such a way that they would remove only the values that they themselves created, making the mechanism seamless. Therefore, if this situation is likely to occur in your deployment, it may be worth consider using midPoint 4.9.
The roles used in this section are in fact business roles, as they correspond to business responsibilities defined by job codes.
Even though the roles were not explicitly marked as business roles in the examples above, they are properly marked in the example files by applying Business role archetype.
|
Autoassignment in Roles
Automatic assignment of roles in the object template is not the only option. This is midPoint, therefore there are usually several ways to do the same thing. The statements that control automatic assignment of roles can be placed in the roles themselves:
<role oid="9f6add7c-b9bf-11e9-abf6-2348fcd328f1">
    <name>Cook</name>
    ...
    <autoassign>
        <enabled>true</enabled>
        <focus>
            <mapping>
                <source>
                    <path>locality</path>
                </source>
                <condition>
                    <script>
                        <code>
                            locality?.norm == 'kitchen'
                        </code>
                    </script>
                </condition>
            </mapping>
        </focus>
    </autoassign>
</role>
The mapping in the autoassign part of the role is evaluated approximately at the same time as other object template mappings.
The mapping has no expression.
There is no need to.
MidPoint prepares complete assignment data structure for this mapping as an input.
The mapping just has to decide whether to apply that assignment to the user.
That is what the condition is for.
When the condition evaluates to true, the role is automatically assigned.
When it evaluates to false, the role is unassigned.
| The expression in this mapping is optional. If an expression is specified, then such expression can be used to further set up the assignment. For example, it can set assignment activation, relation, parameters and so on. |
But wait, why is there this strange norm thing in the condition?
Remember about polystrings?
The locality property is a polystring.
Therefore, it has orig part and norm part.
In this case we want to compare the norm part, as the organizational unit name may be spelled as Kitchen or KITCHEN.
However, in all those cases, the norm part will be kitchen.
If fact, there is little trap for the unwary here. The obvious way to specify the expression would be like this:
locality == 'kitchen' // This is wrong!However, such expression always returns false.
The reason is that different data types are being compared.
The locality property is polystring, while ‘kitchen’ is a string literal.
Polystring and string are never equal regardless for their content.
Therefore, this form of the expression is wrong.
Following forms may be used instead:
locality?.orig == 'Kitchen'
locality?.norm == 'kitchen'
basic.stringify(locality) == 'Kitchen'
The later form is using stringify() method from basic midPoint function library.
This method converts everything to string.
Whatever data type is passed to this method the result is always a string that can be safely compared.
Let’s get back to role autoassignment. When autoassign mappings are specified in the roles, midPoint is processing the mappings in a way that is very similar to object template mappings. This has benefits, but there are also drawbacks.
The benefit of role autoassignment is manageability. The conditions are stored in roles themselves. Therefore, they are bound to the object that they assign. Autoassignment rule is right there, in front of administrator’s eyes. It may also be a benefit if delegated administration is used. E.g. a role owner manages both role definition and the autoassignment condition in the same object. In that case, this encapsulation of autoassignment rule in role definition is a huge benefit.
|
Beware of the expressions
Scripting expressions are very powerful.
In fact, they are way too powerful for secure delegated administration.
Unconstrained scripting expression can do pretty much anything.
It can bring down the system, read memory, modify data, it can do whatever it likes to do.
There are some safeguards that prohibit against accidental abuse, but a malevolent expression can easily circumvent them.
If you allow a user to specify any expression, you are pretty much giving away keys to the kingdom.
Therefore, do not do it.
At least not now.
MidPoint has ability to specify expression profiles.
The goal of the profiles is to constraint expression to only allow safe operations.
However, as scripting languages such as Groovy and JavaScript are very flexible and powerful, it is quite difficult to constraint them to a set of safe operations.
Therefore, use scripting expression with utmost care.
|
Role autoassignment has another drawback which is performance. All the autoassignment mappings need to be evaluated every time a user is recomputed. This means that all the roles that contain the mappings need to be retrieved from midPoint repository. This may not be a big deal for a small deployment with thousands of users and hundreds of roles. However, the performance hit is likely to be significant as the number of users and roles grows. Therefore, role autoassignment is not enabled by default. It has to be explicitly enabled in system configuration:
<systemConfiguration>
    ...
    <roleManagement>
        <autoassignEnabled>true</autoassignEnabled>
    </roleManagement>
    ...
</systemConfiguration>
There is one more significant drawback of role autoassingment, which is quite obvious. The autoassignment mapping needs to be in every role. There is no way to use this mechanism to handle autoassignment of many roles with just one mapping. However, object template mappings can do that easily. Therefore, many deployments chose to implement automatic assignment of roles by the means of object template or inbound mappings.
Role autoassignment mechanism is also part of midpoint dynamic role-based access control mechanism, the policy-based RBAC. As such, autoassignment is an essential tool in midPoint access control policy toolbox.
Automatic Assignment in Synchronization
Automatic assignment of roles can be based on user properties or other complex factors, as we have seen above. However, it is far more common to assign privileges to users based on their birthright. Birthright is a term used in identity management that refers to privileges that are given to the users based on their very nature. This includes privileges given to all users, just because they are users. This can be further refined to individual user types, such as employees, students and suppliers. However, the overall principle of birthright is simple: privileges are assigned to user because the user has a specific type. It also means that the privileges are automatically removed or changed when user type changes.
When we deal with object types, archetypes immediately come to mind.
Archetypes are indeed the right answer for management of birthright permissions.
Archetypes are abstract roles, therefore they work as roles.
We need to add some inducements into Person archetype, and all the persons automatically get the privileges.
It is as simple as that.
<archetype oid="00000000-0000-0000-0000-000000000702">
    <name>Person</name>
    ...
    <inducement>
        ...
    </inducement>
</archetype>
However, how do we make sure that all users get the correct archetype? We have already seen that, back in Synchronization chapter. This can be configured in the schema handling part of resource definition.
<resource>
    ...
    <schemaHandling>
        <objectType>
            <displayName>Default Account</displayName>
            ...
            <focus>
                <type>UserType</type>
                <archetypeRef oid="00000000-0000-0000-0000-000000000702"/>
            </focus>
            ...
In this case, the objects that midPoint creates when synchronizing from HR resource are going to be users.
Moreover, the users are going to have Person archetype.
However, this is company HR systems. The users created by synchronization from this systems are no mere persons, they are employees. We would like to assign birthright privileges to all employees, privileges that other users should not have. E.g. we want all the employees to automatically have account in company LDAP server.
The best way to do that in midPoint 4.8 is to create an employee role.
<role oid="86d3b462-2334-11ea-bbac-13d84ce0a1df">
    <name>Employee</name>
    <inducement>
        <construction>
            <!-- LDAP resource -->
            <resourceRef oid="8a83b1a4-be18-11e6-ae84-7301fdab1d7c" />
        </construction>
    </inducement>
</role>
This role specifies birthright privileges for employees. In this case there is just a single construction for a default LDAP account. This is usually a good start.
Now, how do we make sure all employees have this role?
This is not an archetype, we cannot use the archetypeRef method as we have used above.
Even though we cannot use the built-in support for birthright archetypes, we can still use inbound mapping.
However, we have to use one little trick here.
We want Employee role to be assigned to all users that originate from the HR record.
Therefore, the mapping is not associated with any specific HR account attribute.
Unfortunately, midPoint inbound mapping always need to be configured for a specific attribute.
Therefore, we just choose one of the attributes that all employees have, such as empno attribute.
<resource>
    <name>HR System</name>
    ...
    <schemaHandling>
        <objectType>
            <displayName>Default Account</displayName>
            ...
            <attribute>
                <ref>empno</ref>
                <displayName>Employee number</displayName>
                <inbound>
                    <target>
                        <path>$focus/personalNumber</path>
                    </target>
                </inbound>
                <inbound>
                    <expression>
                        <value>
                            <!-- Employee role -->
                            <targetRef oid="86d3b462-2334-11ea-bbac-13d84ce0a1df" type="RoleType"/>
                        </value>
                    </expression>
                    <target>
                        <path>assignment</path>
                    </target>
                </inbound>
            </attribute>
            ...
</resource>
There are two inbound mappings for empno attribute here.
One is the regular mapping copying value of empno HR attribute to personalNumber property of the user.
The other is the mapping for Employee role.
The mapping is not using the input value of empno at all, it always produces the same assignment for Employee role.
Hence, all employees are getting that role.
|
Auxiliary archetypes
Clever user is uneasy here.
We have mentioned auxiliary archetypes before.
They look like an ideal concept for managing birthright privileges.
Indeed, they are ideal for that purpose - or rather almost ideal, at least in midPoint 4.8.
Support for auxiliary archetypes is quite limited in midPoint 4.8, especially support for management of auxiliary archetypes in midPoint user interface.
That is one thing that will certainly get improved in future midPoint versions.
Adventurous users may try to use auxiliary archetypes instead of birthright roles, especially in cases where user interface is not essential.
However, for general-purpose deployment, use of birthright roles is still recommended.
|
Generating Unique Identifiers
There are some use cases that pop out in identity management solutions all the time.
One such case is the problem of finding a unique identifier.
This is a concern for almost any type of identifier, but it is particularly painful when it comes to usernames.
In midPoint world, this means finding a value for name property.
This property must be unique for almost all the data types that midPoint supports.
The rational way would be to base usernames on something that is already unique and immutable such as employee numbers or student identifiers.
However, those tend to be long numbers, and people often hate them.
Therefore, many deployments chose to base usernames on real names of the user.
We can easily generate username for Alice Anderson.
Maybe aanderson would be a good fit?
It is nice, easy to remember and reasonably unique.
We can do that with a simple object template mapping:
<objectTemplate>
    ...
    <item>
        <ref>name</ref>
        <mapping>
            <source>
                <path>givenName</path>
            </source>
            <source>
                <path>familyName</path>
            </source>
            <expression>
                <script>
                   <code>
                       givenName?.norm[0] + familyName?.norm
                   </code>
                </script>
            </expression>
        </mapping>
    </item>
    ...
</objectTemplate>
This can indeed work quite well - until Albert Anderson is hired.
Then we need to get creative.
Obviously, alanderson will not work here.
What about alianderson and albanderson?
Oh no, we have this ancient application in our company.
That application allows only ten characters in the username, and alianderson is just too long.
What is even worse, we would need to change Alice’s username for this to work.
She will get really mad about it.
Not to mention that if we go on with this scheme, we may need to change usernames for pretty much everybody, eventually.
That won’t do.
Let’s go the usual way.
Let’s have aanderson and aanderson1.
It is not entirely elegant, but it will do the job.
Even better, Alice will not get mad.
You know, she is really scary when she gets mad.
This use case is so common that even very early midPoint versions supported it.
This feature is called iteration in midPoint terminology.
The name suggests how the mechanism works.
First step is an attempt to create a user object in a perfectly normal way.
This means that username aanderson is generated for Albert Anderson.
Then midPoint checks if that username is unique.
In this case the username is not unique, as it is already taken by Alice.
That is the point when midPoint starts iterating.
MidPoint creates iteration token.
Iteration token is a short string that changes in every iteration.
In our case, the iteration token is initially set to 1.
Then midPoint re-evaluates all the object template mappings.
Mappings that are supposed to create unique values need to use that token.
They should look like this:
<objectTemplate>
    ...
    <item>
        <ref>name</ref>
        <mapping>
            <source>
                <path>givenName</path>
            </source>
            <source>
                <path>familyName</path>
            </source>
            <expression>
                <script>
                   <code>
                       givenName?.norm[0] + familyName?.norm + iterationToken
                   </code>
                </script>
            </expression>
        </mapping>
    </item>
    ...
</objectTemplate>
When this mapping is evaluated for the first time, the iteration token is empty.
Therefore, it will make no difference for the normal processing.
When the mappings are re-iterated, the token is set to 1.
Result of this mapping is aanderson1, which is unique username.
Therefore, iteration stops there and normal processing continues.
In case that even aanderson1 is not unique, the iteration continues.
Usernames aanderson2, aanderson3 and other variants are tried.
The iteration continues until a unique username is found, or until iteration limit is reached.
The expression to generate name as provided above is nice and simple.
However, reality is not that simple.
There are going to be users without given names or family names.
Using the script above would produce some ugly null strings in that case.
Some systems allow only certain number of characters in username.
Real-world script has to account for that, generating more sensible usernames.
Also, there is administrator user, which we usually do not want to rename.
More sophisticated version of the script is already part of Person Object Template in default midPoint installation.
|
Iteration functionality is disabled by default.
Therefore, any conflict in username will result in hard error.
This makes sense, as no amount of iterations will make any difference until the iteration token is used in the expressions.
We also want to set maximum number of iterations.
E.g. there may be a bug in the mappings that may cause endless iterations.
The iteration functionality can be enabled by specifying iterationSpecification element and setting iteration limit:
<objectTemplate>
    ...
    <iterationSpecification>
        <maxIterations>5</maxIterations>
    </iterationSpecification>
    ...
</objectTemplate>
Iteration tokens are strings that are created from iteration number. It is the iteration number that really matters for midPoint. Iteration token can take variety of forms, it can be numeric, it may be alphanumeric, fixed length, variable length or anything else. Some mappings will not use the token at all. E.g. mappings that subsequently add letters from given name to the username. Therefore, both iteration number and iteration token are exposed to the mappings. There are two variables:
-
iterationvariable contains iteration number in an integer form. It is always numeric, starting with zero (0). Iteration zero means normal processing. Iteration one happens after the first conflict. -
iterationTokenvariable contains a string that is derived from the iteration number.
There is default algorithm that derives iteration tokens from iteration number. The algorithm is illustrated in following table.
| Iteration | The value of iteration variable |
The value of iterationToken variable |
|---|---|---|
Normal processing |
|
|
First iteration |
|
|
Second iteration |
|
|
The algorithm is designed to put empty value in the iterationToken during normal processing.
The idea is that iterationToken variable can be safely used both for the normal processing and for the iterations.
This is just a default algorithm, and it is certainly not going to fit all the deployments.
Therefore, a custom mechanism to derive iteration token can be specified.
For example, we may not like to have aanderson and aanderson1.
Which one of these is number one and which is number two anyway?
Let’s skip aanderson1 and let’s use aanderson2 for the first iteration.
The iteration number cannot be changed as the iteration sequence is fixed.
However, there is no problem for iteration 1 to produce iteration token "2".
This can be achieved by specifying a custom algorithm for the token:
<objectTemplate>
    ...
    <iterationSpecification>
        <maxIterations>5</maxIterations>
        <tokenExpression>
            <script>
                <code>
                    if (iteration == 0) {
                        return ''
                    } else {
                        return iteration + 1
                    }
                </code>
            </script>
        </tokenExpression>
    </iterationSpecification>
    ...
</objectTemplate>
This algorithm will produce sequence of aanderson, aanderson2, aanderson3 and so on.
Iteration number and iteration token is the same for the entire object template. All the mappings see the same value and all the mappings are recomputed when there is a need to re-iterate. Therefore, iteration token is not limited to username, it can be used in other mappings too. For example, use of the token in e-mail address is a very common case:
<objectTemplate>
    ...
    <item>
        <ref>emailAddress</ref>
        <mapping>
            <source>
                <path>givenName</path>
            </source>
            <source>
                <path>familyName</path>
            </source>
            <expression>
                <script>
                   <code>
                       givenName?.norm + '.' + familyName?.norm
                           + iterationToken + '@example.com'
                   </code>
                </script>
            </expression>
        </mapping>
    </item>
    ...
</objectTemplate>
This mapping produces a sequence of albert.anderson@example.com, albert.anderson2@example.com, albert.anderson3@example.com and so on (assuming that customized token expression is also applied).
Shared value of iterationToken means that the values of e-mail address are consistent with the values of username.
If username of aanderson2 is generated, then the e-mail address is albert.anderson2@example.com.
The same iteration token is used.
However, it all becomes interesting when it comes to e-mail addresses and other identifiers that are publicly exposed.
It is one thing to have username aanderson2.
That username is used to log into the system, but is it not very visible outside the system.
However, an e-mail address is exposed to a lot of people.
It may be strange to have e-mail address of albert.anderson2@example.com, while there is no other albert.anderson@example.com in the company.
This can be solved by making the mapping for e-mail address smarter.
It can ignore the iteration token, and it may try to create an e-mail address on its own.
However, in that case it needs to explicitly check for uniqueness.
There are two ways to do that.
First method is to check for e-mail address uniqueness inside the e-mail mapping.
There is a isUniquePropertyValue(…) method in midPoint function library that is designed for this purpose:
<objectTemplate>
    ...
    <item>
        <ref>name</ref>
        <mapping>
            <source>
                <path>givenName</path>
            </source>
            <source>
                <path>familyName</path>
            </source>
            <expression>
                <script>
                   <code>
                       def plainAddress = givenName?.norm + '.' + familyName?.norm
                                         + '@example.com'
                       if (midpoint.isUniquePropertyValue(focus, 'emailAddress',
                                         plainAddress)) {
                           // Bingo! We have unique address
                       } else {
                           // Address not unique.
                           // We have to use iteration token here.
                       }
                   </code>
                </script>
            </expression>
        </mapping>
    </item>
    ...
</objectTemplate>
The problem with this approach is that there may be corner cases.
We might need to force another iteration even if the username is unique.
MidPoint checks only for uniqueness of username by default.
However, it is possible that even if aanderson2 username is available, the albert.anderson2@example.com address is already taken.
This may be an error in the data, administrator’s mistake, or it may be an artefact of retired Albert Anderson senior who worked in the company years ago, yet his e-mail address was never deprovisioned.
The e-mail address mapping can detect this situation.
However, what is the mapping supposed to do when it detects a problem?
It makes no sense to have username aanderson2, and e-mail address albert.anderson3@example.com or albert.anderson.X@example.com or anything similar.
What would make sense is to re-iterate and produce username aanderson3 and e-mail address albert.anderson3@example.com.
That would be nice and consistent.
However, the mapping cannot do that by itself.
Therefore, there is another iteration expression for this purpose: post-iteration condition.
It is a condition that gets executed after the iteration is completed.
If the condition returns true, then the iteration is accepted as valid, and the generated values are used.
If the condition returns false, then midPoint re-iterates and yet another iteration is tried.
<objectTemplate>
    ...
    <iterationSpecification>
        ...
        <postIterationCondition>
            <script>
                <code>
                    def email = ... // Code to generate or retrieve e-mail
                    return midpoint.isUniquePropertyValue(focus,
                            'emailAddress', email)
                </code>
            </script>
    </iterationSpecification>
    ...
</objectTemplate>
The code above does not do much in case the e-mail address is unique.
It returns true, the iteration is accepted, and everything goes as usual.
In case that the e-mail address is not unique, the code returns false.
In that case, midPoint discards all the results of the iteration, increments iteration counter and re-tries the iteration.
There is yet another mechanism that can be used here: pre-iteration condition.
It is a condition that is executed prior to iteration.
If it returns true, then the iteration continues.
If it returns false, then midPoint immediately re-iterates.
The difference here is that this condition is executed before all the other mappings are evaluated.
Therefore, it may be used to avoid evaluation of expensive mappings just to discard the values that they produce.
|
Identifier uniqueness and consistency
Finding identifier values and uniqueness checks are messy stuff.
They are not entirely reliable.
There is a delay between the time when uniqueness is checked and the time when the record is actually written into database.
Therefore, strange things can happen.
Duplicate identifiers may be generated or attempt to create a user may end up with an error, especially under high loads.
The delay between check and write cannot be entirely avoided.
We could lock the data during that time, but that would have significant impact on system performance.
What we can do to improve the situation is to check the uniqueness on database level and gracefully handle the errors.
This is currently implemented only for usernames and even for that the implementation is not perfect.
Implementation of strict uniqueness constraints for other properties is possible, but it is no easy endeavor.
The values need to be normalized, this can influence database schema and so on.
Nevertheless, it is still feasible.
In case you are interested, midPoint platform subscription is the best approach for you.
|
When it comes to human-friendly identifiers, there is yet another trouble.
People tend to change their minds.
They also like to have all kinds of crazy ideas, such as the urge to get married.
The result is that the names of people change.
In fact, they change surprisingly often.
When user-friendly identifiers are used, change in user’s name usually means a change in the identifiers.
This is known as the rename problem, and you can observe a glimpse of fear in the eyes of all experienced identity management engineers every time it is mentioned.
Overall, midPoint handles renames very well.
Primary identifier of any midPoint object is an OID, not a name.
OIDs do not change.
Therefore, as long as midPoint is concerned, nothing special happens when user’s name is changed.
The change is picked up by mappings, recomputed and stored.
However, iterations and uniqueness checks may complicate the things here.
MidPoint remembers the iteration number for all objects that went through an iteration process.
This is necessary to get the same results from the mappings every time that they are recomputed.
Otherwise the identifiers may get re-generated on every recompute.
However, there is a drawback to this approach.
Let’s suppose that Carol Cooper had username ccooper2.
She got married and now her name is Carol Cunningham.
Even though there is no ccunningham in the system, her generated username will be ccunningham2.
The iteration token is remembered and re-used during the rename process.
The rename scenarios can be very treacherous.
We always recommend to test them thoroughly in any project where user renames are possible.
Another drawback of those iterating algorithms is scalability and performance.
Every time there is a conflict, the algorithm need to go through all the iterations that correspond to all the taken usernames.
How many people named John Smith can be in a large user population?
We can easily get to jsmith42.
This means that the next John Smith needs to go through 42 iterations before the system figures out that the next available username is jsmith43.
This gets worse with every John Smith added to the system.
Therefore, this iterative approach is not suitable for generating identifiers that are likely to require a lot of iterations.
Generating UNIX user and group numbers is a good example for identifiers that would surely cause a disaster if an iterative approach is used.
Fortunately, there is another mechanism in midPoint that can support generation of such identifiers: sequences.
More on that later.
Overall, the best strategy is to avoid using those generated human-friendly identifiers altogether. The best choice would be something that is already unique, immutable and reasonably short. Something like employee number, student identifier or partner ID are usually suitable. If that is not acceptable, then the second-best approach is to keep the algorithms simple. The simpler it is the less likely it is to fail.
Combining the Ingredients
It is time to put all the bits and pieces together. So far we have been talking about provisioning, inbound synchronization, schema, RBAC, archetypes and object templates. Let’s see how all the parts fit together:
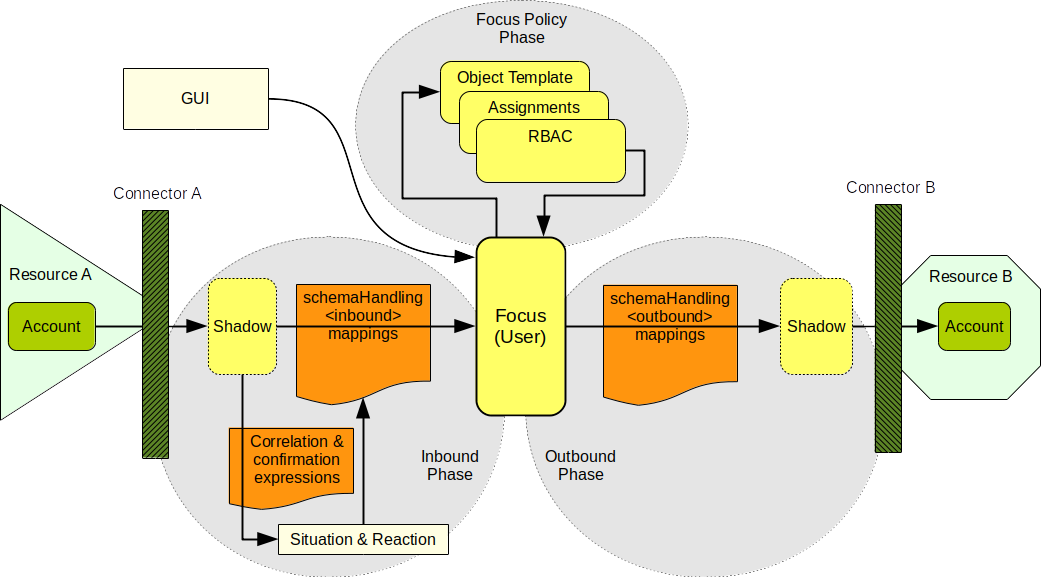
Everything starts with a synchronization process, whether it is reconciliation or live synchronization.
Synchronization process invokes the connector for the source resource (Resource A).
The connector retrieves the data from the source system.
Shadow objects are created for all the source accounts as soon as the data set foot in midPoint.
Correlation is evaluated for all new accounts to find their owners.
Once we have owner of the account, we can execute inbound mappings.
This is the way how account data are reflected to midPoint user object, which is a focus of the computation.
Next couple of steps is all about the focus. This is the part where object templates are executed, assignments and roles are evaluated. Assignments and roles may contain construction statements. Those statements are just collected at this stage. They are not evaluated yet. This focus policy phase of computation is all about the focus. Which means that user object is both the input and output of this computation.
Outbound phase takes place next.
In this phase, the focus of the computation (user) is projected to accounts.
This is the time when constructions are processed and the mappings inside them are evaluated.
Those constructions were collected from the assignments in the previous phase.
They are combined with outbound mappings specified in resource schema handling.
All of that is mixed together, sorted to resource accounts, all the values are computed.
This is also the time when attribute-level reconciliation takes place.
We know what attributes the account should have, therefore we can compare that with the values that the attributes have in reality.
When all of that is computed and processed, then a connector is used to update the target resource (Resource B).
This picture is still not entirely complete. It does not show policy rules, existence mappings, approval processes, hooks and good deal of other advanced features. Yet, this picture is good enough for now. It is good enough to create a simple, yet complete solution.
Complete Deployment Example
We have all that we need to create a simple but mostly complete identity management solution. Our environment and solution outline:
-
HR system is a data input. It exports employee data into a CSV file. Employee number is a primary key, there are first and last names and job code. There is no username or password.
-
We need to feed employee data into midPoint. Which means that we need to configure synchronization.
-
We need to generate unique and user-friendly username, compute full name and generate a random initial password.
-
We need to automatically assign roles based on job code from the HR system.
-
We need to automatically provision account to LDAP server and CRM database table.
We can do that if we put together all that we have learned so far. Even though this is still quite a simple example, the complete configuration is too large to put all of it into this book. It will take too much space. Moreover, after all the detailed explanation in the previous chapters, it would also get a bit boring. Therefore, we will show only the interesting pieces of the configuration here. Complete configuration can be found in the usual place. Please see Additional Information chapter for details. These files represent the final configuration, the expected state at the end of this chapter. Therefore, if you want to follow instructions in this chapter step-by-step, you have to choose appropriate parts of the files to import. Alternatively, you can just import everything, and use the following text as an explanation of the effects that you see.
Let us start with an HR resource.
This is mostly the same resource definition as we have seen in the Synchronization chapter.
However, there are few differences.
First of all, the data feed is a bit different.
We have a new jobcode column there.
It looks like this:
"empno","firstname","lastname","jobcode"
"001","Alice","Anderson","S006"
"002","Bob","Brown","S007"
...
Of course, the HR resource definition has to reflect those changes.
We have defined a new custom user property jobCode in our extension schema:
<xsd:schema ...>
    <xsd:complexType name="UserExtensionType">
        <xsd:annotation>
            <xsd:appinfo>
                <a:extension ref="c:UserType"/>
            </xsd:appinfo>
        </xsd:annotation>
        <xsd:sequence>
            ...
            <xsd:element name="jobCode" type="xsd:string"
                                        minOccurs="0" maxOccurs="1">
                ...
            </xsd:element>
        </xsd:sequence>
    </xsd:complexType>
    ...
</xsd:schema>
The jobcode column is mapped to jobCode extension property in HR resource inbound mapping:
<resource oid="03c3ceea-78e2-11e6-954d-dfdfa9ace0cf">
    ...
    <schemaHandling>
        <objectType>
            ...
            <attribute>
                <ref>jobcode</ref>
                <displayName>Job code</displayName>
                <inbound>
                    <target>
                        <path>$focus/extension/jobCode</path>
                    </target>
                </inbound>
            </attribute>
            ...
        </objectType>
    </schemaHandling>
    ...
</resource>
There is one more interesting inbound mapping, a mapping that automatically assigns Employee role.
All the records that come from the HR resource are employee records.
Therefore, we want to assign Employee role to all of them.
The easiest way to do that is to use inbound mapping of HR resource:
<resource oid="03c3ceea-78e2-11e6-954d-dfdfa9ace0cf">
    ...
    <schemaHandling>
        <objectType>
            ...
            <attribute>
                <ref>rempno</ref>
                ...
                <inbound>
                    <expression>
                        <value>
                            <!-- Employee role -->
                            <targetRef oid="86d3b462-2334-11ea-bbac-13d84ce0a1df"
                                       type="RoleType"/>
                        </value>
                    </expression>
                    <target>
                        <path>assignment</path>
                    </target>
                </inbound>
            </attribute>
            ...
        </objectType>
    </schemaHandling>
    ...
</resource>
This mapping is quite straightforward.
Its expression produces a static targetRef value that is placed in user’s assignment.
The strange thing here is the placement of this mapping.
It is placed in the section that corresponds to empno attribute.
This is inbound mapping, and it just has to be placed somewhere.
Any reasonable attribute would do.
It does not really matter into which attribute it is placed as it ignores attribute value anyway.
The rest of the mappings that are defined in the HR resource is a bit boring.
The interesting thing is the mapping that is not there at all.
The mapping for username (property name of the user object) is missing.
We are not generating username in the inbound phase.
We just do not have enough data to responsibly generate username just yet.
Inbound phase is still running, user object is not fully populated yet.
Let’s postpone the decision about username for later.
Synchronization part of the HR resource definition is also a pretty standard one.
This resource is an authoritative source.
Accounts are correlated by the empno column matching the personalNumber user property.
Linked accounts are updated and new users are created for unmatched accounts.
It is all the same routine as we have already described in Synchronization chapter.
Perhaps the most interesting part of this setup is object template. The template has several responsibilities:
-
Compute full name from first name and last name.
-
Generate unique username.
-
Generate e-mail address.
-
Automatically assign the roles based on job code.
All our users originating from the HR system have Person archetype.
This is quite a standard configuration, and it is a very suitable one.
We want to set up object template for users that represent persons.
We do not want the template to apply to system users, such as administrator.
Therefore, Person archetype is an ideal place to specify the template.
This configuration is so common, that this is already pre-configured in midPoint.
There is Person Object Template which is present in midPoint by default and it is already applied to Person archetype.
All we need to do is to modify that template.
Let’s start with the simple thing: generating full name. At this point this almost a no-brainer:
<objectTemplate oid="00000000-0000-0000-0000-000000000380">
    <name>Person Object Template</name>
    ...
    <item>
        <ref>fullName</ref>
        <mapping>
            <name>generate-fullname</name>
            <description>Generate fullName (enforcing on renames because of strong mapping)</description>
            <strength>strong</strength>
            <source>
                <path>givenName</path>
            </source>
            <source>
                <path>familyName</path>
            </source>
            <expression>
                <script>
                    <code>
                        basic.concatName(givenName, familyName)
                    </code>
                </script>
            </expression>
            <target>
                <path>fullName</path>
            </target>
        </mapping>
    </item>
    ...
</objectTemplate>
This is almost the same mapping as we have seen before.
However, there is one difference: concatName function is used to concatenate the names.
The concatName is quite smart, it converts all inputs to strings, it trims them, handles cases where some parts of name are null or empty - overall, it saves a lot of trouble.
Perhaps the most interesting thing about this mapping is the fact, that it is already present in Person Object Template by default.
We do not need to change anything.
Full name mapping is really simple, but it is a bit harder for username.
We want to generate a user-friendly username.
We could simply use user’s last name, but this is very likely to create conflicts.
Therefore, let’s combine last name with the first letter of first name.
That gives us nice usernames such as aanderson, bbrown and so on.
However, there is still a chance of username conflict.
So let’s add iteration tokens into the mix.
Like this:
<objectTemplate oid="00000000-0000-0000-0000-000000000380">
    <name>Person Object Template</name>
    ...
    <item>
        <ref>name</ref>
        <mapping>
            <name>generate-name-jsmith</name>
            <lifecycleState>active</lifecycleState>
            <strength>weak</strength>
            <source>
                <path>givenName</path>
            </source>
            <source>
                <path>familyName</path>
            </source>
            <expression>
                <script>
                    <code>
                        tmpGivenName = basic.trim(basic.norm(basic.stringify(givenName)))
                        tmpFamilyName  = basic.trim(basic.norm(basic.stringify(familyName)))
                        tmpGivenNameInitial = tmpGivenName?.take(1)
                        return (tmpGivenNameInitial + tmpFamilyName?.replaceAll(" ", ""))?.take(8)
                                    + iterationToken
                    </code>
                </script>
            </expression>
        </mapping>
    </item>
    ...
</objectTemplate>
This looks a bit more complicated that your have expected, doesn’t it? The basic idea is simple, so why won’t equally simple expression work? Maybe something like this?
givenName[0] + familyName + iterationTokenThe devil is, as usual, in the details.
Firstly, good part of any programming is robustness and error handling.
All the stringify and trim functions deal with inputs that are null, formatted in a wrong way (e.g. extra spaces) or wrong data types (e.g. polystring instead of string).
We are also making sure there are no spaces in username (hence the replaceAll function).
Secondly, midPoint is built with multinational environment in mind.
It is 21st century already and Unicode is everywhere.
Almost everywhere, that is.
It is expected that the HR system stores names with full national characters, such as Radovan Semančík.
Yet, it is still not a common practice to use national characters in usernames, e-mail addresses and so on.
Therefore, we usually want to normalize the national characters to their ASCII-7 equivalents.
That is what PolyString is for and that is what the norm methods are doing.
The result is that the generated username will be rsemanci instead of RSemančí.
Then there is slightly annoying issue of legacy in information technologies.
Even though it is 21st century already, some systems are still quite behind.
For example, sAMAccountName identifier in Active Directory is limited to 10 characters in length.
Therefore, we are limiting the length of username to 8 characters, leaving last two characters for the iteration token.
This is what the take(8) function does.
The bad news is that reality always finds a way to bring surprises, therefore the expressions dealing with real-wold data need to be more complicated than it is perhaps expected.
However, there is also good news - at least when it comes to username generator mapping.
The mapping above is already pre-configured in default Person Object Template in midPoint.
It is not enabled by default.
Lifecycle state of the mapping is set to draft, which effectively inactivates the mapping.
Changing the lifecycle state to active enables it, and makes it ready to be used.
However, there is still one piece missing.
We want to enable iteration to resolve naming conflicts.
Otherwise poor Albert Anderson won’t have his accounts created because aanderso username is already taken by Alice.
We can enable iterations like this:
<objectTemplate oid="00000000-0000-0000-0000-000000000380">
    <name>Person Object Template</name>
    ...
    <iterationSpecification>
        <maxIterations>99</maxIterations>
        <tokenExpression>
            <script>
                <code>
                    if (iteration == 0) {
                        return ""
                    } else {
                        return iteration + 1
                    }
                </code>
            </script>
        </tokenExpression>
    </iterationSpecification>
    ...
</objectTemplate>
The maxIteration part up there is quite straightforward.
We want to have some limit on the number of iterations as we do not want to iterate forever.
Most iteration sequences are short in practice.
If the iterative approach cannot find a match in several steps, then perhaps the iteration is not a good method anyway.
Therefore, the limit is usually not a problem.
However, having a limit makes a huge difference for troubleshooting.
Most infinite iteration loops are caused by configuration errors.
It is way much better to get an error after a couple of seconds than to wait forever.
The second part of the iteration configuration is also quite clear for people that read this chapter carefully.
The default iteration token sequence is "", "1", "2", "3" and so on.
That would give us aanderso, aanderso1, aanderso2 and so on.
We do not want to have aanderso and aanderso1 as that would be confusing.
Therefore, we chose to skip the "1" token and start with "2".
The custom iteration token expression does just that.
Similarly to the mappings, iteration specification is already part of default Person Object Template.
As soon as the above configuration is in place, we can start testing our little deployment. Go ahead and import the HR resource, import object template, set the object template in the configuration and do not forget to replace the HR CSV file. If you did any experiments with previous configuration, it can be helpful to clean up midPoint by using the "delete all identities" process (that little dropdown button in Repository objects page). When everything is set up, you can try to manually import a single account from the HR resource by using the btn:import[] button, located on the page where you can list resource accounts. Once the basic configuration works, you can test username generator by adding Albert Anderson to the HR CSV file and importing the account. Do not forget to explicitly fetch the accounts from the resource by clicking on the btn:Reload[] button on the bottom of the page. There is no synchronization task running, therefore MidPoint have not seen Albert’s account yet. You have to instruct midPoint to explicitly look at the resource. Once Albert’s account is imported, a non-conflicting username should be generated for him:
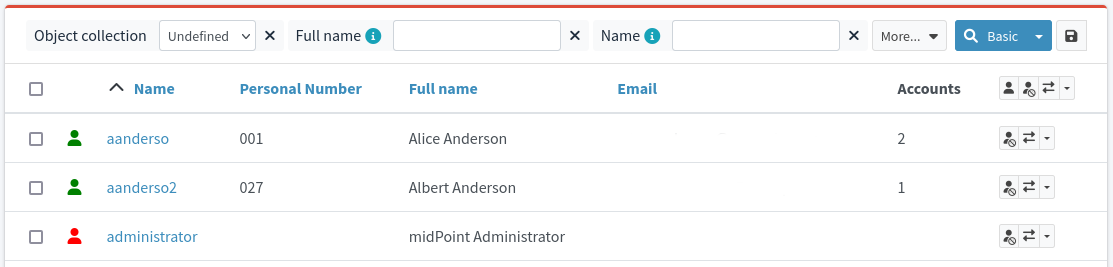
We need to generate e-mail address next. In our case, the mapping for e-mail address is a bit similar to username mapping:
<objectTemplate oid="00000000-0000-0000-0000-000000000380">
<name>Person Object Template</name>
...
<item>
<ref>emailAddress</ref>
<mapping>
<name>generate-email</name>
<strength>weak</strength>
<source>
<path>givenName</path>
</source>
<source>
<path>familyName</path>
</source>
<expression>
<script>
<code>
if ( givenName == null && familyName == null ) { return null }
if ( familyName == null ) { return givenName?.norm + iterationToken + '@example.com' }
if ( givenName == null ) { return familyName?.norm + iterationToken + '@example.com' }
givenName?.norm + '.' + familyName?.norm + iterationToken + '@example.com'
</code>
</script>
</expression>
</mapping>
</item>
...
</objectTemplate>This mapping should be quite understandable by now.
There are the same checks for special cases.
Then the main expression at the end combines given name and family name to get an e-mail address.
This is just a simple example for e-mail address that is a good fit for a book or for a simple deployment.
However, dealing with e-mail address is a bit more difficult in practice.
A clever reader can surely discover a couple of obvious issues.
Firstly, the expression is using the same iteration token than the username mapping is using.
Therefore, the e-mail address for Albert Anderson will be albert.anderson2@example.com.
This is what we get when we re-import or reconcile both Andersons:
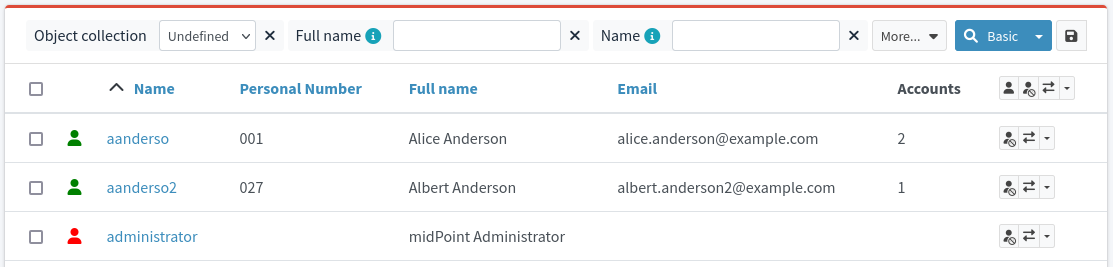
This is not exactly what we want.
Ideally, we would like to use much simpler versions albert.anderson@example.com.
In this case there is no conflict with alice.anderson@example.com.
However, midPoint does not consider e-mail address to be an identifier, therefore it does not check for its uniqueness.
Also, there is only one iteration token that is reused for all the expressions in all object template mappings.
There are also primary e-mail accounts and account aliases, dealing with account renames and temporary assignment of e-mail aliases and so on.
Overall, dealing with e-mail addresses is far from easy.
Some of those issues can be solved with pre-iteration or post-iteration conditions.
However, it is quite likely that a completely custom code will be needed for a more complex cases.
That is also one of the reasons to set strength of this mapping to weak. We want to set an e-mail address automatically, but only in case that an address was not already specified manually. Weak mapping does not overwrite existing value. Sometimes it is best not to automate everything, leave the complex cases to system administrators to deal with.
Similarly to the full name and username mappings, the mapping for e-mail address is also part of Person Object Template by default.
Role autoassignment is the next step.
We are going to handle role autoassignment based on job code using the object template method described above.
Our object template works with user object both as input and output.
It cannot (or rather should not) reach out to the HR account to get the value of jobcode attribute.
We have to do that the other way around.
We have to map HR account attribute jobcode to midPoint user property jobCode by using an inbound mapping:
<resource oid="03c3ceea-78e2-11e6-954d-dfdfa9ace0cf">
    <name>HR System</name>
    ...
    <schemaHandling>
        <objectType>
            ...
            <attribute>
                <ref>jobcode</ref>
                <inbound>
                    <target>
                        <path>$focus/extension/jobCode</path>
                    </target>
                </inbound>
            </attribute>
            ...
        </objectType>
    </schemaHandling>
    ...
</resource>
As the job code is synchronized to user, we can easily use it in object template mapping now:
<objectTemplate oid="00000000-0000-0000-0000-000000000380">
    <name>Person Object Template</name>
    ...
    <item>
        <ref>assignment</ref>
        <mapping>
            <name>autoassign-jobcode</name>
            <strength>strong</strength>
            <source>
                <path>extension/jobCode</path>
            </source>
            <expression>
                <assignmentTargetSearch>
                    <targetType>RoleType</targetType>
                    <filter>
                        <q:text>extension/autoassignJobCode = $jobCode</q:text>
                    </filter>
                </assignmentTargetSearch>
            </expression>
        </mapping>
    </item>
    ...
</objectTemplate>
This is the same principle as we have used earlier in this chapter.
The mapping is using assignmentTargetSearch expression to look for roles where user’s jobCode and role’s autoassignJobCode match.
This mapping is strong, as we want to recompute the mapping and set the value all the times.
If the mapping would be normal-strength, then the values are recomputed only when jobCode changes.
Which actually might be enough during normal operation of the system.
However, making this mapping strong makes things much easier during testing.
That is all that we need to do for the mapping.
Now we need to prepare the roles for this mapping to work with.
We need to extend role schema first:
<xsd:schema ...>
    ...
    <xsd:complexType name="RoleExtensionType">
        <xsd:annotation>
            <xsd:appinfo>
                <a:extension ref="c:RoleType"/>
            </xsd:appinfo>
        </xsd:annotation>
        <xsd:sequence>
            <xsd:element name="autoassignJobCode" type="xsd:string"
                                                  minOccurs="0" maxOccurs="1">
                ...
            </xsd:element>
        </xsd:sequence>
    </xsd:complexType>
    ...
</xsd:schema>
Then we need a couple of roles with job codes in their extension:
<role oid="a1572de4-b9b9-11e9-af3e-5f68b3207f97">
    <name>Sales Manager</name>
    <extension>
        <exmpl:autoassignJobCode>S006</exmpl:autoassignJobCode>
    </extension>
    ...
</role><role oid="b93af850-b9b9-11e9-8c2c-dfb9a89635a0">
<name>Sales Agent</name>
<extension>
<exmpl:autoassignJobCode>S007</exmpl:autoassignJobCode>
</extension>
...
</role><role oid="b9d2b604-b9b9-11e9-bbc4-17d8e85623b4">
<name>Sales Assistant</name>
<extension>
<exmpl:autoassignJobCode>S008</exmpl:autoassignJobCode>
</extension>
...
</role>That is all the configuration needed for autoassignment to work.
The roles should be automatically assigned to users when the users are recomputed.
Just make sure that the users have their jobCode properly set in the user object.
If they do not have it, then re-import them from the HR resource or run a reconciliation task.
Then go ahead and create some more roles for the missing job codes.
The mappings do not need to be changed at all to support more job codes.
Just create new roles and recompute.
That is the beauty of this solution - it is so easy to maintain.
So far we have tackled the inbound phase and focus policy phase. However, we have not talked about the outbound (provisioning) phase much. Now it is the right time to have a look at that.
We are going to reuse the LDAP and CRM resources from previous chapters.
Those resources are used here in a pretty much unchanged form.
There is no need to change them.
Outbound mappings in the resource definitions specify the basic framework of the account.
The key to provisioning flexibility is usually not in the resource definition, it is in the roles.
Let’s start in the simplest way possible - with the Employee role.
ExAmPLE company policy states that every employee should have a very basic LDAP account.
Therefore, all we need is a very simple LDAP account construction that we place into an inducement in the Employee role:
<role oid="86d3b462-2334-11ea-bbac-13d84ce0a1df">
    <name>Employee</name>
    <inducement>
        <construction>
            <!-- OpenLDAP -->
            <resourceRef oid="8a83b1a4-be18-11e6-ae84-7301fdab1d7c" />
            <!-- just basic account. Nothing special here. -->
        </construction>
    </inducement>
</role>
All employees get this role, by the means of inbound mapping defined for HR resource. Therefore, all employees automatically get basic LDAP account. It is as simple as that. Put the construction in the role, reconcile the HR resource or just recompute the users, then LDAP accounts are created for all employees.
We want something a bit more fancy next. Salespeople tend to be a bit sensitive when it comes to their professional image. Therefore, they insist on having proper titles set up in company directory. Not a problem. We can do that easily in their "job" roles. This is how it looks like for a sales manager:
<role oid="a1572de4-b9b9-11e9-af3e-5f68b3207f97">
    <name>Sales Manager</name>
    ...
    <inducement>
        <construction>
            <!-- OpenLDAP -->
            <resourceRef oid="8a83b1a4-be18-11e6-ae84-7301fdab1d7c" />
            <attribute>
                <ref>title</ref>
                <outbound>
                    <expression>
                        <value>Sales Manager</value>
                    </expression>
                </outbound>
            </attribute>
        </construction>
    </inducement>
</role>
This construction refers to the same account as the Employee role.
MidPoint knows that, therefore it does not attempt to create a new account.
It just updates existing account with appropriate title.
However, we are not done yet.
We need to provide access to CRM system for the salespeople.
Should we create a new role for that?
Absolutely not.
We do not want to have too many roles as every role is a maintenance burden.
Let’s just add new construction to an existing job role:
<role oid="a1572de4-b9b9-11e9-af3e-5f68b3207f97">
    <name>Sales Manager</name>
    ...
    <inducement>
        <construction>
            <!-- OpenLDAP -->
            ...
        </construction>
    </inducement>
    <inducement>
        <construction>
            <!-- CRM -->
            <resourceRef oid="04afeda6-394b-11e6-8cbe-abf7ff430056" />
            <attribute>
                <ref>accesslevel</ref>
                <outbound>
                    <expression>
                        <value>MANAGER</value>
                    </expression>
                </outbound>
            </attribute>
        </construction>
    </inducement>
</role>
This is a role that gives access to the CRM system for a sales manager.
MidPoint knows that, and it automatically creates a new CRM account when the role is assigned.
Outbound mappings from the CRM resource definition are used to set basic properties of CRM account, such as account identifiers and password.
In addition to that, the Sales Manager role sets appropriate access level to the CRM system.
Our setup is almost complete now. We have inbound synchronization, object template, roles and outbound mappings. This is the right time to test everything. Select few representative HR accounts and try to import them. Check that everything is provisioned correctly. If it works, then it is the time for roll-out. Set up a synchronization task for the HR resource, and we are done. We have running system:

Users are imported from the HR system. Roles are assigned, which can be checked by navigating to user details page and opening the Assignements tab. Accounts are provisioned according to the roles, which is the reason for variations in number of accounts for individual users. The basic stuff works now. Go ahead and try it out, add more roles and mappings, modify the configuration. Have some fun.
Even this simple identity management deployment is a huge improvement for many organizations already. However, there is still a lot of things to improve here. Maybe we want to set up a formalized organizational structure. Maybe we need delegated administration. We almost certainly want to manage groups, privileges and other entitlements. This is still just a beginning.
Conclusion
This chapter concludes one whole part of the book. If you have followed the book so far, you should be able to set up a simple working identity management deployment at this point. We have covered all the basic mechanisms: resources, mappings, roles, schema and object templates. This is a good time to stop reading and get your hands dirty. Take the examples from this book and play a bit with them. Explore the examples that come with midPoint distribution. Watch videos on Evolveum YouTube channel. Now it is time for experiments. You will surely do a lot of things that are suboptimal or even outright wrong. That does not really matter now. This is part of the learning process. If you get to dead end, just scrap everything and start over, or maybe rework everything from the ground up. MidPoint is designed for this. Evolutionary approach is deeply embedded in midPoint philosophy and design. Just go ahead, have fun, conduct experiments and explore. Such experience will help a lot when you get back and read through following chapters.
10. Organizational Structures
If life is going to exist in a Universe of this size, then the one thing it cannot afford to have is a sense of proportion.
The Restaurant At The End Of The Universe
Organizations come in all shapes and sizes. Unless your organization is extremely unusual, there is always some form of recognizable internal structure. There may be the usual corporate divisions, departments and sections. Perhaps there are dynamic teams, projects, work groups and task forces. One way or another, some kind of organizational structure is always there, and it matters. While many organizational structures are quite far from the ideal, organizational structure is seldom completely useless. Membership in some organizational units is a reason to automatically grant privileges to users. Managers can usually access quite a wide set of data about employees in organizational units that they are managing. Team leaders and project managers often exercise elevated privileges over their teams and projects. Moreover, organizational structure is not limited to users. Roles are often organized into role catalog. Services and devices may be organized by geographical location. There are many things that need to be organized, and there are many ways to organize them.
Organizational structure affects almost every part of the identity management deployment. We have realized that in very early stages of midPoint development. Therefore, organizational structure is an integral part of midPoint functionality. It permeates almost every part of midPoint functionality. Unlike most other systems, organizational structure in midPoint is a very flexible and almost universal concept. It can be used to build functional organizational hierarchies as well as flat project-based structures. The same mechanism can be used to sort roles in a role catalog, or to manage devices by geographical location. All of those organizational structures may co-exist at the same time in the same system.
The concept of organizational structure is a very powerful one, but it is implemented by just a handful of simple components. Let us have a look at those building blocks now.
Organizational Units
Basic building blog of all organizational structures is just one simple object type. Due to the lack of poetic talent and because of critical shortage of abstract words in our dictionary, we have decided to call that object simply an org. It is a nice and short name. Org can represent any kind of organizational unit: company, division, department, section, project, team, role category, geographical location or anything else. Orgs can be used to create hierarchical structures. For example, a top-level org may represent a company. A couple of other orgs can represent divisions. Those orgs can be put "inside" the company org. Other orgs can represent departments, these can be put "inside" the division orgs. That process can be repeated until complete organizational structure is formed.
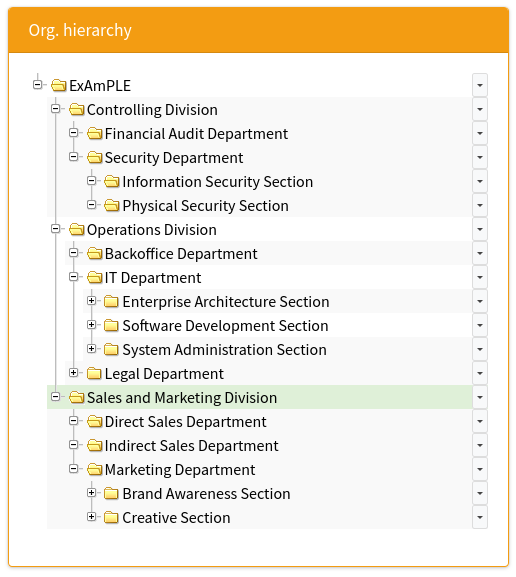
Org is quite a basic thing with a very simple anatomy:
<org oid="4d12c1ac-440c-11ea-80af-2b314d06ba95">
    <name>F10000</name>
    <displayName>ExAmPLE, Inc.</displayName>
</org>
Strictly speaking, the only two things that an org really needs are name and OID.
The example above adds displayName to make the presentation of the org nicer.
As all regular midPoint objects, a name of an org must be unique.
This often leads to a practice that org names are in fact identifiers, or that they are generated automatically.
This is also our case.
We have decided to set F1000 as the name of this org.
The value 1000 is an identifier of the company in our HR system.
As we are building a functional organizational structure of the company, we have prefixed the identifier with F which stands for functional.
However, names such as F1000 are not very friendly.
Therefore, there is a mechanism to set nicer display name that does not need to be unique.
The display name is used instead of the ordinary name whenever this org is displayed to a user.
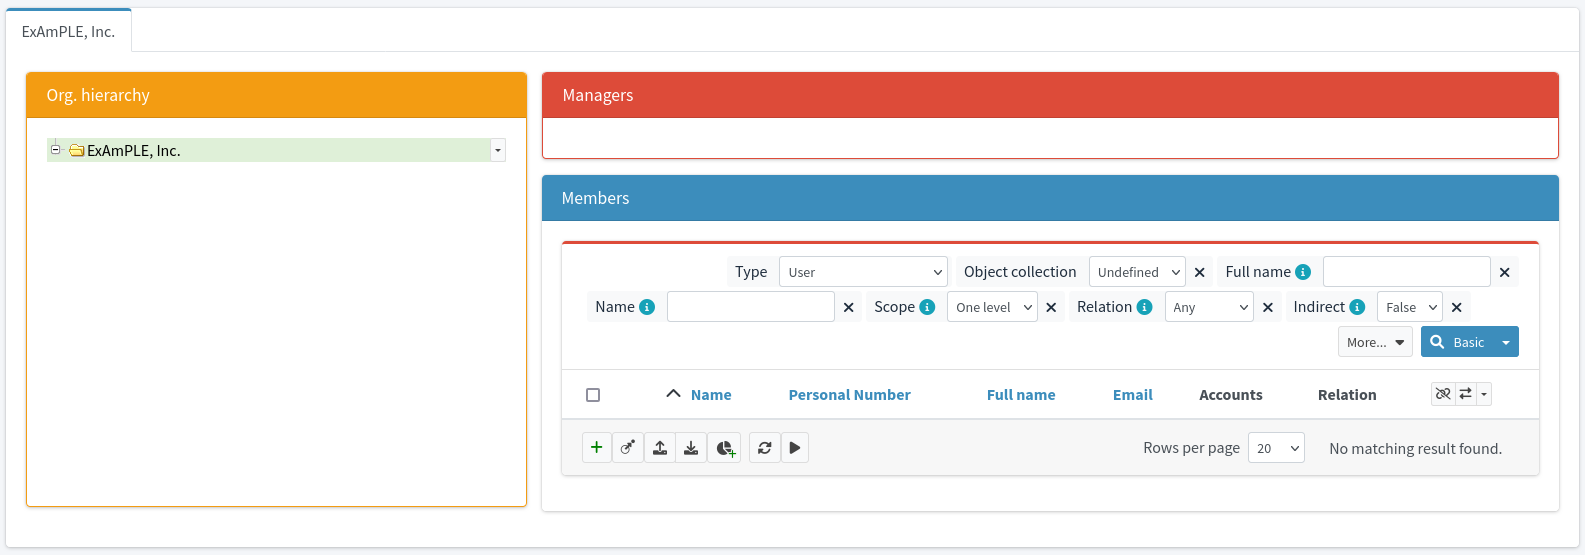
We have an organizational unit now, but how do we put users in it?
Clever reader already knows the answer: assignment.
All we need is to assign the org to a user.
This is done in almost the same way as you would assign a role, just select the Org tab in assignment dialog.
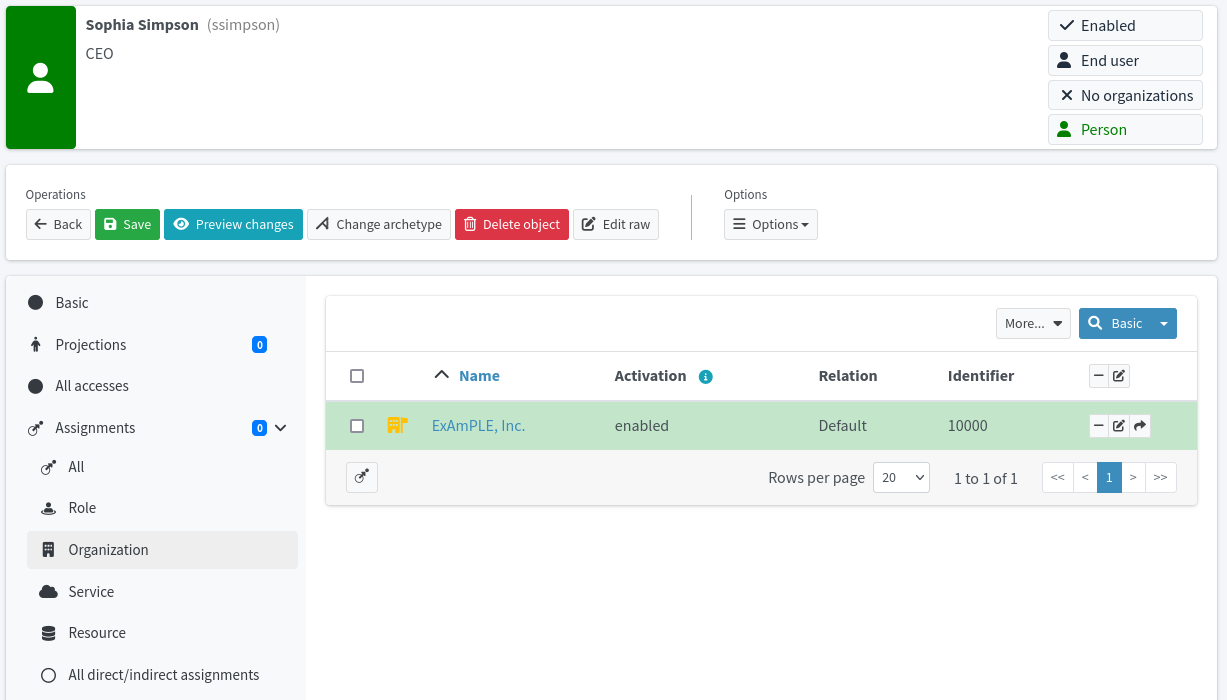
The assignment looks like this in XML form:
<user>
    <name>eevans</name>
    ...
    <assignment>
        <targetRef oid="4d12c1ac-440c-11ea-80af-2b314d06ba95" type="OrgType"/>
    </assignment>
    ...
</user>
The user is a part of our minimalistic organizational unit now:
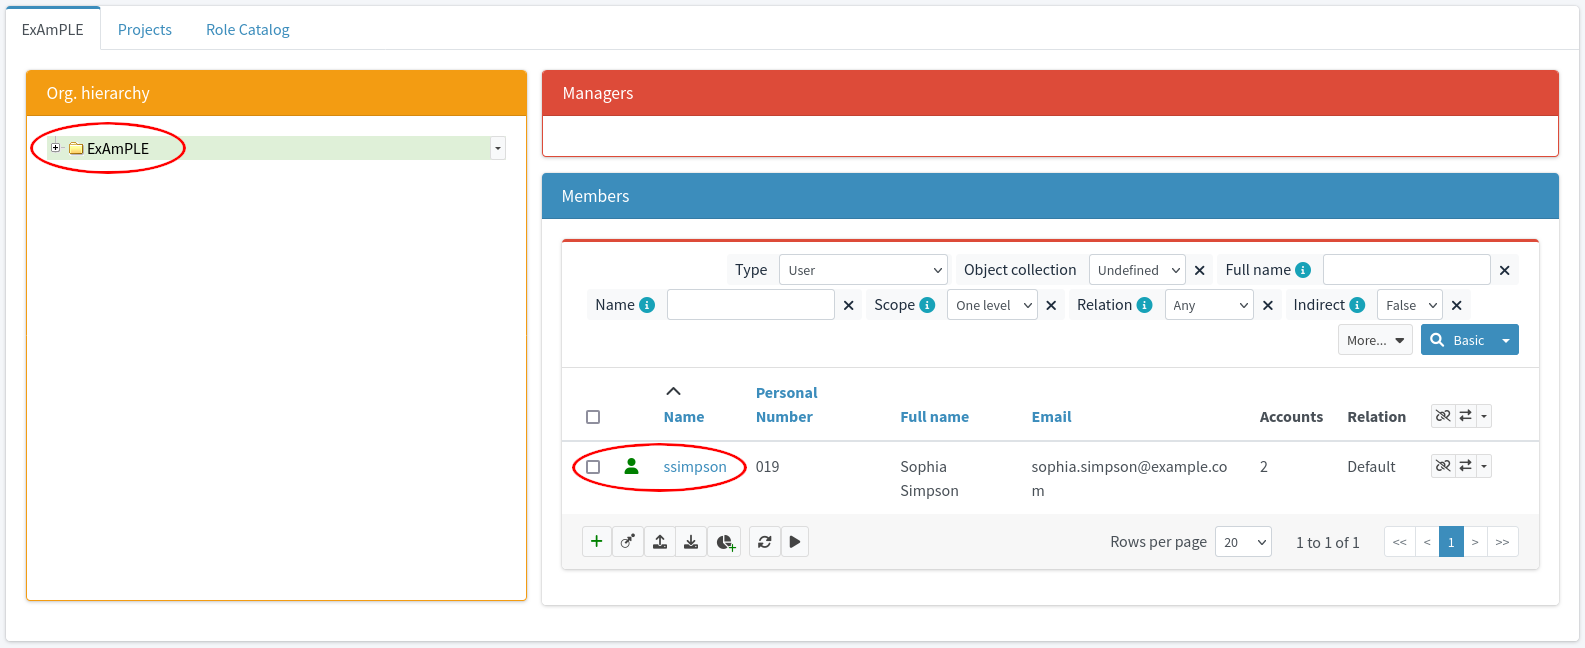
Organizational Structure Hierarchy
There is very little structure in our tiny organizational structure yet. Orgs would not be very useful, unless they can be placed inside each other, creating a hierarchy. It is this hierarchy that makes organizational structures attractive. Therefore, let us go corporate and create some hierarchy now. It is a well-known fact that all self-respecting corporations need sales and marketing division:
<org oid="7a1feb50-471f-11ea-8aab-1b2627541f15">
    <name>F11000</name>
    <description>Expensive people that make money.</description>
    <displayName>Sales and Marketing Division</displayName>
    <identifier>11000</identifier>
</org>
We have pimped up this organizational unit a little.
We have seen name and displayName before.
The description is no stranger either.
Then there is an identifier.
The value of the identifier is usually an official "code" of the organizational unit assigned by HR people.
Why do we need yet another identifier?
OID is an identifier, name is an identifier of sorts, why do we need another one?
For now, let’s just say that the identifier is going to be very useful later on, when we synchronize organizational structures.
If we import the org above into midPoint it becomes the top org. MidPoint puts it at the same level as the ExAmPLE company org. We do not want that. We want to create a hierarchy. We want to tell midPoint to put the department inside the company. How do we do that? We use an assignment, of course:
<org oid="7a1feb50-471f-11ea-8aab-1b2627541f15"
    xmlns='http://midpoint.evolveum.com/xml/ns/public/common/common-3'
       xmlns:org='http://midpoint.evolveum.com/xml/ns/public/common/org-3'>
    <name>F11000</name>
    <description>Expensive people that make money.</description>
    <displayName>Sales and Marketing Division</displayName>
    <identifier>11000</identifier>
    <assignment>
       <targetRef oid="4d12c1ac-440c-11ea-80af-2b314d06ba95" type="OrgType"/>
    </assignment>
</org>
Now we have our minimalistic hierarchy:
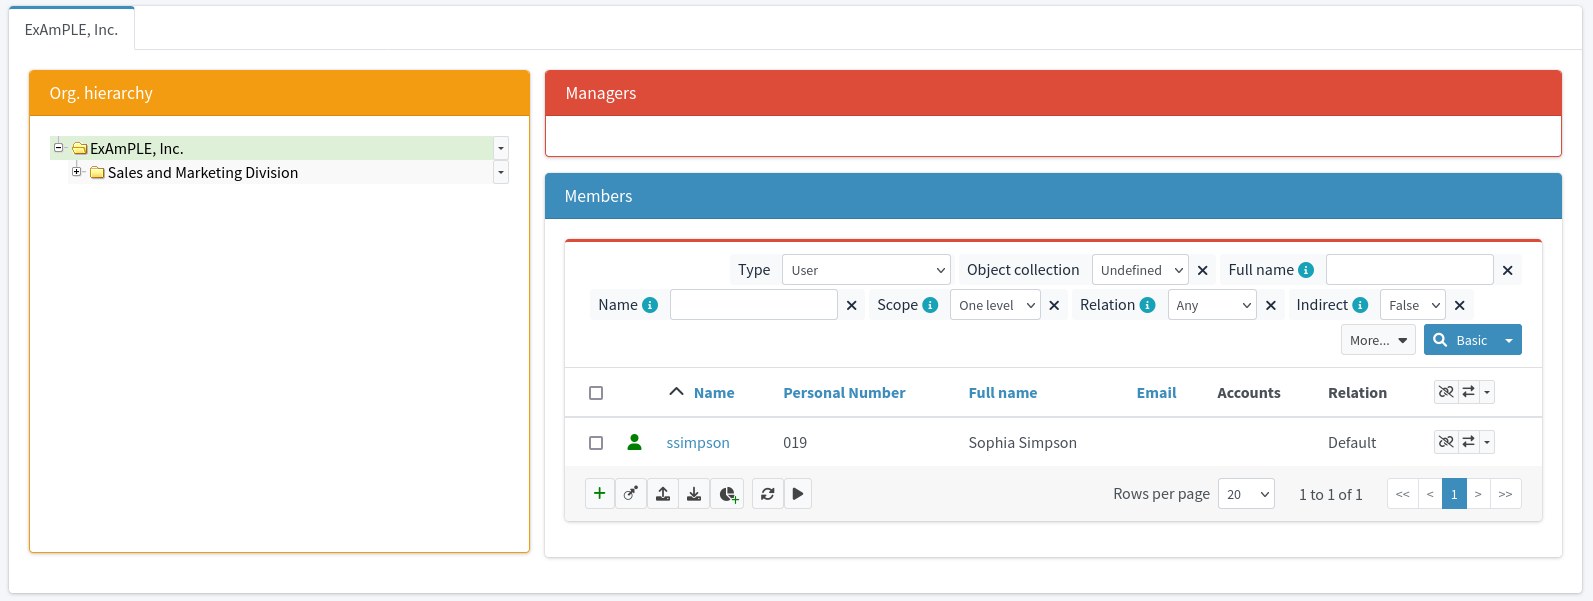
This makes perfect sense, doesn’t it? Users become part of organizational units when the units are assigned to them. Therefore, also organizational units become part of other organizational units when they are assigned to them. This principle applies to everything: roles, services, tasks, resources and other object types. Every object type that can be assignment holder can be placed in organizational structure, by assigning an organizational unit to it.
|
Assignment holders
Almost all midPoint object types are assignment holders, and therefore they can be placed into organizational structure.
Theoretically.
However, midPoint user interface has some limits.
Convenient management of the assignments is currently possible only for focal types: user, role, org and service.
Other objects can be placed in organizational structure, and they should behave up to the expectations.
However, that cannot be done by few convenient clicks in midPoint user interface
Not yet.
You have to use a different approach.
You either add the assignment manually in the XML/JSON/YAML form.
You may also try to use mappings to create the assignments automatically, or perhaps use the REST interface to do that.
Maybe it would be a good idea to send some money in the direction of midPoint development team to motivate them to add this functionality to user interface.
|
We know how to create a simple organizational hierarchy. All we need to do now is to repeat the process ad nauseam to create something that resembles real corporate organizational structure. Let us add marketing department to our division:
<org oid="a0c7d92c-4722-11ea-bc8d-d79a6cefb1bf"
    xmlns='http://midpoint.evolveum.com/xml/ns/public/common/common-3'
       xmlns:org='http://midpoint.evolveum.com/xml/ns/public/common/org-3'>
    <name>F11300</name>
    <description>Creative bunch that spends money to get more money.</description>
    <displayName>Marketing Department</displayName>
    <identifier>11300</identifier>
    <assignment>
       <targetRef oid="7a1feb50-471f-11ea-8aab-1b2627541f15" type="OrgType"/>
    </assignment>
</org>
It is the same process over and over again. However, there are so many organizational units, there are so many files to import. We like to be efficient in all the things that we do. Therefore, let’s put the entire organizational structure into a single file:
<objects>

    <!-- Functional organizational structure of ExAmPLE company -->

    <org oid="4d12c1ac-440c-11ea-80af-2b314d06ba95">
        <name>F10000</name>
        <displayName>ExAmPLE, Inc.</displayName>
    </org>

    <org oid="7a1feb50-471f-11ea-8aab-1b2627541f15">
        <name>F11000</name>
        <description>Expensive people that make money.</description>
        <displayName>Sales and Marketing Division</displayName>
        <identifier>11000</identifier>
        <assignment>
            <targetRef oid="4d12c1ac-440c-11ea-80af-2b314d06ba95" type="OrgType"/>
        </assignment>
    </org>

    ...

</objects>
It would be no big surprise to find out that laziness was a driving force behind many improvements in life, would it? Now, let us use this convenient approach to create a nice and rich corporate organizational tree:
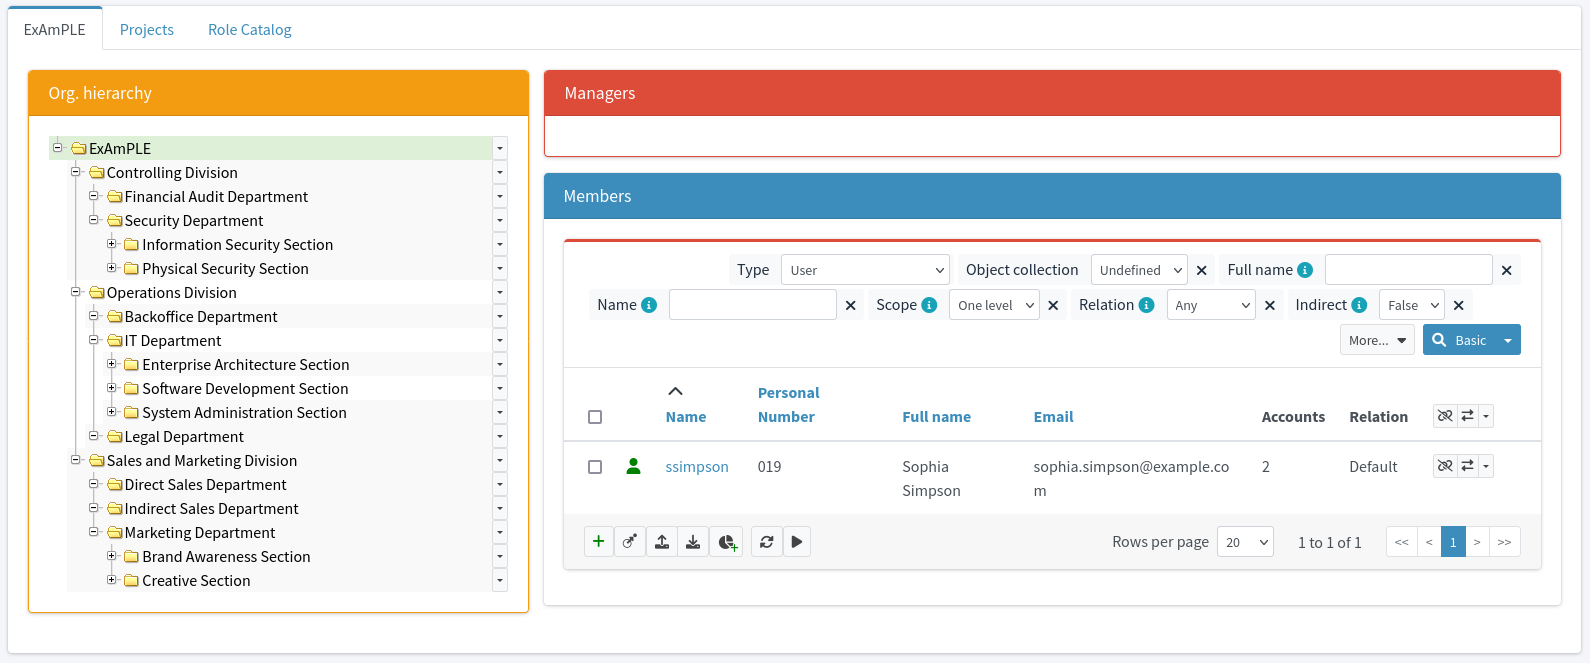
| Of course, you can create and manage organizational structure in midPoint user interface. In fact, people do that quite often. However, now we are talking about the initial organizational structure. It is the structure that gets created in midPoint at the beginning of the deployment. There is usually a lot of trial and error until you get your midPoint configuration right. It is quite likely you will have to purge all midPoint configuration and start clean. In that case, it is very convenient to have organizational structure in one file that can be easily imported after the clean-up. Also, it is a common practice to have several environments: development, testing and production. You probably want the same organizational structure in all of them. Having organizational structure in a file makes that job easy. Of course, you can also create organizational structure in the user interface and then export it into a file. However, according to our experience, many engineers prefer text editor to graphical user interfaces. |
Orgs in the Database
Organizational structures tend to form hierarchies - data structures that look like trees. However, databases are usually designed to store relational data - data structures that look like tables. If you ever tried to express hierarchical data in a spreadsheet application you know that these paradigms are not entirely easy to align. It is not entirely easy to express tree-like data structure in relational tables. Moreover, hierarchical data tend to have some specific requirements. For example, we usually want to look for people in Operations Division and all the departments and sections that belong to it. This is known as subtree searches, and it is usually not possible to execute them directly on data that are stored in relational form.
This is further complicated by the fact that midPoint assignment is a very flexible data structure. Assignments can be valid from a specific time to a specific time. Assignments can be parametric and conditional. Assignment is just too complex for the database to understand and use efficiently.
MidPoint is solving these problems with parentOrgRef operational data item.
As the name suggests, parentOrgRef is an object reference that points to parent org.
Any assignment holder in midPoint can have parentOrgRef, and it points to the org (or orgs) that the object belongs to.
This somehow duplicating the data in the assignment.
Yet, there are several crucial differences.
Firstly, parentOrgRef points to the orgs that the object is currently member of.
I.e. it only reflects those assignments that are currently active and valid.
Therefore, there will be no parentOrgRef value for assignment that is expired or not valid yet.
Secondly, parentOrgRef represents all organizational assignments, both direct and indirect.
Orgs that are directly assigned to users are present in parentOrgRef.
Orgs that are induced in a role that is assigned to the user are also present in parentOrgRef.
Everything is there.
Thirdly, parentOrgRef is a very simple data structure.
This simplicity allows efficient indexing of the parentOrgRef values in the database (repository) layer.
The indexes are designed to allow efficient subtree searches over organizational structure hierarchies.
This is our trick to fit hierarchical data into flat data tables.
The details may be a bit complicated, but it usually works quite well.
The parentOrgRef is automatically maintained by midPoint under the hood.
Therefore, its use is usually completely transparent.
The user does not even notice that there is a special mechanism working in the background.
However, there are also downsides to this approach.
The index that is build on parentOrgRef is designed to work even if organizational structure is re-organized.
The index has to be continually maintained.
Maintenance overhead of the index is usually very low for small or mid-sized structures that do not change often.
However, maintenance of massive organizational structures can be painful.
Similarly, it may be problematic to maintain organizational structures that change very frequently.
Therefore, it is perhaps a good idea to prototype the design of organizational structure before putting the system into production.
Also, the parentOrgRef is in fact a copy of the primary data (assignment).
As it is a copy, there is a risk that it may get out of synchronization.
MidPoint is designed to keep parentOrgRef and all the indexes strictly consistent during normal operations.
However, midPoint allows systems administrators to do a lot of non-standard things.
Some of those things may lead to data inconsistencies.
Therefore, it is a good idea to check whether the values of parentOrgRef make sense in case you notice that organizational structures are behaving strangely.
Overall, organizational structures work very well in midPoint, and you usually do not need to care about the mechanisms under the hood. However, management of organizational structures is much more complex than it seems. If you try to do strange and unusual things, you should better be sure you fully understand what you are doing.
Orgs and Roles
Organizations and roles have many things in common. Roles are granting privileges to its members. Usually, people that are members of an organization are granted privileges too. People that have the same role usually have the same set of privileges. People in an organization often have the same privileges too. In fact, organizations behave in almost the same way as roles.
MidPoint has fully embraced this similarity. Orgs are designed to behave in almost the same way as roles. Orgs are abstract roles, therefore they may have inducements, there may be constructions in them, orgs may contain authorizations and so on. Org can do everything that a role can do.
Therefore, there is no need to set up complicated configurations that assign a particular role to all members of an organization. The organization itself acts as a role. All the privileges that organization members need can be simply added as inducements in the organization itself. This is very simple, elegant and mostly fool-proof solution.
We have Sales and Marketing Division in ExAmPLE, Inc. We want to make things simple, and therefore we want to grant access to CRM system to all the members of this division. It is very easy to do:
<org oid="7a1feb50-471f-11ea-8aab-1b2627541f15">
    <name>F11000</name>
    <description>Expensive people that make money.</description>
    <displayName>Sales and Marketing Division</displayName>
    <identifier>11000</identifier>
    <assignment>
        <!-- Assignment of parent organizational unit -->
        <targetRef oid="4d12c1ac-440c-11ea-80af-2b314d06ba95" type="OrgType"/>
    </assignment>
    <inducement>
        <!-- Inducement that grants CRM privileges to all members of this department -->
        <construction>
            <!-- CRM resource -->
            <resourceRef oid="04afeda6-394b-11e6-8cbe-abf7ff430056"/>
            ...
        </construction>
    </inducement>
</org>
Clever reader certainly wonders whether the CRM privileges apply also to Indirect Sales Department, which is located below Sales and Marketing Division in our organizational structure. However, clever reader is clever enough to figure out that the privileges are not "inherited" in this case. To follow the thoughts of clever reader, you have to think about orgs in the same way as you would think about roles. There is an assignment from Indirect Sales Department to Sales and Marketing Division. However, there is no inducement. Role hierarchies are built using inducements. Therefore, privileges of Sales and Marketing Division are not included in Indirect Sales Department. This may seem to be counter-intuitive, but in fact it is completely correct. Orgs and roles form separate hierarchies (see note below). However, if you want to "inherit" privileges of a parent org, there is a very simple way how to do it: add explicit inducement. For example, this is how we can "inherit" the CRM privileges in Indirect Sales Department:
<org oid="8887e0b0-4726-11ea-96b0-5f5ced221e42">
    <name>F11200</name>
    <description>Suits that talk to other suits that talk to customers.</description>
    <displayName>Indirect Sales Department</displayName>
    <identifier>11200</identifier>
    <assignment>
        <!-- Assignment of parent organizational unit -->
        <targetRef oid="7a1feb50-471f-11ea-8aab-1b2627541f15" type="OrgType"/>
    </assignment>
    <inducement>
        <!-- Inducement to parent organizational unit. This creates "inheritance" of privileges. -->
        <targetRef oid="7a1feb50-471f-11ea-8aab-1b2627541f15" type="OrgType"/>
    </assignment>
</org>
This has to be done for every org that needs to inherit privileges from parent, which may be quite daunting for large organizational structures. Fortunately, there is a clever way how to avoid placing inducements everywhere. The solution involves the concept of meta-roles, as parent org is technically a meta-role for child orgs. However, this involves an advanced thinking about application of assignment and inducements. Even a clever reader may not be ready for such abstract thoughts yet. This has to come later when the basic principles have enough time to sink in.
|
Org and role hierarchies
Both orgs are roles are hierarchical in a way.
However, they form a separate hierarchies.
Org hierarchy is used to model organizational trees.
Role hierarchy is used to build access control structures.
Those hierarchies have completely different purpose.
They are also built using different mechanism.
Role hierarchy is used to group privileges, and therefore it is built using inducements.
Org hierarchy is used to group subjects (users), and it is built using assignments.
There are also different internal mechanisms, indexing and data storage properties.
For example, role hierarchy does not use parentOrgRef, therefore there is much lower overhead as compared to org hierarchy.
However, this means that the capabilities to query role hierarchy is limited.
Both hierarchies have their respective place and purpose.
Even though the difference may not be entirely obvious now, it is quite substantial.
Hopefully, this will get much more clear later when there will be more examples for both org and role structures.
|
Multiple Organizational Structures
Tree is a simple and very elegant structure in many ways. However, it is a rare sight to see a lone tree growing in the field. When we think of trees, we usually think about a forrest. It takes a lot of trees to make a forrest.
This is also the case when it comes to organizational structures. It is a very rare sight when an entire organizational structure of an organization can be modeled in a single tree. There is always the usual functional organizational structure with divisions, departments, sections, companies, branches, schools and faculties. Then there is a project organizational structure that is often completely orthogonal to functional organizational structure. This is sometimes spiced up with workgroups, task forces, focus groups, research teams, interest groups, clubs and similar collective life forms. There are many trees that make a forrest of organizational structures.
Fortunately, midPoint is not very picky when it comes to organizational structures. MidPoint is not limited to a single organizational tree. You can have as many organizational trees as you like. You can have functional organizational tree, as we have seen in previous sections. Then you can have independent project organizational structure. Just create new root org for projects and place the projects under it:
<org oid="832e37e4-edfd-11ea-9f8c-ef736d6646a2">
    <name>Projects</name>
</org>

<org oid="9c1b8464-edfd-11ea-87b8-db467c5ae301">
    <name>PBD2020</name>
    <description>Make money fast.</description>
    <displayName>Big Deal</displayName>
    <identifier>BD2020</identifier>
    <assignment>
        <targetRef oid="832e37e4-edfd-11ea-9f8c-ef736d6646a2" type="OrgType"/>
    </assignment>
</org>

<org oid="22dc2bd4-edfe-11ea-a904-5be54dda2e46">
    <name>PLS</name>
    <description>Make sure our marketing message gets across.</description>
    <displayName>Loudspeaker</displayName>
    <identifier>LS</identifier>
    <assignment>
        <targetRef oid="832e37e4-edfd-11ea-9f8c-ef736d6646a2" type="OrgType"/>
    </assignment>
</org>

<org oid="1954d496-f6ad-11ea-a96a-8bfa569f5fff">
    <name>PWL2</name>
    <description>Second generation wonderland. We are all mad here.</description>
    <displayName>Wonderland 2.0</displayName>
    <identifier>WL2</identifier>
    <assignment>
        <targetRef oid="832e37e4-edfd-11ea-9f8c-ef736d6646a2" type="OrgType"/>
    </assignment>
</org>
We have two organizational trees now, each neatly stowed under its own tab:
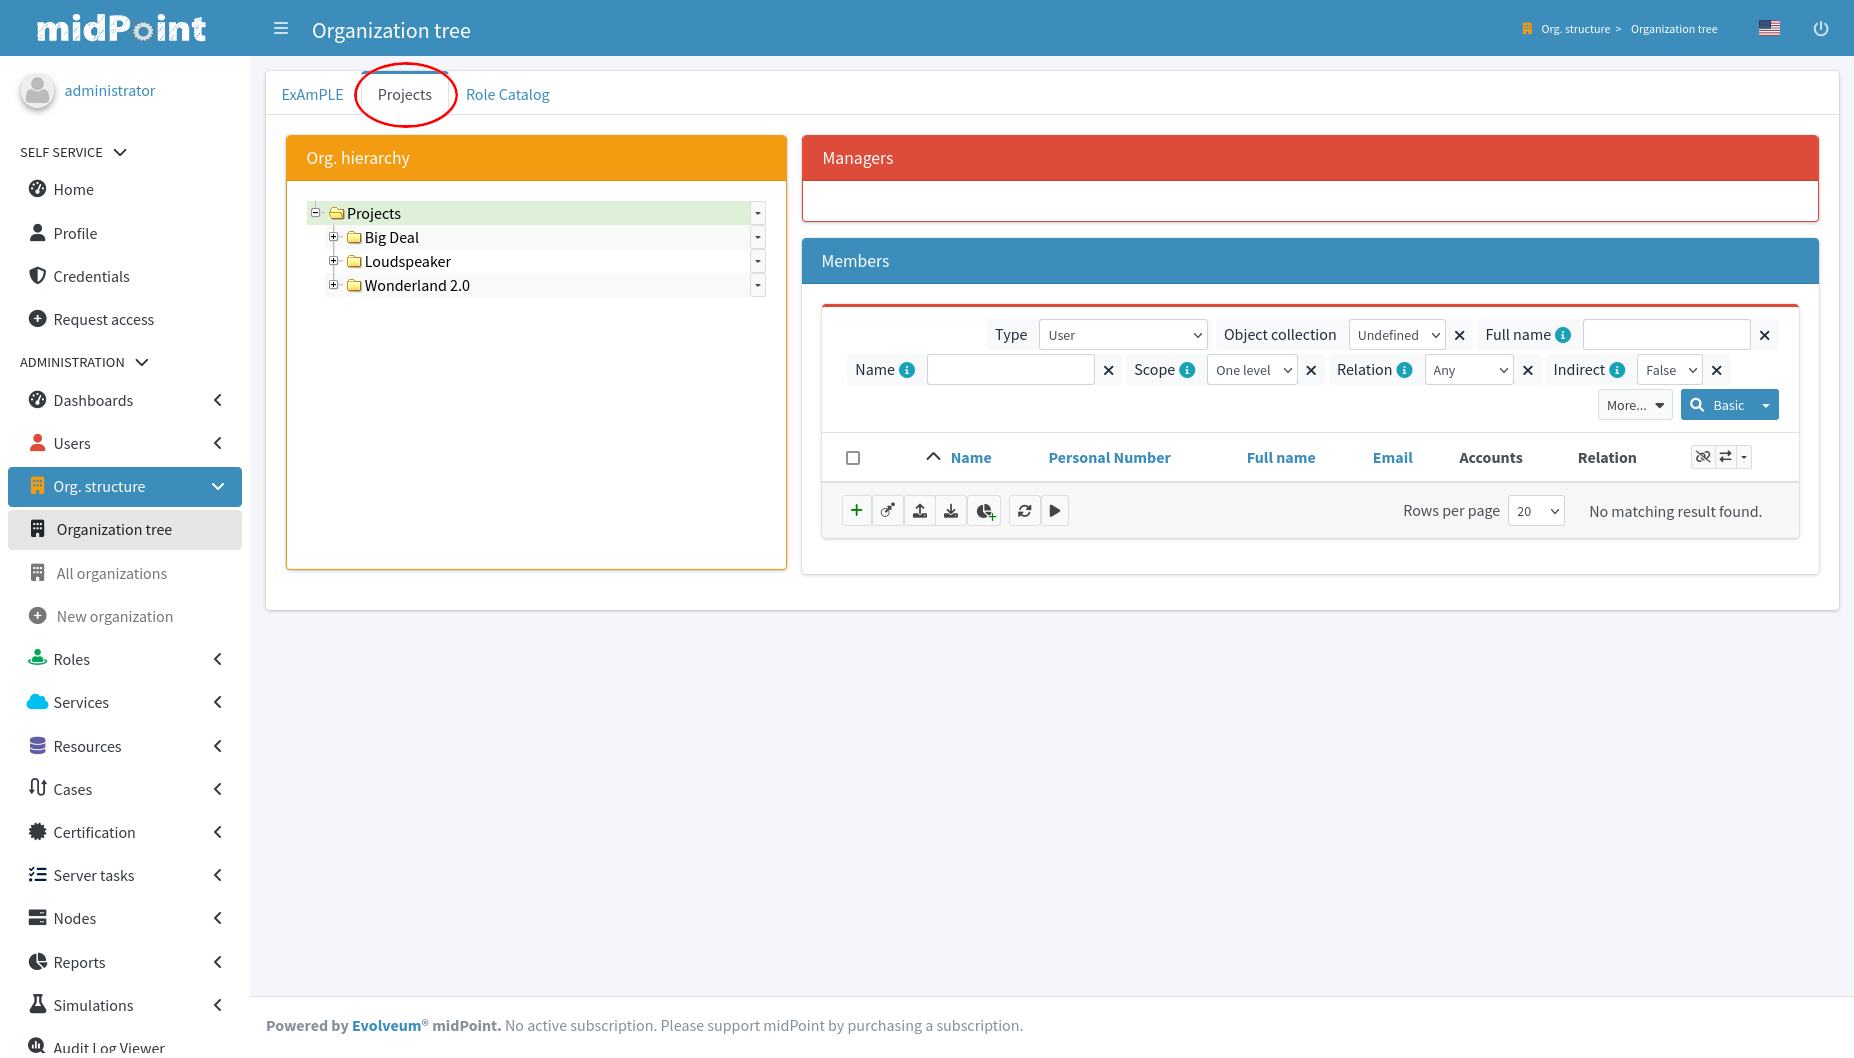
This is a nice project organizational structure. However, our users are members of functional organizational structure already. How can we add our users to the projects? The answer is assignment, of course. User can belong to any number of organizational units at the same time. It makes no difference whether they are in the same organizational tree or in different trees. We can simply assign the projects to the users. In fact, midPoint does not even recognize the difference between functional and project organizational structures. They look all the same to midPoint, and midPoint treats them in the same way. If there is a need for the structures to behave differently, it has to be explicitly configured. Which is usually done by using archetypes.
There are two organizational structures now. You can have three organizational structures if you want to, or five of them. Any number you like - as long as all the tabs for organizational structures fit on the screen. The structures can be a deep trees with many branches, or they can be completely flat, with just a single level. The structure may not even be a tree. As long as it is an acyclic directed graph it will work just fine. It can have multiple roots, it may have alternate paths, it can do all the crazy stuff. Just avoid cycles. Cycles break the maths which is the foundation of organizational structure indexing and evaluation. Cycles won’t work, but pretty much all the other arrangements are perfectly fine.
Archetypes
Org is such a flexible creature. It can represent variety of concepts: divisions, sections, departments, teams, projects, companies, branches, schools, faculties, zones, locations - you name it. However, it would be very easy to get lost if all these fine shades of orgs looked and behaved the same. Fortunately, we already know what we can use to apply some character to individual subtypes of objects. We are going to apply archetypes to orgs.
In theory, application of an archetype to org is easy. First, we need a suitable archetype.
<archetype oid="5c2c123e-86ff-11ef-9f50-ab1904c498f6">
    <name>Project</name>
    <archetypePolicy>
        <display>
            <label>Project</label>
            <pluralLabel>Projects</pluralLabel>
            <icon>
                <cssClass>fa fa-chart-gantt</cssClass>
                <color>#ffc107</color>
            </icon>
            <tooltip>Project</tooltip>
        </display>
    </archetypePolicy>
    <assignment>
        <identifier>holderType</identifier>
        <description>This archetype can be applied to orgs (OrgType).</description>
        <assignmentRelation>
            <holderType>OrgType</holderType>
        </assignmentRelation>
    </assignment>
</archetype>
Then we can apply the archetype to objects.
<org oid="9c1b8464-edfd-11ea-87b8-db467c5ae301">
    <name>PBD2020</name>
    <description>Make money fast.</description>
    <displayName>Big Deal</displayName>
    <identifier>BD2020</identifier>
    <assignment>
        <targetRef oid="832e37e4-edfd-11ea-9f8c-ef736d6646a2" type="OrgType"/>
    </assignment>
    <assignment>
        <targetRef oid="5c2c123e-86ff-11ef-9f50-ab1904c498f6" type="ArchetypeType"/>
    </assignment>
</org>
When the archetype is applied, the projects have nice icon and custom color.

Archetypes are easy to apply.
However, it may not be entirely easy to choose what archetypes to apply to orgs.
For example, the traditional enterprise functional organizational structure has divisions at the top, sections at the bottom and departments in between.
It may be tempting to create three archetypes: Division, Department and Section.
However, this is usually not necessary.
Single Organizational unit archetype should be enough.
Having a single archetype for all kinds of functional organizational units is usually much simpler and more flexible.
Perhaps the only reason to go for Division, Department and Section would be a need to modify behavior and policies of individual types of organizational units - which is not very common.
While single Organizational unit archetype is usually the best option, it is a good idea to create a separate archetype for top-level org.
The top-level org usually represents an organization, such as company, university or agency.
While individual organizational units are usually similar to each other, the top-level organization is likely to be quite different.
Therefore, having a separate Organization archetype is a good idea.
<archetype oid="886bfa6e-8702-11ef-9c40-6fce51f54b0d">
    <name>Organization</name>
    <archetypePolicy>
        <display>
            <label>Organization</label>
            <pluralLabel>Organizations</pluralLabel>
            <icon>
                <cssClass>fa fa-building-flag</cssClass>
                <color>#ffc107</color>
            </icon>
            <tooltip>Organization</tooltip>
        </display>
    </archetypePolicy>
    <assignment>
        <identifier>holderType</identifier>
        <assignmentRelation>
            <holderType>OrgType</holderType>
        </assignmentRelation>
    </assignment>
</archetype>
Moreover, while organizations do not change often, when they change the change is usually quite substantial.
For example, companies are occasionally re-structured, re-branded or merged with other companies.
In such cases, separate top-level root object comes very handy.
E.g. in case of merger, it is quite easy to add another top-level Organization object for the other company, and then take your time to gradually move people and organizational units around.
<org oid="4d12c1ac-440c-11ea-80af-2b314d06ba95">
    <name>F10000</name>
    <displayName>ExAmPLE, Inc.</displayName>
    <assignment>
        <targetRef oid="886bfa6e-8702-11ef-9c40-6fce51f54b0d" type="ArchetypeType"/>
    </assignment>
</org>
Having a separate archetype for the top-level root orgs is generally a good idea due to the definition of assignment relations, as is explained below. However, first we need to talk a bit about the relation itself.
Managers
Placing people in organizational structures has a significant value on its own. However, all the people usually do not have the same relation to the organizational unit. Most people are ordinary members of organizational unit. Then there are people that are somehow special: departmental managers, team leaders, project managers, supervisors and similar life forms.
How do we designate a manager of an organizational unit?
You probably guessed it already.
In a typical midPoint fashion, we are re-using assignment, of course.
There is just one small detail.
We are specifying relation in assignment target reference:
<user>
    <name>aanderson</name>
    ...
    <assignment>
        <!-- Direct Sales Department -->
        <targetRef oid="832f409a-4726-11ea-b0be-8b8eab99c1ed" type="OrgType" relation="manager"/>
    </assignment>
    ...
</user>
This assignment makes Alice a manager of Sales and Marketing Division. It is as simple as that. All the power of assignment is at your disposal. Therefore, it is easy to assign a manager for a temporary time period, suspend a manager and so on.
Manager assignment is created in the user interface in almost the same way as normal assignment is created. The only difference is selection of manager relation at the bottom of the assignment target dialog:
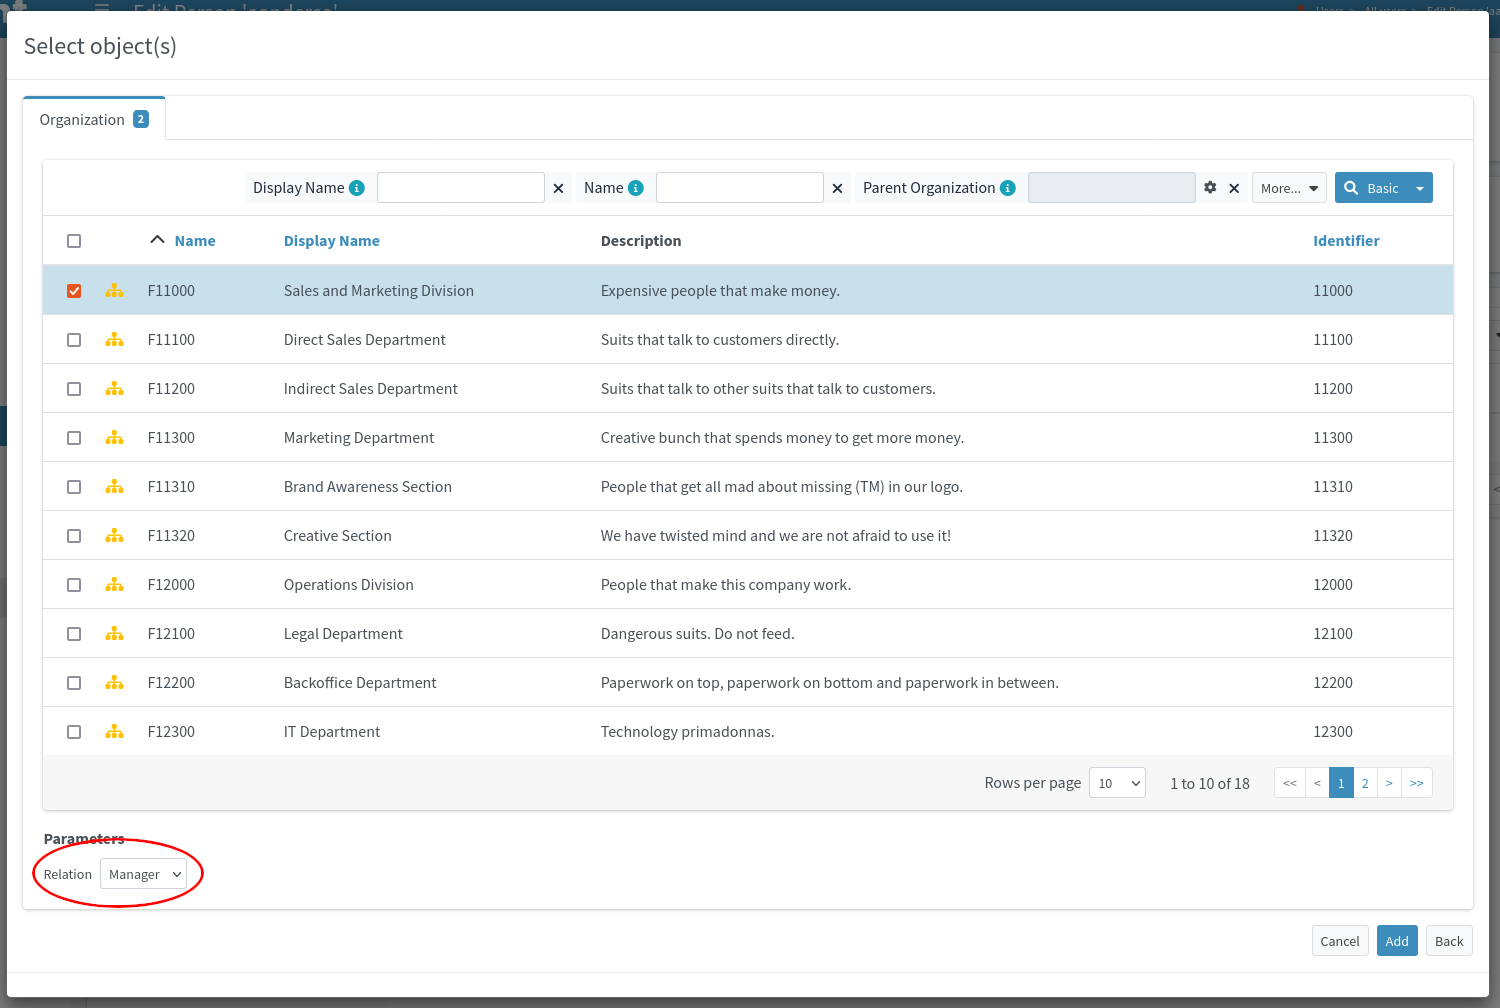
After the assignment is in place, midPoint knows that Alice is a manager of Sales and Marketing Division. This is also displayed in the organizational tree:
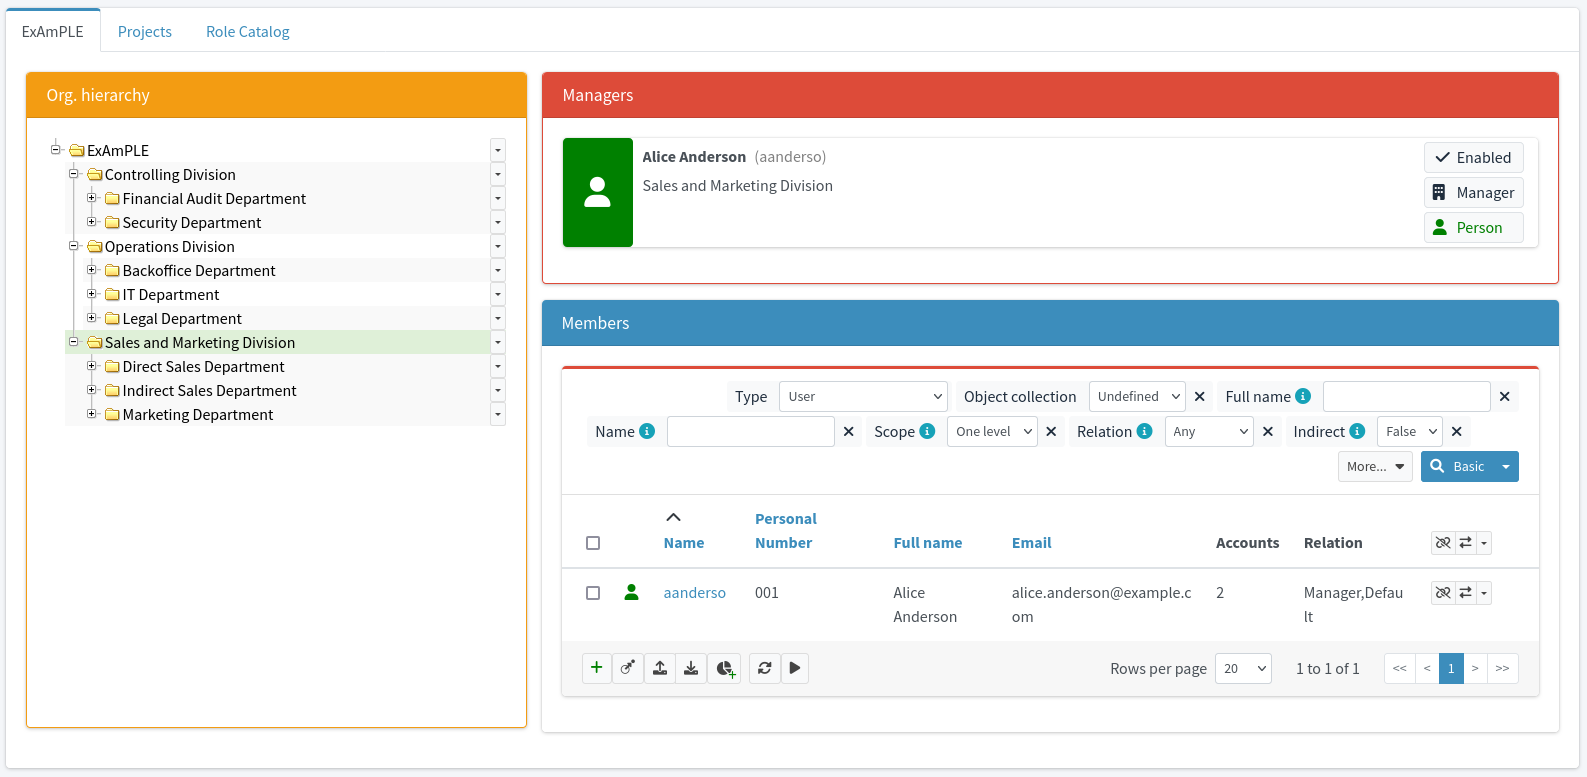
| MidPoint assigns managers to organizational units. That is the right way to do it. However, we have often seen a different approach. In these cases the manager is "assigned" to users. I.e. each user has a reference to his or her manager. This approach is wrong. Organizational structures change. People come and go. Everything is changing all the time. It is very easy to change one assignment in organizational structure in case that a manager is replaced. However, it is extremely difficult to replace a manager in the direct user-manager data structure. Maybe the former manager was managing several organizational units, and now we are replacing him with two managers. Maybe there is a re-organization going on at the same time. The result is going to be a mess. Avoid the direct user-manager approach whenever possible. |
We can congratulate Alice on her new position in management. However, she still has the same access rights as ordinary workers. That is not right! Managers wear suits and ties, which means that they need to have more privileges than mere mortals. As managers usually control funding of software development, it is perfectly understandable that midPoint has a way to set up privileges that apply to managers:
<org oid="7a1feb50-471f-11ea-8aab-1b2627541f15">
    <name>F11000</name>
    <displayName>Sales and Marketing Division</displayName>
    <identifier>11000</identifier>
    ...
    <inducement>
        <construction>
            ... Privileges exclusive to managers are specified here ...
        </construction>
        <orderConstraint>
            <order>1</order>
            <relation>manager</relation>
        </orderConstraint>
    </inducement>
</org>
This inducement grants special privileges to manager of the Sales and Marketing Division.
The orderConstraint makes sure that only the users that have manager relation to this organization unit get the privileges.
Wait a minute! Clever reader does not like that. This approach to manager privileges is not going to be very practical. Managers usually do not have special privileges in each organizational unit. In most organizations, managers have the same privileges regardless of the unit they manage.
One way to implement this approach is to create a Manager role, put the special privileges there, and assign the role to every manager of every organizational unit.
However, that creates redundancy.
We have to make sure this role is assigned whenever a person becomes manager, and that it is unassigned when the person is no longer manager.
This is the "standard" method used to manage privileges in other identity management platforms.
However, it is quite a fragile mechanism.
This is not a way how we do things in midPoint, we do not like fragile and tedious things here.
The orderConstraint data structure in our example looks suspiciously complex.
That impression is correct, as it indeed is quite a complex concept.
What we see here is the first glimpse at high-order "assignment algebra" that is a work-horse of complex midPoint deployments.
This mechanism is often employed when working with meta-roles and archetypes.
As organizational units are abstract roles, and organizational structures are just a trees formed by assignments, they technically form meta-role structures.
Therefore, the right way to set up manager privileges is to move privilege definition to a central place.
It may be top-level root org, or it may be an Organizational unit archetype.
In such case our inducement can apply to all the managers, regardless of organizational unit.
However, the exact configuration is a bit complex, and we still need to learn more about midPoint to be able to use it.
Therefore, we leave the details for later chapters.
Organizational structure may have almost any form. A user can be a member of many organizational units. Which also means that a user may manage many organizational units. That also applies the other way around: an organizational unit may have many managers. As member and manager assignments are independent, users may belong to a different organizational unit that they manage. MidPoint can support all kind of bizarre organizational arrangements. MidPoint was deliberately designed in this way, because reality has an annoying habit to bring surprises, especially when organizational structures are involved. However, you may not like all this liberalism in organizational management. Ordnung muss sein! If you want to constraint organizational management to allow only a single manager for each organizational unit, you can do it. However, you have to explicitly specify a policy by setting up assignment relation, policy rules and archetypes. Policy rules provide a very generic and very powerful mechanism to constraint and control midPoint in many ways, and archetypes provide flexible typing mechanism.
Relation
In midPoint, we like to design generic re-usable mechanisms. You did not think that we made the concept of manager in a way that would be hardcoded to organizational structure, did you? As you have got so far through this book, you would probably suspect there is more to this relation thing that we have seen so far.
The relation parameter specifies the nature of a relation between two objects. For example a user may be a member of an organizational unit, manager of a project, owner of a role or approver of role assignment requests. In such cases, member, manager, owner and approver are relations that a user can have to an object.
The most common way to use relation is to specify it in targetRef in an assignment.
The following example illustrates the usual way to assign an owner for a role:
<user>
    <name>aanderson</name>
    ...
    <assignment>
        <!-- Business Analyst role -->
        <targetRef oid="aaa6cde4-0471-11e9-9b50-c743da469067" type="RoleType" relation="owner"/>
    </assignment>
    ...
</user>
There are several built-in relations in midPoint:
| Relation | Usually used for | Description |
|---|---|---|
|
Everything |
This is the most ordinary, most common, non-specific relation to an object. When used with a role, it simply means that the user has the role. Usually interpreted as member when used with organizational units. It is the usual, normal relation. As the name suggests, this is the default relation. If no other relation is specified, this relation is used. |
|
Orgs |
Manager of an organizational unit, project manager, teamleader, etc.
Usually entitles a person (or a group) that have leading position in an org.
This usually specifies executive or operational privileges (cf. |
|
Roles, Orgs |
Person responsible for governance of the object.
Often used to nominate role owners that are responsible for role definition and maintenance.
May be used with organizational units to specify project sponsor or business owner.
Specifies a person responsible for governance and high-level policy decisions rather than day-to-day management (cf. |
|
Roles, Orgs |
Person responsible for deciding membership in roles and orgs, a gatekeeper or moderator. Approvers usually decide whether someone can have a role, or may be a member of organizational unit. Unlike owners, approvers do not create or modify role definition. They cannot change the role. They can only decide who can have that role and who cannot. |
|
Meta-roles |
Special-purpose relation that is sometimes used with meta-roles. Meta-role structures can be complex and confusing. However, such structures and especially policies that govern them may sometimes be simplified, if role-metarole relations are marked in a special way. This relation is designed specifically for that purpose. The |
Those are built-in relations. There are some pre-configured policies that work with them. However, you are free to specify and use your own relations. However, that is quite an advanced topic, and the majority of deployments are perfectly fine using just the built-in relations.
As you can see, the built-in relations do not have overly strict specifications. There is a lot of usually, often and almost in the description of relations. The reason is that the relations do not do anything just by themselves. They just specify how one object relates to another object. There are no strict policies or behavior associated with them.
The policies are specified elsewhere.
Assignments and inducements may behave differently for different relations, as we have seen in previous section.
Similarly, policy rules are often sensitive to relations.
For example, the policy that assignment of some roles has to be approved is implemented by a policy rule that is aware of approver relation.
Authorizations are often sensitive to relations.
Archetypes influence how the system behaves based on relations.
User interface may behave differently for some relations.
And so on.
Relations do nothing just by themselves.
However, good part of the system is usually configured to recognize relations and behave accordingly.
It is a matter of that configuration that determines how exactly will the system behave.
This is also the reason for such vague definition of relations, even those built-in relations.
They will do what you make them do.
Assignment Relation Limitations
MidPoint is very flexible platform - which is usually a huge advantage. However, there are downsides to flexibility. It may be difficult to choose correct option from large number of possibilities. This is especially true when it comes to assignments and relations. By default, midPoint does not constrain the assignments, which means any object can be assigned to any other object using any relation. However, this makes it difficult to create a reasonable user interface, as there are just too many options to choose from. Users can be confused what relation to choose, which relations make sense. Even worse, users may to choose to do the same thing in two different ways. As midPoint deployment matures, it is more than desired to constraint the use of assignments and relations only to those combinations that make sense.
Assignment relation mechanism is used for that purpose.
We have already seen basic usage of assignment relation in archetypes.
The assignment relation was used to constraint object type that an archetype can be assigned to.
Following example of Project archetype is using holderType clause of the assignmentRelation to limit application of archetype to orgs.
<archetype oid="5c2c123e-86ff-11ef-9f50-ab1904c498f6">
    <name>Project</name>
    ...
    <assignment>
        <identifier>holderType</identifier>
        <description>This archetype can be applied to orgs (OrgType).</description>
        <assignmentRelation>
            <holderType>OrgType</holderType>
        </assignmentRelation>
    </assignment>
</archetype>
The assignmentRelation constraints ability to create assignment to the Project archetype, in this case the holder of the assignment must be of OrgType type.
However, assignment relation can be used to further constraint use of assignments.
We probably want to constraint the relations that can be applied to a project.
It is quite resonable to constraint the relations to members, managers and owners of projects.
This can simplify things, as we probably do to want approvers and "meta" as a relations to projects.
Also, we want to put only users in the project.
In theory, midPoint organizational structure can hold almost any type of object.
However, it does not make much sense for a project to contain roles or services.
We can constrain both relations and object types using assignmentRelation in the Project archetype.
<archetype oid="5c2c123e-86ff-11ef-9f50-ab1904c498f6">
    <name>Project</name>
    ...
    <inducement>
        <identifier>membership</identifier>
        <description>Projects are flat (no sub-teams), have members and manager. May have owner (sponsor).</description>
        <assignmentRelation>
            <description>User can be direct member of project, as well as manager and owner.</description>
            <holderType>UserType</holderType>
            <relation>org:default</relation>
            <relation>org:manager</relation>
            <relation>org:owner</relation>
        </assignmentRelation>
    </inducement>
</archetype>
Unlike the holderType case above, in this case the assignmentRelation is placed in inducement instead of assignment.
In the previous case, we were constraining assignment of projects to archetypes.
Whereas in this case we are trying to constraint assignments of users to the projects.
This is one degree of indirection farther, therefore inducement is used instead of assignment.
The arechetype acts as a meta-role, the content of the inducement is applied to the projects (archetyped objects), not to the archetype itself.
The assignment relation specification is used by the user interface. User interface is going to present only those object types and relation that make sense for the operation that user has initiated.
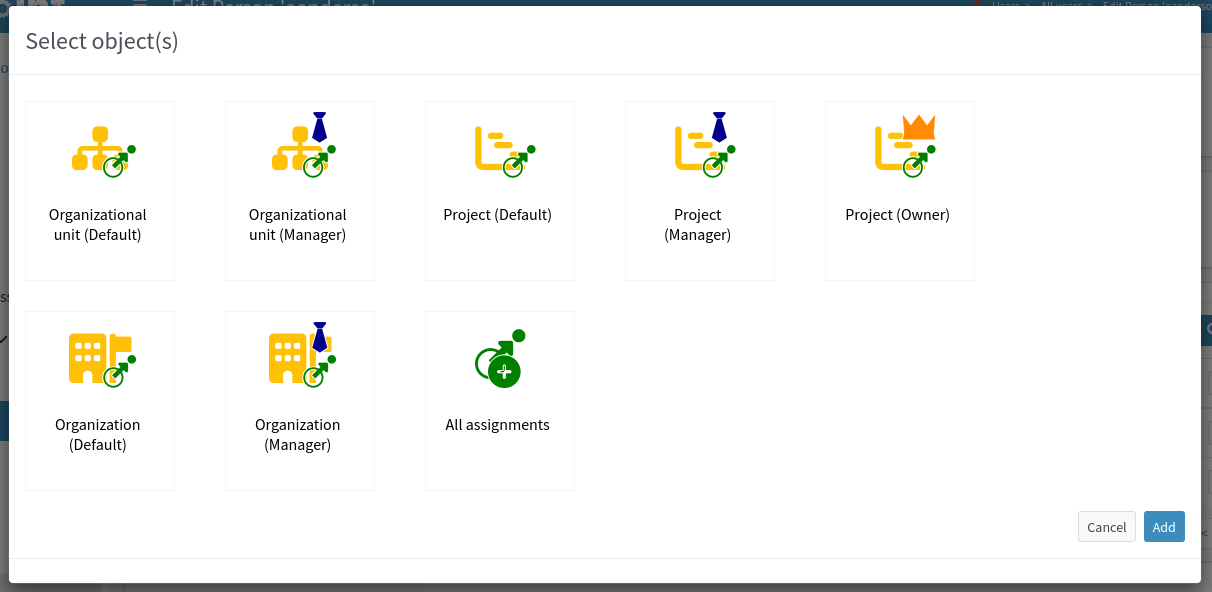
| Support for assignment relation in midPoint 4.8 user interface is not yet completed. Some parts of user interface use assignment relation, while others are not using it yet. However, it is a good practice to specify assignment relation in archetypes quite early in midPoint deployment. The specification is going to be very useful after upgrade to a newer midPoint version. |
Beyond Users
MidPoint organizational structure can do a lot of crazy stuff. Organizational structures are usually build to contain people. However, midPoint is quite different. MidPoint organizational structure can contain a broad range of object types. Users, roles and services are the most common object types, but almost any other midPoint object can be placed in organizational structure.
Role catalog is a common use of organizational structure that does not (directly) involve people. Role catalog is used to sort the roles into categories, much like a catalog in electronic shop is used to sort the products. The catalog is used to present roles to users in organized form, so users may easily find the roles when request them in self-service interface.
MidPoint role catalog is simply an organizational structure. It does not have divisions, sections or projects, but it has categories. Categories are (almost) ordinary orgs that form the hierarchy.
<org oid="945315a6-fc23-11ea-832e-1f9945adb481">
    <name>Role catalog</name>
    <displayOrder>500</displayOrder>
</org>

<org oid="b7e4cd0c-fc23-11ea-a79a-079cad42b39b">
    <name>RC001</name>
    <displayName>Client acquisition</displayName>
    <assignment>
        <targetRef oid="945315a6-fc23-11ea-832e-1f9945adb481" type="OrgType"/>
    </assignment>
</org>

<org oid="259625ee-fc24-11ea-8bae-1bfdce011faf">
    <name>RC002</name>
    <displayName>Customer support</displayName>
    <assignment>
        <targetRef oid="945315a6-fc23-11ea-832e-1f9945adb481" type="OrgType"/>
    </assignment>
</org>
Role catalog configuration with several roles can be found in org-role-catalog.xml file in the samples.
|
Role catalog is displayed in used interface as a new organizational structure. However, as most organizational structures are built for people, midPoint user interface displays only users as members of organizational units by default. You have to explicitly change the type to role to see content of the catalog.
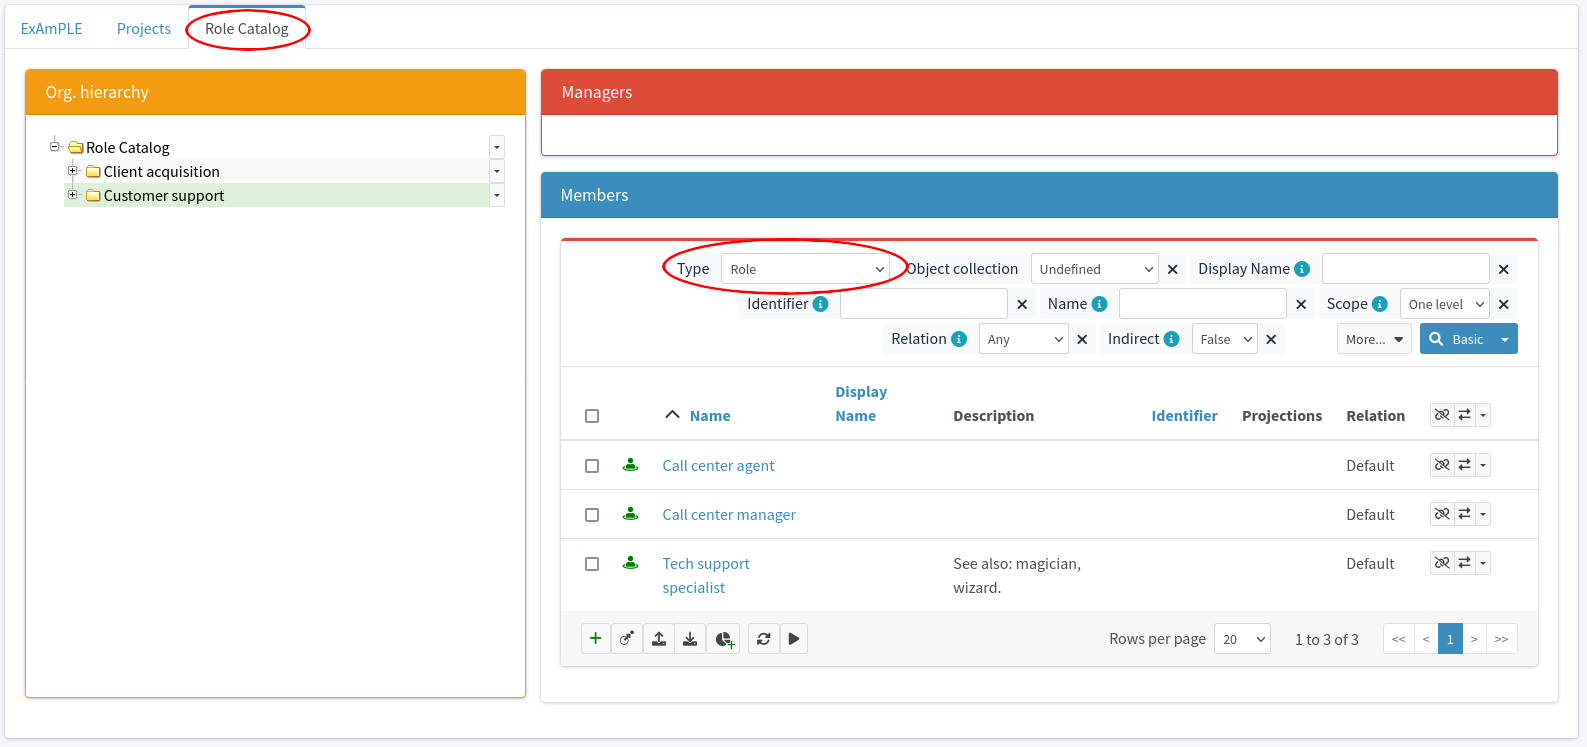
Primary use of the catalog is related to access request process.
The catalog makes it easier for a user to find appropriate role when requesting its assignment in self-service part of midPoint user interface.
Root org of the role catalog has to be configured in adminGuiConfig section of system configuration object:
 <systemConfiguration>
    ...
    <adminGuiConfiguration>
        ...
        <accessRequest>
            <roleCatalog>
                <roleCatalogRef oid="945315a6-fc23-11ea-832e-1f9945adb481" type="OrgType"/>
                ...
            </roleCatalog>
        </accessRequest>
    </adminGuiConfiguration>
</systemConfiguration>
While the primary use of role catalog is the access request process, the catalog can also be used to apply policies to a whole group of roles. Owner of the category may be considered to be a default approver for all the roles in the category. Category owner may be authorized to modify roles in the category. And so on.
Similar approach can be applied to most objects in midPoint. Organizational structure can be used to organize roles, services, resources, function libraries and other objects. Orgs are also crucial mechanism in supporting midPoint multi-tenancy. Not everything is perfectly supported in user interface yet. Nevertheless, the organizational structure is a powerful mechanism to systematically and consistently apply policies and organize the system.
Organizational Structure Synchronization
MidPoint can manage organizational structure, but where that structure comes from? Back in 20th century there were entire teams dedicated to drawing organizational charts on paper. However, it is 21st century already. We do not use paper anymore. We are using computers to manage organizational charts now. Which means that dedicated teams are drawing organizational charts in Excel and distributing them by e-mail.
Fortunately, there are some organizations that have truly progressed into 21st century. Such organizations store their organizational structures in a machine-processable form, usually in database tables. When exported to a CSV file, the structure may look like this:
"orgnum","name","description","parentOrgNum"
"11000","Sales and Marketing Division","Expensive people that make money.","10000"
"11100","Direct Sales Department","Suits that talk to customers directly.","11000"
"11200","Indirect Sales Department","Suits that talk to other suits that talk to customers.","11000"
...
In this case, each organizational unit has a unique identifier, such as 11000.
Each organizational unit has a reference to parent organizational unit.
When all the lines are processed, they form a complete organizational tree.
This is quite a good information source. Of course, we would like to automatically pull the data from this source instead of managing organization tree manually. How could we do it? Clever reader is smiling, remembering that we like to create generic re-usable mechanisms in midPoint. We already know how to synchronize user records from the HR system. As we are using midPoint, it is perhaps no big surprise that the same mechanisms can be easily reused to synchronize organizational unit records as well.
MidPoint synchronization mechanism can work with almost any type of object. It can synchronize HR records to users, organizational unit records to orgs, application inventory database to services, Active directory groups to roles or pretty much anything to anything. This is what we call generic synchronization.
Similarly to ordinary synchronization, we need to start with a resource. However, this resource does not contain accounts, it contains organizational units.
<resource oid="81ec779e-13b2-11eb-8e47-dfbfd542db3e">

    <name>Organizational Chart</name>

    <connectorRef type="ConnectorType">
        <filter>
            <q:text>connectorType = "com.evolveum.polygon.connector.csv.CsvConnector"</q:text>
        </filter>
    </connectorRef>

    <connectorConfiguration>
        <icfc:configurationProperties>
            <icfccsvfile:filePath>/opt/midpoint/var/resources/org.csv</icfccsvfile:filePath>
            <icfccsvfile:encoding>utf-8</icfccsvfile:encoding>
            <icfccsvfile:fieldDelimiter>,</icfccsvfile:fieldDelimiter>
            <icfccsvfile:multivalueDelimiter>;</icfccsvfile:multivalueDelimiter>
            <icfccsvfile:uniqueAttribute>orgnum</icfccsvfile:uniqueAttribute>
        </icfc:configurationProperties>
    </connectorConfiguration>

    <schemaHandling>

        <objectType>
            <displayName>Organizational unit</displayName>
            <default>true</default>
            <delineation>
                <objectClass>AccountObjectClass</objectClass>
            </delineation>
            <kind>generic</kind>
            <intent>orgunit</intent>
            <focus>
                <type>OrgType</type>
                <archetypeRef oid="99fa4b3c-8702-11ef-896e-0b7221540b8b"/>
            </focus>
            <attribute>
                <ref>orgnum</ref>
                <inbound>
                    <target>
                        <path>$focus/identifier</path>
                    </target>
                </inbound>
                <inbound>
                    <expression>
                        <script>
                            <code>'F' + input</code>
                        </script>
                    </expression>
                    <target>
                        <path>$focus/name</path>
                    </target>
                </inbound>
            </attribute>
            <attribute>
                <ref>name</ref>
                <inbound>
                    <target>
                        <path>$focus/displayName</path>
                    </target>
                </inbound>
            </attribute>
            <attribute>
                <ref>description</ref>
                <inbound>
                    <target>
                        <path>$focus/description</path>
                    </target>
                </inbound>
            </attribute>
            <attribute>
                <ref>parentOrgNum</ref>
                <inbound>
                    <expression>
                        <assignmentTargetSearch>
                            <targetType>OrgType</targetType>
                            <filter>
                                <q:text>identifier = $input</q:text>
                            </filter>
                        </assignmentTargetSearch>
                    </expression>
                    <target>
                        <path>$focus/assignment</path>
                    </target>
                </inbound>
            </attribute>
            <correlation>
                <correlators>
                    <items>
                        <item>
                            <ref>identifier</ref>
                        </item>
                    </items>
                </correlators>
            </correlation>
            <synchronization>
                <reaction>
                    <situation>linked</situation>
                    <actions>
                        <synchronize/>
                    </actions>
                </reaction>
                <reaction>
                    <situation>deleted</situation>
                    <actions>
                        <deleteFocus/>
                    </actions>
                </reaction>
                <reaction>
                    <situation>unlinked</situation>
                    <actions>
                        <link/>
                    </actions>
                </reaction>
                <reaction>
                    <situation>unmatched</situation>
                    <actions>
                        <addFocus/>
                    </actions>
                </reaction>
            </synchronization>
        </objectType>

    </schemaHandling>

    <projection>
        <assignmentPolicyEnforcement>none</assignmentPolicyEnforcement>
    </projection>

</resource>
This should all look very familiar by now. It is almost the same resource as we have seen in the synchronization chapter. However, there are few differences, which are described in the following sections.
Kind and Intent
The definition of Organizational unit resource object contains specification of kind and intent:
        ...
        <objectType>
            <displayName>Organizational unit</displayName>
            <default>true</default>
            <delineation>
                <objectClass>AccountObjectClass</objectClass>
            </delineation>
            <kind>generic</kind>
            <intent>orgunit</intent>
            ...
Kind and intent identify the type of resource object for use by midPoint. There are three possible values for kind:
| Kind | Description |
|---|---|
|
Resource object that represents identity of a person, either physical such as computer user or virtual such as |
|
Resource object that represents groupings or privileges of an account.
Entitlement resource objects represent groups, resource-specific roles, permissions or privileges.
Entitlements are meant to be associated to an account.
For example a |
|
Any other type of resource object. This is used for resource objects that cannot be classified as account or entitlement. |
You can choose any of these kinds for your resource objects. Values of kind are pre-defined in midPoint, as midPoint makes some assumptions about them. For example, midPoint expects that accounts can be associated with entitlements, for example accounts may be members of groups. Therefore, it is recommended to properly categorize your resource objects to kinds. This also helps to make the configuration understandable for mere mortals.
Then there is intent.
There are no pre-defined values for intent in midPoint, perhaps except for value default which is used in case there is no explicit definition of intent.
You can choose any intent value that you like.
However, it is recommended to choose a value that describes the intended use of the resource object.
For example:
| Kind | Example intent | Description |
|---|---|---|
|
|
Default account. This usually means the usual, very ordinary user account. |
|
|
Administration account. Used in situations where administrators get dedicated accounts with administrator privileges. |
|
|
Testing account. Used when testers are given special-purpose accounts to use for testing, to avoid interference with their usual accounts. |
|
|
The usual, most ordinary, boring group of users. It can have accounts or other groups as its members. |
|
|
LDAP |
|
|
Resource object that represents system privilege. Can be "given" to an account. |
|
|
Resource object that represents physical location in our organization. Such as branch office, campus building or meeting room. It has no formal association to the account. |
|
|
Resource object that represents organizational unit. In our case, it represents one record in the organizational chart database. |
These are just examples.
You can choose any kind/intent combination that makes sense for your deployment.
For example, you may choose to use entitlement kind for organizational units instead of generic.
MidPoint would work fine even in that case.
However, our Organizational Chart resource does not have any accounts, therefore the organizational units cannot be associated to anything in this resource.
Also, membership in an organizational unit does not really look like an entitlement.
Therefore, we have chosen to use generic kind here.
You are free to make your own choices.
|
Why
Why is there AccountObjectClass?AccountObjectClass in the configuration?
We are not working with accounts here, we work with organizational units.
So, why AccountObjectClass?
The reason is the CSV connector that we are using.
The CSV connector is quite simplistic, it considers everything to be an account.
Object classes are determined by the connector, hence we need to use AccountObjectClass as the connector specified this object class.
However, the kind and intent definition is "overriding" the notion that this is an account, making it more understandable for midPoint users.
|
Kind and intent behave like coordinates when midPoint has to identify resource object that is assigned to a user.
Given normal circumstances, a user may have at most one default account on a resource (which means kind=account, intent=default).
That same user may also have admin account on the same resource (kind=account, intent=admin).
A role may be represented by at most one LDAP group on a resource (kind=entitlement, intent=ldapGroup).
MidPoint logic is heavily based on such assumptions.
Whenever there are two constructions that have the same combination of kind and intent, midPoint assumes that they are describing the same resource object.
MidPoint automatically merges the constructions.
If the constructions have different combination of kind and intent, midPoint assumes that they are describing different resource objects, therefore the constructions are processed separately.
Correct configuration of kind and intent is crucial for midPoint to work correctly.
|
Tag (a.k.a. "multiaccounts")
The requirement that there may be at most one resource object for each kind+intent combination works very well in most cases.
However, there are also cases when more than one resource object is needed.
Kind and intent has to be specified in the configuration, therefore this mechanism will not work for resource objects that appear and disappear dynamically.
Therefore, new concept of tag was introduced in midPoint 4.0.
The tag can supplement the kind+intent combination with a dynamic value, thus allowing multiple resource objects to exist for any particular kind+intent combination.
This feature is colloquially known as "multiaccounts".
|
Archetype
It would be acceptable to create our org just as plain org. Most things would work quite right. However, it is a very good practice to apply archetype to objects, especially those objects that are created automatically. Automation can create many objects very quickly. It may be tedious to modify all these objects when you figure out that you need to do something about them differently. Re-import of the objects do not always work, as not all the mappings may be strong. Of course, you can delete all the objects and re-import. However, that is going to change the OIDs, and manually created assignments are going to break - not to mention losing all manual changes to descriptions and documentation that you might have done. This is all too much inconvenience and manual work. We are using midPoint, we can do better.
When archetype is applied to the objects, common parts of object configuration and behavior can be specified in the archetype. Therefore update and maintenance of the objects is much easier. Really, there is no excuse for not applying the archetype, as it is very easy to do. All we need is to mention the archetype in the specification of object type in the schema handling.
<resource>
    ...
    <schemaHandling>
        ...
        <objectType>
            ...
            <focus>
                <type>OrgType</type>
                <archetypeRef oid="99fa4b3c-8702-11ef-896e-0b7221540b8b"/>
            </focus>
In this case we are using Organizational unit archetype.
For now, the archetype is almost empty, it just specifies some cosmetics for nicer look and feel of organizational units.
<archetype oid="99fa4b3c-8702-11ef-896e-0b7221540b8b">
    <name>Organizational unit</name>
    <archetypePolicy>
        <display>
            <label>Organizational unit</label>
            <pluralLabel>Organizational units</pluralLabel>
            <icon>
                <cssClass>fa fa-sitemap</cssClass>
                <color>#ffc107</color>
            </icon>
            <tooltip>Organizational unit</tooltip>
        </display>
    </archetypePolicy>
</archetype>
Names and Identifiers
Synchronization of organizational structure is the same as synchronization of users.
Theoretically.
However, there are some subtle differences in practice, mostly caused by the differences of User and Org schemas.
The first difference originates from the fact, that name of the org has to be unique.
This uniqueness is usually not a problem for users, as username is naturally unique among the entire user base.
However, this is slightly different for orgs, as there may be several parallel organizational structures.
There may be Security department, Security project and Security workgroup at the same time.
This may be partially solved by using identifiers instead of names.
However, this still does not solve the problem of department 123 and project 123.
The simple solution is to prefix the identifier with a code of the organizational tree that it belongs to, thus creating department F123 and project P123.
However, users looking for project 123 may have difficulty finding it, as the P prefix in P123 name is usually just a deliberate decision of midPoint administrator.
Therefore, we still want to store the original identifier value (123) into the identifier property of the org object.
There is no uniqueness constrain on the identifier property, therefore both department 123 and project 123 can co-exist and both can be easily discovered by searching the identifier.
The result is that we need two inbound mappings for the orgnum attribute:
            <attribute>
                <ref>orgnum</ref>
                <inbound>
                    <target>
                        <path>$focus/identifier</path>
                    </target>
                </inbound>
                <inbound>
                    <expression>
                        <script>
                            <code>'F'+input</code>
                        </script>
                    </expression>
                    <target>
                        <path>$focus/name</path>
                    </target>
                </inbound>
            </attribute>
Storing original organizational unit identifier in the identifier property makes it easier to correlate organizational units.
The idenfier property can be used by the correlators.
If the identifier is reasonably persistent, this is a huge benefit.
Changes in organizational structure can be quite nasty. Organizational units are often renamed or moved in organizational trees. Simplistic synchronization configuration may not be able to interpret such events correctly. Rename of an organizational unit may look like new organizational unit was created, and the old unit was deleted. This is likely to wreak havoc to organizational unit assignments, especially if there were special privileges configured for renamed organizational unit. Even worse, organizational tree data are sometimes acquired from a different source than the user data, which is causing timing problems. If organizational tree is updated first, there will be new empty organizational unit, old unit will be deleted, and user assignments will become invalid. If user data are updated first, the synchronization routines may not be able to update the assignments as the new organizational unit does not exist yet. This is going to cause a whole lot of problems, most of them requiring manual intervention of midPoint administrator. Additionally, reorganizations usually happen in cycles, each cycle changing a number of units at the same time. Which means that every few months the organizational structure is going to break down, everybody is going to complain, and it is likely to take several days to fix all the problems manually.
All of that can be avoided if there are reasonably persistent organizational unit identifiers. Which means that every organizational unit has an identifier that does not change when the unit is renamed or moved. In that case midPoint can reliably detect the rename, change organizational unit name and keep the assignments intact. MidPoint can also detect that the unit was moved, change the parent unit and still keep all the assignments. Organizational unit identifiers make everything so much easier. Therefore, try really hard to use the identifier when setting up synchronization of organizational structure. If there is no such identifier, talk to the business people to add it. This is usually not an easy discussion, as the solution often involves changes in business processes. However, it is absolutely essential to get it right. All the effort will be repaid many times over during the course of identity program.
Nesting Organizational Units
We can synchronize the organizational units into midPoint. We can use mappings to set up the properties of organizational units, such as names and identifiers. However, that is still not enough, as organizational structures are usually hierarchical. How to do we nest organizational units to create organizational tree?
In midPoint, organizational tree is formed by assignments. Therefore, the answer is quite simple: create the right assignments. Clever reader is not paying attention anymore, being busy re-reading the sections on automatic role assignments. Clever reader is quite right, the same techniques that are used for automatic assignments of roles can be used to form organizational assignments. Perhaps the best way to set the assignments for organizational hierarchies is to use inbound mappings:
            <attribute>
                <ref>parentOrgNum</ref>
                <inbound>
                    <expression>
                        <assignmentTargetSearch>
                            <targetType>OrgType</targetType>
                            <filter>
                                <q:text>identifier = $input</q:text>
                            </filter>
                        </assignmentTargetSearch>
                    </expression>
                    <target>
                        <path>$focus/assignment</path>
                    </target>
                </inbound>
            </attribute>
This mapping automatically sets up an assignment to parent organizational unit.
We are lucky as we have almost ideal source of organizational data.
Our CSV file contains an identifier of a parent organizational unit in the parentOrgNum column.
All we need to do is to look for midPoint org that has that particular value in its identifier property.
This is done by the assignmentTargetSearch that we have already used for automatic assignment of roles.
The same mechanism is reused here.
All that remains is to set up a synchronization task.
Make sure that you specify kind and intent in the synchronization task.
This is important, otherwise the tasks are not going work.
Setting the right kind and intent was not emphasized before when we were synchronizing accounts.
The account kind is the default, and midPoint is usually smart enough to use default intent.
However, the defaults do not work any longer when we go beyond the accounts.
|
Troubleshooting
Generic synchronization can be confusing as there may be non-obvious configuration complexities.
When mis-configured, the synchronization mechanism often does nothing.
There is no error or any other obvious indication as to what exactly went wrong.
Logging is your best friend in that case.
Try to enable logging of synchronization service (com.evolveum.midpoint.model.impl.sync) at debug level.
MidPoint will log a reasonable amount of information about the synchronization process.
That information is very likely to lead you to the solution.
|
The configuration above works for simple cases, yet there is still a room for improvement.
The search filter in assignmentTargetSearch expression is quite simplistic.
It matches orgs from several trees if they have the same identifier.
Similar problem is in the correlation settings.
However, clever reader would surely find a way how to improve it.
Also, this method works only if the data feed is correctly ordered. Everything works as long as parent organizational units are synchronized before child organizational units. However, that is not always the case. If ordering is wrong, child organizational units will not be able to find parent units, and the tree disintegrates. As we are living in a networked concurrent world, data ordering is usually difficult to guarantee.
MidPoint has a mechanism to handle unordered data sources. There is a way to create parent organizational units on demand. When a child organizational unit looks for a parent that is not there yet, the parent object can be created at that moment. Of course, this can only create stub parent, a very minimal object that has only the essential data. Yet, even such a stub object is sufficient to create an organizational hierarchy. The stub can be updated later, when the details about parent organizational unit are retrieved from the data feed. The details of the create on demand mechanism is beyond the scope of this chapter. We will get back to it later.
Adding Users To Organizational Units
We have a nice hierarchical organizational structure now. Yet, something is still missing. The organizational structure is all about the people, but there are no people in our organizational tree. Let’s fix this.
In our ExAmPLE case, people data are coming from HR resource.
So far we do not have any data in this data source to automatically assign people to the organizational tree.
We need to modify the HR resource to add information about organizational units into our HR feed.
It went quite well.
After several phone calls, tens of e-mails and a quick 3-hour meeting, the HR department agreed to add a new orgnum column to the CSV file:
"empno","firstname","lastname","jobcode","orgnum"
"001","Alice","Anderson","B002","11000"
"002","Bob","Brown","O302","12000"
"003","Carol","Cooper","S101","11310"
...The 'orgnum' column contains an identifier of the organizational unit the person belongs to. This looks quite familiar, and clever reader is working on the configuration already. Of course, we can use the same approach we have used to build up organizational hierarchy. We just need to apply it to the users instead of orgs. Therefore, we are going to add new inbound mapping to the HR resource:
<attribute>
<ref>orgnum</ref>
<inbound>
<expression>
<assignmentTargetSearch>
<targetType>OrgType</targetType>
<filter>
<q:text>identifier = $input</q:text>
</filter>
</assignmentTargetSearch>
</expression>
<target>
<path>$focus/assignment</path>
</target>
</inbound>
</attribute>The assignmentTargetSearch expression looks for the right organizational unit.
Then the mapping creates an assignment to that unit.
We are done, as easily as that.
Run the HR synchronization task, and all the users are going to be neatly organized in the organizational tree.
|
Get your data structures right at the beginning.
That 3-hour meeting with HR was in fact really useful and necessary. The result was that ExAmPLE HR department did the right thing. They put identifier of organizational unit in the HR feed, instead of organizational unit name. Having organizational unit identifier makes everything much more stable. There is a lesson to be learned. Every hour spent designing the data structures will be repaid many times over. Getting it wrong will cost you days or months spent dealing with data inconsistencies. It is also very difficult to change data formats in the future, as they effectively become data integration interfaces. Take your time and get it right at the beginning. |
Organizational Structure Provisioning
We have seen how we can synchronize organizational structure into midPoint. We are talking about midPoint here. What goes in, can also go out. It is very simple to provision organizational structure to an ordinary target system, such as database table. However, we have already learned a thing or two, and doing that would be almost boring. Therefore, let’s do something a bit more challenging. Let us synchronize the organizational structure into an LDAP directory tree.
The basic principles of organizational structure provisioning are the same as for user provisioning. We need to set up outbound mappings for organizational units. We already know how to do that. There are just few little differences:
-
We will use
organizationalUnitobject class instead ofinetOrgPerson. -
We will use kind/intent combination that describes organizational units.
-
We have to be a bit smarter about creating LDAP distinguished names (DNs) for the entries, as we want them to create a hierarchical data structure.
Everything else is essentially the same as for users and accounts. Let us go over all the details, step by step.
First of all, we need to add new objectType definition to the LDAP resource:
<objectType>
<kind>generic</kind>
<intent>ou</intent>
<displayName>Organizational Unit</displayName>
<delineation>
<objectClass>organizationalUnit</objectClass>
</delineation>
<attribute>
<ref>dn</ref>
<displayName>Distinguished Name</displayName>
<limitations>
<minOccurs>0</minOccurs>
<maxOccurs>1</maxOccurs>
</limitations>
<outbound>
<name>ldap-ou-dn</name>
<trace>true</trace>
<source>
<path>$focus/name</path>
</source>
<expression>
<script>
<code>
import javax.naming.ldap.Rdn
import javax.naming.ldap.LdapName
// We will collect names of the org units in the orgpath list
// We cannot add them to dn yet as we need their order to be reversed
def orgpath = []
def node = focus
while (true) {
log.debug("processing node {}", node)
orgpath.add(node.displayName.orig)
if (node.parentOrgRef == null || node.parentOrgRef.isEmpty()) {
break
} else {
node = midpoint.resolveReference(node.parentOrgRef[0])
}
}
log.debug("orgpath={}", orgpath)
def dn = new LdapName('ou=org,dc=example,dc=com')
orgpath.reverse().each { ouname -> dn.add(new Rdn('ou',ouname)) }
return dn.toString()
</code>
</script>
</expression>
</outbound>
</attribute>
<attribute>
<ref>ou</ref>
<limitations>
<maxOccurs>1</maxOccurs>
</limitations>
<outbound>
<source>
<path>$focus/displayName</path>
</source>
</outbound>
</attribute>
</objectType>Except for that big piece of Groovy code, this configuration is relatively simple.
The delineation definition specifies organizationalUnit value for object class.
This is a standard LDAP object class for "ou" entries.
There is also specification of kind (generic) and intent (ou).
These are midPoint "coordinates" for this object type.
Then we have two outbound mappings, one for LDAP distinguished name (dn), the other for naming attribute (ou).
The ou mapping is very simple, using a value of org’s displayName.
On the other hand, the dn mapping looks somehow scary.
There is no need to be afraid.
We are going to explain everything, and there are some really interesting parts here.
The purpose of the dn mapping is to construct LDAP distinguished name in a hierarchical manner.
We want to put the organizational tree under the ou=org,dc=example,dc=com entry, with the entry for ExAmPLE company at the top.
Therefore, the dn of Operations Division need to be ou=Operations Division,ou=ExAmPLE,ou=org,dc=example,dc=com.
IT Department goes under the Operations Division, therefore we need its dn to be ou=IT Department,ou=Operations Division,ou=ExAmPLE,ou=org,dc=example,dc=com.
We need to process the tree from the organizational unit all the way through all the parent units to the very top of organizational structure.
That is exactly the thing that the Groovy expression does.
Let’s skip the import statements for now.
The first thing that the expression has to do is to figure out the "path" from the current organizational unit to the top of the tree.
The expression gets the current organizational unit in the focus variable.
However, the org object does not contain its complete path in the tree.
All it has is a reference to its parent organizational unit (parentOrgRef).
Therefore, the expression has to iterate over all the levels in the tree until it gets to the top.
The top organizational unit does not have any parent, that is where the iteration stops.
Display names of each organizational unit at the "path" is collected in the orgpath list.
As the org contains only a reference to the parent, we need to explicitly read the parent object from midPoint repository.
We do that with an explicit call to midpoint.resolveReference(…) method.
This method reads the object from midPoint repository and returns it.
When the loop stops, orgpath contains all the display names that we want in our dn.
Now we need to encode the names in LDAP DN format.
This can be done by simple string operations.
However, there are some intricate details about escaping the names as they are encoded.
It would be nice if someone else could do the encoding for us.
Turns out, there is someone else to do it.
Java platform comes with Java Naming and Directory Interface (JNDI), which is supposed to be a generic library to access broad range of directory services.
JNDI is not the best library that the world has ever seen, but it is part of Java platform, and it can do formatting of LDAP DN.
It is good enough for our purposes.
We take advantage of JNDI LdapName and Rdn classes to encode the DN.
The import statements at the beginning made use of these classes quite convenient.
The last detail is the ordering.
We want our names in the DN to be in a different order, therefore we just reverse orgpath before processing.
|
Tracing and logging
Clever reader has noticed a couple of interesting things in that mapping.
Especially the <trace> element looks very useful, which it is.
It turns on detailed tracing of the mapping.
MidPoint will record the details of mapping evaluation in the log file.
Similar <trace> element can also be applied at the expression level.
Then there are the log statements in the Groovy code, such as log.debug("processing node {}", node).
These are explicit logging statements.
The processing node … message is recorded to the log file at debug level.
This is a very useful tool for diagnosing execution of complex expressions.
|
Our outbound mappings are ready to go. However, nothing happens yet. MidPoint does not know that it is supposed to create LDAP objects for our organizational units. MidPoint does not automatically create accounts for all the users either. We need a construction to do that. The orgs need to have an assignment with a construction - similar to these that we have used to create accounts, just with different kind and intent. We want to archive something like this:
<org oid="7a1feb50-471f-11ea-8aab-1b2627541f15">
<name>F11000</name>
<displayName>Sales and Marketing Division</displayName>
...
<assignment>
<construction>
<!-- LDAP resource -->
<resourceRef oid="8a83b1a4-be18-11e6-ae84-7301fdab1d7c"/>
<kind>generic</kind>
<intent>ou</intent>
</construction>
</assignment>
</org>You can test your configuration by creating this assignment manually in the GUI, or by editing the XML/JSON/YAML version of the org. However, manual method is not going to work in production. We need to create these assignments automatically. There are several ways to do it.
Perhaps the most obvious way would be to add a mapping to create this assignment in the object template for Organization unit objects.
As there is an object template for users (UserType), there may be an object template for any other midPoint object or archetype.
Therefore, you can create object template for Organizational unit archetype and configure the mapping there.
This would be an acceptable solution.
An alternative way would be to add inbound mapping to create this assignment.
That would be in fact quite easy, as it would is very similar to the mapping that we have used to create organizational hierarchy.
However, that would not be an ideal configuration, as we would mix the concerns here.
The mapping would be an inbound mapping in the Organizational Chart resource.
It would not be entirely appropriate for this inbound mapping to control provisioning (i.e. outbound flow) of organizational structure.
It could work, but such configuration would be difficult to understand and maintain.
We do not like that.
Clever reader is now thinking about the meta-role principle, looking at the Organizational unit archetype.
As usual, cleaver reader is absolutely right.
All we need is to add the construction into the Organizational unit archetype in a form of inducement.
<archetype oid="99fa4b3c-8702-11ef-896e-0b7221540b8b">
<name>Organizational unit</name>
...
<inducement>
<construction>
<!-- LDAP resource -->
<resourceRef oid="8a83b1a4-be18-11e6-ae84-7301fdab1d7c"/>
<kind>generic</kind>
<intent>ou</intent>
</construction>
</inducement>
</archetype>Back when we were configuring inbound synchronization of organizational units, we have do the right thing and assigned an archetype to the orgs we have created. Now it pays back ist dues, archetype makes is very easy to control behavior of all the organizational units. All we need to do now is to re-run the synchronization task. The result is a nice organizational structure in LDAP directory:
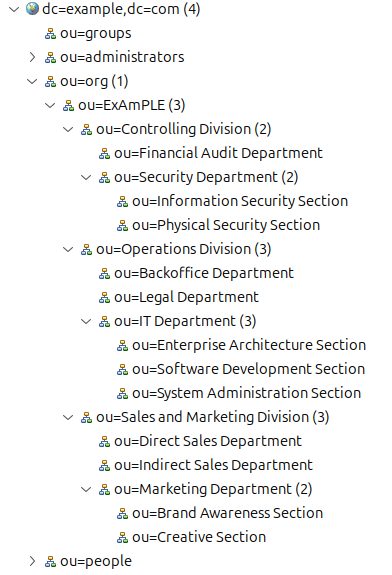
This is a nice result. However, there are still several remarks to make.
If you are going to try this scenario with a real LDAP server, you would need to create a root entry for the organizational structure (ou=org,dc=example,dc=com), as well as entry for ExAmPLE company (ou=ExAmPLE,ou=org,dc=example,dc=com).
You would also need to update access control lists (ACLs).
However, be warned that this is not a very ideal method to maintain organizational structure in LDAP directory.
We are using display names here, which are part of LDAP identifiers (DNs).
Therefore, even a minor correction in organizational unit name will trigger LDAP rename operation.
It will change the identifier of the organizational unit, and also all the organizational units below it.
Perhaps the only thing that can make it worse is to place users in that structure as well.
Which some people actually do.
The only real reason to put organizational structure in this form is to satisfy the needs of legacy applications.
Avoid this approach whenever you can.
We are presenting it here only for demonstration purposes, to explain a method for provisioning hierarchical structures.
The clever reader have surely noticed that the big Groovy expression above is explicitly fetching objects from midPoint repository database. This may cause a performance problem in case that such expression is evaluated often or if the structure is very deep. This is usually not the case with ordinary organizational structures, therefore this approach is usually not problematic. However, it is always a good thing to keep performance in mind, especially if your user population is bigger than few thousands of users.
Finally, we still depend on ordering of the data feed. We want to create "higher" entries in LDAP first, otherwise an attempt to create "lower" entries would fail. This can be solved by using the "create on demand" approach mentioned above. However, it is going to be problematic and cumbersome when organizational unit display names are used instead of identifiers. However, in that case this little details does not matter that much anyway, as it is likely you will suffer for many different reasons if organizational display names are used instead of identifiers. Always use organizational unit identifiers if you can. We really mean it. You can thank us later.
Focus and Projection
Synchronization of an organizational structure is an application of a generic synchronization principle. Almost any resource object can be synchronized with almost any midPoint object - and vice versa. Principle of the synchronization is essentially the same as in user-account case, as we have seen in previous chapters. In that case, the accounts were linked to user, midPoint synchronized the data from account to user and from user to accounts. The synchronization follows user-account links.
Synchronization of an organizational structure is based on the same principle. However, there is an org instead of user, and there are various resource objects instead of accounts. It may look like this:
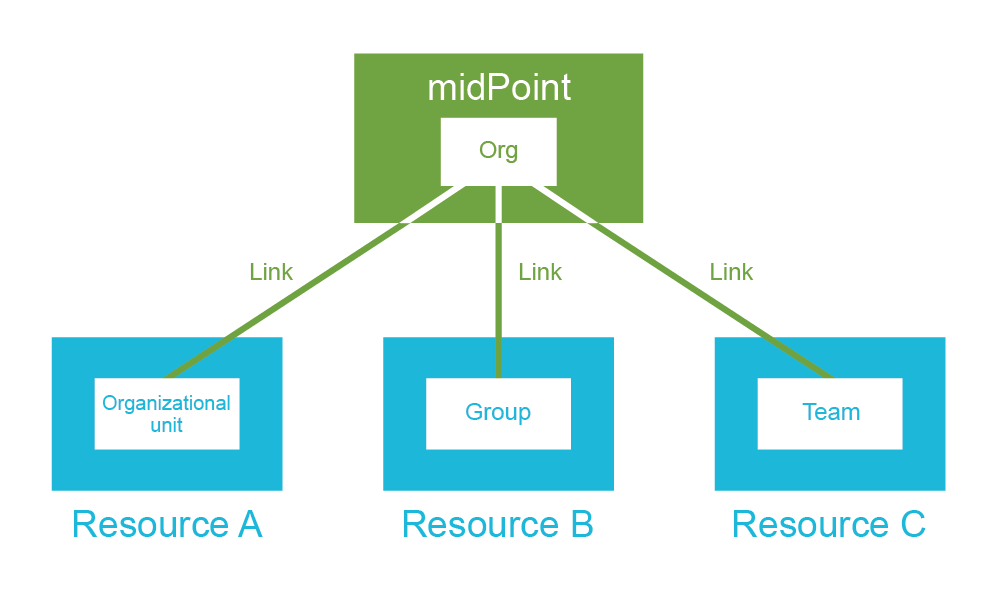
There may be user, org, service, role or similar midPoint object on the midPoint side. These may be synchronized with account, group, role, privilege, organizational unit or almost any resource object on resource side. As you can see, the terminology becomes quite cumbersome. Saying "similar midPoint object" and "almost any resource object" is not very natural or precise. Therefore, we have decided to use focus and projection terms:

The object that is "in the middle" is called focus or focal object. It is in the centre of the synchronization, it is its focal point. Every relevant piece of data is reflected onto the focal object by the synchronization mechanisms.
User is a very typical focal object. Other midPoint objects can be focal objects as well, most notably org, role and service.
The state of focal object is projected back to the resources. Therefore, the objects that reside on the resources are called projections. An account is a typical projection object, but there is wide variety of other object classes such as groups, organizational units, (resource-side) roles, privileges, access control lists, teams and so on.
|
Focus and projection
Focus and projection may sound like strange words to use for identity management concepts.
However, it is very difficult to find the right words.
Many identity management systems work with just user and account.
However, midPoint is more flexible, much more generic.
When we designed the generic synchronization mechanism, we needed to find good names for the generalization of user and account concepts.
We tried hard, but we could not find anything better than focus and projection.
The names may not be ideal, yet we are able to live with them.
There are only two hard problems in computer science, after all.
|
There is always one focus, one focal object in the center. There may be any number of projections linked to the focus. There may be several projections on one resource. However, each projection has to be unique, it needs to have a unique combination of kind and intent (or kind, intent and tag when "multi-accounts_ are used). This is the reason that we consider kind and intent to be coordinates, as they uniquely identify a projection on a particular resource.
This is a very flexible concept that can be used for various purposes. We have already seen how it can be used for synchronization of organizational structure. Similar principle can be used to synchronize Active Directory groups, automatically creating application role for each Active Directory group. This principle provides a mechanism to create multiple accounts for one user on one resource. For example, it can be used to create administration accounts for some users. In this case, we would use explicit kind and intent in the construction:
<role oid="0e9c448c-1f87-11eb-9703-b3d28c537192">
<name>System Administrator</name>
<inducement>
<construction>
<!-- Active Directory resource -->
<resourceRef oid="1e1e5a1c-1f87-11eb-8ace-1fbd338f61c5"/>
<kind>account</kind>
<intent>admin</intent>
</construction>
</inducement>
</user>The System Administrator role above specifies that a special admin account should be created for system administrators.
When this role is combined by an ordinary Employee role, the administrator will get two accounts: the usual employee account (intent=default) and a special-purpose administration account (intent=admin).
Overall, the concept of focus and projections is a generic principle that permeates entire midPoint platform. It applies to generic synchronization, access control models such as RBAC, provisioning, policy management and to almost any other aspect of midPoint functionality. It is one of the basic principles that midPoint is built on.
Conclusion
MidPoint organizational structure is a versatile and powerful mechanism. It can be used to organize users in units, teams and projects. It can be used to group variety of other midPoint objects. However, organizational structure becomes incredibly powerful when combined with other midPoint mechanisms. Authorizations can take advantage of organizational structures to implement delegated administration schemes. Organizational structures are used in certification campaigns. MidPoint multi-tenancy mechanism also relies on organizational structures. Organizational structure is a universal mechanism to organize midPoint objects.
There are many universal mechanisms in midPoint, synchronization mechanism being one of the prominent ones. Synchronization was designed to work with many types of midPoint objects, including organizational structure. Expressions and mappings bring the power to transform organizational structure data during synchronization, supporting diverse set of use cases. Similar mechanisms can be used to synchronize roles and services, granting midPoint enormous flexibility in identity management deployment.
11. Troubleshooting
The problem is not that there are problems. The problem is expecting otherwise and thinking that having problems is a problem.
MidPoint is a big and comprehensive system. Generally speaking, identity governance systems tend to be big and complex. They have a lot of things to do. There is a lot of data mapping, synchronization, policies, access control models, expressions and all such stuff. While each individual mechanism in itself is relatively simple, the combination of those mechanisms often creates something that would put the famous labyrinth of Knossos to shame. Especially junior engineers tend to create configurations that are unnecessarily complex. Those configurations may work for common cases. Then there comes a corner case and the result is a puzzled look at junior engineer’s face and a mysterious smile of his senior colleagues. At that point, junior engineers tend to panic and switch to high-energy trial-and-error mode, which usually does even more harm. What is really needed here is to stand back, to think about the situation and start to troubleshoot the problem in a systematic way.
However, even senior engineers often get into trouble. This is no weakness. MidPoint is really flexible, and sometimes it is hard to figure out what is going on exactly. In fact, midPoint has surprised even its authors on more than one occasion. When midPoint misbehaves, then the cause is almost always a configuration problem. However, there are usually thousands upon thousands of users, roles, policies and expressions. There is a lot of places where a little treacherous problem can hide and live happily ever after.
All of that was perfectly clear to midPoint developers even before midPoint project started. MidPoint developers are more than just programmers. Writing midPoint code takes a good part of developer’s day. But there is also testing, diagnostics of bugs and helping our colleagues and partners to figure out what is going on when the things get really tough. The developers would be lost without an efficient method to diagnose the behavior of midPoint. Therefore, diagnostic mechanisms were an integral part of midPoint design from the very beginning.
This chapter provides an overview of the diagnostics mechanisms in midPoint. Even more importantly, it describes the method that can help to find the problem in a systematic and reliable way. That is what every engineer should learn and use every day. In fact, troubleshooting is perhaps the most important skill for smooth deployment of any software system.
Designed for Visibility
MidPoint is designed, developed and maintained by a completely unique team. Expert identity management engineers were part of midPoint development team very early in midPoint design. Several key people that took part in midPoint design were involved in identity management projects since early 2000s. That experience was crucial – especially bad experience from the use of the technologies that were available at the time. One of the most important lessons that can be learned from fist-generation identity management systems is a lesson of visibility. All those early systems were closed, their vendors jealously guarding all the secrets of inner workings of their systems. This made troubleshooting a very demanding task. Engineers often had to resort to desperate measures, such as calling vendor’s support help desk. Unfortunately, even such drastic actions usually did not help much. It was a real struggle.
When midPoint project started, the team agreed to take a different approach. MidPoint is radically open. It is an open source project from the day one. There is a reasonable documentation, even including architectural documentation and design notes. All of that is public. Most importantly, the visibility goes deep down in midPoint implementation. Great attention was paid for proper logging, as that is the primary troubleshooting mechanism. There are various diagnostic mechanisms in midPoint user interface, performance metrics and so on. All of that is improved in every midPoint release.
However, the most important thing is to know how to use those mechanisms properly. Even the best diagnostics mechanism does not do any good for you if it shows the data that you do not need at the moment. It is important to know where to start, where to look, and what to look for. These are the questions that this chapter should answer.
Systematic Approach
Where to even start the troubleshooting? That is a question that troubles most engineers who are new to midPoint. Senior engineers would probably think that this is a silly question and the answer is obvious. Yet, it is not. It gets even harder to figure out how to follow the trace of the problem deeper into midPoint configuration.
Let us start with the obvious. Maybe there is an error message right in front of your eyes. MidPoint usually provides a lot of details that come with error message. Then there are log files. MidPoint logs a huge amount of information, it just needs to be enabled.
The usual troubleshooting sequence goes like this:
-
What exactly is the problem? What are the symptoms? Does the operation fail? Is there an error message? Does it crash? Did it produce wrong results, or are there no results at all? What was the supposed result? Can this be an error in the input data?
-
If there is an error message, what is that message saying? Is there any additional information in the message or in the operation result that comes with the message? Where is the error coming from? Is it an error from a connector? Is it an error from an expression?
-
Is there any additional information in the log file? Are there any errors or warnings in the log file that may cause the problem? Are there any suspicious errors or warnings before in the log file before the problem happened?
-
What was midPoint doing, exactly? Is there any information about the operation progress when log level is set to
DEBUG? What are the intermediary results of the processing? Are those results correct? At which point in the operation are data getting wrong? -
Where exactly is the problem? Which component, configuration, mapping or expression are causing it? What are the details of the operation? Are there any hints if you set logging level of that component to
TRACE?
The first step is perhaps obvious – even though too many people fail to see what is right in front of their eyes. Once you have opened your eyes and checked for the obvious causes, then there is time to go deeper.
Once you have ruled out the obvious cases you need to have a look at midPoint log files. You need to follow the trace and examine the operations that midPoint was doing. The best strategy here is one of divide and conquer. In other words, start in the middle. Find a convenient starting point in the middle of the processing. Where exactly that middle is depends on the nature of the problem. If the problem is related to a connector, then the best starting point is probably a connector framework. Does the operation make sense? Are the values correct? If the answer is "yes", then the problem is probably in the connector. If the answer is "no", then the problem is in midPoint configuration. Either way you know where you should focus your investigation. If that problem is in midPoint, then in which part it is? Are data in the user object correct? If they are, then the problem is probably in the outbound mappings. Have a look at those. And so on. Start with a big thing, and then follow the clues and dive into the details.
Error Messages and Operation Results
Error messages are the most obvious troubleshooting mechanisms. MidPoint error messages usually provide enough information to diagnose and fix trivial problems right away.
MidPoint error messages are in fact part of a more complex system of operation results. Operation result is a data structure that accompanies every midPoint operation. The operation records important points during the processing in the operation result. Operation result is hierarchical. There is one big operation at the top. The top-level operation usually consists of smaller operations which in turn consist of even smaller operations. Connector operations are somewhere at the bottom. If the top-level message does not provide information about the problem, then dig deeper. Expand the sub-operations until you find the root cause.
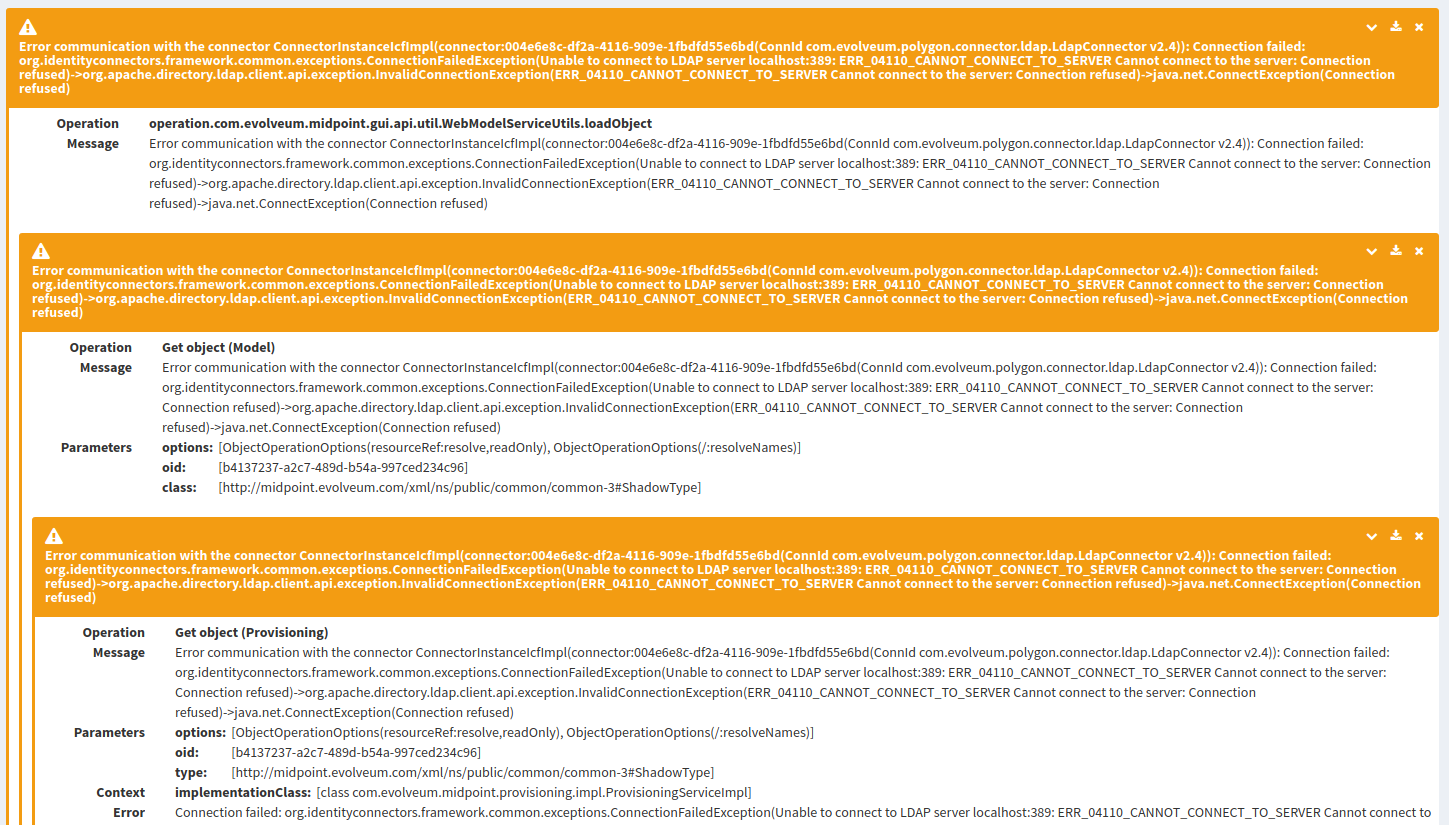
Operation result can be used to get a rough idea what midPoint was doing and what are the results. Each of the operations in the result has a status:
| Status | Meaning |
|---|---|
|
Operation completed. The operation has finished successfully. There are no errors. |
|
Operation completed, but there are warnings. |
|
Operation completed. Some parts of the operation were successful, other parts of the operations resulted in an error. However, the operation was not stopped and the execution continued despite the errors. Partial error is often indicated in case that user modification is successful but account modification fails. |
|
Operation was interrupted due to an error. The error prohibited completion of the operation. |
|
Operation completed. An error was experienced during execution of the operation. However, the error was handled and the system was able to compensate the effects of the error. The results should be equivalent to a successful operation. |
|
Operation was not even started because the operation is not applicable to the inputs. |
|
Operation is in progress. The operation was started, but it was not yet finished. This status is seen for operations that execute “in the background”, in running tasks and so on. It may also be used for operations that are waiting for an external event, such as approval operations or operation retries. |
|
Status of the operation is not known. This status code should not be normally seen. However, it may happen under special circumstances. For example, if a bug in midPoint or a connector leaves the operation in an uncertain state or in case that unforeseen error appeared, and it was not handled properly. This status usually indicates a programming bug. |
Operation result is a very useful data structure. It has many purposes. For example, it is stored in the tasks and provides data for later diagnostics. It can summarize the operations, provide performance data and so on. That means that the operation result cannot be too big. Therefore, the granularity of the operation result is usually quite rough to pinpoint serious issues. Issues that are really tricky usually cannot be resolved by examination of operation results. For that we need to go deeper still.
Logging
Logging is the best tool in the troubleshooting toolbox. Logging provides information about all the important things that happen in the system. It also goes very deep, and it can provide very fine details about midPoint operations. Logging is universal and very powerful tool. It is the best hope to find the cause even for the trickiest of problems.
Similarly to every other tool, the most important thing is to know how to use it properly. MidPoint logs only a very little information by default. This is a reasonable setting for a production system that has been properly configured and tested. It is not enough in case that you are chasing a configuration problem. In that case, the logging system needs to be reconfigured to log more information. Beware, if logging system is set to its full power, you will get a huge stream of data that is likely to completely overwhelm you. The important information is certainly going to be there. However, it will be completely lost in the flood of other data. Therefore, logging needs some skill and experience to manage it correctly.
MidPoint is using logging approach that is well established in the industry. MidPoint logging principles should be quite familiar to any deployment engineer. However, it is perhaps worth to provide a quick overview of those basic principles.
MidPoint log files are located in midPoint home directory.
This is usually var sub-directory of midPoint installation directory.
When using docker compose, midPoint home directory is available as midpoint_home directory, located in the same directory as is your docker-compose.yml file.
MidPoint home directory contains subdirectory logs.
That is where midPoint logfiles are located.
There are usually several files:
-
midpoint.logis the primary midPoint log file. Almost all log messages from midPoint are be recorded here. This is the right file to examine. The truth is in there. -
midpoint.outis file where the standard output of midPoint process is recorded in some deployment scenarios. Only a very few things are usually logged here. Those are the things that happen before midPoint logging system is enabled, therefore midPoint cannot control and redirect logging of those messages. Which that the messages usually describe events that happen before midPoint starts and after it stops. This file does not need to be inspected routinely. However, it is a useful place to look while experiencing startup issues.
Log files are usually rotated. Which means that when there is too much data in one log file the file is renamed. Oldest files are removed. Otherwise the log files would fill all available disk space.
|
Docker logs
Logs are handled in somehow special way in the docker environment.
Perhaps the easiest way to look at the logs is to simply start the containers in foreground, e.g. by using docker compose up without the -d switch.
This can provide nice overview that the container are running, but it is not very practical for log analysis.
The usual method of locating the log file in midPoint home directory can still be used in docker environment.
If you prefer using native docker tools, there is docker compose logs command to access the logs.
|
Log messages have a structured format. They look like this:
2019-08-16 16:40:25,863 [PROVISIONING] [main] INFO (com.evolveum.midpoint.provisioning.impl.ProvisioningServiceImpl): Discovered local connector connector: ConnId com.evolveum.polygon.connector.ldap.LdapConnector v2.3 (OID:268678c0-b5b3-4b13-a399-c2fbd903e51d)
The fields are described in the following table.
| Field | Description | Example |
|---|---|---|
Timestamp |
Timestamp of a moment when the message was generated. |
|
Component name |
Name of the component where the message originated. |
|
Thread name |
Name of thread in which the message originated. |
|
Log level |
Severity level of the message. |
|
Logger name |
This is usually package name or a fully-qualified name of the class that produced the message. There may also be special-purpose loggers with special names. |
|
Message |
Content of log message. This is usually single-line message. However, multi-line messages are common on finer log levels. |
|
As midPoint takes advantage of parallel processing, the thread name is often useful to filter out messages that belong to a single operation.
The logger name is sometimes abbreviated, therefore com.evolveum.midpoint.provisioning.impl.ProvisioningServiceImpl becomes c.e.m.provisioning.impl.ProvisioningServiceImpl.
Otherwise, the log message format is similar to message formats of other products, and it should be quite familiar to most system engineers.
The log format can be customized if needed.
The most important aspect of efficient usage of logging as a diagnostic tool is to control granularity of logging. This is both a science and an art. It requires some instincts and experience. The granularity can be controlled in two "dimensions":
-
Log level determines the level of details that is logged.
INFOlog level will log only the important events.TRACElevel will log huge amount of information that is primarily interesting for developers. This controls depth of logging. -
Package determines which midPoint components log their messages. Setting a log level for a particular package also enables logging of all sub-packages and classes. This controls the breadth of logging.
Logging setting is a combination of a package and level. Therefore, it is possible to get a very detailed logging from a single package while keeping logging of other packages at a very rough-grained level. And this is exactly what is needed when chasing a bug. We want to have a very precise look at the component where the problem occurs without being overwhelmed by a flood of data from other parts of midPoint. The trick is to know which package and level to use.
Let’s start with log levels. Each level has a precise definition of the amount of details it provides.
| Level | Circumstances | Description |
|---|---|---|
|
Critical errors. The system cannot continue operation, it is about to crash or stop working. |
This is bad. The system is going down. There is no way that the system can run. Big problem. This should not happen. |
|
Error that seriously affects the system, but the system as a whole can recover. |
Typically caused by errors in the data, network errors and so on. This is not good. Sometimes the system can recover just by itself. However, manual intervention of system administrator is usually needed. |
|
Suspicious situation. System may be able to operate normally, but there may be a hidden or temporary problem or an indication of future error. |
Important messages that should not occur in a well-configured and tuned systems. If they appear they should be investigated. However, the investigation can wait. Immediate action is usually not required. |
|
Important changes in system state, start/stop of important system tasks, etc. |
Those events occur normally in almost all running systems. Unless you have a very busy system, this log level can be enabled all the time in production. |
|
Execution messages, state changes, expression evaluation messages and similar messages for system administrator. |
This log level is dedicated for system administrators to debug the configuration. It will provide reasonable amount of messages that can be used to find configuration problems. |
|
Fine-grained messages about execution details. |
This log level will provide a lot of data, lots of details. Its primary purpose is to allow developers to find a bug in production systems. However, this can also provide precious details for system administrators when troubleshooting really tricky problems. |
The levels are organized in a hierarchy.
When DEBUG level is set for a particular package, the package also logs all messages with higher (rough-grain) levels.
The usual log level to start with when chasing a bug is DEBUG log level.
This may be too much for some packages or too little for other packages.
Yet, it is a good overall starting point.
Log levels are simple and well-defined. However, figuring out proper package name is much harder. Engineers that understand midPoint architecture and source code have a huge advantage here. Logging package names are directly derived from Java packages and classes used in midPoint source code. However, even non-developers can learn how to use the package names efficiently.
The first thing to keep in mind is that midPoint is composed of subsystems and components. Each subsystem and component has its own package name. Those can be used to control logging of individual parts of midPoint. Following table provides an overview of those architectural blocks.
| Subsystem/component | Package name | Description |
|---|---|---|
GUI |
|
User interface. This subsystem drives all interaction with the user. Note: the |
Model |
|
This subsystem implements most of the identity management logic in midPoint. User processing, RBAC, organizational structure, policies – everything is processed here. |
Provisioning |
|
Communication with external systems. This subsystem is responsible for communication with the connectors, management of shadow objects, driving live synchronization, manual connectors, operation retries, management of resources and connectors and so on. |
ConnId |
|
ConnId connector framework. This is responsible for running the connectors and passing operation to the connectors. |
Repository |
|
Primary responsibility is to store midPoint objects in the database. But there is also task management, authorization processing, expression evaluation and so on. |
Schema |
|
Definition of midPoint data model and various utilities. |
Prism |
|
Library that is parsing and storing objects in representation data formats (XML/JSON/YAML). |
Those package names can provide rough boundaries for logging.
Enabling TRACE level on an entire subsystem can still provide a lot of data, but it is better than enabling TRACE for whole midPoint.
The best approach here involves a look at midPoint source code.
However, there is a still a way to do it without a source code:
-
Enable
DEBUGlevel on the entire subsystem. This is likely to provide a log of data, but it should not be overwhelming. -
Look at the log file and try to figure out in which part the interesting things happen. Where the things are getting out of control. Observe name of the packages that are used in those messages.
-
Set
TRACElevel only for those packages or classes where interesting things happen. You will get much more details. -
Optionally mute some packages that show too much data by setting their log level to
INFO.
This is a good overall approach. However, there are few very specific packages that tend to attract problems. Therefore, they are often set to finer log levels. Below is a list of those packages.
| Component | Package name | Description |
|---|---|---|
Clockwork |
|
The "controller" that drives computation of all changes in midPoint. Change of every object is passing through clockwork (unless it is "raw"). Enabling logging on clockwork will provide rough overview of the processing. |
Projector |
|
The "brain" that computes all effects of the change. It is invoked as part of the clockwork. Enabling logging will provide overview of the computation. |
Change Executor |
|
The "hand" that executes all the computed changes. Enabling logging will provide an overview of computed changes and the result of their application (success or failure). |
Lens |
|
Sub-component responsible for computing and processing all ordinary changes on objects. It includes clockwork, projector and executor. Setting |
Mappings |
|
Code that is processing mappings. Enabling logging provides a short overview of mapping inputs and outputs with some insights into the inner processing. |
Expressions |
|
Expression evaluation code. Enabling logging will provide a lot of details about expression evaluation. This is likely to produce a log of data. |
Script expressions |
|
Logs a lot of details about script expression evaluation (Groovy, JavaScript, …). Provides a lot of details. |
ConnId API Operations |
|
Special package used to log summary of all connector operations that go through ConnId framework. This is the API side of the framework (midPoint-ConnId boundary). |
ConnId SPI Operations |
|
Special package used to log summary of all connector operations that go through ConnId framework. This is the SPI side of the framework (ConnId-connector boundary). |
Security |
|
Package that contains security-related components. This is especially useful for debugging authorizations. |
Setting DEBUG log level to clockwork, projector or change executor is a good starting point for diagnostics of problems related to mappings and assignments.
The ConnId operation log is a good starting point for connector related problems.
Security package is perhaps the only really efficient mechanism to debug misbehaving authorizations.
Logging is the best troubleshooting tool to handle even the most complex issues. Therefore, make sure you take full advantage of this tool. The importance of logging can hardly be overstated. Make sure you know how to set up logging properly and how to interpret log messages. This is a skill that takes some time to learn. Yet, it is a crucial investment to make. The time will be repaid many times over. Therefore, if you have any problem that looks strange, remember one simple rule: always look at the log files. The answer will be there.
Auditing
Purpose of the auditing mechanism is to record all operations in midPoint for accountability purposes. Auditing is used by security officers to inspect system activity, it may be used for forensic purposes, or it can simply provide a data for statistical analyses. However, the fact that auditing records all operations in the system can be a significant benefit for troubleshooting.
MidPoint user interface is quite comprehensive. Despite that complexity, most operations of the user interface should be easily understandable in an intuitive way. However, there are cases when it is not clear what exactly is user interface trying to do. Some operations can even be quite counter-intuitive. For example, designation of a deputy is an operation on a different user than most people would intuitively expect. It is always an advantage to see all the details of an operation that user interface tries to initiate. That is where auditing mechanism comes in. The auditing subsystem records all the operations in a precise, structured way. Maybe midPoint does unexpected thing just because the operation request itself does not make sense. Audit trail can be examined to make sure that the operation is correct. Also, the results of the operation are recorded in the audit trail. Audit may be a quick and efficient way to get an overview about the operation as a whole.
Audit may also be very handy when exploring bulk operations, such as results of synchronization or reconciliation runs. The tasks in which those operations run provide overview of the results, e.g. they provide the number of errors. However, the task data structure holds only limited details of each operation. Data structures providing all the details would be huge. However, there are audit records for each of those operations. Those records can be used to figure out what went wrong exactly: which objects have failed, what operations were attempted, what exactly is the outcome.
Audit trail is one of the few places in midPoint where historical data are kept. All other parts of midPoint are concerned about here and now, historical data are usually kept only for informational purposes. Audit log is different. Audit log stores historical data, therefore it can be used to get an overview of midPoint operations in the past. Common use of audit trail is to get overview of daily operations. For example, audit records can provide data on how many operations were processed during the past day, which operations have failed during last few hours and so on. There is a special type of report to show such information. There is also a dashboard widget that is designed to show such audit-based information for monitoring purposes.
However, please keep in mind that midPoint is an identity management system. It is not a security information and event management (SIEM) system or a data warehouse. MidPoint is not designed to keep and process massive amount of historical data. Therefore, even the use of audit trails has its limits. Keeping audit trail in midPoint database for a short period of time is usually perfectly acceptable. However, a more suitable system should be used for a long-term storage and processing of audit trail data.
Typical midPoint deployment records audit trails in the database table. This is the right method to use for production deployment. However, there is another option. Audit records can be also recorded in the log files. This approach is not recommended for a production deployment. It is quite likely that audit records would flood the logs, and it may even disclose sensitive data. However, directing audit records into system logs may provide interesting benefits in development environments. For example, in case that a detailed debug logging is used, audit records will provide summary of operation and the outcome in the same log together with all the details. It makes it easier to analyze the log files. As audit data is recorded close to the operation start and operation end, audit log entries also provide a “frame” for the operation. It may be easier to find start and end of the operation in the logfile.
Recording audit messages can be enabled in user interface, in the part where ordinary logging is configured. There is an "Audit" section on that page. Audit log message looks like this:
2019-08-19 15:02:05,367 [MODEL] [pool-3-thread-6] INFO (com.evolveum.midpoint.audit.log): 2019-08-19T15:02:05.367+0200 eid=1566219725367-0-1, et=MODIFY_OBJECT, es=REQUEST, sid=DF97547B47BC6795D941B8C28AFB6089, rid=d0c90fdf-d101-457b-baf9-ea0371637a1d, tid=1566219725331-0-1, toid=null, hid=localhost, nid=DefaultNode, raddr=127.0.0.1, I=FocusType:00000000-0000-0000-0000-000000000002(user), T=PRV(oid=df2210ad-3eec-4f59-9b11-46479b9ebc7c, targetType={.../common/common-3}UserType, targetName=alice, relation={.../common/org-3}default), TO=null, D=[df2210ad-3eec-4f59-9b11-46479b9ebc7c:MODIFY], ch=http://midpoint.evolveum.com/xml/ns/public/gui/channels-3#user, o=null, p=null, m=
This is a semi-structured message that provides summary of significant fields of the audit record. Detailed audit logging can also be enabled. In that case the deltas will be dumped in the log files.
Troubleshooting Clockwork and Projector
MidPoint has many components that have diverse responsibilities.
However, there is one set of components that can be described as a heart (or rather a brain) of midPoint.
It is the set of components known as "lens".
Clockwork and Projector are two most prominent classes in that set.
Projector is responsible for computing the values, running the mappings, processing assignment and almost anything else related to the computation of identity data.
Clockwork is responsible for controlling the process.
It invokes Projector as many times as is needed to complete the computation.
Clockwork also invokes ChangeExecutor to carry out the changes.
The overall request processing in midPoint works like this:
-
User clicks on Save button in midPoint user interface. User interface code computes what operation needs to be done.
-
Operation on
ModelServiceis invoked. This is usuallyexecuteChanges(…)operation. Deltas that describe requested changes are passed as a parameter of this operation. -
The operation is passed to
Clockworkto control the operation. -
Projectoris invoked to compute all the changes. The changes are recorded in model context. The changes are computed, but not executed yet. Mappings and expressions are evaluated at this point. -
Clockworkfigures out what to do with the operation. There may be a need to drive the operation through approval process. Special hooks may need to be invoked. Maybe the operation violates the policy rules therefore it needs to be stopped.Clockworkdoes what needs to be done. -
ChangeExecutoris invoked to carry out the changes. Changes to users, roles and other focal objects are carried out by changing the data in midPoint repository. That is quite straightforward. However, changes to projections (objects that reside in resources) are much more complicated. -
Provisioningservice is invoked to carry out changes to projections. The changes are expressed as changes to shadow objects (ShadowType). Some of those changes are recorded in midPoint database, such as changes in identifier or metadata. However, most of the changes need to be carried out on a resource by using a connector. -
Connector framework (ConnId) is invoked to initiate resource operation by using appropriate connector.
-
Connector is invoked. Connector initiates the operation on resources and gets the results.
-
Operation results get back to
ChangeExecutorand then toClockwork. Results are summarized. If there is an error it is decided whether to continue or whether to stop the operation. At the endClockworkrecords the final audit record and returns control back to the caller. Operation is finished.
Sometimes it is not possible to compute everything in a single pass. There may be dependencies between resources, result of one operation may be an input to another operation. For that reason clockwork and projector work in waves. Therefore, several steps described above may be repeated in each wave. Clockwork and projector exchange control in each wave until the operation is done.
Following picture provides a structural view of this setup.

This process is moving around a lot of data. Those data are recorded in model context. It is a data structure that describes the operations, it holds all related objects, intermediary computation results and all other important data. This data structure is absolutely crucial for the entire process. It also provides valuable troubleshooting information. When appropriate log packages and levels are enabled, the model context is dumped to log files at important moments during the computation. Often the best way how to find a problem is to watch how the model contest changes during the computation.
The model context is putting together the focus and projections that belong together. Focus is usually a user, projections are accounts. In such case, the model context groups together a user with all the accounts are associated with that accounts. These are usually accounts that are linked to the user, new accounts that were not yet created, or old accounts that were recently deleted. MidPoint groups all these objects together to allow efficient computation of assignments and mappings and other policies.
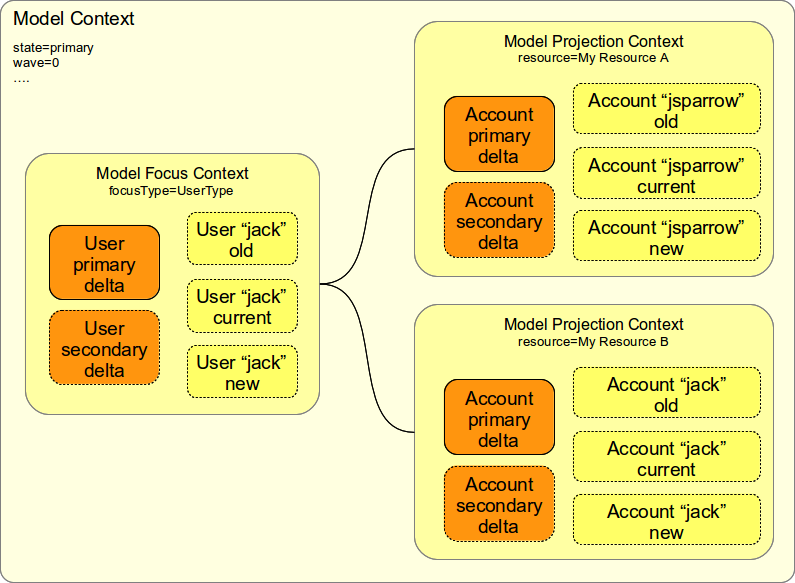
Model Context has three parts:
-
The context itself contains information about the entire computation (such as computation state and wave number).
-
Focus part which contains information about focal object. There is at most one focus.
-
Projection part which contains information about each projection. There may be multiple projections.
Focus and projection parts have similar structure. Both of these parts contain:
-
Old object: the object (focus or projection) as it was before the computation. This means really the beginning of computation. Please note that the computation can take several days e.g. if the request waits for approval.
-
Current object: the object as it was last time the Projector loaded the object. This is usually quite recent information (at most few seconds old).
-
New object: the expected form of new object after the computation. This item is here mostly for informational purposes and for diagnostics. The actual value of the result may be slightly different (e.g. if two operations are carried out over the same object in parallel).
-
Primary delta: The request delta. This is the delta that was explicitly entered in the GUI, supplied to the web service or otherwise specified in IDM Model Interface invocation. This is the "command" that midPoint should execute. This defines what user wants. This delta will be executed exactly as it was specified.
-
Secondary delta: The computed delta. Secondary delta originates from execution of mappings or hooks or other automated mechanisms. This describes what midPoint has computed. This delta will be executed, but it can be recomputed several times during the process.
-
Synchronization delta: The detected delta. The delta that was detected by synchronization. MidPoint assumes that this delta was already executed and all it can do is to react to this. It is used as an input to the computation. This delta will not be executed again.
This description is slightly simplified, the real thing is a bit more complex. However, this description should be sufficient to understand the overall process.
Model context is dumped at strategic places during clockwork and projector computation. The dumps look like this:
---[ PROJECTOR (INITIAL) context projection values and credentials of resource:10000000-0000-0000-0000-000000000204(Dummy Resource Blue)(default) ]--------------------------------
LensContext: state=INITIAL, Wave(e=0,p=0,max=0), focus, 1 projections, 2 changes, fresh=true
Channel: null
Options: null
Settings: assignments=FULL
FOCUS:
User, oid=c0c010c0-d34d-b33f-f00d-111111111116, syncIntent=null
User old:
user: (c0c010c0-d34d-b33f-f00d-111111111116, v5, UserType) name: guybrush .....Those dumps provide crucial information for troubleshooting. Their importance for diagnosing really hard problems cannot be overstated. It is more than recommended to get used to read and follow those dumps through the computation process. It will save a huge amount of time.
Why is it so important to know all of this? You need to know this to find your way through this labyrinth. MidPoint provides quite a lot of diagnostic data for each step and each sub-step of each step. You can try to enable full logging to get all the details. In that case you get a digital equivalent of a flash flood, and you are very likely to get drowned. The information that you are looking for will be almost certainly there, but it will be lost among all the innocent-looking data. This is a good way to spend a lot of time and lose your sanity in the process. It is not an efficient debugging method.
The efficient debugging method is to proceed in steps. Start with high-level information. Then focus your eyes a bit deeper. Try to figure out which steps of the processing are working well and which steps are wrong. Then have a closer look at those steps by enabling more detailed logging. The look deeper and deeper until the problem is found.
The process usually goes like this:
-
Have a look at input and output of the operation as a whole. There are several ways to do that. You can use "preview" operation of user interface to see the input. You can examine the operation result in the user interface to see the outcome of the operation, or you may have a look at the audit trail. Enabling auditing to a log files may also help.
-
Have a look at clockwork. Clockwork can provide a summary of the operation when
DEBUGlog level oncom.evolveum.midpoint.model.impl.lens.Clockworkpackage is enabled. The summary is an important branch in the troubleshooting process. The summary may suggest whether the problem with the operation is in the computation (Projector) or whether it is in the connectors and resources (Provisioning). -
Have a detailed look at the Clockwork process. Clockwork summary provides only a brief summary in a very compact form. That information may not be detailed enough to figure out what is going on. Therefore, you may need to go deeper. Enabling
TRACElog level on Clockwork provides detailed data about all the stages of clockwork processing. Model context is dumped in each step. It is this dump of model context that provides valuable troubleshooting data. Have a look at those dumps and try to figure out where exactly the operation goes wrong. After that you should be able to decide whether the problem is in computation (Projector) or execution (Provisioning). -
In case you suspect provisioning issues but you are not sure, it may be helpful to have a detailed look at
ChangeExecutor. This component is responsible to carry out all the changes from Projector and Clockwork. EnablingDEBUGorTRACElogging oncom.evolveum.midpoint.model.impl.lens.ChangeExecutorprovides details about each operation and its outcome.
Overall, clockwork summary is a good starting point. The summary looks like this:
###[ CLOCKWORK SUMMARY ]######################################
Triggered by focus primary delta ObjectDelta(UserType:c0c010c0-d34d-b33f-f00d-111111111111,MODIFY: PropertyDelta( / {.../common/common-3}organizationalUnit, REPLACE), PropertyDelta(metadata / {.../common/common-3}modifyTimestamp, REPLACE))
Focus: focus(user:c0c010c0-d34d-b33f-f00d-111111111111(jack))
Projections (1): account(ID {.../connector/icf-1/resource-schema-3}uid = [ jack ], type 'default', resource:10000000-0000-0000-0000-000000000104(Dummy Resource Red)): KEEP
Executed:
ObjectDelta(UserType:c0c010c0-d34d-b33f-f00d-111111111111,MODIFY: PropertyDelta( / {.../common/common-3}organizationalUnit, REPLACE), PropertyDelta(metadata / {.../common/common-3}modifyTimestamp, REPLACE)): SUCCESS
ObjectDelta(ShadowType:a3ebbe89-227b-42ff-9d00-f42bee3cf151,MODIFY: PropertyDelta(attributes / {.../resource/instance-3}ship, REPLACE), PropertyDelta(metadata / {.../common/common-3}modifyTimestamp, REPLACE)): SUCCESS
##############################################################At this point you should know the rough outline of the problem. At the very least you should know whether the problem is in:
-
Projector: the problem is that midPoint does not compute the values correctly.
-
Provisioning: the values are computed correctly, but there is a problem when midPoint tries to execute the operation.
If the problem is in the computation, then you need to have a closer look at Projector.
The first step should be to enable DEBUG logging of com.evolveum.midpoint.model.impl.lens.projector.Projector.
The output of this logging is similar to the output of Clockwork trace.
Each step of Projector computation is recorded and model context is dumped.
Watch the changes in model context closely and try to figure out where wrong results occur.
This is usually all that is needed to figure out the nature of the problem.
The problem is often in the mappings.
In that case, follow the instructions in the next section to debug the mappings.
If you still cannot figure out what is going on there are still finer details that can be enabled.
The projector consists of many "processor" classes, such as ActivationProcessor or AssignmentProcessor.
Each of those are responsible for one part of the computation.
Enabling TRACE logging on them provides a very fine details about the computation.
Package names of those classes can be found in midPoint source code.
However, it is usually more convenient to enable TRACE logging on the entire com.evolveum.midpoint.model.impl.lens package at this point.
Doing so also shows all the names of all the "processors" that take place during the computation.
Those names can be used to focus the logging output only to specific parts of computation.
The things may get quite messy if the problem is in the execution of the operation.
There are many components to consider.
There is midPoint provisioning code, ConnId connector framework, connector and then the target system itself.
There is almost uncountable number of combinations, configurations, network conditions and other circumstances where things may go wrong.
The first step should be to figure out whether the problem is on midPoint side or on the resource side.
Once again the best strategy is to find a suitable point in the entire process and to check operation status here.
Connector framework is such a suitable point.
There is special logger that can be used to record summary of all the operations of connector framework: org.identityconnectors.framework.spi.operations.
Enabling TRACE logging on this logger will record all the operation requests and results that pass between ConnId framework and the connector.
Some connectors provide similar facility that can provide even more details.
For example, LDAP and AD connectors can log details of all LDAP operations by enabling TRACE logging on com.evolveum.polygon.connector.ldap.OperationLog.
This method is usually preferable as it can clearly indicate whether the problem is caused by wrong operation request or whether the problem occurs on the LDAP or AD server.
If case that the problem is in the connector or somewhere on the resource side there is a separate troubleshooting guide below.
In case that the problem is in midPoint, then the best strategy would be to enable logging of midPoint provisioning components: com.evolveum.midpoint.provisioning.
Setting the logging to DEBUG level should provide enough information to locate the problem.
Desperate engineers can try to use TRACE level here.
But in that case, it is perhaps a good idea to leave some provisioning classes to DEBUG level (such as ResourceManager) as they are usually too loud at TRACE level.
| Lens, Clockwork and Projector. Where do those names come from? Naming is a notoriously hard thing. Software engineers create things that are not alike anything in the real world. Therefore, it is often very hard to find good names for components. The recommended practice is to find appropriate metaphor for the system. In other words: find something in the real world that something similar as you do. When midPoint was young we were implementing a component that mapped user data to accounts. However, this component was supposed to be generic. It mapped user to accounts, but also role to entitlements, org to OUs and so on. The obvious name "Mapper" was problematic, as we had a concept of "mapping" already. Such name would be confusing. Therefore, we have chosen a concept of projecting user data to accounts in the same way as movie is projected to a screen in a theater. That was also a reason for "focus" and "projection" and to use name "lens" for the whole package. Some time later we needed a name for a controller that will drive the projector. We thought about a planetarium or a telescope driven by a clockwork mechanism. MidPoint has evolved since then and those names may no longer be a perfect metaphor. However, they are there, and we got used to them. |
Troubleshooting Mappings and Expressions
Mappings and expressions often contain custom scripting code. This ability makes midPoint very flexible, satisfying diverse requirements. Yet, it also means that mappings and expressions are often the source of problems. Creating, testing and maintaining the expressions would be almost impossible without any debugging and troubleshooting facilities.
MidPoint contains code that can be used to trace execution of mappings and expressions on a very detailed level. The trace shows inputs and outputs and deltas that are taken into consideration when the expression or mapping is evaluated. There are two options to enable this tracing.
First option is to enable the tracing globally for all expressions and mappings by setting one or more of the following loggers to TRACE level:
| Component | Package name | Description | Verbosity |
|---|---|---|---|
Mappings |
|
Code that is processing mappings. Enabling logging will provide a short overview of mapping inputs and outputs with some insights into the inner processing. |
Medium |
Expressions |
|
Expression evaluation code. Enabling logging will provide a lot of details about expression evaluation. This is likely to produce a log of data. |
High |
Script expressions |
|
Logs a lot of details about script expression evaluation (Groovy, JavaScript, …). Provides a lot of details. |
Very high |
Setting logger levels to TRACE logs all execution of mappings and expressions.
However, this may be a huge amount of information, especially in complex deployments with many mappings and expressions.
Therefore, there is an alternative way that can be used to trace mappings and expressions individually.
There is a special-purpose trace property in the mapping:
<mapping>
...
<trace>true</trace>
...
</mapping>There is a similar property in expression:
<mapping>
...
<expression>
<trace>true</trace>
...
</expression>
...
</mapping>This is a nice method to look at one particular troublesome mapping without flooding the log files with traces of all the mappings in the system. However, it still may not be entirely easy to locate the dump of the mapping in the log files. Therefore, it is a good practice to name your mappings:
<mapping>
<name>my-pretty-mapping</name>
...
</mapping>Mapping name is recorded in the mapping and expression dumps, therefore it can be easily located in the log files. Mapping names are also used in error messages, and they are likely to be used in diagnostic outputs that will be developed in midPoint in the future. Therefore, it is a very good practice to put names to mappings.
Dumping a mapping or expression provides overview of inputs and outputs. However, that alone may not be enough to figure out what is wrong inside the expression. Therefore, script expressions can explicitly invoke a logging facility. MidPoint has script expression functions that can be used to log messages from the scripting code. It works like this:
<mapping>
...
<expression>
<script>
<code>
...
log.error('The {} is broken, {} is to blame', thing, reason)
...
</code>
</script>
</expression>
...
</mapping>Such messages are recorded in the system log using special-purpose logger com.evolveum.midpoint.expression and the appropriate level.
The message itself is composed of several parts using {} placeholders.
Troubleshooting Connectors
MidPoint is using the ConnId identity connector framework to manage identity connectors. All ordinary connectors are running under the control of this framework. It means that midPoint calls the ConnId framework and the framework calls the connector. Therefore, when it comes to troubleshooting connector problems there are several places where a problem can occur and also several places where you can get diagnostic data:
-
MidPoint: midPoint may invoke wrong operation at the first place. This may be caused by a misconfiguration or a bug. We have already covered most of those cases.
-
ConnId: the framework may misinterpret the operation. The framework also simulates some operations, and it may post-process the results.
-
Connector: this is the tricky part of the story. Each connector is different. Very different. Yet, there are ways. More on this below.
-
Resource: it is possible that the problem is caused by resource misconfiguration. E.g. the connector is not allowed to see all data, there are some limits, etc. We will not go into details here. See the documentation that goes with the resource for troubleshooting details.
The ConnId connector framework stands between midPoint and the connectors. It knows about every operation that midPoint invokes on every connector, and it knows about all the return values. This can be easily enabled by using the following log configuration:
org.identityconnectors.framework.api.operations: TRACE org.identityconnectors.framework.spi.operations: TRACE org.identityconnectors.framework.common.objects.ResultsHandler: TRACE
The ConnId operation traces look like this:
TRACE (org.identityconnectors.framework.api.operations.SearchApiOp): method: search msg:Enter: search(ObjectClass: inetOrgPerson, null, com.evolveum.midpoint.provisioning.ucf.impl.ConnectorInstanceIcfImpl$2@643dc940, OperationOptions: {ALLOW_PARTIAL_ATTRIBUTE_VALUES:true,PAGED_RESULTS_OFFSET:1,PAGE_SIZE:20})
...
TRACE (org.identityconnectors.framework.api.operations.SearchApiOp): method: search msg:Return: org.identityconnectors.framework.common.objects.SearchResult@a90221a
This is a very useful mechanism. It logs every operation of every connector. If you suspect that the connector is not executing the right operation, this is the right place to check it. You can see the operation that midPoint is passing to the connector. If that operation looks good, then the problem is most likely in the connector (see below). If the operation does not make sense, then the problem is usually in the provisioning component of midPoint (see above).
However, the operation is logged by the ConnId framework on relatively high level and the operation is still quite abstract. If you need more details about what really gets executed you have to rely on the connector logging.
Please note that the ConnId framework has two "faces": API and SPI. The API is facing midPoint.
MidPoint invokes ConnId API operations.
The SPI is facing the connector.
Connector implements SPI operations, and ConnId framework is invoking them.
You can see the distinction in the class names that are written in the logfiles, e.g. SearchApiOp vs SearchOp (if there is no Api or Spi in the operation name then it is assumed to be SPI).
There is also similar distinction in the package name of the logger.
Most API and SPI operations are direct equivalents, but there may be subtle differences.
E.g. the get API operation is executed as search (executeQuery) SPI operation.
Most connector operations are "pure" request-response operations: there is one request and one response. These are operations such as create, modify, delete. In this case you will see one request in the log files and one response. That is the whole operation. Like this:
2017-02-01 10:44:16,622 [main] TRACE (o.i.framework.api.operations.CreateApiOp): method: create msg:Enter: create(ObjectClass: inetOrgPerson, [Attribute: {Name=uid, Value=[will]}, Attribute: {Name=__NAME__, Value=[uid=will,ou=People,dc=example,dc=com]}, Attribute: {Name=cn, Value=[Will Turner]}, Attribute: {Name=sn, Value=[Turner]}, Attribute: {Name=givenName, Value=[Will]}], OperationOptions: {})
2017-02-01 10:44:16,623 [main] TRACE (o.i.framework.spi.operations.CreateOp): method: create msg:Enter: create(ObjectClass: inetOrgPerson, [Attribute: {Name=uid, Value=[will]}, Attribute: {Name=__NAME__, Value=[uid=will,ou=People,dc=example,dc=com]}, Attribute: {Name=cn, Value=[Will Turner]}, Attribute: {Name=sn, Value=[Turner]}, Attribute: {Name=givenName, Value=[Will]}], OperationOptions: {})
...
2017-02-01 10:44:16,641 [main] TRACE (o.i.framework.spi.operations.CreateOp): method: create msg:Return: Attribute: {Name=__UID__, Value=[675f7e48-c0ee-4eaf-9273-39e67df4cd2c]}
2017-02-01 10:44:16,641 [main] TRACE (o.i.framework.api.operations.CreateApiOp): method: create msg:Return: Attribute: {Name=__UID__, Value=[675f7e48-c0ee-4eaf-9273-39e67df4cd2c]}The above example illustrates a very common create operation.
It should be interpreted like this:
-
…api.operations.CreateApiOp Enter: MidPoint invokes ConnId API. The object to create is logged as an operation parameter. This is what midPoint sends. -
…spi.operations.CreateOp Enter: ConnId invokes the connector. This is what the connector receives. -
Connector executes the operation. Logs from the connector are here (if connector logging is enabled).
-
…spi.operations.CreateOp Return: Connector operation is finished. The connector returns the result to ConnId. -
…api.operations.CreateApiOp Return: Operation is finished and post-processed by the framework. Framework returns the result to midPoint.
This is quite straightforward, and it applies to the vast majority of connector operations. However, there are some peculiarities. For example, there are four update operations:
-
update(…)inUpdateOp: This replaces attribute values. It is (roughly) an equivalent to midPoint modify/replace deltas. -
addAttributeValues(…)andremoveAttributeValues(…)inUpdateAttributeValuesOp. This adds or deletes attribute values. It is (roughly) an equivalent to midPoint modify/add and modify/delete deltas. -
updateDelta(…)inUpdateDeltaOp: This operation allows complex combinations of add, delete and replace values. This is a new operation designed to replace older operations above.
New connectors implement updateDelta(…) operation only.
Other update operations are considered to be obsolete.
However, they are still used by many connectors.
Search operations are also a bit strange.
First of all, the SPI provides only one operation for all search and get operation and that operation is executeQuery(…).
Then the results of each object found by the search operations is passed back to midPoint by using a callback method: handle(…).
Therefore, interpreting search operations takes a keen eye and a bit of practice.
ConnId framework logs should indicate whether the problem is on the "connector-side".
Which means that the problem is either in the connector or that the resource itself is not behaving according to expectations.
The next step should be to have a look inside the connector.
However, each connector is different.
The connectors have to adapt to the resource communication protocol, and therefore they are expected to use variety of client and protocol libraries.
Each library may have its own method of troubleshooting.
Therefore, there is no universal way to troubleshoot a connector.
However, there is (almost) always some way.
Connector documentation should provide some details about troubleshooting.
Unfortunately, most connectors do not provide troubleshooting details.
The best way is to have a look at connector source code.
Enabling logging by using the connector package name is usually quite a safe bet.
The logger name is usually the same as the package name of the connector classes.
Look in the documentation or directly inside the connector JAR file to find out the package name.
You may also need to enable logging of the libraries that come with the connector.
You can examine these if you look in the lib directory inside the connector JAR file.
Some connectors have really good logging, such as the connectors in the LDAP connector family.
The LDAP connector logs all the LDAP operations if you set the com.evolveum.polygon.connector.ldap.OperationLog logger to DEBUG level.
2016-08-30 17:14:20,043 [main] DEBUG [](c.evolveum.polygon.connector.ldap.OperationLog): method: null msg:ldap://localhost:10389/ Add REQ Entry:
Entry
dn: uid=jack,ou=People,dc=example,dc=com
objectClass: inetOrgPerson
uid: jack
userPassword: deadmentellnotales
sn: Sparrow
cn: Jack Sparrow
description: Created by IDM
givenName: Jack
l: Black Pearl
displayName: Jack Sparrow
2016-08-30 17:14:20,091 [main] DEBUG [](c.evolveum.polygon.connector.ldap.OperationLog): method: null msg:ldap://localhost:10389/ Add RES uid=jack,ou=People,dc=example,dc=com: Ldap Result
Result code : (SUCCESS) success
Matched Dn : ''
Diagnostic message : ''This logging can be used in two connectors that are used in the majority of midPoint deployments: LDAP connector and Active Directory connector. This logging is much more natural and easier to understand than the ConnId framework logging. Therefore, a look at this log should be the first thing to do when there are problems with LDAP and AD connectors.
However, not all connectors are built with troubleshooting in mind. Some connectors barely log anything at all. This is all connector-dependent. If the connector author did a good job you will get what you are looking for. If the author did a poor job, you are mostly out of luck. One way or another, this is the best chance to learn what the connector is doing. If that fails, you have to resort to packet sniffer and similar tools.
Troubleshooting Authorizations
MidPoint authorizations provide a very powerful mechanism for a fine-grained access control. This mechanism is quite simple in principle. However, the configuration can get very complex especially if a sophisticated RBAC structure is in place. Setting the authorization up is not entirely easy task. It is often quite difficult to tell why the user is not authorized for a specific action or why the user can access more than he is supposed to. Therefore, this page describes basic mechanisms how to troubleshoot authorizations.
The basic troubleshooting steps are simple in theory:
-
Enable logging of authorization processing.
-
Initiate midPoint operation to examine.
-
Look at the logs, figure out which authorization is wrong.
-
Fix it.
-
Rinse and repeat.
Yet, the practice is much more complex. As always.
The authorizations are processed in midPoint security component. The processing of every authorization is logged. Therefore, to see the authorization processing trace simply enable the logging of security component:
com.evolveum.midpoint.security: TRACE
However, please keep in mind that this is quite intense logging. It can easily impact the system performance and flood the logs on a busy system with a lot of authorization. It is better to troubleshoot the configuration in a development or testing environment.
When the security logging is enabled then you can see following messages in the logs:
2017-01-23 14:32:37,824 [main] TRACE (c.e.m.security.impl.SecurityEnforcerImpl): AUTZ: evaluating security constraints principal=MidPointPrincipal(user:c0c010c0-d34d-b33f-f00d-111111111111(jack), autz=[[http://midpoint.evolveum.com/xml/ns/public/security/authorization-model-3#read])]), object=user:c0c010c0-d34d-b33f-f00d-111111111111(jack) 2017-01-23 14:32:37,824 [main] TRACE (c.e.m.security.impl.SecurityEnforcerImpl): Evaluating authorization 'read-some-roles' in role:7b4a3880-e167-11e6-b38b-2b6a550a03e7(Read some roles) .... 2017-01-23 14:32:37,824 [main] DEBUG (c.evolveum.midpoint.security.api.SecurityUtil): Denied access to user:c0c010c0-d34d-b33f-f00d-111111111111(null) by jack because the subject has not access to any item
There is a set of similar messages for every operation that midPoint attempts. First message describes the operations and its "context": who has executed it (principal), what was the object and target of the operation (if applicable). The last line usually summarizes the decision: allow or deny. The lines between describe the processing of each individual authorization statement. If you examine that part carefully, then you can figure out which authorizations were used. The result of authorization evaluation can be one of these:
-
Authorization denies the operation. That’s a dead end. If any authorization denies the operation then the operation is denied. No other authorizations need to be evaluated.
-
Authorization allows the operation. That’s a green light. However, other authorizations are still evaluated to make sure that there is no other authorization that denies the operation.
-
Authorization is not applicable. The authorization does not match the constraint for object or target, or it is not applicable for other reasons. Such authorization is skipped.
If there is a single deny then the evaluation is done. The operation is denied. Deny is also a default decision. I.e. if there is no decision at the end of the evaluation, then the operation is denied. At least one explicit allow is needed to allow the operation.
All authorization processing is recorded in the log. There is a record of processing of every operation, every authorization, evaluation of every authorization clause, whether the authorization is applicable or not, whether it denies or allows the operation.
Authorization of operations such as add or delete is quite easy. The result is simple: the operation is either allowed or denied. However, it is a bit different for get operations. The entire get operation can still be denied if the user does not have any access to the object that he is trying to retrieve. However, the common case is that the user has some access to the object, but not to all the items (properties). In such a case the operation must be allowed. However, the retrieved object needs to be post-processed to remove the fields that are not accessible to the user. This is done in two steps.
Firstly, the set of object security constraints is compiled from the authorizations.
The object security constraints is a data structure that describes which properties of an object are accessible to the user.
There is a map (itemConstraintMap) with an entry for every item (property) which is explicitly mentioned in the authorizations.
This entry contains explicit decisions given by the authorizations for every basic access operation (read, add, modify, delete).
Then there are default decisions (actionDecisionMap).
These decisions are applied if there is no explicit entry for the item.
This object security constraints data structure is logged when it is compiled.
Secondly, the object security constraints are applied to the retrieved object. The constraints are used to remove the properties that are not accessible to the user. This process is not easy to follow in the logs. Therefore, it is better to inspect the object security constraints structure. If it is correct then also the resulting object will be most likely correct.
|
Object security constraints and the user interface.
The object security constraints has much broader application than just authorization of the read operations.
This data structure is (indirectly) used by midPoint user interface when displaying edit forms for objects.
The data from this structure are used to figure out which fields are displayed as read-write, which fields are read only and which fields are not displayed at all.
The object security constraints structure is always produced by the same algorithm in the security component.
Therefore, the interaction of authorizations and GUI forms can be diagnosed in the same way as the get operations.
|
Search operations are very different from common operations such as add or delete and they are also different from get operations. Search operations does not result in an access denied error (except for few special cases). If the user that is searching has access only to some objects, then only those objects are returned. There is no error, because this is a perfectly normal situation. The extreme case is that user has access to no object at all. Even though this situation is not entirely "normal", it is also not in any way special. The search simply returns empty result set and no error is indicated. You need to keep this in mind when troubleshooting the read authorizations. Attempt to get inaccessible object results in a security violation error. However, searching for them simply returns empty result set and there is no error.
The search operations are interesting for another reason. Operations such as get, add or delete have precise specification of object: the object that is being retrieved, added or modified. However, it is entirely different for search operations. The object is a result of the search operation, not the parameter. We cannot examine the object before the search and decide whether we allow or deny the operation. There is no object before search operation. Also, we cannot simply search all objects and then filter out those that are denied. That would be totally inefficient, and it will completely ruin paging mechanisms. A completely different strategy is needed for search operations.
Search authorizations work the other way around: at first, the authorizations statements are compiled to a search filter.
For example, if the authorization allows access only to active roles the authorization is compiled to a filter activation/effectiveStatus = "enabled".
Then this filter is appended to the normal search filter and the search operation is performed.
This approach ensures that the search returns only the objects that the user is authorized to see.
It also makes the search as efficient as possible and maintains page boundaries.
In addition to that, another round of post-processing is needed to filter out the items that are not visible to the user.
This is the same filter as is applied to get operations.
Finally, there is a couple of things to keep in mind:
-
The authorizations are designed to be additive. Each role should allow the minimum set of operations needed for the users to complete their job. MidPoint "merges" all the authorizations from all the roles. Use allow operations, avoid deny operations if possible. It is much better not to allow an operation than to deny it.
-
Deny always wins. If there is a single deny in any applicable authorization in any roles, then the operation is denied. It does not matter if there are thousands of allow authorizations, deny always wins. What was once denied cannot be allowed again. We need this approach because we do not have any way to order the authorization in many roles. Do not use deny unless really needed.
-
There are two phases: request and execution. The operation needs to be allowed in both phases to proceed. Please keep in mind that object may be changed between request and execution due to mappings, metadata and properties that are maintained by midPoint. This is also the reason why we have separate authorizations for request and execution.
-
Name the authorizations. Each authorization statement can have an optional name. Specify a reasonably unique name there. Then use that name as a string to find the appropriate trace in the log files.
Authorization traces are quite verbose and there is quite a lot of them. Many traces need to be examined to figure out what exactly is going on. Troubleshooting is a hard work in general, troubleshooting of authorizations is even harder. This mechanism of recording authorization processing in the log is the best way that we have figured out to troubleshoot the authorizations. We know that it is not ideal, yet it is the best we have. If you have any better idea we are more than open to suggestions.
Reporting a Bug
MidPoint is perfect. There are no bugs. Therefore, you can skip this section entirely.
No, that is not really the case. MidPoint is a real software deployed in a real world. While we spend a huge amount of time and effort to maintain midPoint, test it and fix the bugs, the bugs have ways to always get in. This is also given by the very nature of midPoint. MidPoint is flexible and comprehensive. It is nearly impossible to test midPoint for all the conceivable configurations and use cases. Whenever you deploy midPoint, there is a chance that some parts of your configuration or usage patterns are unique to your deployment. Those parts might not be used by anybody else yet. Therefore, there may be bugs that nobody ever experienced yet. That is the fate of all flexible software products that live in the real world.
In case that you find a bug which needs to be fixed you have several options:
-
Fix the bug yourself. MidPoint is an open source product. We will gladly accept bugfixes. However, midPoint is also a substantial product and we need to keep it maintainable and secure. Therefore, all contributions including the bug fixes have to be reviewed. The fixes need to be good enough to be accepted. Writing an automated test for the bug is usually required as part of the bugfix contribution.
-
Report the bug and wait. The bug will be fixed by someone, eventually. However, there is no telling how long you will need to wait. If it is a security-related bug, then it will be fixed as soon as possible. If the bug is severe and it affects a lot of users, then it is likely to be fixed relatively soon. However, such bugs are very rare. It is likely that your bug is quite exotic, and it can only be reproduced in your deployment. In that case, it is almost certain that you will need to wait for a very long time. Several years may pass before someone finds the time to have a look at your problem. Those issues are known as community issues, and they are usually seen at the very tail of developer’s work queues. Except for one case: security issues. Security issues are always prioritized regardless of who the reporter is.
-
Purchase midPoint support from Evolveum. This dramatically increases the priority of your bug reports. Software development cannot be easily predicted, therefore we still cannot guarantee precise time period to fix the bug. However, typical fix time will be counted in days, weeks or in very rare and complicated cases in months. Those issues are known as subscriber issues, and they are always prioritized over community issues.
In any of those cases, there is a recommended procedure for bug diagnostics and reporting. There are bug reporting standards that apply to anybody, even midPoint subscribers. Evolveum provides 3rd-line support only. This means that it is expected that the issues has already passed through 1st and 2nd lines of support. The bug report should be really a report of midPoint bug, it should not be a configuration issue. Proper diagnostics techniques should be employed to investigate the issue before it is reported. The rest of this section will describe the recommended procedure.
Diagnostics is the first step that is absolutely mandatory. Troubleshooting techniques described in this chapter should be used to find out what is going on. MidPoint is a very flexible product and the vast majority of midPoint issues are caused by wrong configuration. Therefore, please make sure that your problem is not one of those. Simple mis-configuration may easily look like a bug. Try to go through midPoint documentation and understand how midPoint works. Re-read relevant parts of this book. MidPoint development team invests a huge amount of time and effort to make the error messages and log entries are understandable. Therefore, please make sure you use those facilities. Please follow the troubleshooting guides above. They are usually very helpful.
Reproducing the problem is a second step. The easiest way for us to fix a problem is being able to reproduce it. In such case, we do not just blindly fix the problem, but we can also make sure it is really gone. In most cases we create a test case in our automated test suite to make sure the problem is gone and it will not appear again. Therefore, your best strategy to make sure that the problem is fixed quickly and does not appear again is to show us how to reproduce the problem in our environment. Saying that "this and that does not work" usually does not help, as the same use case may work perfectly in other configurations. Please describe your configuration in the report.
Try to figure out what is the minimal configuration necessary to reproduce the problem. We appreciate if you could reproduce the problem using our sample resources and objects with minimal customization. This saves you a lot of time describing your environment to us, and it also saves us a lot of time to try to re-create your environment in our lab. This approach also helps you to check your configuration and to make sure you are not reporting mis-configuration as a bug.
In a very rare cases the problem cannot be easily reproduced using samples or similar simple setup. In that case we need to work with what we have. Therefore, we either need to know quite a lot about your environment to be able to set it up in our lab. If that fails, we may need access to your environment or your cooperation with diagnosing the problem. In such case, please use your common sense in what comes into the bug report. Please keep in mind that midPoint is open source project and the bug reports are public, therefore please be careful when providing sensitive information in bug reports.
When you are sure that the problem is not caused by mis-configuration, it is time to report the issue. The best way to submit a bug report is to use Evolveum bug tracking system. The registration is open to everyone. This is also the only bug reporting method available for community issues. Evolveum tracker allows you to track the progress of issue resolution, add additional information, etc. Just please keep in mind that the tracker is public and open to anyone, following the spirit of open source. Therefore, be careful about submitting sensitive information.
Please note that security issues revealing a potential security vulnerability should not be reported by using the tracker. Information in the tracker is public and this may lead to unintentional disclosure of sensitive information. Special e-mail address is provided for responsible disclosure of security-related issues:
security@evolveum.com
Typical bug report contains following information:
-
What operation have you tried or what do you want to achieve. Some "bugs" may be caused by trying to achieve something using the wrong mechanism. Having a broader perspective helps us to help you.
-
If there is a form or other input to the operation, then please describe how it was set up or filled in. E.g. an XML snippet used to import, data entered into input field, request deltas retrieved from an audit log and so on.
-
What kind of resource definition was used, how it was modified, etc. We need to know only the relevant parts. We prefer if you reproduce the problem with the simplest configuration possible (see above).
-
Any other special configuration that you feel can influence the outcome, such as custom schema, strange things in expressions, etc.
-
If the operation produced an error message in GUI, include that error message as well.
-
If there is an exception in the log files, please make sure that you include full stack trace of the exception. The exception stack trace is usually a very efficient pointer to likely cause of the problem.
-
Relevant part of the log files. You may want to have a look at the list of useful loggers above to correctly set up your logging to get the most useful data in the logs.
-
Your environment: operating system, Java platform version, target system type and version. You do not need to bother with this if the bug is obviously not environment-specific.
-
Indication of midPoint version (release) or git branch/revision that was used.
Not all of the above is required in a bug report. Use your common sense. As a rule of the thumb too much information is usually better than too little information. However, sometimes too much non-relevant information may obscure the tiny problem that would be obvious if just the right amount of information is provided.
Useful Troubleshooting Tips
Finally, there are some generic troubleshooting tips. Those are not specific to midPoint and those tips should be a second nature to any experienced engineer. Some of those were already covered. However, it may still be useful to summarize.
First of all, try to keep your troubleshooting effort methodical and systematic. It makes very little sense to just randomly poke around and hope that the bug shows its ugly head. Even though such random methods may work occasionally, they often require a lot of effort in the end. Try to follow a divide-and-conquer method. Find a boundary in the middle of midPoint, e.g. Clockwork component. Examination of clockwork traces will show you whether the problem is in the mappings or it is in the provisioning. Is the problem in provisioning? Then select another boundary. LDAP connector operation traces may be a good bet in that case. That shows you whether the problem is in midPoint or it is in the LDAP server. Are operation parameters wrong? It means that problem is in midPoint, somewhere between model and the connector. Have a look at debug logs of provisioning component. Maybe there is wrong object class in the resource definition. Have a look at debug logs on the connector. Maybe connector configuration is wrong? The log files will guide you to the problem.
MidPoint log files may look like a maze. However, it all makes sense. MidPoint has good component structure and the log files reflect that. You just need to understand how midPoint works, and you will not get lost. Just make sure that you never forget to look at the log files. Always look at the log files. When it comes to troubleshooting logfiles are your best friends.
There is one troubleshooting method that is universally applicable to almost any problem. The method involves some specialist equipment. However, this method provides surprising, almost unbelievable results. To make this method work you have to strictly follow those steps:
-
Describe your problem to a rubber duck.
Yes, a rubber duck. That strange object that usually floats in bubble baths. The duck is a good listener. Therefore, just go ahead and describe you problem to the duck. Step by step. Talk about every detail that you have explored. Every possible solution that you have tried. Do not hurry. The duck has unlimited patience. You have to literally talk to the duck. Doing it just in your head does not work. Talk to the duck. The duck will help. It is a wise animal.
As ridiculous as this process might sound, it really works. It does wonders. It is known as rubber duck debugging method. Of course, it does not have to be a rubber duck. Any object will work as long as you really talk to it. However, choosing an object with eyes make you feel less stupid while you talk to it. Rubber duck is a popular choice.
That is it. Troubleshooting is not an easy work to do. Although it may sometime resemble witchcraft, it is in fact a science - and an art. It needs some time to find your way. However, it is a time well spent. It will be repaid many times over.
12. MidPoint Development, Maintenance and Support
Those who do nothing but observe from the shadows cannot complain about the brightness of the sun.
MidPoint is a professional open source project. This means that midPoint is developed by using professional methods by professional developers, but the product is still available under open source license.
Professional Development
MidPoint is developed by professional developers. The development is lead by senior developers in the midPoint core team that have decades of software engineering experience. There are also few younger developers in early stages of their careers. MidPoint development team is first of all a community of developers that enjoy working together on a next-generation software. Professionalism is a strict requirement for all midPoint development, but it is mostly the engineering passion that really moves the project forward.
All midPoint core developers work for Evolveum. Evolveum is the company that created midPoint. Evolveum also maintains midPoint. Vast majority of work on midPoint is being done by midPoint core team. All the core developers are paid fair wages for their work on midPoint. Evolveum income from midPoint is necessary to make sure that the developers have all their time available for midPoint development. This means that midPoint can be properly maintained.
Professional development also means that professional software engineering methods are used to develop and maintain midPoint. MidPoint development is firmly founded on principles of continuous integrations. There are literally thousands of automated integration tests that are part of midPoint build process. Thousands of additional automated tests are running every day. There are tests that closely reflect real-world configurations and use cases. There are tests with real resources. All of that is an integral part of midPoint development. MidPoint is a comprehensive and very flexible system. Professional quality assurance is essential for midPoint to work reliably.
Open Source
MidPoint is an open source project. All of midPoint source code is available under two open source licenses. We have chosen Apache License 2.0 as this is one of the most liberal licenses out there. We are also based in European Union and therefore midPoint is also under the terms of European Union Public License (EUPL). However, there is much more to open source than just a license. Evolveum is fully committed to the open source approach. MidPoint is completely developed in public. Entire history of midPoint source code is public. Every commit of every developer is immediately available to anyone. Complete midPoint source code is available. There are no private parts that are held back by purpose. There are no private branches with extra features. Even all the support branches are completely public. When it comes to the source code midPoint is as true to the open source methods as it gets.
Even though vast majority of midPoint development is done by Evolveum, open source approach is absolutely critical for the success of midPoint. Open source is the only way that allows midPoint users to understand midPoint completely. All non-trivial software needs to be customized in some way and open source brings the ultimate power of customization. Open source allows participation. Open source is great approach to avoid vendor lock-in. Open source brings longevity to the project. Open source has so much advantages. Evolveum is completely committed to the open source approach.
MidPoint has started as an open source project. MidPoint source code was available from the day one. And as far as we have something to say about it midPoint will remain open source forever.
MidPoint Release Cycle
MidPoint has stable development cycle. There is a feature releases every year. As the name suggests, such releases are bringing new features and major improvements.
In addition to that, there are several maintenance releases. Those releases bring bugfixes and minor improvements. Maintenance releases are published as needed, there is no strict schedule. Timing of maintenance releases is influenced by midPoint subscribers.
Every couple of years there is a special long-term support (LTS) release. This release is supported for a longer time than usual. This release is ideal for people who prefer stability over new features.
MidPoint Support and Subscriptions
MidPoint support and subscription is a service provided by Evolveum. There are several service offerings with different scope and service level. But generally speaking, the most common service is 3rd-line support. Which basically means that we will fix midPoint bugs. Obviously, this includes assistance with diagnostics of difficult issues where it is not entirely clear whether it is a bug or configuration issue. Simply speaking, midPoint support service is a way how to make sure that your midPoint deployment will run without any problems. There are also subscription offerings designed to help you deploy midPoint in the first place. Some subscription offerings also contain feature development and improvements (a.k.a. 4th-line support). Those subscriptions are an ideal way to make sure midPoint will be able to do anything that you need for your project.
MidPoint support and subscription services provide primary source of funding for midPoint development and maintenance. Therefore, it is perfectly natural that midPoint subscribers get high priority for resolution of their issues, feature requests and so on. This limits the time that midPoint core team has available for other tasks. Therefore, there are some rules:
-
Evolveum decides midPoint roadmap, the features and improvements that are going to be developed in each version. MidPoint subscribers and Evolveum partners have a chance to influence the roadmap.
-
MidPoint architecture and quality is the primary responsibility of Evolveum team. Part of Evolveum income is reserved to maintain midPoint - to keep the architecture up to date, to make systemic quality improvements, to maintain midPoint in the long run and so on.
-
Evolveum will fix security issues immediately. Security issues have absolute priority. Those will be fixed immediately regardless of who reported them (subscriber or non-subscriber). Fixes for severe security issues will also get automatically backported to all active support branches.
-
Evolveum will fix any bugs in midPoint, eventually. Those bugfixes will be committed to midPoint primary development branch (master branch). The fixes that make it into development branch will be part of the next feature release. However, as midPoint release cycle is fixed, not all the bugs will be fixed in each release. The bugs that were reported as part of subscription or support service will be fixed first. If there is still some time, then other (non-subscriber) bugs will be fixed as well. However, there are no guarantees for that. If the time before the release runs out, bugs reported by non-subscribers will not get fixed. In fact, such non-subscriber fixes may have to wait for several releases until they finally get fixed.
-
Every feature release has a support branch. This is where the maintenance releases come from. However, every bugfix or improvement is developed on master branch first. It has to be backported to the support branch. Which takes time. Therefore, there are very strict rules for backporting. Any bugfix, improvement or any other update will go to the support branch only if:
-
Backport to support branch is explicitly requested by customer with active support or subscription service.
-
It is a security issue.
-
It fixes a severe issue that affect large number of users.
-
Simply speaking, if you want to make sure that midPoint works for you, then purchase a support or subscription. Those services will help you, that is what they are for. However, the money from support and subscription services also enable long-term midPoint maintenance and new feature development. Getting midPoint support or subscription is the right thing to do.
MidPoint Community
MidPoint is a proper open source project. As all good open source projects, midPoint has a vibrant community. This is both engineering community and business community. The primary communication channel of the engineering community is midPoint mailing list. Mailing list is used to discuss midPoint futures, announce new releases, discuss configuration issues, provide feedback to the development team and so on. MidPoint community is open to anyone.
Business community is formed mostly from Evolveum partners. Evolveum partners deliver midPoint solutions, provide 1st-line and 2nd-line support services, provide professional services, customized solutions based on midPoint and so on. The possibilities are endless. Even the business community is open. Entry-level partnership is open to anyone. However, there are several partnership levels, and it takes some effort for a partner to level up. There is a rich (and growing) network of midPoint partners. The partners can deliver solutions based on midPoint almost anywhere on planet Earth.
13. Additional Information
Logic’s useless unless it’s armed with essential data.
Children of Dune by Frank Herbert
We have tried to make this book as comprehensive as possible. However, no book can possibly include all the information that an identity management engineer would ever need. Therefore, this chapter describes the sources of additional information about midPoint.
MidPoint Documentation Site
MidPoint documentation site (a.k.a. docs) is the most comprehensive information about midPoint. This is where all the midPoint reference documentation is stored. Yet, there is even more. There is connector documentation, midPoint architecture, developer documentation, midPoint internals and all kinds of information including midPoint release planning and roadmap. Everything is public.
However, the docs are so comprehensive that it is often not entirely easy to find the right page. We have done what we could to organize the information. The pages are organized hierarchically. Many pages have "See Also" section that points to additional information. Yet, the practice shows that if you want to find something in the docs, you need to have at least a faint idea what you are looking for. This book should give you that idea what to look for. If you know what you are looking for, then the docs search bar is your friend. If you enter the correct search term, then there is high probability that you will quickly find the right page.
Samples
The midPoint projects maintains quite a rich collection of samples. These are sample resource definitions, role and organizational structure examples and other various samples. They are usually provided in the XML form. The samples are maintained in a separate project on GitHub. Those samples are also part of midPoint distribution package.
URL (version 4.8.5): https://github.com/Evolveum/midpoint-samples/support-4.8.5/master/samples
URL (latest development version): https://github.com/Evolveum/midpoint-samples/tree/master/samples
Book Samples
This book contains many examples and configuration snippets that are taken from various places. Some smaller snippets are taken from midPoint docs or from the sample files (see above).
Some chapters contain mostly complete configurations of the midPoint deployment.
These configurations have a separate folder in the midPoint samples.
Look for a samples folder in the github repository in which source code of this books is maintained.
All the important files used in this book are there, sorted by chapter number.
There are also special-purpose docker compose configurations that simulate configuratin used in this book.
The readme files in individual directories provide more details.
URL (version 4.8.5): https://github.com/Evolveum/midpoint-book/tree/support-4.8.5/samples
URL (latest development version): https://github.com/Evolveum/midpoint-book/tree/master/samples
Story Tests
MidPoint developers like to create and maintain complete end-to-end automated tests. These tests are usually inspired by real-world midPoint deployments. We call them story tests. These tests are important to maintain midPoint quality and continuity. They are also excellent source of inspiration, and they have often proved useful as examples of midPoint configuration.
-
Documentation: https://docs.evolveum.com/midpoint/reference/samples/story-tests/
-
Code and configuration: https://github.com/Evolveum/midpoint/tree/master/testing/story
MidPoint Mailing List
MidPoint project attracted a vibrant community during the years.
The main community communication channel is midPoint mailing list midpoint@lists.evolveum.com.
The mailing list is used for announcements, user suggestions, and also for community support.
The mailing list is used to ask questions about midPoint.
Experienced community members usually answer these questions and provide pointers to additional information.
The whole midPoint development team is also subscribed to the mailing list, and they provide answers when needed.
However, this is a best effort service.
Please do not abuse this communication channel and try to keep the following community guidelines:
-
Be polite. Mailing list is a best effort service. Nobody is (directly) paid to answer mailing list questions. The engineers that answer the questions are doing that in addition to their day-to-day responsibilities, they are doing that because they want to help the community. Therefore, if you are asking for help, do so politely. If you are answering a question, please respect other members. Everybody started somewhere, it is natural that novice users do not know everything. Please tolerate the differences in skill sets.
-
Do some research before asking a question. Do not ask trivial question that can be easily answered by googling the question, by searching for it in the midPoint docs or mailing list archive. If you are getting an error, try to read error message very carefully, and try to think about the possible causes. Try to experiment with the configuration a bit. Look at the troubleshooting section in the docs. Spend at least a couple of minutes to make your own research before asking the question. If that research does not provide the answer, then it is a good question for the mailing list.
-
Provide context. If your post looks like "my midpoint is broken, please help" then it is very unlikely that you will get any answers. Try to describe your problem in more details. Make sure to describe relevant bits of your configuration. Be sure to include error message. Look in the log files if necessary. Most importantly of all: state your goal, describe what you are trying to achieve. Maybe the root of your problem is that you are using completely wrong approach. The community may point your nose in the right direction - but only if they know what is your goal.
-
Give back. Mailing list is not one way communication channel where users ask questions and developers answer them. There is already a significant body of knowledge distributed among community members that are not midPoint developers. If you adhere to these guidelines and ask a question, it will most likely be answered. However, for that to happen there needs to be someone who is answering. Therefore, do not just ask the questions. If you know the answer to the question that someone else asks, then please go ahead and answer it. Do not worry that your answer may not be perfect. Even a partial answer will be greatly appreciated by any novice user. Simply speaking: Do not only take from the community. Try to repay what the community gave you.
You may also be tempted to send your questions directly to Evolveum or midPoint developers. However, the developers have many midPoint users, partners, customers and contributors to deal with in their day-to-day job. The first responsibility of any midPoint core developer is to make sure that midPoint development continues. The developers naturally prefer to spend time doing tasks that bring funding to the midPoint project. Therefore, the developers strictly prioritize the communication. Answers to midPoint subscribers are the highest priority, mailing list is second and answers to private messages from the community are absolutely the lowest priority. We prefer efficient spread of knowledge about midPoint. Mailing list is good for that, but private communication is not. That’s the primary reason for this priority setup. Besides, if you contact a developer directly, then only that developer can answer your question. However, if you send the question to the mailing list, there are more people that can potentially answer the question. Therefore, unless you have active subscription, the mailing list is your best option.
Mailing list URL: http://lists.evolveum.com/mailman/listinfo/midpoint
Evolveum Video Channel
Some of the midPoint related information was recorded in a form of videos. There are also recordings of midPoint-related Evolveum webinars, presentation and talks. All videos as published on Evolveum YouTube channel.
Evolveum YouTube channel URL: https://www.youtube.com/@Evolveum
Evolveum Blog
Vast majority of midPoint development and maintenance is conducted by Evolveum team. The people of Evolveum present their professional opinions by the means of Evolveum blog. The blog is very technology-friendly. The information provided on the blog goes often quite deep. This is also a channel how Evolveum shares information about midPoint development plans and business activities related to midPoint. It is a very valuable resource for anyone that has a professional interest in midPoint.
Evolveum blog URL: https://evolveum.com/blog/
Social Networks
Evolveum is moderately active on social networks, publishing information about the company and midPoint. Content published on social networks is made suitable for this environment, therefore it is usually lighter that can be consumed quickly. Despite that, it is well worth subscribing to be kept updated with latest news.
LinkedIn: https://www.linkedin.com/company/evolveum
Twitter(X): https://twitter.com/evolveum
Facebook: https://www.facebook.com/evolveum
Instagram: https://www.instagram.com/evolveum_midpoint/
To Be Continued
Hanc marginis exiguitas non caperet.
(There is not enough space in the margin to write it.)
This is it, then. That was the last real chapter of this book. Yet, we have not yet covered all capabilities of midPoint. In fact, we are not even close. We have only scratched the surface of what midPoint can provide. The other chapters of this book are not written yet. There is still so much to write about:
-
Authorizations: MidPoint works with sensitive data and there is a need to strictly control access to that data. Therefore, midPoint has a fine-grained authorization system for controlling access to itself. Authorization mechanisms are very powerful allowing many scenarios from delegated administration to partial multi-tenancy.
-
MidPoint queries: MidPoint often needs to find objects in the repository. There is a special-purpose query language that is used in many places in midPoint.
-
Security: MidPoint works with quite a sensitive data, therefore it is quite important to keep midPoint secure. There are many security-related settings, ranging from the usual network security mechanisms, through authentication to a midPoint-specific settings.
-
Identity management miscellanea: There are various interesting features that were not mentioned yet: password policies, notifications, auxiliary object classes, provisioning dependencies, deputies, constants, function libraries, provisioning scripts and so on. Those may be little features, but they are essential pieces of the puzzle. It is almost impossible to have a complete identity management solution and not to use any of those features.
-
Requests and approvals: Browse available roles, select role, request role, approve role, assign role, provision accounts. That is the basic mantra of many identity management deployments. Of course this is easy to do in midPoint. There is even more: multi level approvals, optional approval steps, dynamic approver selection, escalation and so on. MidPoint has most of the features already built-in, you just need to configure them.
-
Entitlements: Managing accounts if fine. Yet, it is not the whole story. There is huge difference between a regular account and an administrator account. Fortunately, midPoint can easily manage membership in groups, roles, assignment of privileges and other entitlements. In this case we really mean entitlements on the resources, such as Active Directory groups, distribution lists, Unix groups and so on. MidPoint is designed to this quite easily.
-
Manual resources: Obviously, you want most of the resource to be connected to midPoint by a connector so they can be automatically managed. However, there are always few bothersome resources that just won’t comply. Maybe they are too small to justify the cost of building a connector. Maybe there is just no good way for the connector to manage the resource. MidPoint one again comes to the rescue. MidPoint has a concept of manual resource where the work is done by system administrator instead of connector. There is even a way how to create semi-manual resource that can read the data, but provisioning is still manual. There is a way how to integrate this with ITSM system.
-
Auditing and history: No identity management system can be complete without an auditing facility. MidPoint can store every operation to the audit trail: changes in users, accounts, roles - even internal configuration changes. This is stored in a format that can be used to integrate midPoint with a data warehouse or a SIEM system. Also, midPoint user interface has a facility to display the audit trail. MidPoint can even look into the past: it can reconstruct the objects as they were at a certain point in time.
-
Policy rules: MidPoint is much more than just an identity management system. The identity governance features of midPoint are based on a powerful and universal concept of policy rules. The rules can be used to express role exclusions, thus defining a segregation of duties (SoD) policy. The rules can be used to define policy-based approval. The rules can control role lifecycle. The rules can define compliance policies. The rules can do it all. The rules are here to govern the identities.
-
Access certification: This is known by many names: certification, re-certification, attestation, … but whatever the name is it is still the same process. Simply speaking, this is a method to review roles assigned to the users to make sure the users still need the roles that they have. This is a method how to get a grip on the principle of least privilege even in environments that are naturally inclined to ad-hoc operation. However, it is very useful mechanism in almost all environments. MidPoint provides many flavors of certification mechanisms from a scheduled mass recertification campaigns focused on roles assignments to an ad-hoc recertification of a single used after he is moved to a new organization.
-
Regulatory compliance: midPoint, being an identity governance platform, is an essential component for regulatory compliance of any mid-size or large organization. MidPoint can manage identity lifecycle, govern access control policies, maintain oversight of certain aspects of security policies, support information classification, even assist in business continuity and incident response.
-
Data protection: Identity management is no longer a wild west where anybody can do anything. Now there are strict data protection rules, regulations and legislation. Being a good identity governance system, midPoint can assist in managing the data protection and privacy policies. MidPoint can be really helpful in managing compliance to the data protection regulations such as European GDPR legislation.
-
Role mining and outlier detection: It is very difficult to manually maintain a complex access control model. It is almost impossible to deal with thousands upon thousands of roles one-by-one. Therefore, midPoint contains AI-based tools to help deal with the complexity. Role mining provides ability to discover role definitions from existing access data. Outlier detection looks for users and access patterns that are different, and thus suspicious. Both mechanisms are making life with midPoint easier and more sustainable.
-
User interface customizations: MidPoint has a general-purpose user interface that can be used for user self-service, identity administration and system configuration. The user interface is designed to be dynamic. It automatically adapts to resource schemas, extension of midPoint schema, authorizations and so on. Therefore, usually there is no need to customize user interface at all. However, there are cases when the deployment need to deviate from the default behavior, and midPoint is prepared to that. There are many ways to customize user interface: colors, stylesheets, localization, custom forms, tabs, whole new custom pages. In extreme cases midPoint can be customized beyond recognition.
-
Integration with midPoint services: MidPoint is an excellent platform. However, even great software does not live in isolation. There is always need to integrate the systems together. Integration runs through midPoint veins, because that is what the connectors really do. Yet, often there is a need to integrate midPoint with other systems in a way that is beyond the capabilities of a connector. Maybe there is a password reset application that needs to interact with midPoint. Maybe there is an analytic software that needs to get midPoint data. MidPoint was designed from the day one to be a service-based application. Therefore, there is REST services packed with features. Actually almost anything that midPoint does can be controlled by using those services.
-
Advanced concepts: There are still some features that were not explained in previous chapters: consistency mechanisms, personas, multi-connector resources and so on. Some of those features are seldom used, but they may save your project. Other features are used all the times, but they are a natural part of midPoint and therefore they are almost invisible. All those features deserve explanation. There is also a need to describe how midPoint itself is developed – as there is a lot of experimental and incomplete features. However, as this is midPoint, even those features may be extremely useful. This chapter may also be interesting to people who would like to extended midPoint in an unusual way or those that want to contribute to midPoint development.
-
MidPoint Deployment: There are many paths from downloading midPoint packages to a working system. Some of those paths are easier than others. MidPoint design was build on many years of practical identity management experience. Therefore, midPoint has mechanisms that can be used to efficiently overcome some notorious problems in identity management – provided that midPoint is used correctly. This chapter aims at giving advice how midPoint should be used in practical projects. How to plan the project, what information to gather, how to design the deployment, how to prepare the environment, plan the migration, handle project extensions and changes and so on.
-
Management of IAM program: Identity management is very similar to information security: Identity management has no end. Identity management is not a project. It is a program. It is an endless cycle of gathering data, planning and execution. The environment around identity management is always changing, therefore identity management must change as well. MidPoint is designed for this kind of longevity. This chapter will describe how to handle this endless cycle. How to make midPoint configuration open to extensions. How to gather data. How to handle new feature requests. How to do upgrades. How to keep identity management solution sustainable.
-
Deployment examples: This book uses a lot of examples in all the chapters. However, those are examples designed to demonstrate one specific aspect of midPoint functionality. This chapter will be different. There will be complete examples of practical midPoint solutions. After all, the way that copying and pasting is one of the best ways how to learn.
Those chapters are still missing. They are not written yet. Obviously, the best people to write those chapters are the people from the Evolveum team: people that designed and implemented midPoint, people that support midPoint deployments, people that work with midPoint every day, people that eat, breathe and sleep midPoint. However, those people are just engineers. They need to pay their bills. They cannot put away their day-to-day responsibilities to work on this book. Obviously, funding is needed to finish the book. As this book is available for free there is no direct income that could provide the funding for next chapters. There is only one way: sponsoring.
If you like this book, then please consider sponsoring some of the next chapters. The market economy is, unfortunately, quite ruthless. Therefore, it is pretty straightforward: if there are no sponsors, it is very unlikely that there will be any new chapters. Therefore, please sponsor this book if you can. If you cannot afford to sponsor this book, then please at least help us to spread the word: a word about midPoint and a word about this book. Any form of help is more than appreciated.
Conclusion
A conclusion is the place where you get tired of thinking.
This book is not finished yet. In fact, it is just a beginning. The book is developed in the same fashion as midPoint, it is written continually, in an incremental and iterative fashion, as fast as time and money allow.
Your contributions and donations will surely speed up completion of this book. Also consider getting midPoint subscription. That is the source of funding for midPoint development. Evolveum is no mega-corporation that can fund open source development from huge profits in other areas. There are no other areas. Evolveum is open-source-only company. Everything we do is focused on open source projects. Evolveum is not a start-up either. We are not funded by venture capital, and we do not have millions to spend. Evolveum is a self-funded, sustainable company. We can spend only what we earn on subscriptions, sponsored features and services. There is no other income. MidPoint development can only go as fast as the money allow. The same principle applies to midPoint documentation and this book. It will grow proportionally to the Evolveum income. Therefore, if you liked this book please consider supporting us. Both money and your time are more than appreciated.
We hope that you enjoyed reading this book at least as much as we enjoyed writing it – and as we enjoy creating midPoint in the first place. MidPoint is quite a unique software project. It would not be possible to maintain and develop this project without you. The whole Evolveum team would like to thank all past, present and future midPoint supporters for making this exciting project a reality. Together we have created interesting and useful software product. We hope that together we can make midPoint even better.
Thank you all.
Glossary
Eskimos had over two hundred different words for snow, without which their conversation would probably have got very monotonous.
Identity management and governance parlance may sound like an alien language to a newcomer. Therefore, perhaps preparing IDMish-to-english dictionary might be a good idea.
There are a lot of terms listed in this part of the book. Many of the terms have several meanings, some of them might be confusing, and there are alternative terms and various "dialects". Identity management, similarly to many fields of technology, is also riddled by many buzzwords, invented by marketing departments rather than scientists and engineers. Therefore, compiling a clear, simple, exact and consistent terminology is almost an impossible task. We have tried to do our best here.
Individual terms are accompanied by acronyms and alternative terms where appropriate. There is also a reference to vocabularies used by standards. Some terms have specific meaning when used in midPoint ecosystem. In that case the midPoint-specific meaning is explained as well.
Although the glossary is certainly incomplete, and we reserve the right for our own interpretation, we hope that this will help you safely navigate the stormy waters of identity management letter soup.
- Attribute-Based Access Control (ABAC)
-
A mechanism for managing user access to information systems based on user attribute values. Attribute-Based Access Control (ABAC) evaluates access dynamically using an algorithm that takes 'attributes' as input and outputs an access decision (allow/deny). The attributes are usually user profile attributes, supplemented with context attributes such as time of access and the user’s current location.
Alternative terms: Claims-based Access Control, CBAC
See also: Access Control
- Abstract Role
-
In midPoint terminology: Abstract role means any type of object that acts as a role. This means that abstract tole can be used to hold inducements, which give privileges to other objects. Role, org, service, archetype are abstract roles in midPoint.
See also more information at docs.evolveum.com.
See also: Inducement, Role, Org, Archetype
- Access Certification
-
Access certification helps with management of access rights. These rights also called privileges, role assignments, authorities or authorizations need to be assigned to the right users in the right systems at the right time. Access Certification means reviewing the settings such as assignments of roles to users to make sure that employees have accesses to the systems they need.
Certifications are often conducted in a form of certification campaigns, certifying access of many users in each campaign, distributing the work among many reviewers to keep amount of work per person reasonable. Despite that, the overall effort necessary for completion of certification campaign can be huge. Therefore, certification campaigns are being replaced by microcertifications, certifying specific users or privileges on as-needed basis.
Access certification is often used to address over-provisioning of privileges, in a attempt to maintain the principle of least privilege.
Alternative terms: Access Re-certification, Re-certification, Attestation, Access Review
- Access Cloning
-
Access cloning is a practice of assigning a user the same access rights as another user has. It is often used to provision new users with initial access rights, copying access rights of an existing donor user.
Access cloning is an undesirable practice (see ISO/IEC 27002 5.18), as it often leads to over-provisioning. Even if the cloned access rights are justified, business role (RBAC) or similar mechanism should be used instead of cloning. Although the practice is generally undesirable, it is often employed due to its simplicity.
Alternative terms: Access Rights Cloning, Donor user
- Access Control
-
Access control is an abstract concept of controlling access of users to applications. It is a very broad and general term, however it usually refers to a mechanism to define and evaluate authorization policies. Two commonly-used access control mechanisms are role-based access control (RBAC) and attribute-based access control (ABAC).
X.1252 term: access control
- Access Management (AM)
-
Access Management (AM) is a security discipline that provides access to authorised users to enter particular resources. It also prevents non-authorised users from accessing the resources. Thus the goal of Access Management is to unify the security mechanisms that take place when a user is accessing specific system or functionality. Single Sign-On (SSO) is sometimes considered to be a part of Access Management.
- Access Request Process
-
Access request process is a business process used to request additional access or privileges for information systems and applications. It is usually a semi-manual process. It starts with a user requesting access or privileges for applications. The request is usually routed through approval steps. When approved, the access is provisioned.
Access request is very frequently used to provide necessary access to users, addressing access under-provisioning situations. As clear and complete access control policy is usually not known, access request process is a practical measure to compensate for this limitation. In fact, the access request process is often over-used, leading to systematic over-provisioning of access. Access certification mechanisms are usually used to compensate such over-provisioning.
Alternative terms: Access Request Management
- Account
-
Data structure in a database, file or a similar data store that describes characteristics of a user of a particular system (resource). Accounts are used to control access of users to applications, databases and so on. Account is a persistent data record, stored in an application or a database. This term is usually not used to describe ephemeral information about user’s identity, such as information temporarily stored only for the duration of user’s session. Such information is often referred to as "principal".
Account is different from a generic data record (e.g. "identity" or "principal"). The purpose of account is to provide user’s access to the system, generic data record may not provide such access.
In midPoint terminology: An account strictly means a data structure in source/target system (resource). Term "user" is used to describe a similar data structure in midPoint itself.
Alternative terms: User account
- Access Control List (ACL)
-
Mechanism for controlling access to information system, based on a simple sequential list of access control instructions. Instructions in access control list are evaluated sequentially. If the instruction matches current access control situation (user, accessed object, operation), then the instruction is applied, either allowing or denying the access.
There is no standardized form or language for access control lists and instructions, making ACLs not interoperable across implementations. There are also numerous variations to the basic idea, e.g. always evaluating entire list, deny instructions always taking precedence, and so on.
See also: Access Control
- Active Directory
-
An identity repository created by Microsoft that stores and arranges identity information. Based on this information, it provides access and permissions to users to enter particular resources and therefore improves organization’s security.
- Agent
-
Active entity, usually a software component that plays an active part.
In identity management field, the term "agent" often means an active software component installed into a controlled system, used to mediate management of identities. It is similar in function to identity connector, however unlike the connector, the agent has to be installed into a controlled system.
X.1252 term: agent
See also: Identity Connector
- Anonymity
-
A situation when an object cannot be distinguished from similar objects, where an identity of an object cannot be determined.
X.1252 term: anonymity
See also: Identity
- Application Programming Interface (API)
-
Set of procedures, functions or methods that can be used by another program or component. APIs are usually interfaces exposed by an application, meant to be used by other application. Therefore APIs are important integration points between applications and services. In the past, APIs were usually created as a programming language library, such as C or Java library. Since c. 2010, APIs usually take form of HTTP-based RESTful service.
See also: RESTful Service
- Archetype
-
In midPoint terminology: Archetype is a formal definition of object subtype in midPoint. Archetypes can give specific characters to basic midPoint types such as user, role or org. For example, archetypes can be used to further refine concept of user to represent employees, students, contractors and partners.
See also more information at docs.evolveum.com.
- Asset
-
Assert is an integral collection of information, data, systems, services, equipment, knowledge and any other means that provide value to an organization. It may take form of customer database, results of a research project, trade secret, proprietary software package, essential business process or any form that is considered valuable. Assets are subjects to risk, realized by threats exploiting asset vulnerabilities. Protection of assets is the primary objective of cybersecurity.
Alternative terms: Information asset
See also: Risk, Threat, Vulnerability, Risk assessment
- Assignment
-
In midPoint terminology: Assignment is a relation that directly assigns privileges, organizational membership, policy elements or other midPoint concepts to assignment holder objects (usually users). Assignment is quite a rich, flexible and universal mechanism. Assignments can be conditional, there may be time constraints, parameters and other details specifying the relation between assignment holder (usually user) and target (usually role or org). Many types of objects can be a target of an assignment, allowing for a significant expressive power.
See also more information at docs.evolveum.com.
See also: Inducement, Assignment Holder, Focus
- Assignment Holder
-
In midPoint terminology: An object that can hold assignments. Assignment holder can be considered a "source" of an assignment, a source of a relation that an assignmnt represents. Almost all object types in midPoint are assignment holder, capable of containing an assignment.
See also: Assignment, Focus
- Audit
-
Audit is an systematic and documented process for reviewing specific processes, organizations or regulatory compliance. It involves obtaining and objective processing of evidence, including evidence stored in special-purpose audit trails. Audit can be internal, conducted by an organization, reviewing its own processes or compliance. It can also be external, conducted by an independent trusted party.
See also: Audit trail
- Audit scope
-
Extent and boundaries of audit review.
See also: Audit
- Audit trail
-
Audit trail is a record of essential information, meant to be used as an evidence in audit reviews. Audit trail is usually a structured, chronological record of operations or observations of an information system. It records important actions taken by users of the system, including actions taken by system administrators.
Alternative terms: Audit log
See also: Audit
- Authentication
-
Authentication is a mechanism by which a computer system checks that the user is really the one she or he claims to be. Authentication can be implemented by a broad variety of mechanisms broadly divided into three categories: something you know, something you have, something you are. Traditionally, authentication is done by the means of by username and password. Authentication is often followed by authorization, however, authentication and authorization are two separate mechanisms.
ISO 24760 term: authentication
X.1252 term: authentication
See also: Identification, Authorization, Multi-factor authentication
- Authenticated Identity
-
ISO 24760 term, describing "identity information" created to record result of authentication. This may mean data such as authentication strength, timestamps and similar information. In software development, it is often referred to as "authenticated user" or "authenticated principal".
Alternative terms: Authenticated user, Authenticated principal
ISO 24760 term: authenticated identity
See also: Authentication, Principal
- Authenticator
-
Something the subject possesses and controls, which is used to prove the identity during authentication. Authenticator can be digital (information), physical (an object such as ID card or authentication device) or a combination of both (an ID card with a tamper-proof chip containing cryptographic keys). Perhaps the most common type of authenticator is a password.
The term "authenticator" is closely related to term "credential" - which is even more confusing as many authenticators are also credentials. The difference is that credential is bound to the authenticated identity, while authenticator does not need to be. E.g. password is not inherently bound to authenticated identity, as the same password can be used to authenticate many identities at various sites. Therefore, strictly speaking, password is an authenticator but not a credential. On the other end, digital certificate (X.509) with associated private key is bound to a specific identity, therefore it is both an authenticator and a credential. There are also credentials that are not authenticators, such as records in the authentication database linking identity identifiers. However, in common usage, the term "credential" is often used to refer to authenticators as well.
Alternative terms: Authentication token
ISO 24760 term: credential
X.1252 term: credential
See also: Credential, Password, Passkey, Personal identification number, Authentication
- Authenticity
-
Authenticity is a property of a data, and also an assurance, that the data are valid and true. Simply speaking, it tells that data are what they claim to be. Authenticity may also mean assurance of data origin (provenance) and their integrity.
See also: integrity
- Authorization
-
Authorization is a mechanism by which a computer system determines whether to allow or deny specific action to a user. Authorization is often controlled by rather complex rules and algorithms, usually specified as part of an access control model. Authorization often follows (and required) authentication, however, authentication and authorization are two separate mechanisms.
In rare cases, "authorization" is understood as a process of allowing access, granting permissions or giving approval. Such as "authorization" of a request to join a group.
X.1252 term: authorization
- Authorization Service
-
A system that provides authorization information to an application. It usually makes a decision whether a specific operation should be allowed or denied by the application. I.e. authorization system is performing the authorization decision instead of the application. Authorization systems often use complex policy, user roles or additional attributes to make the decision. Authorization servers usually implement functionality of Policy Decision Point (PDP). Typical protocols and frameworks: XACML, Open Policy Agent (OPA), SAML authorization assertions, proprietary mechanisms
Alternative terms: Authorization Server
See also: Authorization
- Availability
-
Availability is a property of network service or information system, ensuring that all the necessary functions are available to the user. I.e. it is a property that ensures that systems and the data are available to users as intended, that the service is not interrupted by an attacker.
Availability, together with confidentiality and integrity form a "CIA triad", a classical model of information security (cybersecurity).
Alternative terms: Service availability
See also: Confidentiality, integrity
- Biometrics
-
Automated recognition of persons, based on their biological or behavioral characteristics.
Alternative terms: Biometric authentication
X.1252 term: biometric recognition
See also: Authentication
- Birthright
-
Privileges or access granted to users based on their inherent characteristic, such as user type (employee, contractor, student). It also includes a set of privileges automatically given to all users ("all users" access). Privileges and access that are automatically assigned due to organizational structure membership (e.g. access to departmental systems) is sometimes also considered to be a birthright.
In midPoint terminology: Archetypes are usually used to manage birthright in midPoint, by placing appropriate inducements in archetype definition. Birthright originating from organizational structure can be implemented by placing inducements in organizational units (orgs).
Alternative terms: Birthright provisioning
See also: Identity Provisioning, Archetype, Org, Inducement
- Blinded Affirmation
-
A method to provide strictly limited information to another party, without revealing any unintended information. Blinded affirmation is often used to demonstrate that a certain user is a member of an organization, without revealing any additional information about the user to a third party. Blinded affirmation usually relies on ephemeral identifiers or pseudonyms.
ISO 24760 term: blinded affirmation
See also: Ephemeral Identifier, Pseudonym
- Certificate Authority (CA)
-
Entity that issues digital certificates. Certificate authority is usually a trusted third party, certifying correctness of the data presented in certificates that it issues. The most common form of certificate authority is an authority that issues X.509 digital certificates, containing public keys. Certificate authority signs the certificates, thus certifying that a specified public key belongs to a specified identity.
See also: Digital Certificate, Trusted Third Party
- Claim
-
Statement about an entity, provided in a form which can be verified by other parties. Verification of a claim provides reliable information about the entity that created the claim (issuer), and it provides assurance that the claim content was not modified. However, claim verification does not provide assurance that a claim is correct, or that it is an unquestionable truth. Technically, claims are often digital identity attributes, secured by cryptography mechanisms for network transfer.
See also: Digital Identity Attribute, Triangle Of Trust, Issuer, Holder, Verifier
- Clockwork
-
In midPoint terminology: MidPoint component responsible for evaluation of lifecycle, activation, object templates, assignments, roles, policies, mappings and many other aspects of midPoint configuration. Clockwork is the main workhorse of midPoint synchronization, making sure that objects are properly recomputed and policies are enforced. It also computes the data for synchronization, both in inbound and outbound direction.
See also more information at docs.evolveum.com.
- Cloud Computing
-
Internet-based computing when resources like storage, applications or servers are used by organizations or users via Internet. Data could be accessed any time from any place, without any installations and is stored and processed in third-party data centers which could be located anywhere in the world. Cloud computing is considered to lower organization’s costs by avoiding the need of purchasing servers as well as to speed up the processes with less maintenance needed. Due to data being centralized at one place, it is considered to be secure and easily shared across bigger amount of users.
- Coarse-grain Authorization
-
Authorization concerning big architectural blocks, such as entire applications or systems. E.g. coarse-grain authorization usually decides whether a user can access an application, or access should be denied, without providing any additional details. Coarse-grained authentication is usually being made at the "perimeter" of the system, e.g. by infrastructure components, when a user is accessing an application. Typically, this authorization is based on simple policy rules, such as a role or group assigned to the user.
See also: Authentication, Fine-Grain Authorization
- Competence
-
Ability to perform certain function, or to achieve intended results. It may refer to the ability of people, an ability to apply knowledge, skills and effort to reach results. It may also apply to systems, describing an ability of the system to perform functions to achieve results.
Alternative terms: Capability
- Compliance
-
Fulfillment of a requirement, or a system of requirements. It usually refers to conformity with a regulation, or an industry standard.
In identity and access management (IAM) field, the term "compliance" may refer to a set of IAM platform features that aid with regulation and standards compliance.
Alternative terms: Conformity
- Confidentiality
-
Confidentiality is a property of communication channel or data, ensuring that they are available only to intended actors. I.e. it is a property that ensures that the data are seen only by communicating parties, and no other party can access and read the data. Confidentiality is usually implemented by using encryption.
Confidentiality, together with integrity and availability form a "CIA triad", a classical model of information security (cybersecurity).
Alternative terms: Secrecy
See also: Availability, integrity
- ConnId
-
ConnId is an open source identity connector framework project. It originated from Identity Connector Framework (ICF) developed by Sun Microsystems in late 2000s. ConnId is now an independent open source project, used by several identity management platforms.
Alternative terms: ConnId Framework
See also: Identity Connector, Identity Connector Framework
- Consent for Personal Data Processing
-
Consent for personal data processing is given by a user, to indicate agreement for processing of personal data. In personal data protection frameworks (such as GDPR), consent has a strict structure, it is given for a very specific processing scope. Consent can be revoked by the user any time. Consent is just one of several personal data processing bases (lawful bases). Consent is perhaps the most well know, and also the most misused basis for personal data processing.
Alternative terms: Consent
- Consequence
-
Outcome of an event or an activity.
Alternative terms: Outcome, Result
See also: Event
- Continual improvement
-
Continuous or recurring activity to enhance performance or results.
- Control
-
Control is a measure that affects risk. Controls are used in security management programs to lower risk, and manage overall and residual risks. Controls may take variety of forms, including processes, technology, policies and people,
Alternative terms: Countermeasure, Cybersecurity measure, Measure
- Control objective
-
Control objective is an intended effect of an control. It is a description of the effect that a control should have when implemented.
See also: Control
- Corrective action
-
Corrective action is an action to eliminate causes of non-compliance and prevent recurrence. Unlike remediation (correction) which is focused on correcting the effects, corrective action aims at correction of the causes (e.g. updating the policy).
See also: Compliance, Remediation
- Credential
-
Information used to prove the identity of a subject during authentication, which is bound to that particular identity. Credentials can be digital (information), physical (an object such as ID card) or a combination of both (an ID card with a tamper-proof chip containing cryptographic keys). Perhaps the most common type of digital credential is a password-based credential.
The term "credential" is closely related to term "authenticator" - which is even more confusing as many authenticators are also credentials. The difference is that credential is bound to the authenticated identity, while authenticator does not need to be. E.g. password is not inherently bound to authenticated identity, as the same password can be used to authenticate many identities at various sites. Therefore, strictly speaking, password is an authenticator but not a credential. However, when password is established as a shared secret at a particular site, and bound to a particular identity in that site’s authentication database, a password-based credential is created. On the other end, digital certificate (X.509) with associated private key is bound to a specific identity, therefore it is both an authenticator and a credential. There are also credentials that are not authenticators, such as records in the authentication database linking identity identifiers. However, in common usage, the term "credential" is often used to refer to authenticators as well.
Alternative terms: Digital credential, Credentials
ISO 24760 term: credential
X.1252 term: credential
See also: Authenticator, Password, Passkey, Personal identification number, Authentication
- Credential Issuer
-
An entity that creates and provisions credentials to entities.
ISO 24760 term: credential issuer
See also: Credential, Issuer, Trust service
- Credential Service Provider (CSP)
-
ISO 24760 term, describing an entity responsible for management of credentials in a domain.
ISO 24760 term: credential service provider
See also: Credential
- Cross-domain
-
Anything that involves interaction between two or more domains. Specifically in context of identity and access management, it usually means transfer of information between domains that are under separate control, or transfer of information that needs to be somehow limited (e.g. only a subset of attributes is transferred).
Cross-domain techniques employ special mechanism to protect the information, or to make transfer between domains more reliable or secure. For example, special identifiers (often ephemeral pseudonyms) are used to refer to identity data.
See also: Domain, Identity Provider, Relying Party, Identity Federation
- Cyberattack
-
Cyberattack is a an intentional effort to steal, destroy, expose, alter, disable or gain unauthorized access to information systems and data (information asset). Cyberattack is a cybersecurity breach.
Alternative terms: Cyber attack
See also: Cybersecurity, Cybersecurity incident
- Cybersecurity
-
Cybersecurity is a protection of information systems, usually focused on systems connected to the Internet. It is a broad practice, including protection of systems, networks, software and data. It involves technology as well as people, policies and processes. Cybersecurity is a continuous, never-ending effort to make the systems secure, and keep them secure. Most comprehensive and systematic cybersecurity techniques are based on risk-based approach.
Alternative terms: Information security
See also: Cybersecurity governance, Cyberattack, Risk-based approach
- Cybersecurity event
-
Cybersecurity event is a event affecting cybersecurity of an organization. It is an occurrence of system, service or network state, indicating possible breach of information security.
Alternative terms: Information security event
See also: Event, Cybersecurity incident, Cyberattack
- Cybersecurity governance
-
Cybersecurity governance is a set of systematic activities to direct and control implementation of cybersecurity. Governance is a process of setting up and maintaining policies and rules to govern cybersecurity activities. It includes cybersecurity programs, policies, processes, decision-making hierarchies, mitigation plans, cybersecurity systems and especially oversight processes and procedures. Cybersecurity governance assumes existence and systemic application of cybersecurity strategy.
Alternative terms: Information security governance
- Cybersecurity incident
-
Cybersecurity incident is unwanted or unexpected cybersecurity event, impacting cybersecurity of an organization. Cyberattack is the usual type of cybersecurity incidents. Cybersecurity incidents include situations, where security breach cannot be proven, however there is a siginificant probability that security of information and systems might have been affected.
Alternative terms: Information security incident, Incident
- Cybersecurity incident management
-
Cybersecurity incident management is set of processes and systems to manage cybersecurity incidents. It includes detection, recording, reporting, assessing and responding to incidents. Cybersecurity incident management systems are also used to learn from the incidents, with the goal to improve information security management system (ISMS).
Alternative terms: Information security incident management, Incident management
See also: Cybersecurity incident
- Cybersecurity professional
-
Cybersecurity professional is a competent person who implements, maintains and improves cybersecurity practices.
Alternative terms: Information security professional, ISMS professional, Information security practitioner
See also: Cybersecurity, Cybersecurity governance
- Cybersecurity resilience
-
Cybersecurity resilience is a combination of processes, procedures and governance measures to ensure continuous operation of cybersecurity mechanism. It includes mechanisms to maintain appropriate levels of cybersecurity, as well as necessary improvement of cybersecurity measures to reflect increased threats.
Alternative terms: Information security resilience, Information security continuity
See also: Cybersecurity, Cybersecurity governance
- Cybersecurity standard
-
Cybersecurity standard is a formal specification describing requirements and methods for appropriate implementation of cybersecurity.
Alternative terms: Information security standard
See also: Compliance, Risk criteria
- Cyber hygiene
-
Cyber hygiene is a cybersecurity principle and/or practice. As an analogy to personal hygiene, cyber hygiene requires users to establish routine measures to minimize their cybersecurity risk. It often refers to personal cybersecurity routines such as proper password management, malware protection and data back-up. However, in a broader organizational scope, it also includes infrastructural cybersecurity measures, such as zero-trust principles, software updates, device configuration, network segmentation, identity and access management and user awareness trainings.
Alternative terms: Digital hygiene
See also: Zero trust
- Data Governance
-
Data governance is a data management concept aimed at maintenance of high data quality, through management of data lifecycle and implementation of appropriate data quality controls. Identity governance and administration (IGA) field is concerned with governance of identity data.
- Data Minimization
-
A process of reducing the amount of data to the necessary minimum required for processing.
Data minimization often takes place in context of privacy and personal data protection, minimizing identity data to the necessary minimum.
Alternative terms: Minimization
X.1252 term: data minimization
See also: Privacy, Personal Data Protection, Data Governance
- Data Origin
-
Organization or entity that have created or assigned a particular value. Origin is often part of data provenance, description of the method how a value was acquired by a system.
Origin may be relative, describing only an immediate origin of the information, a "previous hop, a system that have relayed the information to our system. Such origin may not have created or assigned the information, it may have only relayed or copied the information originated in a third system. Origin is often recorded in a form of metadata.
Alternative terms: Origin, Domain of Origin
ISO 24760 term: domain of origin
See also: Digital Identity Attribute, Data Provenance
- Data Provenance
-
Description of the method how a value was acquired by a system. Provenance information almost always contains description of data origin. It is supplemented by additional information, such as timestamps and assurance information.
Provenance may be relative, describing only an immediate origin of the information, a "previous hop, a system that have relayed the information to our system. In other cases, provenance information may include a complete path from the ultimate origin of the information, describing all the systems that it has passed and all the transformations that were applied. Provenance is often recorded in a form of metadata.
Alternative terms: Provenance
See also: Data Origin, Metadata, Data Governance
- Decentralized Identifier (DID)
-
An identifier that does not require centralized registration authority. Technologies supporting decentralized identifiers vary, many of them are based on distributed ledger technologies (e.g. blockchain).
X.1252 term: decentralized identifier
See also: Decentralized Identity, Self-Sovereign Identity
- Decentralized Identity (DID)
-
An identity that does not require centralized registration authority, identity provider, identity data store or any other centralized system to function. Decentralized identity systems are usually built to be self-sovereign.
- Delegated Administration
-
Type of administration where chosen users have administrator permissions. They can manage other users, create passwords for them, move them into groups, assign them roles, etc.
- Delta
-
In midPoint terminology: Delta is a data structure describing a change in data. It describes the data items (and values) that were added, removed or replaced. Delta is a relativistic data structure, it contains only the data that were changed.
See also more information at docs.evolveum.com.
Alternative terms: Prism Delta
See also: Prism
- Digital Identity
-
Digital representation of identity: set of characteristics, qualities, believes and behaviors of en entity, usually represented as a set of attributes. Digital identity forms unique representation of a subject engaged in an online transaction. While digital identity is always unique in the context of a digital service, but does not necessarily need to be traceable back to a specific real-life subject (linkability).
Digital identity should not be confused with identifier. Digital identity is a set of characteristics (complex data), while identifier is (usually simple) value used to refer to digital identity.
Alternative terms: Identity, Network Identity, User Profile
ISO 24760 term: identity information
X.1252 term: digital identity
See also: Identity, Digital Identity Attribute, Entity, Linkability
- Digital Identity Attribute
-
A value representing a characteristic or property of an entity. An attribute is a part of digital identity.
Alternative terms: Attribute
ISO 24760 term: attribute
X.1252 term: attribute
See also: Digital Identity, Identifier, Entity, Claim
- Digital Certificate
-
Digital document, containing an information protected by cryptographic means. Digital certificates are usually used to bind an information to a digital identity. Perhaps the most common use of certificates are certificates of public keys, binding public key to identity of the owner, signed by a trusted third party (certificate authority). The most prominent specification of a format of such digital certificate is X.509.
Alternative terms: Certificate
X.1252 term: certificate
See also: Certificate Authority, Trusted Third Party
- Digital Wallet
-
Physical or virtual device designed to securely store small amount of sensitive information, usually storing credentials. Digital wallets can have variety of forms, ranging from tamper-proof physical devices, to simple programming libraries. It is expected that appropriate level of mechanisms to protect the data exist in all such forms. E.g. virtual wallets usually protect the data using a key or a passphrase.
Digital wallets are often used to store verifiable credentials or credentials for cryptocurrency schemes. The actual information that the wallet protects is usually a private or secret key associated with the credential.
See also: Verifiable Credentials
- Directory Service
-
A database intended as a store of simple objects, shared between applications. Directory services are often used to store identity data. The data are used by other applications, that are accessing the directory service by using a well-known protocol. Lightweight Directory Access Protocol (LDAP) is the most common protocol used to access directory services.
Directory services used to be the usual method to implement functionality of identity data store. However, other databases and technologies are used to implement similar functionality.
Alternative terms: Directory Server
- Documented information
-
Information required to be created and maintained by an organization, usually for the purposes of compliance. Documented information may be in form of documents, documented processes, content of information systems, records of activities or any similar information.
See also: Compliance, Audit trail
- Domain
-
An environment under an autonomous control. A domain is often an organization, managing a set of information systems and databases, keeping the information consistent. However, it may also refer to a smaller information set within an organization, such as a single database or directory server.
Identifiers are often designed to be unique within a particular domain, such as an organization or a database.
Alternative terms: Domain of applicability, Realm, Context, Scope
ISO 24760 term: domain
X.1252 term: domain
See also: Digital Identity, Identifier, Internal context
- Effectiveness
-
Effectiveness is a measure of extent to which activities are realized and desired results are achieved.
- Enrollment
-
A process of entering new identity data into a specific system (usually in a domain). Enrollment usually involves validation and verification of the information and its origin, such as verification of identity assertion that relied the information to the system.
The terms "enrollment", "registration" and "onboarding" are overlapping and they are often used as synonyms. Strictly speaking, "enrollment" is the verification process, "registration" is an act of recording information to data store, and "onboarding" is a complete business process making sure that a new person in an organization is well-equipped for activities within the organization.
ISO 24760 term: enrollment
X.1252 term: enrollment
See also: Identity Registration, Onboarding, Identity Assertion
- Entitlement
-
A privilege or right of access given to the user. An "entitlement" is a very overloaded term. It can be used to represent any kind of privilege, ranging from a very high-level business role to the finest filesystem permission in a specific system.
In midPoint terminology: An Entitlement is a resource object representing privilege, access right, resource-side role, group or any similar concept. However, unlike account, the entitlement does not represent a user.
Alternative terms: Privilege, Access Right, Permission
X.1252 term: privilege
See also: Privileged entitlement, Static Entitlement
- Entity
-
Being (such as person or animal), thing, concept or anything else that has recognizably distinct existence. An entity is usually described by a set of characteristics, known as its identity. An entity can have several identities.
In some interpretations (usually legislation), "entity" is limited to natural and legal persons that are recognized in context of the legislation, able to exercise its rights and be subject to obligations.
ISO 24760 term: entity
X.1252 term: entity
See also: Identity, Digital Identity
- Ephemeral Identifier
-
An identifier used only for a very short duration. Ephemeral identifiers are valid usually only during a single session, or even during a single protocol exchange (e.g. authentication). Ephemeral identifiers are almost always randomly-chosen. When ephemeral identifiers refer to a digital identity, they are efficiently a short-lived pseudonyms.
ISO 24760 term: ephemeral identifier
See also: Identifier, Pseudonym
- Event
-
Event is a significant occurrence or change of circumstances. In cybersecurity, "event" usually means a negative action or occurrence, an incident, such as cyberattack. An event may have several causes and many consequences (outcomes). In a strict sense, an event can consist of something not occurring, e.g. a back-up procedure not running as planned.
See also: Cybersecurity event, Consequence, Cyberattack
- External context
-
Circumstances external to the organization, which affect the way an organization achieves objectives. It includes broad context, such as national and international environment, including regulatory, legal, technological, economic and natural aspects.
Alternative terms: Global environment, Externalities
See also: Internal context
- Federated Identity
-
Digital identity intended to be used in several domains, usually by the means of identity federation. Information about federated identity is transferred between domains, usually in a form of identity assertions exchanged between identity providers and relying parties.
ISO 24760 term: federated identity
See also: Identity Federation, Digital Identity
- Fine-Grain Authorization
-
Authorization made on very detailed information and is providing more detail control within the application operation. E.g. authorization to approve the transaction in an accounting system, with amount up to a certain limit. Typically, fine-grain authorization requires detailed knowledge of both the user profile (attributes) and the operation context (operation name, parameters and their meaning). Due to this requirement, fine-grain application is often implemented directly in application code.
See also: Authorization, Coarse-grain Authorization
- Focus
-
In midPoint terminology: An object that can is a focus of computation, an object central to midPoint computation. The focus is usually a user, but it can be a role, org or a service. Focus is the center of a computation, the hub in hub-and-spoke (star) data synchronization in midPoint. The "spokes" in the computation are represented by projections.
See also more information at docs.evolveum.com.
Alternative terms: Focal Object
See also: Assignment, Projection
- Fulfillment
-
Fulfillment is a functionality of identity management (IDM) system, making sure that users have appropriate access to systems. Simply speaking, this is the functionality that creates accounts, associates them with entitlements (e.g. groups), modifies passwords, enables/disables accounts and deletes them in the end. Fulfillment is a name used for identity provisioning together with deprovisioning and associated activities.
See also more information at docs.evolveum.com.
Alternative terms: Provisioning/deprovisioning
- Graph-Based Access Control (GBAC)
-
Access control model based on a semantic graph modeling an organization. The organization is modeled as a semantic graph. Nodes represent organizational units, functional units (roles) and agents (users), edges represent relationships (e.g. membership, deputy). The model includes a query language, which is used to build the access control matrix.
See also: Access Control, Relationship-Based Access Control
- General Data Protection Regulation (GDPR)
-
General Data Protection Regulation 2016/679 (GDPR) is European Union regulation on personal data protection and privacy. It defines rules for processing of personal data in European Union, European Economic Area, with provisions of the regulation applicable to other parties as well.
See also: Personal Data Protection
- Generic Synchronization
-
Advanced model of synchronization where not only users and accounts are synchronized, but also groups to roles, organizational units to groups, roles to ACLs and so on.
- Governance, risk management and compliance (GRC)
-
Governance, risk management and compliance (GRC) is a discipline that helps organizations to have more control over processes and be more effective. Governance is the set of decisions and actions by which individual processes as well as the whole organization are lead to achieve specific goals. Risk management identifies, predicts and prioritizes risks with aim to minimize them or avoid their negative influence on organizations' aims. Compliance means following certain rules, regulations or procedures. A GRC software facilitates this problematic by taking care of all three parts by one single solution. It is a very helpful tool for business executives, managers or IT directors. Thanks to it it is possible to define, enforce, audit and review policies responsible for the exchange of information between internal systems as well as between the external ones.
See also: Cybersecurity governance, Risk management, Compliance
- Governing body
-
Governing body is a person or a group of persons who are responsible and accountable for the performance of an organization, mostly for the purposes of financial performance and regulatory compliance.
See also: Compliance
- Holder
-
An entity that holds credentials or claims, which usually describe the holder entity. In Triangle of Trust scenarios, the credentials/claims are issued by the issuer and verified by the verifier.
See also: Principal, Subject, Triangle Of Trust, Issuer, Verifier, Trusted Third Party, Credential, Claim
- Identifier
-
A value, or a set of values, that uniquely identify an identity in a certain scope.
An identity usually have several identifiers, used in various situations and contexts. Identifiers may be compound, composed of several values.
ISO 24760 term: identifier
X.1252 term: identifier
See also: Identity, Digital Identity, Digital Identity Attribute, Entity
- Identification
-
A process of recognizing an identity as distinct from other identities in a particular scope or context. Identification is almost always performed by processing identifiers, using them to reference an identity in an identity database.
Identification is a process distinct from authentication. Authentication is a process of proving an identity (verification), whereas identification does not assume any such proof.
The term "identification" usually refers to a process of looking up identity data based on a simple identifier, such as username or reference identifier. In some cases, process of identification involves a correlation, looking up or matching identity information in a more complex way. For example, a system may compare registration data entered by the user with the content of its identity database, in an attempt to determine whether such user is already registered.
ISO 24760 term: identification
X.1252 term: identification
See also: Digital Identity, Identifier, Authentication, Identity Correlation
- Identity
-
The fact of being who or what a person or thing is. Set of characteristics, qualities, believes, behaviors and other aspects of en entity. Identity can be applied to persons, things, even intangible concepts, known as entities. An entity can have several identities (often known as personas). In context of information technologies, parts of identity can be usually represented in a form of digital record, known as digital identity.
Identity should not be confused with identifier. Identity is a set of characteristics, while identifier is a value used to refer to identity.
ISO 24760 term: identity
X.1252 term: identity
See also: Identifier, Digital Identity, Entity
- Identity and Access Management (IAM)
-
Identity and access management (IAM) is a field concerned with managing identities (e.g. users) and their access to systems and applications. IAM is concerned with all the aspects dealing with "identity", with many subfields that specialize in selected aspects. Access management deals (AM) especially with access to applications, including authentication and (partially) authorization. Identity management and governance (IGA) deals with management of user data (e.g. user profiles), synchronization of identity data and applying policies. Other IAM subfields deal with storage of identity data, transfer of the data over the network and so on.
See also more information at docs.evolveum.com.
- Identity Assertion
-
Statement made by an identity provider regarding properties or behavior of an identity. Assertions are used by relying parties. The most common assertion is perhaps authentication assertion, relying information about authentication event from identity provider to relying party. Assertions may contain other information as well, usually identity attributes and authorization decisions.
Alternative terms: Assertion, Claim
ISO 24760 term: identity assertion
X.1252 term: claim
See also: Digital Identity Attribute, Identity Provider, Relying Party
- Identity-based Security
-
Identity-based security is a approach to cybersecurity, focused on concept of identity. It places identities in the center of cybersecurity mind-set, adjusting cybersecurity design and practices around identities. Identity-based security is concerned with the identity that initiates an action, or identity that is responsible for an action, object or configuration. Simply speaking, identity-based security tries to make sure that access to service or information is provided to a specific identity, and only to the identity that is entitled for such access. Identity-based security is not limited to identity of persons. Identities of machines, services, devices, networks and similar technological and virtual concepts (non-human identities, NHI) are included as well.
Identity-based security relies on dynamic policies based on the identity of the actor, as well as context of the operation or situation. Unlike traditional approaches, identity-based security is not fixed, it does not assume static world where an operation is allowed once and for all, and stays allowed for ever. Policies in identity-based security are dynamic, they are meant to be continuously applied, maintained, reviewed and improved, dynamically adapting to the environment and requirements.
Identity-based security is fundamental foundation for zero-trust approach.
Note: Identity-based security should not be confused with "identity security", which is a vastly overloaded term used mostly for marketing purposes.
Alternative terms: Identity-first security, Identity-centric security, Identity-defined security, Identity defense in depth
- Identity Correlation
-
Process of comparing identity information, with an aim to find a matching identity. Correlation is usually employed during identity enrollment or registration, when a system determines whether the new identity is already known to the system. For example, a system may compare registration data entered by the user with the content of its identity database, in an attempt to determine whether such user is already registered. If such a comparison involves simple and reliable identifiers (such as username or employee number), it is called "identification". However, in many cases such identifiers are not available, and the system needs to combine several identifiers or employ sophisticated techniques to find matching identity. Some identity correlation techniques involve probabilistic matching techniques or machine learning methods to find suitable candidates, which are later reviewed by human operator.
Alternative terms: Identity Matching
X.1252 term: correlation
See also: Identification, Enrollment, Identity Registration, Identifier
- Identity Connector
-
Usually small and simple unit of code that connects to a remote system. The purpose of identity connector is to retrieve and manage identity information, such as information about user accounts, groups and organizational units. The connectors are usually written for and managed by a particular connector framework.
Alternative terms: Connector
See also: Identity Connector Framework, ConnId
- Identity Connector Framework
-
Generally speaking, a programing framework (library) for creating and managing identity connectors. However, this rather generic term often refers to the Identity Connector Framework (ICF), originally developed by Sun Microsystem in 2000s. The ICF was releases as an open source project by Sun, only to be later abandoned after Sun-Oracle merger. The ICF was a base for several forks, including ConnId and OpenICF.
Alternative terms: Connector Framework, ICF
See also: Identity Connector, ConnId
- Identity Data Source
-
A system that is the source of identity data, usually data about users. The data are usually created and maintained in such systems manually. There are often multiple identity data sources in an organization with various characteristics. Some data sources are considered authoritative, providing reliable information about identities. Other data sources usually contain user-provided information, such as data entered by the user during registration process. Almost all data sources contain partial information only, information that is limited both in breadth (only some identity types) and depth (only some attributes). Data source may be an intermediary, providing information acquired from other systems.
Alternative terms: Source System
- Identity Data Store
-
A database, designed and/or dedicated to store identity-related data. Identity data store is usually shared among many applications, it is accessed by many systems reading the data. Applications read data from identity data stores, often using them for authorization, and sometimes even authentication purposes. Structure of data in the data store is often application-friendly, containing pre-processed and derived information. Identity data store also usually contain entitlements, or similar information that can be used for authorization purposes. There are usually several identity data stores in an organization, managed and synchronized by an identity management system.
Traditionally, directory servers (such as LDAP serves) are used as identity data stores.
Identity data store is similar to identity register, and in fact many identity data stores are identity registers. The difference is that identity register has a more formal data structure, usually functioning as an authoritative data source. Whereas identity data store usually contains information copied from other system, including application-friendly derived data. However, the exact boundary between functions of identity register and identity data store is not exactly defined.
Alternative terms: Identity Store, Identity Database, Directory Service
See also: Identity Register
- Identity Deprovisioning
-
Identity deprovisioning is as well as identity provisioning a subfield of Identity and Access Management (IAM). It is an opposite to identity provisioning. While identity provisioning takes care of creating new accounts, determining the roles for individual users and their rights or making changes in them, deprovisioning works oppositely. When an employee leaves the company, his account is deactivated or deleted and he loses all the accesses to both internal and external systems. This way organization minimizes information theft and stays secure. Identity provisioning together with deprovisioning and associated activities is known as "fulfillment".
Alternative terms: Deprovisioning, Revocation
See also: Fulfillment
- Identity Evidence
-
Data and documents that support verification of identity data (identity proofing). Identity evidence is used in identity proofing process to achieve higher level of assurance of identity information.
Alternative terms: Evidence of Identity, Identity Proof
ISO 24760 term: identity evidence
- Identity Federation
-
Identity federation is an agreement between several domains, specifying the details of exchange and use of shared identity information. The information in identity federation is usually transferred by the means of identity assertions, exchanged between identity providers and relying parties.
From user’s point of view, identity federation is a process of sharing user’s identification and personal data between multiple systems and between organizations, so the user doesn’t have to register for each organization separately and can seamlessly access systems in federated organizations.
ISO 24760 term: identity federation
X.1252 term: federation
See also: Domain, Federated Identity, Identity Assertion, Identity Provider, Relying Party
- Identity Governance
-
Business aspect of managing identities including business processes, rules, policies and organizational structures. Any complete solution for management of identities consists of two major parts – identity governance and identity management. Identity governance is primarily concerned with establishing and maintaining policies and rules, while identity management is implementing such policies. As such, identity governance is closer to high-level business environment, while identity management is concerned mostly with underlying technology.
Alternative terms: Governance
- Identity Information Authority (IIA)
-
ISO 24760 term, referring to an entity related to a particular domain that can make provable statements on the validity and/or correctness of one or more attribute values in an identity.
ISO 24760 term: identity information authority
See also: Identity Provider, Domain
- Identity Lifecycle
-
Set of identity stages from creation to its deactivation or deletion. It contains creation of an account, assignment of correct groups and permissions, setting and resetting passwords and in the end deactivation or deletion of the account.
Alternative terms: Identity lifecycle management
See also: identity-provisioning,
- Identity Management (IDM)
-
Identity Management (IDM) is a process of managing digital identities and their accesses to specific resources in the cyberspace. It ensures appropriate access in appropriate time and helps to manage user accounts as well as to synchronize data. Identity management deals with digital identity lifecycle, managing values of digital identity attributes and entitlements.
Alternative terms: Identity Administration, User management, User provisioning
ISO 24760 term: identity management
X.1252 term: identity management
- Identity Management System (IDMS)
-
A system that provides identity management functionality: it is managing identities and their accesses to specific resources in the cyberspace. It ensures appropriate access in appropriate time and helps to manage user accounts as well as to synchronize data.
Identity management (IDM) systems are concerned about the "management" side, maintaining user data, policies, roles, entitlements and so on. IDM systems usually do not "apply" or enforce the policies. The policies are transformed as needed and provisioned to other systems (a.k.a. "target systems") that interpret and enforce the policies. The process of provisioning (and "deprovisioning") of data and policies is known as "fulfillment".
In a broad sense, IDM systems are used to manage the policies and data in all connected systems in the organization. IDM systems make sure that the data are consistent, that all the policies are applied, that user profile data are up-to-date, detecting and removing illegal access and generally keep all identity-related information in order across all the systems.
Note: ISO 24760 definition seems to include identification and authentication as functions of identity management systems. While almost all IDM systems implement such functions, they are mostly used for internal purposes, e.g. for system administration access. IDM system usually do not provide identification and authentication services to other systems. ISO 24760 definition is closer to definition of identity and access management (IAM) system. However, complete IAM functionality is usually provided by a combination of several systems in practice.
Alternative terms: IDM System, Provisioning System, User Provisioning System
ISO 24760 term: identity management system
- Identity Proofing
-
Verification of evidence to make sure that identity information are true and up-to-date. Identity proofing is used to achieve higher level of assurance of identity information.
Identity proofing should not be confused with authentication. Identity proofing is used to establish the link between identities and/or subjects/entities. However, identity proofing does not necessarily provide assurance that the entity currently interacting with a service is in fact the same entity that was initially established.
Alternative terms: Initial Entity Authentication
ISO 24760 term: identity proofing
X.1252 term: identity proofing
- Identity Provider (IdP)
-
System that provides identity-related information to applications (known in this context as "relying party" or "service provider"). Such information usually includes user identifiers (which may be ephemeral), user name(s) and affiliation. The information is usually provided in form of identity assertions (claims).
Identity providers are often authenticating the users. In that case, identity providers usually include information describing the authentication, such as statement that user was authenticated and indication of authentication mechanism strength. Identity provider authenticates the users in its own capacity, it never reveals user’s credentials to the application (relying party). In fact, many identity providers are focused on authentication only, providing only a very minimal identity information (often just a single identifier), in which case the authentication-related information forms the most important part of provided information. Such identity providers effectively work as cross-domain single sign-on (SSO) systems.
Although most identity providers include user authentication, there are also providers that do not (directly) authenticate the users, sometimes called "attribute providers". Identity provider may provide also additional information of the user to the application, such as information about user attributes and entitlements.
Identity provider is often managed by a different organization than the relying applications (service providers), thus providing cross-domain identity mechanism. Typical protocols and frameworks used by identity providers include: SAML, OpenID Connect, CAS
ISO 24760 term: identity information provider
X.1252 term: identity service provider
See also: Relying Party, Identity Federation, Cross-domain, Identity Assertion
- Identity Provisioning
-
In broad sense, identity provisioning is a subfield of Identity Management (IDM), concerned with technical aspects of creating user accounts, groups and other objects in target systems. It is a technology thanks to which many identity stores are synchronized, merged and maintained. Identity provisioning takes care of technical tasks during the whole user lifecycle - when new employee is hired, when his responsibilities change or he leaves the company (deprovisioning). It helps the organization to work more effectively as its goal is to automate as much as possible.
The provisioning system usually takes information about employees from the Human Resource (HR) system. When new employee is recorded into HR system, this information is detected and pulled by the provisioning system. After that, it is processed to determine set of roles each user should have. These roles determine and create accounts users should have, so everything is ready for new users on the very first day. If a user is transferred to another department or his privileges change, similar processes happen again. If an employee leaves the company, identity provisioning systems makes sure all his accounts are closed.
In a specific sense, identity provisioning means a process of creating accounts, assigning entitlements and similar actions, making sure a user has appropriate access to information systems. Identity provisioning together with deprovisioning and associated activities is known as "fulfillment".
Alternative terms: User provisioning, Provisioning
See also: Identity Management, Identity Lifecycle, Fulfillment
- Identity Register
-
A repository (database) of identity information, usually structured in a formal manner. Identity registers are almost always indexed using a reference identifier. They are usually designed for a specific purpose of being an authoritative data sources for other systems.
Identity register is similar to identity data store, and in fact many identity registers function as identity data stores. The difference is that identity data store has less formal, usually application-friendly data structure, containing pre-processed and derived information. Identity data store also usually contain entitlements, or information that can be used for authorization purposes. However, the exact boundary between functions of identity register and identity data store is not exactly defined.
Alternative terms: IMS Register, Reference Register
ISO 24760 term: identity register
- Identity Registration
-
A process of recording new identity data into identity register or identity data store. Registration process may involve storing the information is several distinct data stores or registers. The recording process may be indirect, e.g. mediated by synchronization process of an identity management system.
Informally, the registration process often involves the data acquisition process as well, such as asking user for the data using a form.
The terms "enrollment", "registration" and "onboarding" are overlapping and they are often used as synonyms. Strictly speaking, "enrollment" is the verification process, "registration" is an act of recording information to data store, and "onboarding" is a complete business process making sure that a new person in an organization is well-equipped for activities within the organization.
Alternative terms: Registration
ISO 24760 term: identity registration
X.1252 term: registration
See also: Enrollment, Onboarding, Identity Register, Identity Data Store
- Identity Resource
-
In IAM field, a Resource is usually a network-accessible asset capable of managing identity information.
In midPoint terminology: An Resource is a system that is either identity data source or provisioning target. IDM system (midPoint) is managing accounts in that system, feeding data from that system or doing any other combination of identity management operations. Identity resource should not be confused with "web resource" that is used by RESTful APIs.
Alternative terms: Provisioning Resource, Resource
See also: Resource, Identity Connector
- Identity Security
-
Identity security is a vastly overloaded term, usually used for marketing purposes. Depending on the entity describing "identity security", its meaning can range from low-level network security to a high-level identity governance. The common motif seems to be focus on securing the identities, whether the identities represent persons, services or devices, which is a very broad and vague description. Overall, "identity security" does not bring any significant new concept or approach, it is mostly just a marketing description of pre-existing technology and methods.
Identity security should not be confused with identity-based security, which is a valid approach to cybersecurity.
- Identity Vigilance
-
Identity vigilance is a practice of appropriate and responsible management of identity data. It includes proper synchronization of data among information systems and databases, identification of duplicates, handling of data inconsistencies, application of privacy protection and all other practices necessary to ensure that the data are always correct, up-to-date and protected. Identity vigilance is especially important in healthcare, where patient mis-identification or data errors may lead to fatal consequences.
See also: Identity Governance and Administration
- Identity Governance and Administration (IGA)
-
Identity governance and administration (IGA) si a subfield of identity and access management (IAM) dealing with management and governance of identity-related information. IGA systems store, synchronize and manage identity information, such as user profiles. Complex data, entitlement and governance polices can be defined, applied to identity data. IGA system are responsible for evaluating the policies, making sure the data are compliant, addressing policy violations. IGA is often considered an umbrella term covering identity management, identity governance, compliance management, identity-based risk management and other aspects related to management of identities. Identity Governance and Administration (IGA) includes both the technical and business aspects of identity management.
IGA provides basic foundational platform for identity-based security, zero trust approach, and many other cybersecurity techniques and approaches.
See also more information at docs.evolveum.com.
- Inducement
-
In midPoint terminology: Inducement is an indirect representation of an assignment, a relation that assigns privileges, organizational membership, policy elements or other midPoint concepts to assignment holder objects (usually users). Inducement has the same data structure as assignment, and very similar functionality. However, while assignment represents direct relation, inducement is indirect. For example, assignment can be used to assign an account or a group membership directly to a user. Inducement can facilitate the same functionality, however it is usually placed in role. As the role is assigned (using an assignment) to the user, inducements placed in the role are indirectly applied to a user.
See also more information at docs.evolveum.com.
See also: Assignment, Role
- Information classification
-
In midPoint terminology: Information classification is a process in which organisations assess their data and systems, with regard to the necessary level of protection. The information is classified by assigning information labels or classifications to individual assets, such as databases, filesystems, applications or even individual files.
See also more information at docs.evolveum.com.
Alternative terms: Information labeling, Labeling
- Information need
-
In midPoint terminology: Information need is an information necessary to perform certain activity or a task. It is often a basis of "least privilege" principle, providing the minimum necessary information and access to users.
Alternative terms: As-needed basis
See also: Least Privilege Principle
- Information processing facilities
-
In midPoint terminology: Information processing facilities are all systems processing and storing information, including services, infrastructure and physical locations housing it. They include hardware, software, networks and all necessary equipment to operate them.
See also: Information system
- Information system
-
In midPoint terminology: Information systems are technological systems and applications built for processing and storing information. Information systems include hardware, software, networks and all necessary equipment to operate them. In some context, the "system" also includes the technological and physical environment (e.g. a network) as well as the information (data) processes by the system.
See also: Information processing facilities
- integrity
-
Integrity is a property of data or a communication channel, describing that the data or content of a communication channel were not modified in unintended way. I.e. it is a property that ensures that data are received in the same exact form as they were transmitted, without any modification or tampering.
Integrity, together with confidentiality and availability form a "CIA triad", a classical model of information security (cybersecurity).
Alternative terms: Data integrity, Integrity of communication
See also: Confidentiality, Availability
- Interested party
-
Person or organization that can affect, be affected or in any way perceive itself to be involved or affected by a decision, activity or an event. The term "stakeholder" usually describes a person or organization that holds a "stake" in an activity, such as investors or directors of an organization.
Alternative terms: Stakeholder
- Internal context
-
Circumstances internal to the organization, which affect the way an organization achieves objectives. It includes all internal parts and mechanisms of an organization, such as governance, organizational structure, management hierarchy, policies, objectives, responsibilities, resources and capabilities.
Alternative terms: Local environment, Internals
See also: External context, Domain
- Information security management system (ISMS)
-
Information security management system (ISMS) is a set of policies and procedures for systematically managing cybersecurity of an organization. ISMS includes risk assessment, risk treatment (implementation of controls), risk communication and incident response. Management of cybersecurity is a continuous, never-ending effort, which is meant to be constantly improving. Cybersecurity governance is meant to establish and maintain rules and policies for ISMS, and to provide oversight and consistent improvement of ISMS processes.
Alternative terms: Cybersecurity management system
- Issuer
-
An entity that issues credentials or claims, usually describing another entity (holder). In Triangle of Trust scenarios, issuer is considered to be trusted third party.
See also: Triangle Of Trust, Holder, Verifier, Trusted Third Party, Credential, Claim
- Joiner-Leaver Processes
-
Joiner-Leaver are human resources (HR) process, handling employees joining the organization and leaving the organization. They are constrained versions of joiner-mover-leaver processes, not considering movement of employees in organizational structure.
Alternative terms: Joiners and Leavers
See also: Joiner-Mover-Leaver Processes, Onboarding, Offboarding
- Joiner-Mover-Leaver Processes (JML)
-
Joiner-Mover-Leaver (JML) are human resources (HR) process, handling employees joining the organization, moving within organizational structure and leaving the organization. JML process can be understood as handling events of employee lifecycle from the point of view of organizational and business processes. Generally speaking, this process is not limited to employees. However, when similar processes are applied to other types of persons (students, contractors) they are often referred to as "on-boarding" and "off-boarding".
JML processes are (manual) business processes in their nature. Despite that, the JML processes are important for identity management, as they provide the contextual framework for identity management technology to fit in. Moreover, identity management deployments are usually automating some parts of the JML processes.
Alternative terms: Joiners, Movers and Leavers
See also: Onboarding, Offboarding, Joiner-Leaver Processes
- Lightweight Directory Access Protocol (LDAP)
-
Lightweight Directory Access Protocol (LDAP) is industry-standard protocol (RFC4510) for accessing directory services.
See also: Directory Service, Identity Data Store
- Level of Assurance (LoA)
-
Measure of reliability of identity information. Information with low levels of assurance are usually user-provided information that were not verified in any significant way. Higher levels of assurance are usually achieved by identity proofing, a process of verifying the information. Level of assurance is usually stored as metadata, describing the specific value that was verified.
X.1252 term: assurance level
See also: Digital Identity Attribute, Identity Proofing, Metadata
- Least Privilege Principle
-
Principle of information security, stating that each user should have the least privilege necessary to carry out their activities. In other words, the principle states that there should be no over-provisioning (over-permissioning) of users. The principle is often implemented by "default deny" approach: everything is denied by default, every access has to be explicitly allowed.
Adherence to the principle of least privilege is generally accepted as best practice for information security, as it is minimizing overall risk by keeping the extent of privileges as low as possible. However, due to complexity, maintenance effort and other factors, strict adherence to the principle is surprisingly difficult to achieve.
Alternative terms: Principle of Least Privilege, PoLP, Default deny
See also: Over-provisioning, Information need
- Linkability
-
Ability to determine that two digital identities represent the same entity, or whether a digital identity represents a particular (real-life) subject. Linkability is usually deterministic, based on a reliable identifier. Identity proofing is a mechanism to reliably establish the link.
X.1252 term: linkability
See also: Identity Correlation, Digital Identity, Identity Proofing
- Management
-
Management is a broad set of systematic activities, methods and other means to direct and control activities in an organization, in order to achieve its objectives. It is meant to provide efficient, systematic method to achieve objectives, which can be controlled and monitored. Management operates within the constraints given by governance activities. While governance is a process of establishing policies and rules, management is concerned with efficient implementation of the activities within established rules.
Alternative terms: Management system
- Manual Fulfillment
-
Manual process of creating, updating and deleting accounts, entitlements and similar objects, driven by identity management system, but exexcuted by human operator. Manual fulfillment is initiated by an identity management system, usually as a consequence of change in user privileges or policies. Identity management system creates a ticket for system administrators, containing instructions to create/modify/delete an acccount or entitlement in a specific information system. Actual action is executed manually, by the system administrator. Manual fulfillment is used for systems, for which automatic identity connector is not available.
Alternative terms: Manual Provisioning/deprovisioning, Manual resource, Manual connector
- Memorized Secret Authenticator
-
Memorized secret authenticator is a secret value intended to be memorized by the user, used during authentication. Passwords and PINs are the most common type of memorized secret authenticators. Memorized secrets are used for "something you know" type of authentication.
Alternative terms: Something you know
See also: Authenticator, Password, Personal identification number
- Metadata
-
Data about data. Metadata describe properties of data, such as the method how the data were acquired (a.k.a. "provenance"), how reliable the data are (e.g. level of assurance) and so on.
Alternative terms: Meta-data, Meta data
See also: Data Origin, Data Provenance, Level of Assurance
- Multi-factor authentication (MFA)
-
Multi-factor authentication (MFA) is a composite mechanism, combining several independent authentication factors in a single authentication session. MFA is meant to counteract vulnerability of individual credential types. E.g. what-you-know credentials (such as passwords) are easily phished, while what-you-have credentials may be lost or stolen. Multi-factor authentication solves the problem by combining several credential types, making combined authentication stronger.
See also: Authentication, Credential
- Microcertification
-
Microcertification is a form of access certification (access review), limited to a single user or privilege. The basic idea of micro-certification is to limit the huger effort associated with traditional certification campaigns. Microcertifications are usually automatically triggered by specific events, such as user re-assignment in organizational structure, or increase of user’s overall risk above tolerable threshold.
- Minimal Disclosure
-
A principle, stating that only the minimal amount of information is disclosed as is required to perform a specific function or provide a service. Minimal disclosure principle is often used in cross-domain data transfer, such as when using identity providers or identity federations. Only the information required to perform a service is disclosed to the other party, no extra information is provided.
Alternative terms: Minimal Disclosure of Personal Information
ISO 24760 term: minimal disclosure
- Monitoring
-
Systematic effort to continuously determine status of a process, system or activity.
- Mutual Authentication
-
Authentication process in which all involved parties authenticate to all other parties. Usually a two-sided process, where both sides of a connection authenticate to each other, i.e. server authenticates to client and client authenticates to server.
X.1252 term: mutual authentication
See also: Mutual Authentication
- Near miss
-
An event that could have compromised the security of systems, data or services that did not materialise.
See also: Cyberattack, Cybersecurity incident
- Next Generation Access Control (NGAC)
-
A graph-based mechanism for managing of user access to information systems. NGAC specifies directed acyclic graph for user and concepts related to them (e.g. organizational units), and a separate directed acyclic graph for objects and and concepts related to them (e.g. folders). Access control decisions are reached by evaluating the two directed acyclic graphs with respect to policy classes, and operations specified as relations between the graphs. NGAC is specified in NIST publications (e.g. INCITS 499: Information technology - Next Generation Access Control - Functional Architecture)
See also: Access Control, Relationship-Based Access Control
- Non-compliance
-
State of non-fulfilment of a requirement, such as violation of a requirement stated in a policy, regulation or standard.
Alternative terms: Noncompliance, Nonconformity, Violation
- Non-repudiation
-
Non-repudiation is an ability to prove that an event happened, including proof of the originating parties. Non-repudiation is a property of a system, protecting against denial from one of the parties. The involved parties cannot deny that an action took place.
X.1252 term: non-repudiation
- Objective
-
Intended result of an activity or process.
Alternative terms: Goal
- Offboarding
-
Business process that takes place when a person leaves an organization. The aim of offboarding is making sure that the person no longer has access to sensitive data and premises of the organization. From IT point of view, this often means identity de-provisioning, e.i. deactivation of user accounts in various applications, databases and identity data stores. This process is often automated using an identity management system. However, a complete offboarding process is usually more complex, including non-IT steps such as returning the provided equipment.
Alternative terms: Off-boarding
- Onboarding
-
Business process that takes place when a new person enters an organization. The aim of onboarding is making sure that the person is well-equipped for any tasks and activities within the organization. From IT point of view, this often means identity provisioning, e.i. creation of user accounts in various applications, databases and identity data stores. This process is often automated using an identity management system. However, a complete onboarding process is usually more complex, including non-IT steps such as providing the person with appropriate equipment and training.
The terms "enrollment", "registration" and "onboarding" are overlapping and they are often used as synonyms. Strictly speaking, "enrollment" is the verification process, "registration" is an act of recording information to data store, and "onboarding" is a complete business process making sure that a new person in an organization is well-equipped for activities within the organization.
Alternative terms: On-boarding
- Open Source (OSS)
-
The meaning of this term is very simple - it is something people can wilfully modify according to their own needs or wishes. Firstly, this term was known in the context of software, which code was publicly exposed and available for modification. Later open source spread widely. There are open source projects, products, participations and many others.
Many organizations and people choose open source software, hence it is considered to be more secured and grants people more control over it. This software can also be more stable as many other people may contribute their own ideas, correct it or improve it.
Open source products are free and the creators usually charge other organizations for support or software services as implementation or deployment.
Alternative terms: Open Source Software, FOSS, Free and Open Source Software
- Org
-
In midPoint terminology: Org is a type of midPoint objects, object that represent various forms of organizational units and structures. Org can represent company, division, section, project, team, research group or any other grouping of identities. Orgs are not limited to grouping people, orgs can be used to group most midPoint objects (any assignment holder object).
See also more information at docs.evolveum.com.
See also: Organization, Organizational Structure
- Organization
-
Organization is an entity, usually representing a group of people, that has its objectives and methods to achieve them. Organizations may be or may not be legal entities.
See also: Org, Organizational Structure
- Organizational Structure
-
A hierarchical arrangement of authority, rights or duties in an organization. It determines the assignment, control or coordination of roles, responsibilities and power. A character of the organizational structure is highly dependent on the organization’s strategy and goals.
The theme of organizational structure is closely linked to identity management. Organizing the company into this structure, assigning rights to individuals, working groups or project and controlling everything from one place – that are advantages that any high quality IDM solution is supposed to provide.
See also: Organization, Org
- Orphan Account
-
An account without an owner, an account that does not seem to belong to anybody. In identity management, each account is supposed to have an owner, a user to whom the account belongs. An account without an owner is considered to be "orphaned", and it is usually deprovisioned (disabled or deleted).
Orphan accounts often originate as testing accounts that are not deleted after the testing is done. They may also belong to former users, but were not properly deleted or disabled. Orphan accounts are almost always a security risk, especially testing accounts with weak passwords. Most identity management systems have processes that scan systems for orphan accounts.
Alternative terms: Orphan, Orphaned Account
See also: Account, User, Reconciliation
- Outsourcing
-
Outsourcing is a practice of delegating functions, tasks and responsibilities to an external organization.
- Over-provisioning
-
Situation when an identity has more privileges than are necessary for the tasks that the identity is supposed to carry out.
Over-provisioning is generally undesirable, as it is a violation of least privilege principle which is introducing unnecessary risk. However, over-provisioning is a common occurrence, mostly due to high complexity of access control models, limited visibility, huge privilege maintenance effort or lack of appropriate security management practices.
Alternative terms: Over-permissioning, Over-privileged Access, Excessive Access, Excessive Privilege
- Policy Administration Point (PAP)
-
Functional component with a responsibility to specify, manage and maintain the policy. The "policy" usually refers to access control and/or authorization policy. PAP is an administrative point, which is creating and managing the policy. The policy is then stored at policy retrieval point (PRP). Policy administration point (PAP) can be part of applications, or they may be provided by dedicated infrastructure components (identity management and governance components). PAP specifies the policy, usually as a result of interaction with an administrator by the means user interface. PAP does not make policy decisions or enforce them, that is a responsibility of policy decision point (PDP) and policy enforcement point (PEP) respectively.
Note: The acronym PAP may also refer to Policy Access Point, which is an alternative name for Policy Retrieval Point (PRP), making the terminology somehow confusing.
Alternative terms: Policy Management Point
- Passkey
-
Passkey is a type of strong digital credential. They are used to authenticate a user to information systems, identity provides and applications. Passkeys are based on public key cryptography, making them relatively strong and secure. They may be provided in a hardware form (e.g. a small USB device), or managed entirely in software (e.g. mobile application). Passkeys are bound for each website or application, making them phishing-resistant.
See also: Credential, Personal identification number
- Password
-
Password is a type of (usualy weak) digital credential, meant to be secret, known only to a single user. Passwords are memorized secret authenticators, usually selected by users, meant to be remembered. Therefore, they are often short strings in a human-friendly form, such as simple words or names. Simplicity of passwords makes them vulnerable to dictionary attacks. Recently, passwords are randomly generated, managed by password management applications. However, even randomly-generated passwords may still be vulnerable to phishing attacks. Therefore organizations are moving towards authentication methods that do not depend on passwords (e.g. passkeys), or enroll multi-factor authentication schemes.
Alternative terms: Passcode
- Passwordless authentication
-
Passwordless authentication is an authentication that does not use passwords, or similar knowledge-based credential. It is usually considered to be a stronger form of authentication that the usual password-based authentication. Password-less authentication mechanisms usually rely on public-key cryptography mechanisms.
Alternative terms: Passwordless
See also: Authentication, Password, Passkey, Multi-factor authentication
- Password policy
-
Password policy constraints the selection and use of passwords with an aim to make them more secure. It almost always sets requirements for password complexity, such as minimal length of passwords and characted classes used in the password (e.g. letters, numbers, punctuation). Password policies often specify constraints on password lifetime, such as password expiration intervals.
Alternative terms: Password complexity policy
See also: Password, Password Management
- Password Management
-
Gives the organization an opportunity to meet the highest security standards thanks to the ability of having access to business systems and networks under control. Most of the employees usually pick just simple passwords and use same ones in multiple systems or applications. Password management helps to compose strong and unique passwords for both users and resources and ideally takes care of them during the whole user life cycle.
The term "password management" may also mean management of password on the user side, such as generating and storing of random passwords.
Alternative terms: Credential management
See also: Password, Credential
- Policy-Based Access Control (PBAC)
-
A mechanism for managing of user access to information systems based on policy. In PBAC, authorizations are supposed to be dynamically evaluated, based on policy specified in a machine-processable form. PBAC policy is an abstract concept, it is not clearly defined how it is expressed or evaluated. PBAC is meant to solve problems of static access control models such as RBAC.
PBAC seems to be technically equivalent to ABAC. However, in contrast to ABAC, PBAC is supposed to contain "policy management" layer, which is not clearly defined either.
Overall, PBAC is an conceptual idea rather than a concrete access control model. It is still in early stages of development.
Alternative terms: Dynamic Authorization Management, Policy as Code
- Policy Enforcement Point (PEP)
-
Functional component with a responsibility to enforce policy decisions. The "policy" usually refers to access control and/or authorization policy. Policy enforcement points are usually part of applications or infrastructure components, with an ability to analyze and intercept policed operation. Policy enforcement point only enforces the policy, it does not interpret or decides the policy. PEP depends on policy decision point (PDP) to interpret the policy and make a decision.
- Performance
-
Performance is a measure of a result. In process management, it a measure of how well is a process or activity achieving its objectives. The term "performance" may also meat a measure of efficiency of a computer system, describing how quickly it can provide results and how much resources it needs to perform a task.
- Perimeter
-
Security perimeter is a boundary that separates secure and insecure areas. In cybersecurity, "perimeter" separated insecure outer network (usually the Internet) and secure inner network (usually corporate network). The perimeter was usually implemented by physical protection of network devices and connections, inter-connecting networks by the means of dedicated security devices (firewalls, gateways). Security requirements were significantly reduced in the presumably-secure inner network, usually to the point of no tangible security at all. Access control inside the perimeter was often limited to access control based on network addresses (IP-based access control), or even no practical access control was implemented at all.
Reliance on cybersecurity perimeter was a very common occurrence in early years of inter-network computing. However, concept of cybersecurity perimeter is fundamentally flawed, as computer networks are no longer bound to their physical form. Existence of virtual networking technologies, wireless networks, covert network channels and other technologies made cybersecurity perimeter unsustainable. This effect is further emphasized by move towards cloud services, that are located outside of classic security perimeter by their very nature.
Overall, cybersecurity perimeter is considered flawed and insecure approach. Zero trust approach provides a broad conceptual movement to migrate from the concept of cybersecurity perimeter to more resilient and holistic cybersecurity approach that does not rely on concept of perimeter.
Alternative terms: Security perimeter, Information security perimeter, Network perimeter, Cybersecurity perimeter
See also: Zero trust
- Persistent Identifier
-
An identifier that cannot be changed or re-assigned to another identity. Once assigned, the identifier always references the same identity. Persistent identifiers are usually used as reference identifiers, and reference identifiers are usually persistent, resulting in "persistent reference identifiers".
Depending on a policy, persistent identifiers can be re-assign to another identity after the original identity was deleted (identifier re-use). However, there is usually relatively long interval during which the identifier cannot be re-assigned.
Alternative terms: Non-reassignable identifier
See also: Identifier, Reference Identifier
- Personal Data
-
Data about a person, usually processed in an information system. The definition of "personal data" slightly differ from case to case. For example, GDPR defines personal data as "any information which are related to an identified or identifiable natural person". However, the general understanding is that "personal data" are any data that relate to a natural person, that describe the person in some way. This is different from personally identifiable information (PII), as personal data may not uniquely identify a person. For example, person’s full name is considered personal data, however, a name such as "John Smith" is not entirely unique or identifiable in most contexts.
Alternative terms: Personal information, Identity data, Identity information, Personal profile
- Personal Data Erasure
-
Erasure (deletion) of personal data, usually due to explicit request from user (e.g. "delete account" request), or due to lack of lawful basis for personal data processing.
Alternative terms: Erasure, Data erasure
- Personal Data Processing Basis
-
Basis for processing of personal data. Legal data protection frameworks (such as GDPR) usually mandate that personal data cannot be processed unless there is a basis for that processing. The basis may be a contract, legal obligation, consent, or similar legitimate interest for processing of the data. Some frameworks (such as GDPR) are enumerating the available processing bases.
Alternative terms: Basis for processing, Legal basis, Lawful basis
- Personal Data Protection
-
Personal data protection is a field dealing with protection of personal information, rules for their processing, storage and erasure. It is closely related to privacy, as one of the main goals of personal data protection is to limit exposure of personal data, thus minimizing potential for their abuse.
Alternative terms: Data Protection, DP
See also: Personal Data, General Data Protection Regulation
- Personally Identifiable Information (PII)
-
Information that allows a person to be (directly or indirectly) identified. Obviously, government-issued identifiers, such as birth numbers, social security numbers or serial numbers of various identity documents are usually considered to be personally identifiable information. However, interpretation of what information is "personally identifiable" depends on the context. Even a simple full name of a person may be considered personally identifiable information in some contexts. Personally identifiable information usually require special protection or processing regime. Personally identifiable information should not be confused with personal data. PII are used as an identifier, pointing out a specific person in a group of other persons. Personal data describe certain person, there is no requirement for personal data to be "identifiable".
Alternative terms: Personal identifiers
X.1252 term: personally identifiable information
See also: Personal Data
- Policy Decision Point (PDP)
-
Functional component with a responsibility to interpret policy and make decisions. The "policy" usually refers to access control and/or authorization policy. Policy decision point (PDP) can be part of applications, or they may be provided by dedicated infrastructure components (authorization services). PDP interprets the policy and make a decision, which is usually allow/deny decision. PDP does not enforce the decision, it relies on policy enforcement point (PEP) to enforce it. PDP does not define or manage the policy either, it depends on policy administration point (PAP) to set the policy.
- Policy-Driven Role-Based Access Control
-
A mechanism for managing of user access to information systems based on a concept of dynamic roles and policies. It is an extension of traditional Role-Based Access Control (RBAC), applying dynamic policies to govern behaviour and assignment of roles. In policy-driven RBAC, roles are no longer static, they contain logic that determines set of privileges given by the role. The user-role assignments are also dynamic, controlled by automatic role assignment policies.
See also more information at docs.evolveum.com.
Alternative terms: PDRBAC
See also: Role-Based Access Control, Role, Entitlement, Role Management, Access Control
- Personal identification number (PIN)
-
Personal identification number (PIN) is a type of authenticator, meant to be secret, known only to a single user. They are almost always in a form of short numbers (4-8 digits). PINs are memorized secret authenticators. Even though most PINs are randomly generated, they are meant to be remembered by the users. Simplicity of PINs makes them vulnerable to enumeration attacks when used on their own. Therefore PINs they are almost exclusively used in combination with other authenticators. E.g. PINs are often used to protect strong authenticators/credentials, such as passkeys or public key credentials stored on smart cards.
See also: Authenticator, Memorized Secret Authenticator, Credential, Passkey
- Policy Information Point (PIP)
-
Functional component with a responsibility to provide additional information for policy decision point (PDP). PIP is usually retrieving data from identity data stores, providing them to PDP in form of attributes.
- Policy
-
Policy is a system of guidelines or rules used to reach an objective or a decision.
Unfortunately, "policy" is a heavily overloaded term with numerous of meanings. It may mean organizational policy, a set of high-level guidelines interpreted by people to guide their decisions. Policy may be formal, written down in a form that can be strictly followed, where compliance with a policy can be evaluated. It may also be informal, expressed in non-exact form, specifying a vague objective and methods. Policy may also mean machine-processable and executable code, used to quickly reach authorization decisions in run-time.
See also: Policy Management, Access Control, Authorization
- Policy Management
-
Set of operations defining the authorization roles or policies, or assigning roles to the particular users. This is often manual or semi-manual operation performed in identity management system or identity data store. Policy management is implementing the functionality of Policy Administration Point (PAP).
This term is often confused with authorization itself. However, policy management aims at definition of the policy, while authorization is interpreting the policy.
See also more information at docs.evolveum.com.
Alternative terms: Management of Authorization Policies, Policy and Role Management
See also: Policy, Authorization
- Polystring
-
A built-in data type for polymorphic string maintaining extra values in addition to its original value. The extra values are derived from the original value automatically using a normalization code. PolyString supports national characters in strings. It contains both the original value (with national characters) and normalized value (without national characters). This can be used for transliteration of national characters in usernames. All the values are stored in the repository, therefore they can be used to look for the object. Search ignoring the difference in diacritics or search by transliterated value can be used even if the repository itself does not support such feature explicitly.
- Principal
-
An entity or identity, information about which is managed in an information system.
Usage of the term "principal" varies significantly. Depending on context, it may refer to entity (person), its identity or data structure describing parts of the identity (digital identity). In information security frameworks (such as X.509), "principal" usually refers to entity or identity, such as owner of credentials. In programming frameworks, "principal" usually refers to ephemeral information about user, maintained during user’s session. This is usually different from "account", as accounts are usually persistent (stored in database), while principal may be ephemeral, or may refer to entities that are not users of the system (may not be able to log in). In some contexts, "principal" is equivalent to "subject".
Alternative terms: Subject
ISO 24760 term: principal
X.1252 term: principal
- Prism
-
In midPoint terminology: Prism is a name of a data representation library, which is used by midPoint to access data in its repository. The concepts of Prism permeates all of midPoint, giving structure to midPoint objects, and their representation in XML/JSON/YAML. Prism defines a concept of object, container, property, item, delta and many other useful concepts.
See also more information at docs.evolveum.com.
See also: Delta
- Privacy
-
The right to be left alone. In IT context, privacy is an ability of individuals to control the information about themselves, to choose how the information is used to express their individuality. Technologies that support the concept of privacy are known as privacy-enhancing technologies (PET).
- Privacy-Enhancing Technology (PET)
-
Technologies that support and enhance privacy. This usually means technologies that give an individual an effective control over personal data, and the way how these data are used to express one’s individuality.
Most privacy-enhancing technologies are focused on limiting the spread of personal data, making sure that only a minimal amount of data is disclosed (minimal disclosure), making sure that user approves data transfer (consent), using pseudonyms and various anonymization techniques to limit data exposure.
Privacy-enhancing technologies are somewhat different from personal data protection technologies. While privacy-enhancing technologies are focused on limiting exposure of the data (secrecy), data protection technologies are focused on controlling the way how data are used.
See also: Privacy, Personal Data Protection, Minimal Disclosure, Pseudonym
- Privacy Policy
-
A policy that sets rules for processing of personal data, respecting privacy of an individual.
X.1252 term: privacy policy
See also: Privacy, Privacy-Enhancing Technology
- Private Key
-
In an asymmetric cryptosystem (a.k.a. "public-key cryptosystem), a part of the key pair that is known only to the key owner.
X.1252 term: private key
See also: Public Key
- Privileged entitlement
-
Entitlement (access right, privilege) that allows the performance of activities that typical entities in the system cannot perform. User with privileged entitlement can usually perform activities that goes far beyond usual usage of the system. Privileged entitlements may allow unrestricted access to data, allow modification of entitlements of other users, and often include destructive operations such as deletion of data sets. System administration privileges are almost always considered privileged entitlements.
Alternative terms: Privileged access rights, Privileged access
See also: Entitlement
- Probability
-
Measure of a chance of an event happening.
Alternative terms: Likelihood
See also: Risk, Risk level
- Process
-
Process is a structured and repeatable activity. Process usually consists of a sequence of steps, which may be interrelated and interactive, involving several parties. Unlike one-off activities such as projects, processes are meant to be repeatable, conducting the same or similar activities more than once, delivering similar results.
- Product Architecture
-
Concept, design and description of the products part which are assigned into subsystems. It is also way how these subsystems interact with each other.
- Program
-
Program is a structured and continuous activity meant to maintain and improve a state. Programs are continuous, never-ending activities. They are often executed in cycles: analyzing situation, planning, implementing and validating the results. Programs are meant to continuously maintain and improve a certain state, such as appropriate level of cybersecurity.
See also: Process
- Project
-
Project is a structured and unique activity meant to reach specific objectives. Process usually consists of a sequence of steps, which may be interrelated and interactive, involving several parties. Unlike repeatable activities such as processes and programs, projects are not meant to be repeated. Projects are designed to deliver a specific outcome, and to deliver it only once.
- Projection
-
In midPoint terminology: Projection is a part of midPoint computation that represents the objects in identity resources, usually accounts, entitlements or organizational units. Projection are the "spokes" in hub-and-spoke (star) data synchronization in midPoint. Projections are represented in the computation in a form of shadows (shadow objects), usually supplemented with real-time data from the resource objects.
See also more information at docs.evolveum.com.
See also: Shadow, Focus, Assignment
- Policy Retrieval Point (PRP)
-
Functional component with a responsibility to store and distribute policies for use by policy decision points (PDP). PRP acts as an repository for policy. The policy is usually stored persistently at PRP, e.g. in a form of a file or database. Primary responsibility of PRP is to make policy available to policy decision points (PDP), either by "pull" (PDP retrieving the policy from PRP) or by "push" (PRP sending the policy to PDP). PRP is instrumental in enabling distributed architecture with several PDPs.
Note: PRP is only storing and distributing the policy, it is not responsible for policy creation or management. Policy management is responsibility of policy administration point (PAP).
Alternative terms: Policy Access Point
- Pseudonym
-
An identifier designed to avoid any inherent information about identity or entity. Pseudonyms are meant to hide or modify perception of the entity or identity, as presented to other parties.
In user experience sense, pseudonyms can be chosen by the user to hide or alter their real identity in information systems.
In implementation sense, pseudonym is often a randomly-generated identifier, used selectively for communication with specific domain or system. The pseudonym is used instead of other identifiers to avoid possibility of the other party to reveal parts of user’s identity or correlate user’s actions.
ISO 24760 term: pseudonym
X.1252 term: pseudonym
See also: Identifier, Personal Data Protection, Privacy
- Public Key
-
In an asymmetric cryptosystem (a.k.a. "public-key cryptosystem), a part of the key pair that can be shared with other entities.
X.1252 term: public key
See also: Private Key
- Role-Based Access Control (RBAC)
-
A mechanism for managing of user access to information systems based on a concept of roles. Role-Based Access Control (RBAC) is using roles to group permissions. Roles usually represent meaningful entities, such as job positions, organizational affiliations or similar business concepts. One of the basic assumptions of RBAC is that management of roles is much easier than management of individual permissions.
A form of RBAC is standardized in a series of NIST standards (ANSI/INCITS 359-2004, INCITS 359-2012).
RBAC is mostly concerned with using the roles to control user access to the system and other information assets. Role definitions are usually maintained using a somehow separate "Role Management" mechanisms.
Traditional RBAC models are static: user-role and role-permission relations are fixed, set up by system administrator. Newer RBAC models are dynamic (policy-driven): user-role and role-permission relations may be dynamic, determined by policy (algorithm).
See also more information at docs.evolveum.com.
- Reconciliation
-
In identity management, reconciliation is a process of comparing recorded state od identity management system with a real state of identity resources. In the most common form, reconciliation is comparing user data stored in identity management database with account data stored in identity resource (source or target systems). Reconciliation is meant to detect differences in the data, including detection of orphaned accounts.
Reconciliation is usually quite heavyweight, yet very reliable mechanism of identity data synchronization.
See also: Account, User, Orphan Account
- Relationship-Based Access Control (ReBAC)
-
A mechanism for managing of user access to information systems based on a concept of relationship. Relationship-Based Access Control (ReBAC) is defined by presence of relationship between objects, such as "owner" or "editor". The relationships are interpreted by an access control policy to form access control decisions.
In midPoint terminology: MidPoint has a concept of "relation" that can be used together with assignment/inducement mechanism to implement ReBAC access control structures.
See also: Access Control, Relation, Next Generation Access Control
- Reference Identifier (RI)
-
An identifier that reliably references an identity in a particular scope. Once assigned, the identifier always references the same identity, it cannot be assigned to a different identity. Reference identifiers are often persistent, however, they can change, as long as the identifier is not re-assigned to other identity.
Depending on a policy, reference identifiers can be re-assign to another identity after the original identity was deleted (identifier re-use). However, there is usually relatively long interval during which the identifier cannot be re-assigned.
Alternative terms: Non-reassignable identifier
ISO 24760 term: reference identifier
- Reference Identifier Generator
-
ISO 24760 term, used to describe the tool that generates reference identifier, usually during an enrollment and registration.
ISO 24760 term: reference identifier generator
See also: Reference Identifier, Enrollment, Identity Registration
- Referential Integrity
-
Consistency constraint in a database, mandating that every reference points to a valid object. Simply speaking, when an identifier is used to reference another object, such objects should exist.
Referential integrity is often a concern in group management and directory services. Systems that provide referential integrity make sure that a group points to valid members (user that exist), or that a list of user groups points to valid groups. In case a user who is a member of a group is removed, a system with referential integrity will either automatically remove the user from the group, or it will deny the operation until user is explicitly removed from all groups first. Systems that do not provide referential integrity would allow such operation, leaving invalid identifier in the database, an identifier that does not point to any existing object.
See also: Schema, Digital Identity Attribute, Verification
- Registration Authority (RA)
-
An entity that gathers and verifies identity information, for the purposes of enrollment and identity registration. Registration authority is usually the organization that carries out identity proofing by verifying identity evidence, such as national identity cards.
ISO 24760 term: registration authority
- Relation
-
In midPoint terminology: MidPoint concept of "relation" can parametrize a reference between two objects, further specifying the relation between them. It is usually used in assignment/inducement to provide details about the relationship of the holder and target objects. For example, relation is used to specify role owners, approvers and organizational unit managers. Relation can also be used to implement relationship-based access control (ReBAC) mechanism in midPoint.
See also more information at docs.evolveum.com.
- Reliability
-
Property of a system to behave consistently and deliver expected results.
See also: Availability
- Relying Party (RP)
-
System that relies on other party (identity provider) to provide identity information. Relying party (also known as "service provider") usually relies on identity provider to authenticate the user, and relay the information to the relying party. Relying party has no access to credentials (e.g. passwords), it only knows that the authentication was successful. Identity provider may transfer identity attributes and additional information (such as authorization decisions) to the relying party. Relying party usually has a trust relationship with identity provider.
Alternative terms: Service Provider
ISO 24760 term: relying party
X.1252 term: relying party
See also: Identity Provider, Single Sign-On, Identity Federation
- Remediation
-
Remediation is an action to eliminate violation of a policy, or a non-compliance with regulation or a standard. Remediation is usually a manual action that is addressing the effects, specific cases of non-compliance. E.g. violation of segregation of duties can be remediated by removing one of the conflicting roles or responsibilities.
Alternative terms: Correction
See also: Compliance, Corrective action
- Repository
-
A database, often a database of self-contained objects. In identity and access management context, it usually means a database of identity information.
In midPoint terminology: MidPoint internal database. It is used to store all internal midPoint data and the vast majority of midPoint configuration.
Alternative terms: MidPoint repository
- Requirement
-
Requirement is a need or expectation that is stated or implied. Requirements are usually specified by legislation, regulation or standards. Also, requirements are usual part of software specifications or contracts. Although most of the requirements are expected to be explicitly stated, there may be implied requirements, given by usual practice or common expectations.
See also: Compliance
- Residual risk
-
Residual risk is a risk that remains after risk treatment. It is a risk that was not eliminated during a cybersecurity activities. As it is practically impossible to eliminate risk completely, some residual risk has to be accepted, as part of the usual cybersecurity program.
Alternative terms: Retained risk
See also: Risk, Risk acceptance
- Resource
-
In generic terms, a Resource is any information asset, system or a service that can be meaningfully used to obtain an information, or to initiate an action. Web resources are often used to access information across World Wide Web, e.g. in a form of RESTful interfaces. In IAM field, a Resource (Identity Resource) is usually a network-accessible asset capable of managing identity information.
In midPoint terminology: A Resource is a system that is either identity data source or provisioning target.
Alternative terms: Information Resource, Data Resource
See also: Identity Resource
- REST
-
Architectural style that describes fundamental principles of World Wide Web (WWW). REST architectural style was used to develop HTTP protocol, fundamental building block of WWW. REST specifies a concept of resource (web resource), identified by Unified Resource Locator (URL), access by unified interface. Although REST is designed for hypertext applications, some REST principles are used for general-purpose programming interfaces, known as "RESTful" services or APIs.
Alternative terms: Representational State Transfer
See also: RESTful Service, Application Programming Interface, Resource
- RESTful Service
-
Usually a general-purpose programming interface (API) or network service, exposed by one application to be used by another application. RESTful services are based on operations of HTTP protocols such as GET, PUT and POST. RESTful services are using Unifier Resource Locators (URLs) as addressing scheme, and also for the purposes of conveying some parameters. Despite the name, RESTful services actually do not strictly follow principles of REST architectural style. REST architectural style is designed for use in hypertext applications, while most RESTful services are procedural in nature. Therefore most RESTful services adapt and bind the REST principles for their purposes. Despite such deformations, RESTful services provide a very popular method for application-to-application interaction over the Internet.
Alternative terms: REST Service, REST API
See also: REST, Application Programming Interface
- Review
-
Review is an activity that aims at evaluation whether certain subject matter is adequate to achieve its objectives. Review often evaluates performance of a process, program, project or policy.
See also: Access Certification, Performance
- Review object
-
Review object is the subject matter reviewed by a review. It is usually a process, program, project or policy.
See also: Review
- Review objective
-
Review objective is a statement describing the intended results of a review.
See also: Review
- Risk
-
Effect of uncertain, unforeseen, unknown or unknowable effects on objectives. Risk may originate from the fact that the effects are inherently uncertain, such as short-term fluctuations of the markets. However, many forms of risk stem from lack of knowledge or understanding, such as lack of knowledge about capabilities of attackers. While risk includes both positive and negative uncertain effects, almost all activities in cybersecurity deal with negative effects of risk.
In cybersecurity risk assessment and modeling, risk is associated with the impact of threats, exploiting vulnerabilities of information assets.
See also: Risk level
- Risk acceptance
-
Risk acceptance is a decision to accept a particular (residual) risk. As it is practically impossible to eliminate risk completely, some residual risk has to be accepted, as part of the usual cybersecurity program. Risk acceptance is usual part of risk treatment process. Even though a risk is accepted, it does not mean it is forgotten. Accepted is should be subject to monitoring.
See also: Risk, Residual risk, Monitoring
- Risk analysis
-
Risk analysis is a systematic process to understand the nature and extent of risk, and to determine risk levels. It is a structured process, evaluating several aspects of risk. As risk is almost impossible to measure exactly, risk levels are often estimated during risk analysis.
See also: Risk, Risk level
- Risk assessment
-
Risk assessment is a comprehensive process consisting of risk identification, risk analysis and risk evaluation. Risk treatment is a necessary part of risk management process.
See also: Risk, Risk analysis, Risk identification, Risk evaluation
- Risk-based approach
-
Risk-based approach is an approach to cybersecurity management based on systematic management of risk. It is based on controlled method to manage of risk in an organization. One of the primary principles of risk-based approach is an acceptance that risk cannot be completely eliminated. The risk has to be assessed, subjected to appropriate treatment, and residual risk has to be accepted.
See also: Risk, Risk management
- Risk communication
-
Risk communication is a set of activities to communicate information about risk with interested parties (stakeholders). Communication may take form of consultation, communicating risk and risk-related information both ways. Purpose of risk communication is to improve decision processes related to risk and its impact on organization objectives.
Alternative terms: Risk communication and consultation
See also: Risk, Risk assessment, Interested party
- Risk criteria
-
Specification of requirements and other criteria used to evaluate risk. Legislation, regulation, standards and best practice are the usual baseline for risk criteria. However, specific risk criteria are determine by character, objectives and methods of a particular organization.
See also: Risk, Risk evaluation, Compliance, Requirement, Policy
- Risk evaluation
-
Risk evaluation is a process of comparing results of risk analysis to risk criteria. Result of risk evaluation is a decision whether risk is acceptable, or it has to be treated (eliminated or mitigated).
See also: Risk, Risk assessment, Risk criteria
- Risk identification
-
Risk identification is a process of discovering and describing risks. It involves identification of risk sources and causes, which may be based on historical data or expertise.
See also: Risk, Risk assessment
- Risk level
-
Magnitude or measure of risk. Expression of risk level is heavily influenced by context. Risk levels can be quantitative, expressing risk level in a measurable and generally comparable quantities, such as perceptual probability or weighted monetary cost. Risk levels can also be qualitative, expressing risk level in a relative terms, such as "low", "medium" and "high". Risk levels may consider impact (consequence) or a risk, or it may be concerned solely with probability of a risk occurrence.
Alternative terms: Level of risk
See also: Risk, Probability, Risk analysis
- Risk management
-
Risk management is a broad set of coordinated activities aimed at control of risk in an organization. It includes formal risk management processes, as well as informal and implicit activities. Risk management is one of the basic mechanisms of cybersecurity.
See also: Risk, Risk management process, Risk-based approach, Cybersecurity
- Risk management process
-
Risk management process is a systematic application of processes and methods for controlled management of risk in an organization. It is supposed to be based on formal specification of processes and policies. It is usually a circular, iterative process, going through analytical, implementation, monitoring and review phases. Risk management is one of the most important processes in cybersecurity.
See also: Risk, Risk management, Risk-based approach, Policy
- Risk owner
-
Risk owner is a person who is responsible for a particular risk. It may be an owner of the system, certain privilege in a system, or owner of business process that is a source of risk. Risk owner is supposed to have accountability as well as authority to properly manage the risk.
See also: Risk, Risk management process
- Risk treatment
-
Risk treatment is an activity to address the risk. Ultimate goal of risk treatment is to lower overall risk to an acceptable level. Many methods can be used to treat the risk, including avoiding activities that are sources of risk, eliminating risk sources, lowering probability or impact of a risk, redirecting risk to another party, or accepting the risk. Risk treatment is a necessary part of risk management process.
Alternative terms: Risk mitigation, Risk elimination, Risk reduction, Risk prevention
See also: Risk, Risk management process, Risk assessment
- Role
-
Abstract concept that usually groups entitlements (privileges, access rights) in a single object. The purpose of grouping entitlements in roles is to make access control policies manageable, usually using Role-Based Access Control (RBAC) principles.
X.1252 term: role
See also: Entitlement, Role-Based Access Control, Role Management
- Role Explosion
-
Unreasonable multiplication of the number of roles in role-based access control (RBAC) systems. Role explosion occurs due to a combination of several causes, poor role management practices and cartesian product in role definitions are perhaps the most common. It occurs mostly in static RBAC models, dynamic RBAC models have methods to avoid role explosion.
See also more information at docs.evolveum.com.
See also: Role-Based Access Control, Role Management
- Role Management
-
A process of managing role definitions. It usually includes creating role definitions, maintenance of role definitions, adapting to changed environment and decommissioning role definitions. Role management is concerned with role definitions only, in contrast with Role-Based Access Control (RBAC), which is mostly concerned in using the definitions to control the access.
Alternative terms: Role Modeling, Role Engineering
See also: Role, Role-Based Access Control
- Schema
-
Description of a structure of information, such as description of data types, attribute names and types, attribute structure and multiplicity, often supplemented by additional information such as documentation and presentation metadata.
In information systems designed to process identity information, the schema usually refers to structure of digital identity data, names of identity attributes, their types, multiplicity, optionality and similar properties.
Alternative terms: Data model, Identity model
- Secure by Default
-
Software development principle, mandating that system or service should be secure from the moment of installation. Software and services should be distributed with a secure configuration.
Alternative terms: Security by Default
See also: Secure by Design, Secure Through Lifecycle
- Secure by Design
-
Software development principle, mandating that security of software products and services should be built into the system from very early stages of design and development. Security should be an integral part of the design, rather than an after-thought. Functionalities of the system should be based well-established security practices and standards and reduced to the minimum required for operation.
Alternative terms: Security by Design
See also: Secure by Default, Secure Through Lifecycle
- Secure Through Lifecycle
-
Software development principle, mandating that system should be secure from its inception, through all its life all the way to decommissioning. System should always be in a secure configuration, never opening any vulnerabilities, not even in emergency situations.
Alternative terms: Security Through Lifecycle
See also: Secure by Design, Secure by Default
- Security Audit
-
Independent review of a system, in order to assess adequacy of security controls, evaluate compliance with policies, regulations and operational procedures.
X.1252 term: security audit
- Security Posture
-
Security posture is the security status of an enterprise’s networks, information, and systems based on cybersecurity resources (e.g., people, hardware, software, policies) and capabilities in place to manage the defense of the enterprise and to react as the situation changes. It is a "big picture" of the state of cybersecurity in an organization.
Alternative terms: Cybersecurity posture
See also: Cybersecurity
- Selective Disclosure
-
A mechanism that gives person a control over the sharing of data, usually between domains. Selective disclosure is sometimes applied in cross-domain data transfer, such as when using identity providers or identity federations. In case of data transfer, the user is prompted to select that data that can be disclosed to the other domain. This process is sometimes automatic, governed by a pre-defined data disclosure policy.
Alternative terms: Selective Disclosure of Personal Information
ISO 24760 term: selective disclosure
- Self-Asserted
-
An assertion (claim) made by an entity about itself. It usually means a claim that was not verified or certified by any other party.
See also: Self-Asserted Identity
- Self-Asserted Identity
-
An identity (usually a digital identity) that an entity declares about itself. It usually means a set of digital identity attributes that an entity claimed about itself, without being verified of certified by any other party.
X.1252 term: self-asserted identity
See also: Self-Asserted, Decentralized Identifier, Identity Assertion
- Shadow
-
In midPoint terminology: Shadow objects are objects in midPoint repository representing objects in identity resources, such as accounts or groups. Shadow objects are used by midPoint as a proxy objects, or data adapters for real accounts, groups or organizational units in identity resources. MidPoint stores identifiers of resource objects in shadow objects, together with meta-data, policy-related information and operational data that relate to the resource object that the shadows represent. The identifiers stored in shadow objects are used to locate the correct resource object even in cases that is renamed or it moves. Shadow objects may contain copies of the data of real resource objects. However, in default configuration, only identifiers are stored in shadow objects.
See also more information at docs.evolveum.com.
Alternative terms: Shadow Object
See also: Projection
- Self-Sovereign Identity (SSI)
-
Self-sovereign identity is an approach to digital identity that gives individual control over their identity data. Without self-sovereign identity, individuals need to rely on (usually big and influential) organizations to manage their identity data, acting as identity providers. SSI systems are often decentralized, based on verifiable credentials stored in digital wallet which are under user’s control.
- Single Sign-On (SSO)
-
Single sign-on (SSO) is an authentication process based on user logging into multiple systems with single set of credentials (usually username and password)s. It is used for systems that require authentication for each application while using the same credentials. SSO works on central service from where the user gains access to different applications without logging in again.
Unlike identity providers, SSO systems usually operate within a single domain. Both the SSO server and the applications being controlled by the same organization. Implicit trust of such arrangement allows SSO systems to be much simpler than identity federation systems, albeit both classes of systems provide similar services and mechanisms.
Alternative terms: Single Log-On
See also: Authentication, Identity Provider, Identity Federation
- Standard
-
Technical specification, adopted by a recognised standardisation body, for repeated or continuous application, with which compliance is not compulsory.
Alternative terms: Technical standard, Technology standard, Official standard
See also: Technical specification
- Static Entitlement
-
An entitlement that is statically assigned to a user or an account. The entitlement stays ("stands") assigned to a user indefinitely, until it is explicitly unassigned. Static entitlement is assigned to a user by an action of system administrator, by the means of access request process or by similar means.
Standing entitlement forms a basis of some access control models, most notably Role-Based Access Control (RBAC). Static nature of the entitlement assignment is often a target of critique, stating the lack of dynamics and flexibility of static entitlements. Policy-based access control models avoid use of standing entitlements in favor of entitlements that are determined dynamically in run-time.
While static entitlements may be necessary at higher levels (especially identity governance level), they may not necessarily be reflected to lower levels (e.g. directory services and operating systems). Eliminating low-level standing privilege has several advantages, including lower risk of misuse and less visibility for the attacker. Just-in-time or on-demand mechanisms for temporary assignment of privileged access provides a solution for bridging high-level and low-level static entitlements.
Alternative terms: Standing Privilege, Standing Entitlement, Persistent Privileges
- Subject
-
An entity or identity, which is active in information system, typically a user. It is assumed that subject has an agency, directly or indirectly. Subjects can represent organizations or similar "legal persons" that cannot act on their own, users have to act on their behalf. In this case the organization is the "subject", while the person that acts on organization behalf is the "user".
The term "subject" is often used in context of authorization, as part of subject-action-object triple. Subject is the active part, a user executing certain action on a specific object. In some contexts, "subject" is equivalent to "principal".
Alternative terms: Principal
- Target System
-
In IAM field, it is any system in which identity management (IDM) system is managing identity data. IDM system is usually using identity connectors to manage data in target systems.
Some target systems can also be (partial) identity data sources, IDM system both managing and reading the data.
- Technical specification
-
Document that prescribes technical requirements to be fulfilled by a product, process, service or system and which lays down characteristics, production methods or assessment criteria. Unlike standard, it is not required that technical specification is adopted by a recognized standardization body.
See also: Standard
- Threat
-
In cybersecurity, threat is a potential to cause harm or to endanger information assets or organization. Threats may be intentional, unintentional or completely natural. Many cybersecurity threats are materialized by motivated attackers, while other threats may be environmental (flooding, fire), or may be caused by a society or government actions.
Alternative terms: Cyber threat, Security threat
See also: Risk, Asset, Risk assessment, Cyberattack
- Top management
-
Top management is a person or a group who controls the organization at the top level. Top management is ultimately responsible for allocation of resources, objectives and results of the organization.
Alternative terms: Executive management, Board, Board of directors
See also: Organization, Organizational Structure
- Triangle Of Trust
-
Triangle of trust is a three-party relationship of issuer, holder and verifier. Issuer issues credential or claim to the holder. Holder presents the credential/claim to the verifier. Verifier verifies the credential/claim, using data provided by the issuer.
Triangle of trust is a frequently-used concept to support trust relationships in distributed information systems.
Alternative terms: Trust Triangle
See also: Issuer, Holder, Verifier, Trusted Third Party
- Trust
-
Confidence in or reliance on some person or quality. In information technology world, it usually means a confidence in a correctness of an information. It is often a long-term relationship between entities, one of the entity trusting in correctness of a whole class of information claimed by other entity (trusted third party).
X.1252 term: trust
See also: Triangle Of Trust, Trusted Third Party
- Trust service
-
Electronic service that issues a digital credentials, acting as a trusted third party.
See also: Trusted Third Party, Certificate Authority
- Trusted Third Party
-
An entity which makes a claims, claims that are trusted by other parties. Usually a central entity in a system that is trusted by many entities. In scenarios involving Triangle of Trust, the issuer is considered to be trusted third party.
X.1252 term: trusted third party
See also: Trust, Triangle Of Trust, Issuer, Trust service
- Under-provisioning
-
Situation when an identity has less privileges than are necessary for the tasks that the identity is supposed to carry out. For example, a user does not have all the necessary permission to carry out his usual work tasks. Under-provisioning is an operational risk, leading to low workforce efficiency.
Ideally, under-provisioning should be addressed by automated provisioning mechanism of identity management systems, such as utilization of birthright provisioning. However, due to a lack of clear access control policy, under-provisioning is often addressed by access request processes.
Alternative terms: Under-permissioning, Under-privileged Access
- User
-
Generally speaking, a person that is using a computing system.
In midPoint terminology: A user means a data structure in midPoint that describes a person. Similar data structure in source/target system (identity resource) is called an "account".
Alternative terms: MidPoint User
X.1252 term: user
- User-Centric
-
A system that is oriented towards the user, having user in control. In identity and access management context it usually means a system, where users are in control of their data.
X.1252 term: user-centric
- Verifiable Credentials (VC)
-
Credentials that can be presented by the holder to the verifier, and independently verified by the verifier, without cooperation of any third party. Verifiable credentials do not require verifier to cooperate with credential issuer to verify every single credential issued. Only the holder and the verifier are aware about the transaction, no other party has any data about the transaction. Some verifier-issuer communication may be necessary to establish or renew the trust. However, such communication is in no way related to the holder-verifier transaction.
Verifiable credentials are often based on public key cryptography techniques. Holders keep verifiable credentials in digital wallets.
- Verification
-
A process establishing that a particular information is correct, while the meaning of "information" and "correct" varies from context to context. When dealing with identity information, this usually means formal verification of identity attributes, checking the schema, identifier uniqueness and referential integrity. However, verification may mean deeper verification, such as checking that the information is true and up-to-date.
ISO 24760 term: verification
X.1252 term: verification
See also: Verifier, Digital Identity Attribute, Schema, Referential Integrity
- Verifier
-
Entity that performs verification, usually a verification of an credential or a claim. In Triangle of Trust scenarios, the verifier verifies credentials/claims provided by the holder. Verifier may need information provided by the issuer of credential/claim to be able to complete the verification process.
ISO 24760 term: verifier
See also: Verification, Triangle Of Trust, Issuer, Holder, Trusted Third Party, Credential, Claim
- Vulnerability
-
Vulnerability is an aspect of information asset that makes it vulnerable to damage or misuse. It is a weakness in the protection of an asset that can be exploited by a threat. In software development, vulnerability is a bug in software code that opens the software to cyberattacks.
Alternative terms: Weakness
See also: Risk, Threat, Asset, Risk assessment, Cyberattack
- Zero trust (ZTA)
-
"Zero trust" is an approach to cybersecurity based on the concept of "never trust, always verify". The basic idea of the approach is to never trust any system or network implicitly, always verify that the request is authentic both with respect to the identity of the source and trustworthiness of network channels. Under zero trust, every request should be authenticated and authorized. For that approach to work, all relevant identities must be reliably known, especially non-human identities (NHI) representing communicating services and devices. Therefore, identity-based security is a fundamental foundation for zero trust approach.
Zero trust originated mostly as a reaction to flawed concept of cybersecurity perimeter, which was a common approach to cybersecurity in early years of inter-network computing. Cybersecurity perimeter approach allowed for existence of "perimeter" that separated insecure outer network (usually the Internet) and secure inner network (usually corporate network). Security requirements were significantly reduced in the presumably-secure inner network. In that respect, zero trust can be summarized as "no weak interior", an approach in which no assumption of secure inner network exists. Zero trust approach is operating under "assumption of breach", meaning that it is assumed that the attacker already has access to the network, devices or services.
Overall, "zero trust" is mostly a broad conceptual approach - a set of guiding principles, rather than a set of specific technologies and practices. It is currently used as a token of paradigm shift from perimeter-based approach to more resilient and holistic cybersecurity approach that does not rely on concept of perimeter.
Alternative terms: Zero-trust, Zero trust security model, Zero trust architecture, Zero trust approach, Perimeterless security, Defense in depth
See also: Cybersecurity, Identity-based Security, Perimeter