<resource oid="236dd5ca-47df-403c-82e1-9ce2f36be000">
    <name>hr</name>
    <lifecycleState>proposed</lifecycleState>
    <connectorRef type="ConnectorType"> ... </connectorRef>
    <connectorConfiguration> ... </connectorConfiguration>
</resource>Simple Simulation Tutorial
|
Since 4.7
This functionality is available since version 4.7.
|
- Connecting the Source (HR) System
- Connecting the Target System (Simulation of LDAP)
- Step LDAP-1: Viewing the Raw LDAP Data
- Step LDAP-2: Definition of an Object Type
- Step LDAP-3: Correlation on Employee Number
- Step LDAP-4: Improving the Correlation
- Step LDAP-5: Marking Shadows as Ignored
- Step LDAP-6: Linking the Remaining Shadows Manually
- Step LDAP-7: Importing the usernames into midPoint
- Conclusion
This is a simple tutorial describing the new simulation feature.
| The reader is expected to have reasonable knowledge of midPoint; we don’t describe individual steps in much detail here. |
| The simulations feature requires midPoint 4.7 or later and the native (PostgreSQL-based) repository. |
The overall scenario is that we connect the HR system, represented by a CSV file, to midPoint. Then, we will connect the target LDAP-based system, represented again by a CSV file.
The source files for this tutorial are in the midPoint samples repository.
Connecting the Source (HR) System
Step HR-1: Viewing the Raw HR Data
-
Create a directory for CSV files (like
~/sim-tutorial) and copy the HR CSV file there. -
Check that the
filePathin HR definition #1 matches the location of the copied HR CSV file. -
Import the HR definition #1 into midPoint. Note that the lifecycle state of the resource is
proposed, so the whole resource definition is in the development mode.Listing 1: The resource definition #1 -
List the accounts on the resource. You should see something like this:
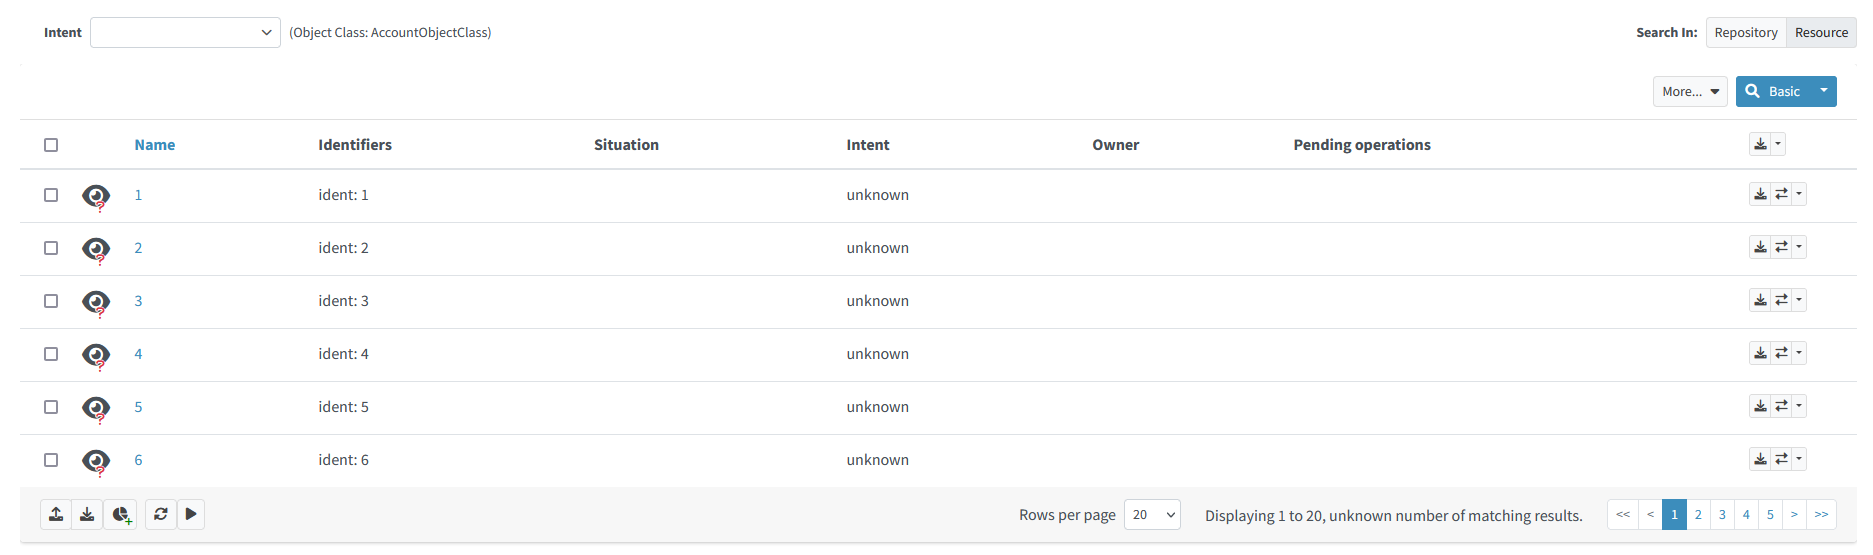 Figure 1. Content of the HR resource
Note that the accounts are not classified: their intent is unknown.
Step HR-2: Definition of an Object Type
The initial definition contains no object types. So, let us define one. Please import HR definition #2. (Do not forget to check the CSV file location, as usual).
Listing 2: The resource definition #2
<resource oid="236dd5ca-47df-403c-82e1-9ce2f36be000">
    <name>hr</name>
    <lifecycleState>proposed</lifecycleState>
    <connectorRef type="ConnectorType"> ... </connectorRef>
    <connectorConfiguration> ... </connectorConfiguration>
    <schemaHandling>
        <objectType>
            <kind>account</kind>
            <intent>default</intent>
            <default>true</default>
            <delineation>
                <objectClass>ri:AccountObjectClass</objectClass>
            </delineation>
        </objectType>
    </schemaHandling>
</resource>
Now, list the accounts on the resource again. You should see something like this:
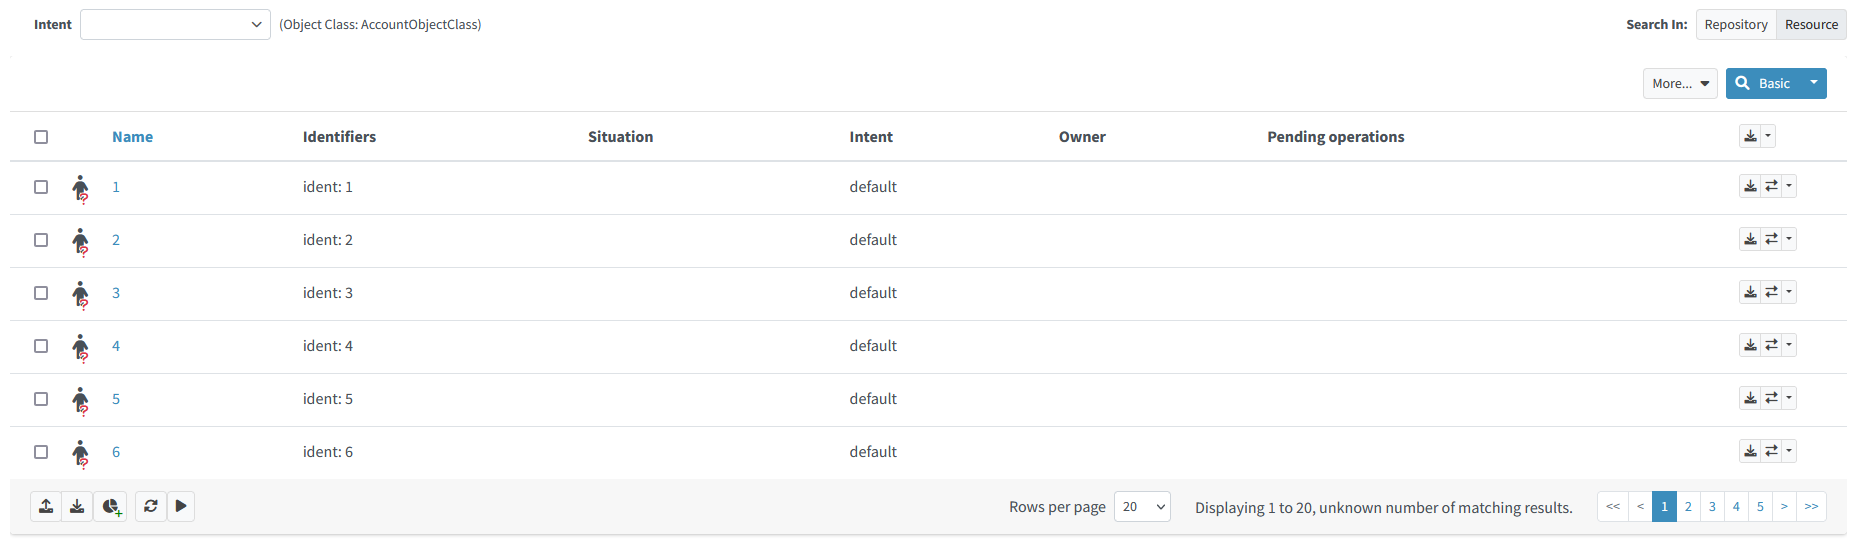
Figure 2. Content of HR resource with preliminary classification
The intents were immediately set to default, because the accounts were not classified before.
Step HR-3: Change the Definition of the Object Type
Imagine we want to change the definition of the object type so that real persons (recognized by having a non-empty last name) will have the intent of person instead of default.
Let us do that in HR definition #3.
Listing 3: The resource definition #3
<resource oid="236dd5ca-47df-403c-82e1-9ce2f36be000">
    <name>hr</name>
    <lifecycleState>proposed</lifecycleState>
    <connectorRef type="ConnectorType"> ... </connectorRef>
    <connectorConfiguration> ... </connectorConfiguration>
    <schemaHandling>
        <objectType>
            <kind>account</kind>
            <intent>person</intent>
            <delineation>
                <objectClass>ri:AccountObjectClass</objectClass>
                <filter>
                    <q:description>Everyone with non-empty last name is a person</q:description>
                    <q:text>attributes/lastname exists</q:text>
                </filter>
            </delineation>
        </objectType>
        <objectType>
            <kind>account</kind>
            <intent>default</intent>
            <delineation>
                <objectClass>ri:AccountObjectClass</objectClass>
                <filter>
                    <q:description>Everyone with empty last name is not a person</q:description>
                    <q:text>attributes/lastname not exists</q:text>
                </filter>
            </delineation>
        </objectType>
    </schemaHandling>
</resource>
Now, let us import the definition and check the accounts. Their intents have not changed. Why? Because midPoint does the reclassification very carefully, in order to avoid breaking things. In general, a shadow is classified or re-classified only if:
-
It was not classified yet.
-
Or, it was classified, but the corresponding type (pointed to by kind and intent) no longer exists.
-
Or, it was classified, the corresponding type exists, and all the following conditions are met:
-
the current shadow type is part of the development configuration,
-
and the operation is able to see the development configuration.
-
By default, the GUI does not engage the development configuration when listing the content of a resource. Hence, our shadows are not reclassified when looking at them.
To re-classify the accounts from default to person we have the following options:
-
Delete the shadows and let midPoint re-create them. (This was the only way before version 4.7.)
-
Read the content of the resource with the development configuration enabled. (This implies the simulation mode.) This is currently doable using synchronization (e.g. import) tasks. Here are two alternatives:
-
Execute the re-classification directly.
-
Simulate the re-classification. Unlike the standard simulation, this is a special low-level simulation that captures assumed changes on shadow objects. In 4.7, it is experimental functionality.
-
Let us go through options 2b and 2a now.
Simulation of Re-classification Process
|
EXPERIMENTAL
This feature is experimental.
It means that it is not intended for production use.
The feature is not finished.
It is not stable.
The implementation may contain bugs, the configuration may change at any moment without any warning and it may not work at all.
Use at your own risk.
This feature is not covered by midPoint support.
In case that you are interested in supporting development of this feature, please consider purchasing midPoint Platform subscription.
|
Running the Simulation
Import the following task:
Listing 4: A task that simulates the accounts re-classification
<task xmlns="http://midpoint.evolveum.com/xml/ns/public/common/common-3"
      xmlns:ri="http://midpoint.evolveum.com/xml/ns/public/resource/instance-3"
      oid="e44cd468-70e0-44b4-a25e-c26ccfdfb33d">
    <name>hr-import (shadow management simulation)</name>
    <executionState>runnable</executionState>
    <activity>
        <work>
            <import>
                <resourceObjects>
                    <resourceRef oid="236dd5ca-47df-403c-82e1-9ce2f36be000"/>
                    <objectclass>ri:AccountObjectClass</objectclass>
                </resourceObjects>
            </import>
        </work>
        <execution>
            <mode>shadowManagementPreview</mode> (1)
            <configurationToUse>
                <predefined>development</predefined> (2)
            </configurationToUse>
        </execution>
        <reporting>
            <simulationResult/> (3)
        </reporting>
    </activity>
</task>| 1 | Selects the (experimental) low-level simulation that captures changes to the shadows during classification and correlation. |
| 2 | Instructs midPoint to use development configuration, not the production one. |
| 3 | Enables the creation of the simulation result object. Without this option, the simulation would run, but its results would not be captured. |
Viewing the Results
After running this task, the classification of the shadows will not change, but a new simulation result is created. It looks like this:

Figure 3. Simulation result capturing the shadows reclassification
We see that the classification of both shadows would be changed. We can look at the details by clicking on "Shadow classification changed" mark:
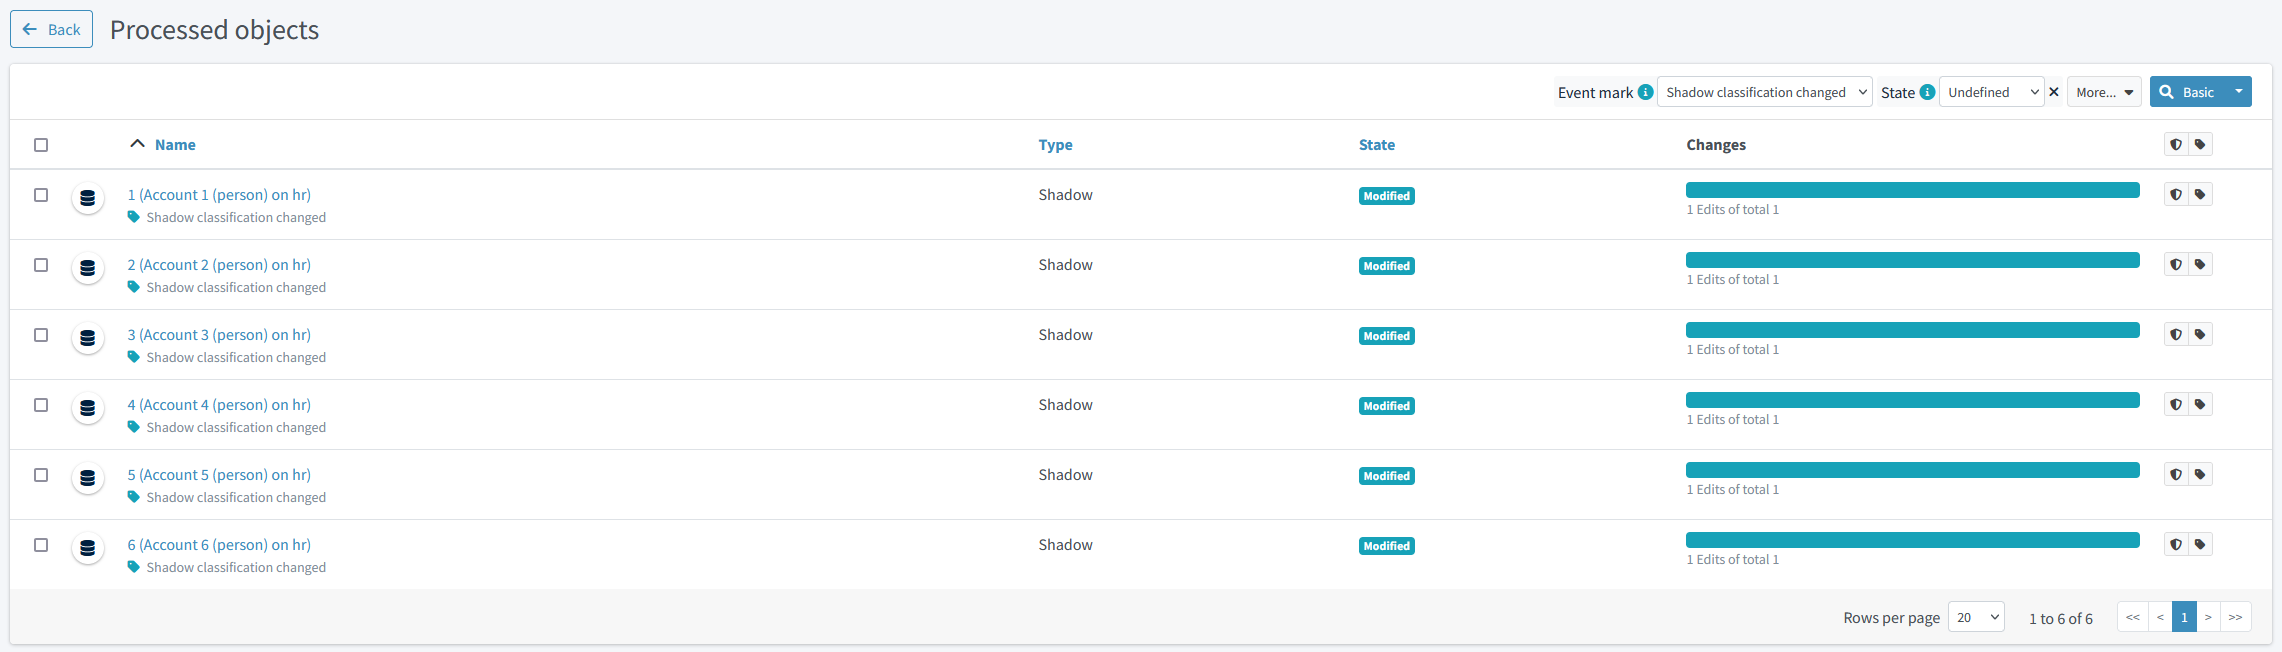
Figure 4. Reclassified objects
And then on a shadow. After clicking on Advanced button the details will be shown:
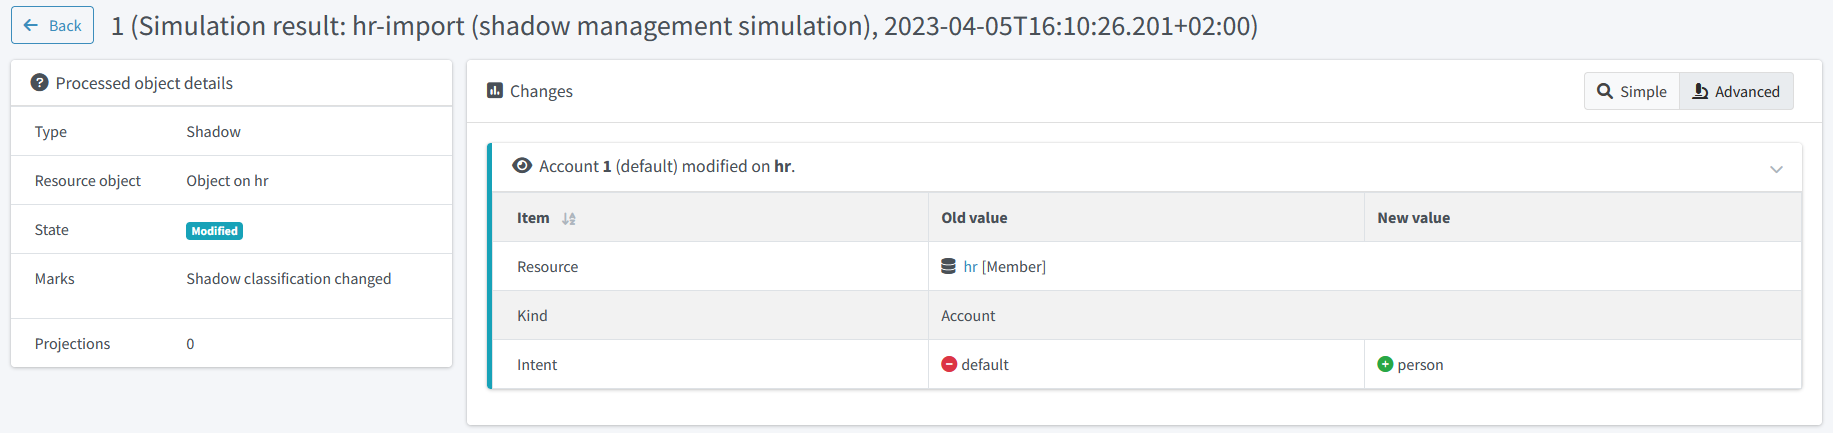
Figure 5. Reclassified object details
Creating a Report
The results can be also exported into CSV, by running a report named Simulation report: Items changed, with the following parameters:
Parameter |
Value |
Description |
Simulation result |
choose the simulation result |
|
Paths to include |
|
to avoid showing other changes, e.g. those of synchronization timestamps |
Show rows with no details |
|
to show only the really changed values |
(The preview in GUI does not work with these kinds of reports. You have to execute the report to create the CSV file.)
After opening the CSV in the spreadsheet and hiding unimportant columns it will look like this:

Figure 6. Reclassified objects report
Running the Re-classification
After we are satisfied with the expected re-classification results, we can run the re-classification in real.
There are two options:
Reclassification through the GUI
We can open the Accounts or Uncategorized panel and click on the Reclassify button. A task is created in background. After the task finishes, we may refresh the view to see the updated classification.
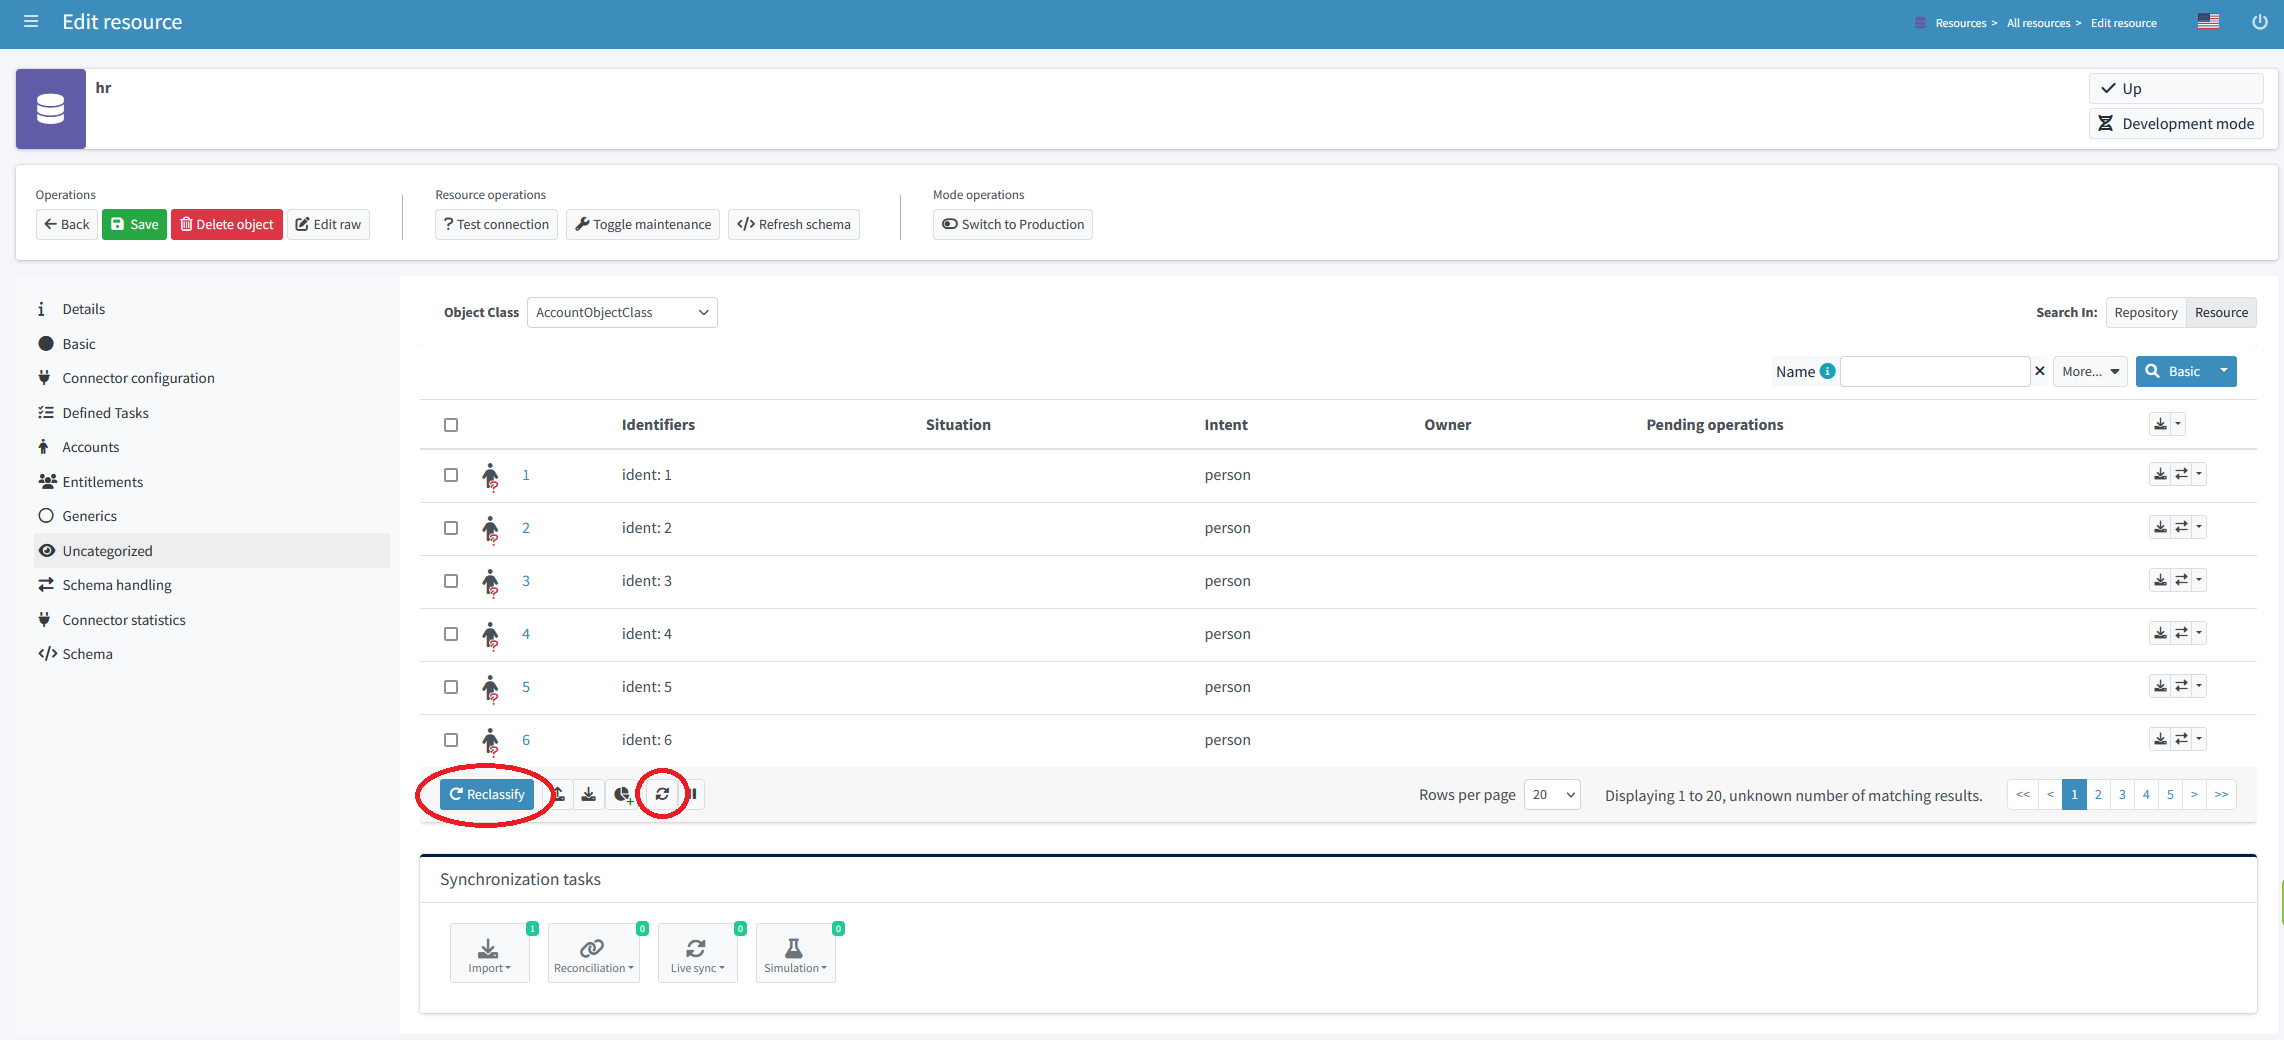
Figure 7. Reclassification through the GUI
Running the Reclassification Task Manually
Import the following task:
Listing 5: A task that executes the accounts re-classification
<task xmlns="http://midpoint.evolveum.com/xml/ns/public/common/common-3"
      xmlns:ri="http://midpoint.evolveum.com/xml/ns/public/resource/instance-3"
      oid="8b169df3-3124-4e36-871f-83bb52acfd7b">
    <name>hr-import (full simulation, no result)</name>
    <executionState>runnable</executionState>
    <activity>
        <work>
            <import>
                <resourceObjects>
                    <resourceRef oid="236dd5ca-47df-403c-82e1-9ce2f36be000"/>
                    <objectclass>ri:AccountObjectClass</objectclass>
                </resourceObjects>
            </import>
        </work>
        <execution>
            <mode>preview</mode> (1)
            <configurationToUse>
                <predefined>development</predefined>
            </configurationToUse>
        </execution>
        <reporting>
            <simulationResult/>
        </reporting>
    </activity>
</task>| 1 | This is the "main" (full) simulation. The low-level operations on shadows (classification, correlation state determination) are carried out. Changes to focus objects and resource objects are not executed. |
After running the task and listing the accounts, we see their intent was changed to person.
As an exercise, you can try running the simulated reclassification task again and check there are no simulated re-classification now.
Step HR-4: Simulation of Inbound Mappings
So we can assume the resource object classification is OK now. Let us prepare some inbound mappings and synchronization reactions. Please import HR definition #4.
Listing 6: The resource definition #4 - with mappings and reactions
<resource oid="236dd5ca-47df-403c-82e1-9ce2f36be000">
    <name>hr</name>
    <lifecycleState>proposed</lifecycleState>
    <connectorRef> ... </connectorRef>
    <connectorConfiguration> ... </connectorConfiguration>
    <schemaHandling>
        <objectType>
            <kind>account</kind>
            <intent>person</intent>
            <delineation>
                <objectClass>ri:AccountObjectClass</objectClass>
                <filter>
                    <q:description>Everyone with non-empty last name is a person</q:description>
                    <q:text>attributes/lastname exists</q:text>
                </filter>
            </delineation>
            <attribute>
                <ref>ri:ident</ref>
                <inbound>
                    <strength>strong</strength>
                    <expression>
                        <script>
                            <code>"empNo:$input"</code>
                        </script>
                    </expression>
                    <target>
                        <path>name</path>
                    </target>
                </inbound>
                <inbound>
                    <strength>strong</strength>
                    <target>
                        <path>employeeNumber</path>
                    </target>
                </inbound>
            </attribute>
            <attribute>
                <ref>ri:firstname</ref>
                <inbound>
                    <strength>strong</strength>
                    <target>
                        <path>givenName</path>
                    </target>
                </inbound>
            </attribute>
            <attribute>
                <ref>ri:lastname</ref>
                <inbound>
                    <strength>strong</strength>
                    <target>
                        <path>familyName</path>
                    </target>
                </inbound>
            </attribute>
            <attribute>
                <ref>ri:email</ref>
                <inbound>
                    <strength>strong</strength>
                    <target>
                        <path>emailAddress</path>
                    </target>
                </inbound>
            </attribute>
            <synchronization>
                <reaction>
                    <situation>linked</situation>
                    <actions>
                        <synchronize/>
                    </actions>
                </reaction>
                <reaction>
                    <situation>deleted</situation>
                    <actions>
                        <unlink/>
                    </actions>
                </reaction>
                <reaction>
                    <situation>unmatched</situation>
                    <actions>
                        <addFocus/>
                    </actions>
                </reaction>
            </synchronization>
        </objectType>
        <objectType>
            <kind>account</kind>
            <intent>default</intent>
            <!-- ... -->
        </objectType>
    </schemaHandling>
</resource>
Traditional import from GUI does nothing, because it simply does not "see" the resource configuration: just as if there were no mappings nor synchronization reactions defined.
There is a possibility to preview (simulate) the import. But be sure to select the preview that uses the development configuration, otherwise there will be no effects at all.
Simulated Import of a Single Account (on Foreground)
Select the account to be imported and choose Import preview:
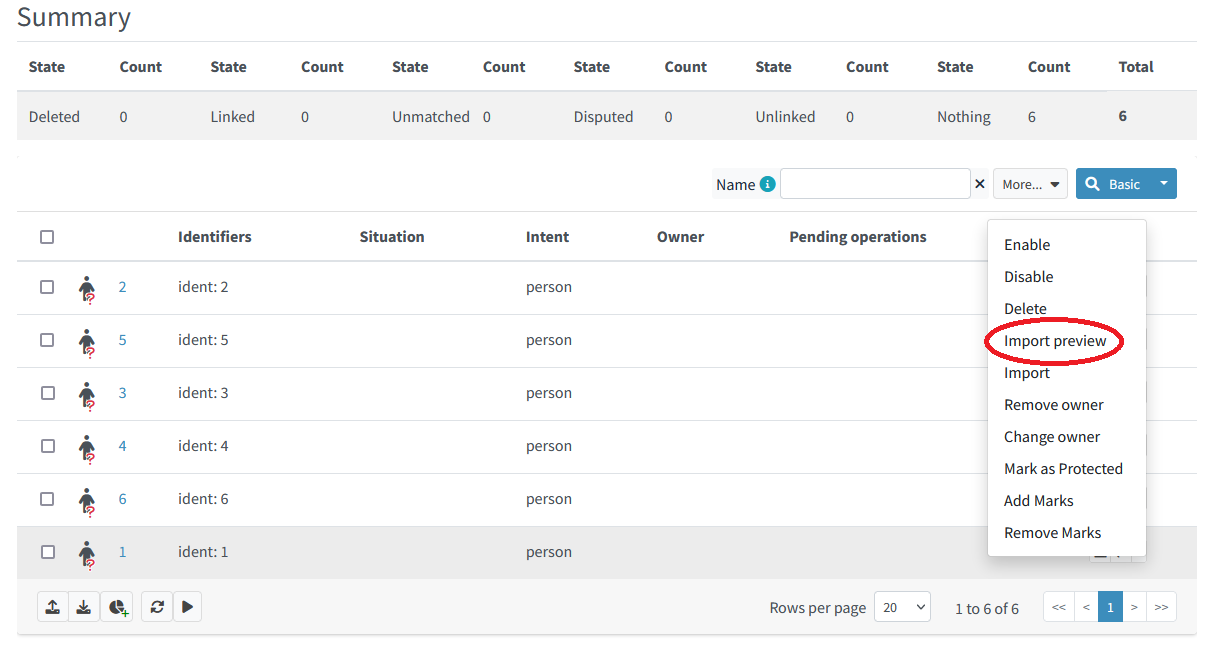
Figure 8. Simulated import of a single account
Now choose Simulated development and click on Select button:
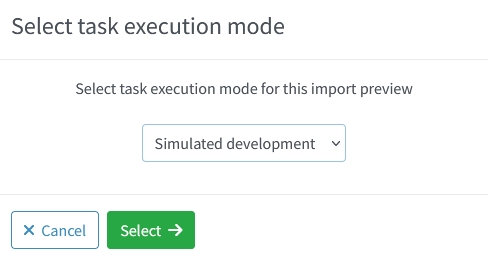
Figure 9. Simulated import of a single account (continued)
Observe the result:
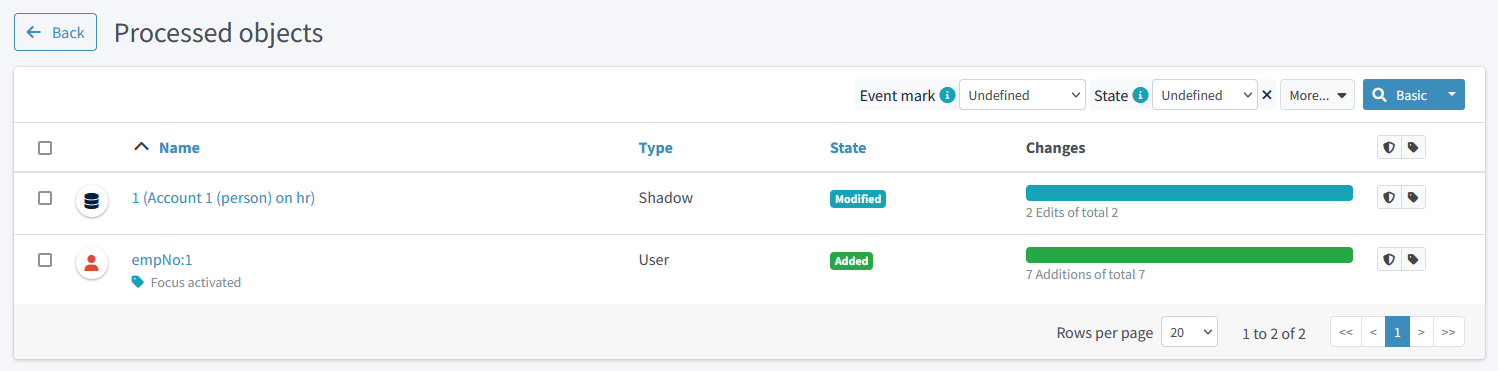
Figure 10. Simulated import of a single account (result)
After displaying the details of the user, we see the following:
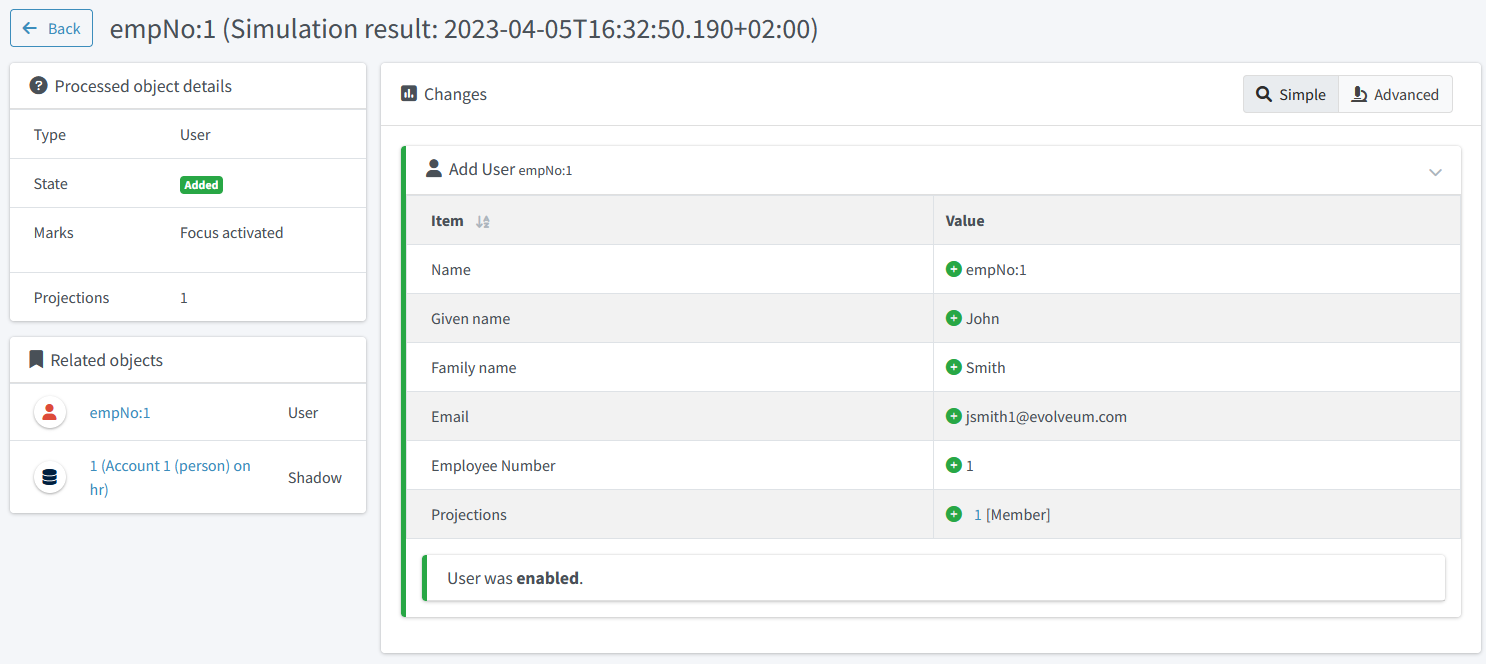
Figure 11. Preview of the first user added
We see that our mappings work correctly.
Simulated Import of All Accounts (on Background)
To simulate the execution of mappings for all accounts in a background task, let us import the full simulation task.
After looking at the simulation result, we should see "6 focus activations" and after clicking on that mark, we will see users that are going to be added.
Step HR-5: Switching the Resource into Production
Now we can switch the resource to production mode, either by clicking on the Switch to production button, or changing the lifecycle state to Active.
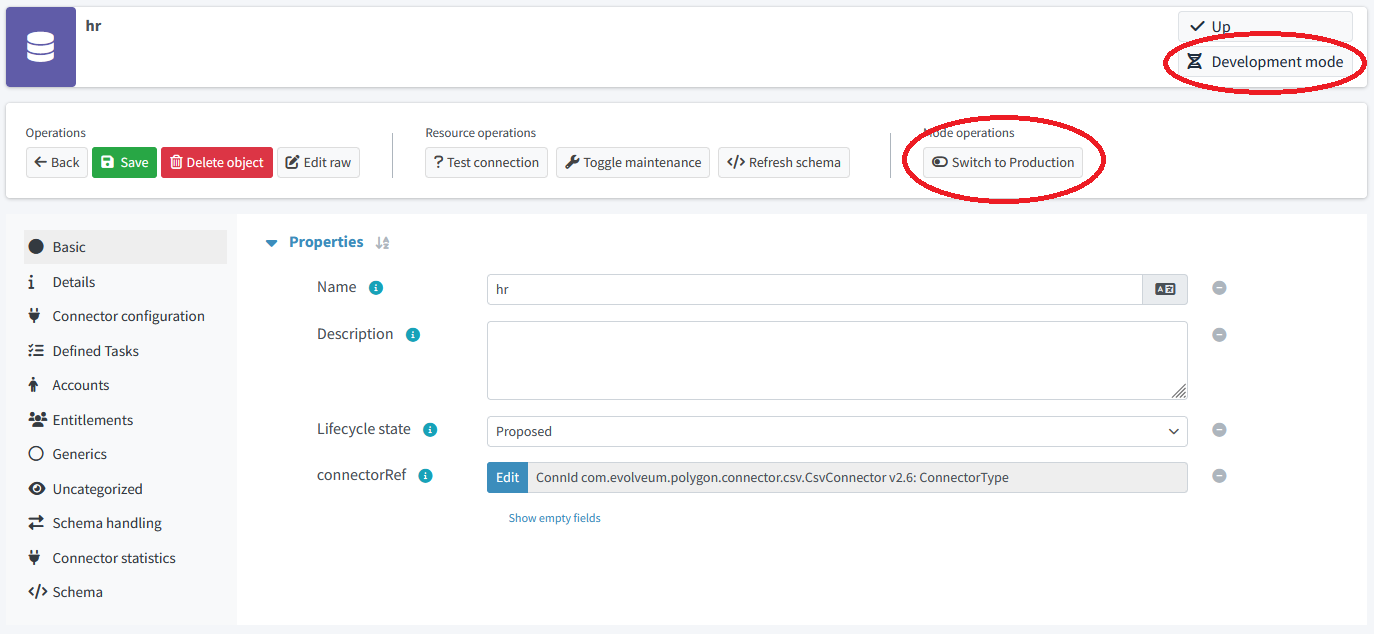
Figure 12. Switching the resource into production
After that, we can run the regular HR import task.
We observe that the users were added.
We may now run the simulated import and check that there are no computed changes.
Step HR-6: Extending the Resource
Len us imagine that we want to add a mapping for telephoneNumber.
Usually, we cannot put the whole resource back into development mode.
However, we can do that for the particular mapping.
Please import HR definition #5.
Listing 7: New mapping, in development mode
<resource oid="236dd5ca-47df-403c-82e1-9ce2f36be000">
    <name>hr</name>
    <lifecycleState>active</lifecycleState> (1)
    <connectorRef> ... </connectorRef>
    <connectorConfiguration> ... </connectorConfiguration>
    <schemaHandling>
        <objectType>
            <kind>account</kind>
            <intent>person</intent>
            <default>true</default>
            <delineation>
                <objectClass>ri:AccountObjectClass</objectClass>
            </delineation>
            <attribute>
                <ref>ri:phone</ref>
                <inbound>
                    <lifecycleState>proposed</lifecycleState> (2)
                    <strength>strong</strength>
                    <target>
                        <path>telephoneNumber</path>
                    </target>
                </inbound>
            </attribute>
            <synchronization> ... </synchronization>
        </objectType>
        <!-- ... -->
    </schemaHandling>
</resource>| 1 | The resource as such is in production mode. |
| 2 | This particular mapping is visible only in the development mode. |
After running the (full) simulation of import from HR, the result contains deltas like this:

Figure 13. Telephone number change
After we are satisfied with the mapping, we can put it into production mode (e.g. by doing as shown in the following figure or by setting lifecycleState = active manually) and run the import task in "persistent-effects" mode.
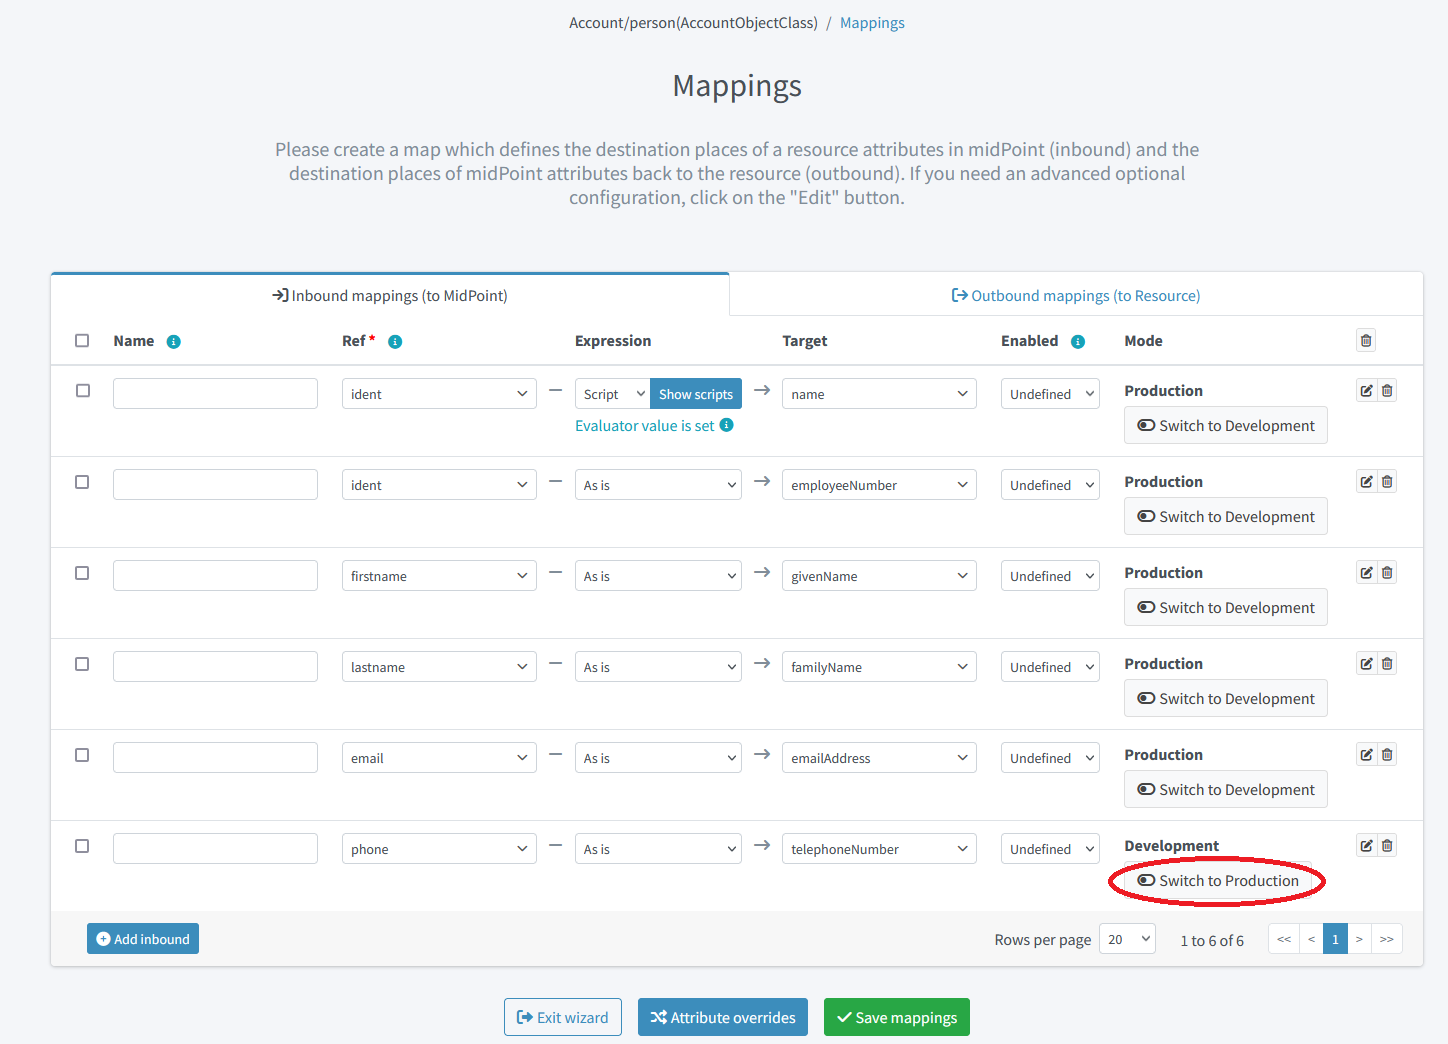
Figure 14. Switching the mapping into production
Connecting the Target System (Simulation of LDAP)
Now, let us connect a sample target system. Typically, this would be an LDAP (AD) one. For simplicity, let us use a CSV resource instead.
Step LDAP-1: Viewing the Raw LDAP Data
-
Copy the LDAP CSV file to the directory for CSV files for this tutorial (e.g.
~/sim-tutorial). -
Check that the
filePathin LDAP definition #1 matches the location of the copied LDAP CSV file. -
Import the LDAP definition #1 into midPoint. Note that the lifecycle state of the resource is
proposed, so the whole resource definition is in the development mode.Listing 8: The LDAP resource definition #1 (simulated by a CSV file)<resource oid="80d0e843-906a-4bbe-b237-bd3568ec4169"> <name>ldap</name> <lifecycleState>proposed</lifecycleState> <connectorRef type="ConnectorType"> ... </connectorRef> <connectorConfiguration> ... </connectorConfiguration> </resource> -
List the accounts on the resource. You should see something like this:
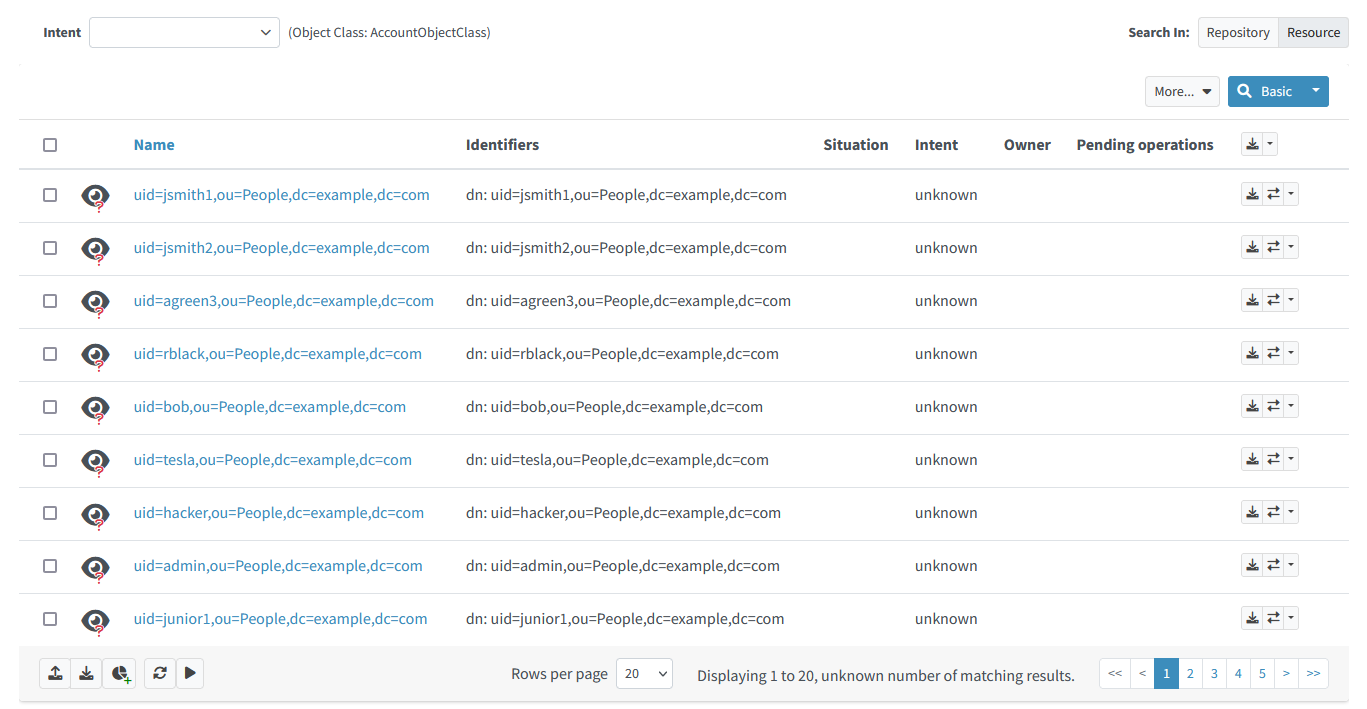 Figure 15. Content of the LDAP resource
Note that the accounts are not classified: their intent is unknown.
Step LDAP-2: Definition of an Object Type
The initial definition contains no object types. So, let us define one. Please import LDAP definition #2.
Listing 9: The LDAP resource definition #2
<resource oid="80d0e843-906a-4bbe-b237-bd3568ec4169">
    <name>ldap</name>
    <lifecycleState>proposed</lifecycleState>
    <connectorRef type="ConnectorType"> ... </connectorRef>
    <connectorConfiguration> ... </connectorConfiguration>
    <schemaHandling>
        <objectType>
            <kind>account</kind>
            <intent>default</intent>
            <default>true</default>
            <delineation>
                <!-- Would be inetOrgPerson on real LDAP -->
                <objectClass>ri:AccountObjectClass</objectClass>
            </delineation>
        </objectType>
    </schemaHandling>
</resource>
Now, list the accounts on the resource again. You should see something like this:
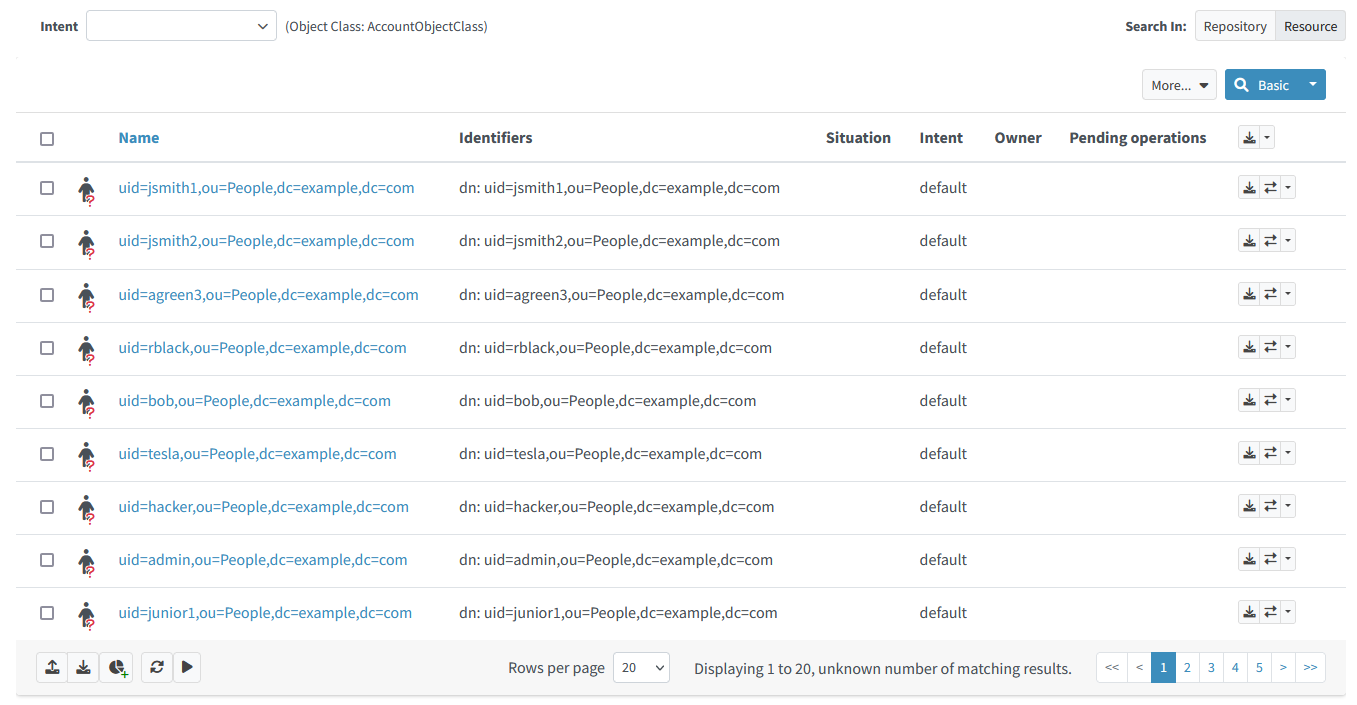
Figure 16. Content of LDAP resource with classification
The intents were immediately set to default, because the accounts were not classified before.
Let us assume we are satisfied with this. If we would not be, we could fine-tune the classification just like in Step HR-3: Change the Definition of the Object Type.
Now let us start correlating the accounts.
Step LDAP-3: Correlation on Employee Number
Let us assume that some of our accounts have employeeNumber attribute specified.
We want to use it as the primary correlation attribute.
Please import LDAP definition #3.
Listing 10: Definition of
employeeNumber LDAP attribute<attribute>
<ref>ri:employeeNumber</ref>
<correlator/> (1)
<inbound>
<target>
<path>employeeNumber</path>
</target>
<evaluationPhases> (2)
<include>beforeCorrelation</include>
<exclude>clockwork</exclude>
</evaluationPhases>
</inbound>
</attribute>
<synchronization/> (3)| 1 | Marks employeeNumber as a correlation attribute. |
| 2 | This configuration tells midPoint to execute the mapping but just for the sake of correlation, not for actual data movement from LDAP to midPoint.
(The mapping has to be there in order for the correlator configuration property to work.)
So, we want to correlate on this attribute by such a simple mechanism but do not want to use it to really modify the focus.
Hence, such non-intuitive configuration must be used for now.
This may happen for correlation attributes on non-authoritative resources (e.g. target ones, or "auxiliary" source ones).
We should simplify this in the future. |
| 3 | Optional. Note there are no reactions. We want to do just the correlation. |
Just as in Step HR-3: Change the Definition of the Object Type we have now two options:
-
Execute the correlation and see the results right on the shadows.
-
Simulate the correlation first (experimental feature).
Simulating the Correlation
|
EXPERIMENTAL
This feature is experimental.
It means that it is not intended for production use.
The feature is not finished.
It is not stable.
The implementation may contain bugs, the configuration may change at any moment without any warning and it may not work at all.
Use at your own risk.
This feature is not covered by midPoint support.
In case that you are interested in supporting development of this feature, please consider purchasing midPoint Platform subscription.
|
Running the Simulation
Import the following task. It is analogous to the one mentioned in Step HR-3: Change the Definition of the Object Type; only the resource reference is different.
Listing 11: A task that simulates the accounts correlation
<task xmlns="http://midpoint.evolveum.com/xml/ns/public/common/common-3"
      xmlns:ri="http://midpoint.evolveum.com/xml/ns/public/resource/instance-3">
    <name>ldap-import (shadow management simulation)</name>
    <executionState>runnable</executionState>
    <activity>
        <work>
            <import>
                <resourceObjects>
                    <resourceRef oid="80d0e843-906a-4bbe-b237-bd3568ec4169"/>
                    <objectclass>ri:AccountObjectClass</objectclass>
                </resourceObjects>
            </import>
        </work>
        <execution>
            <mode>shadowManagementPreview</mode> (1)
            <configurationToUse>
                <predefined>development</predefined>
            </configurationToUse>
        </execution>
        <reporting>
            <simulationResult/>
        </reporting>
    </activity>
</task>| 1 | Selects the (experimental) low-level simulation that captures changes to the shadows during classification and correlation. |
Viewing the Results
After running this task, the correlation information in the shadows will not change, but a new simulation result is created. It looks like this:
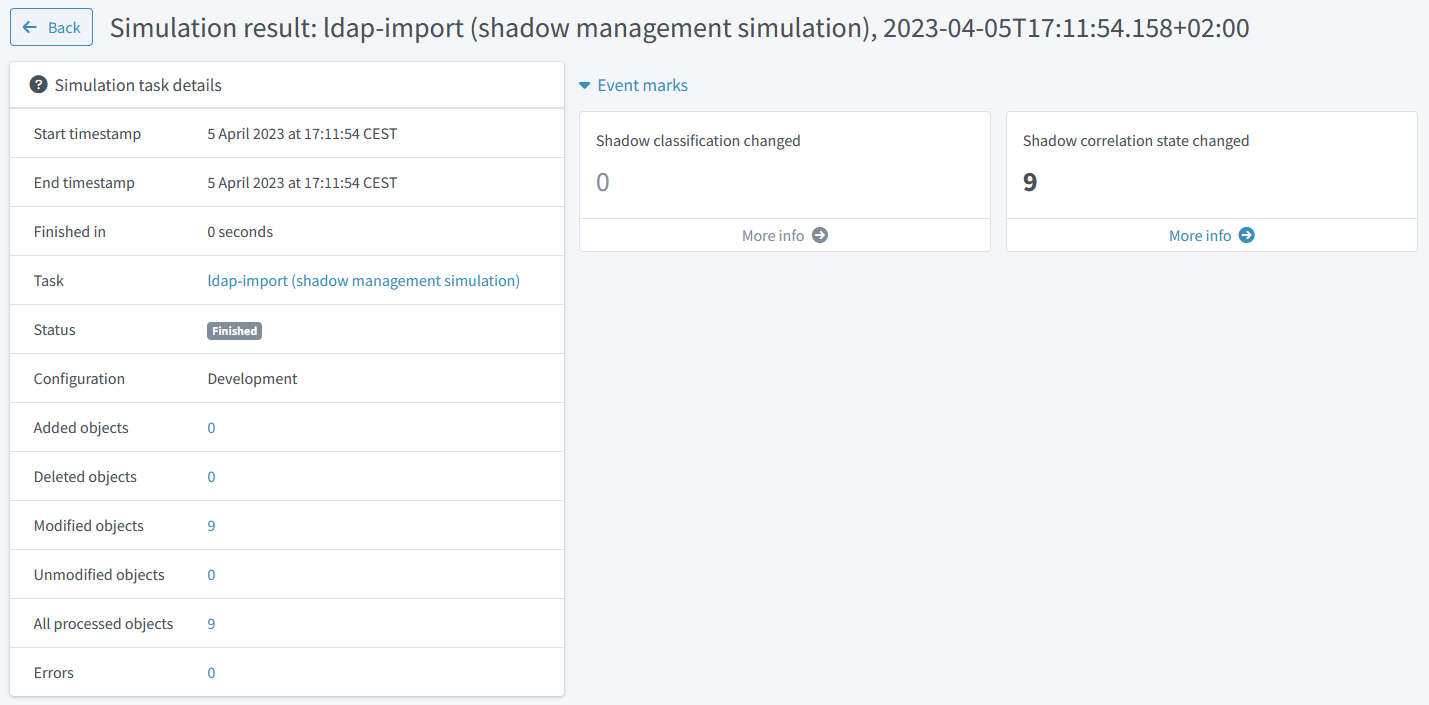
Figure 17. Simulation result capturing the first correlation
We see that there are 9 objects whose correlation state has changed. We can look at the details by clicking on "Shadow correlation state changed" mark, and then on any shadow:
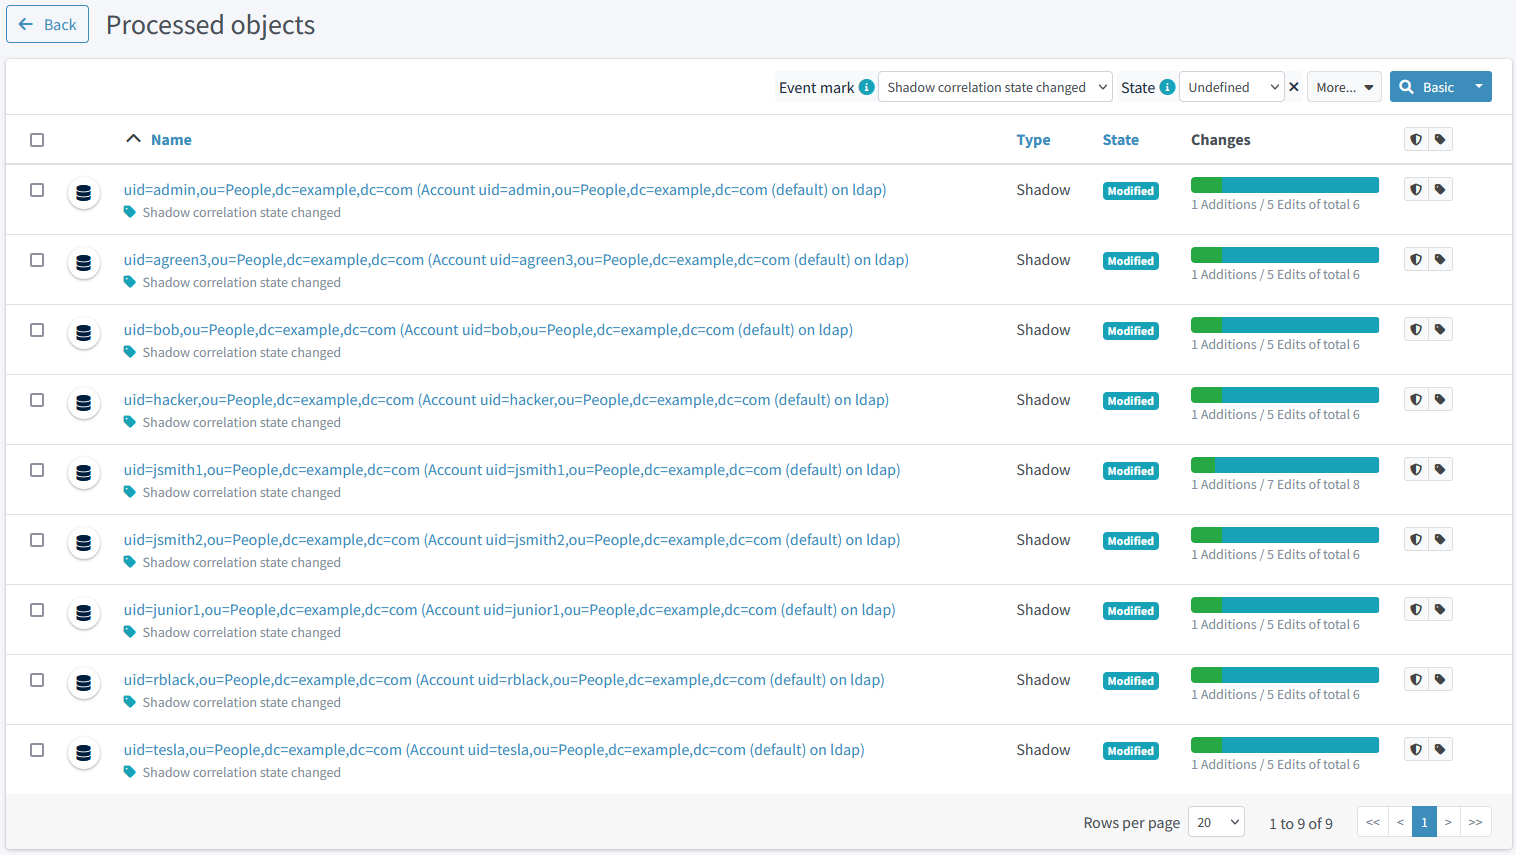
Figure 18. Correlated accounts
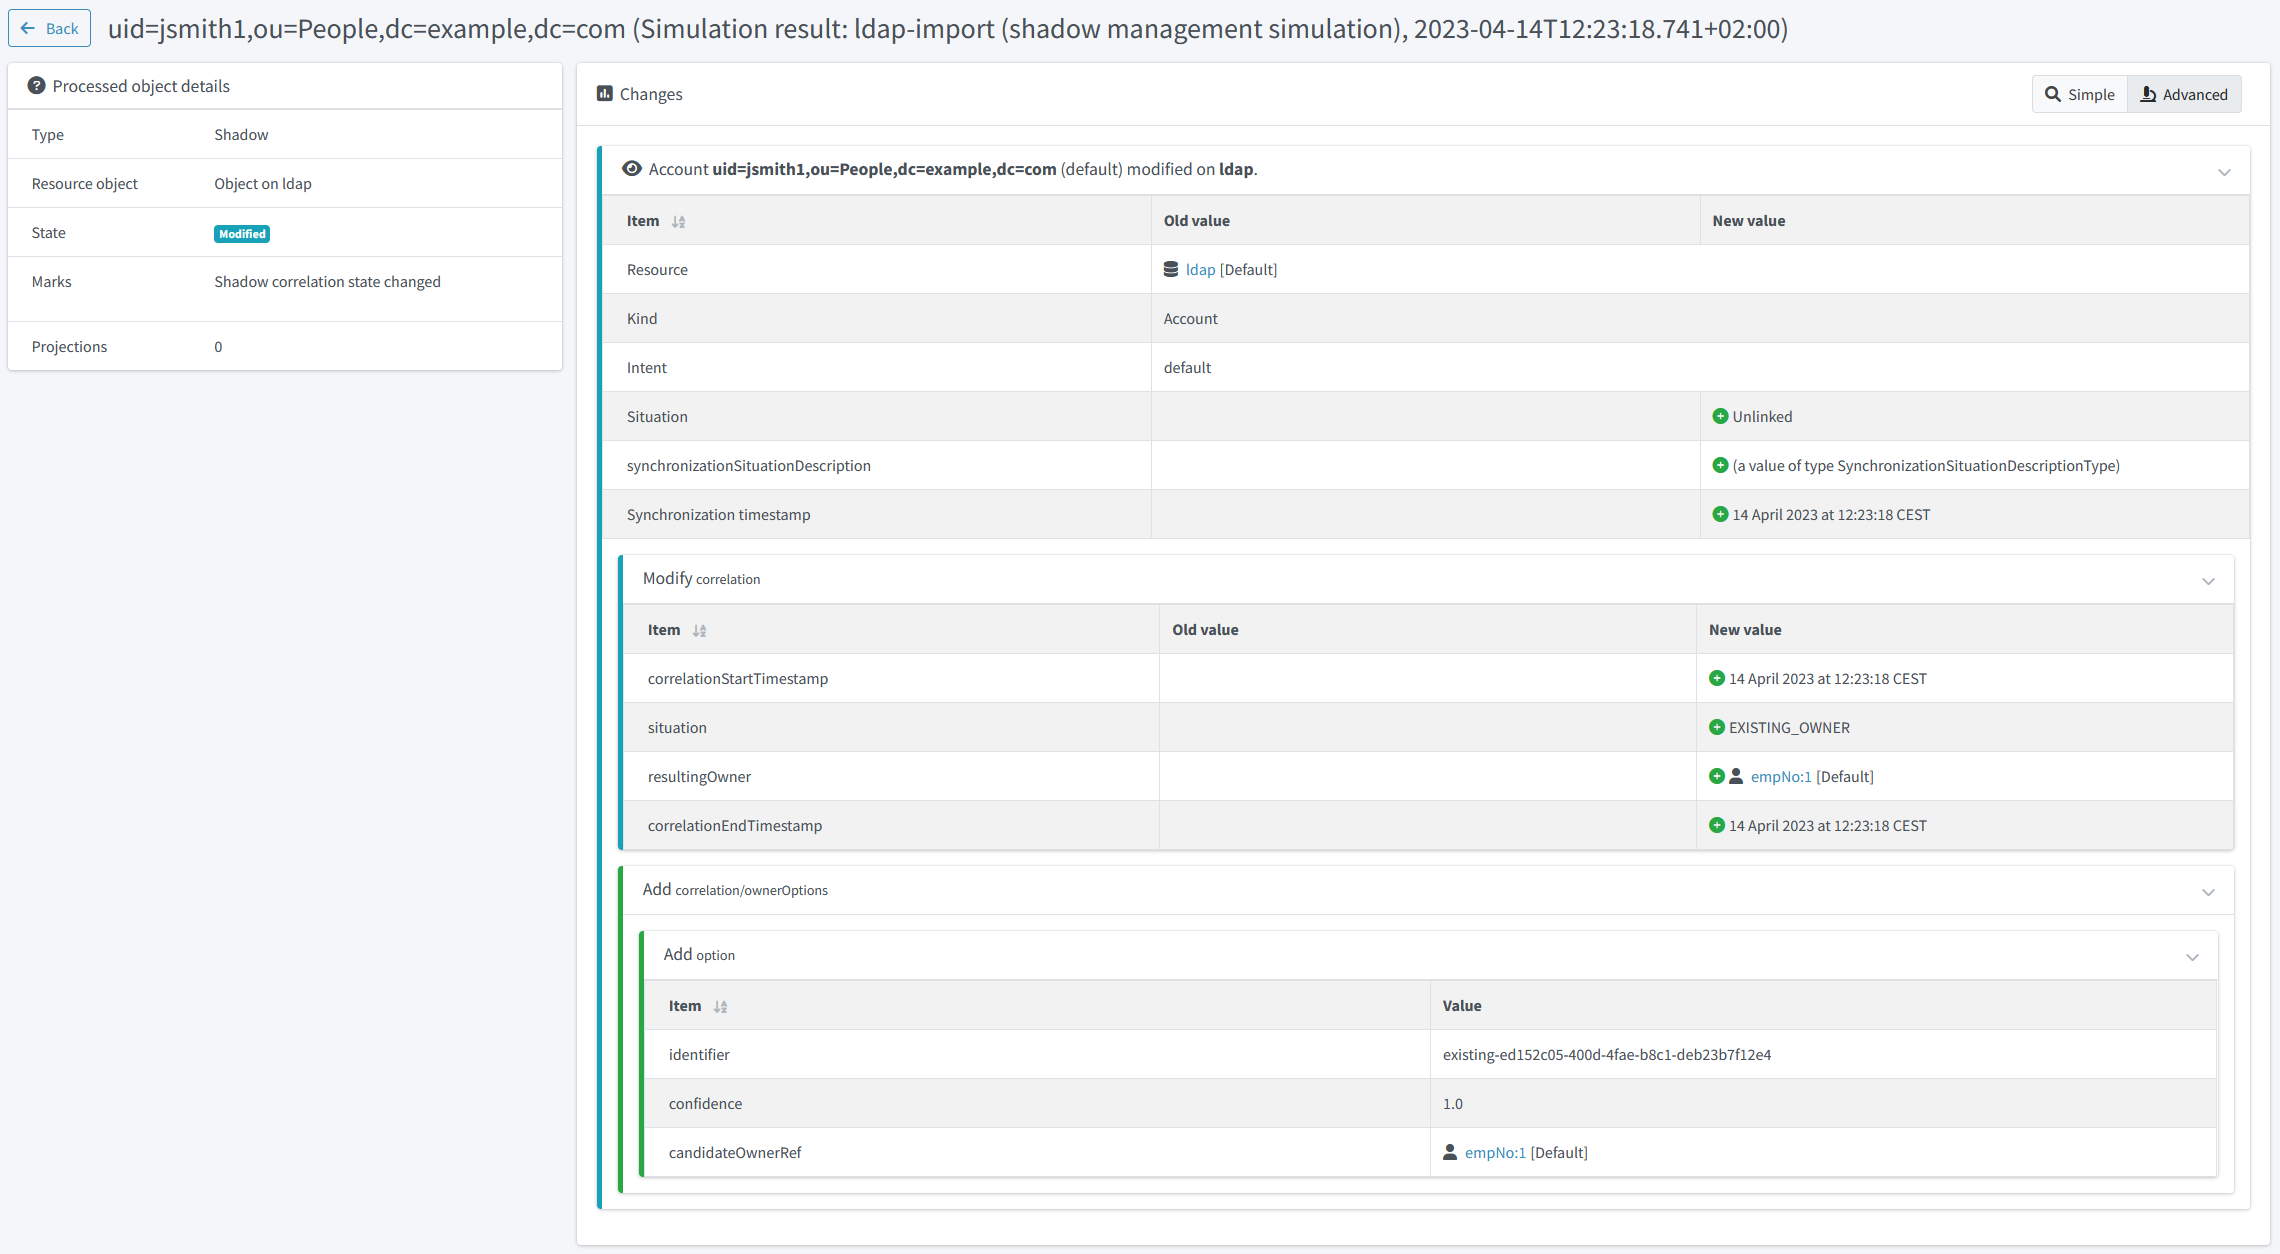
Figure 19. Correlated account details
Creating a Report
The results can be also exported into CSV, by running a report named Simulation report: Items changed, with the following parameters:
Parameter |
Value |
Description |
Simulation result |
choose the simulation result |
|
Show rows with no details |
|
to show only the really changed values |
After opening the CSV in the spreadsheet and hiding unimportant rows and columns it will look like this:
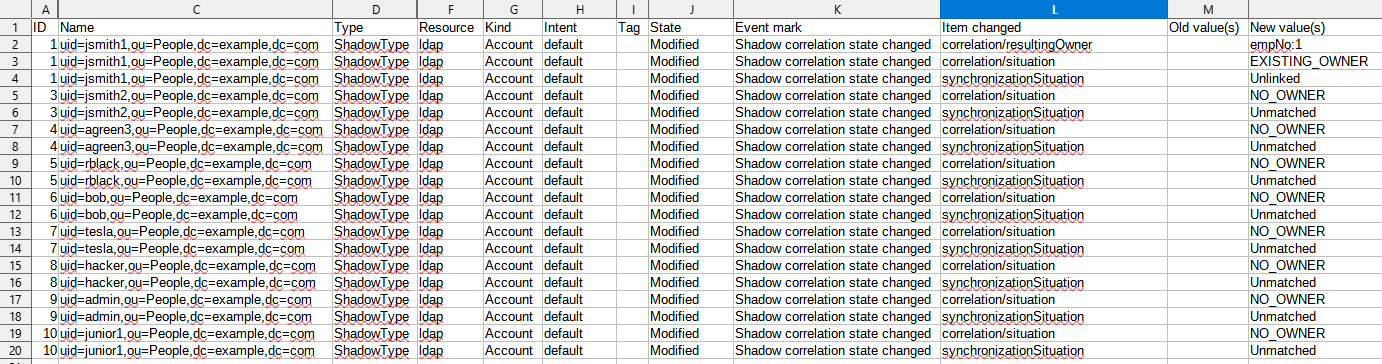
Figure 20. Correlation report
To facilitate working with this experimental kind of simulations, we have prepared a sample customized report. Please import and run it now. You should see something like this.

Figure 21. Specialized correlation report
Running the Correlation
After we are satisfied with the expected correlation results (in this iteration), we can make them permanent by running the correlation in real.
Import the following task.
Listing 12: A task that executes the accounts correlation
<task xmlns="http://midpoint.evolveum.com/xml/ns/public/common/common-3"
      xmlns:ri="http://midpoint.evolveum.com/xml/ns/public/resource/instance-3">
    <name>ldap-import (full simulation, no result)</name>
    <executionState>runnable</executionState>
    <activity>
        <work>
            <import>
                <resourceObjects>
                    <resourceRef oid="80d0e843-906a-4bbe-b237-bd3568ec4169"/>
                    <objectclass>ri:AccountObjectClass</objectclass>
                </resourceObjects>
            </import>
        </work>
        <execution>
            <mode>preview</mode>
            <configurationToUse>
                <predefined>development</predefined>
            </configurationToUse>
        </execution>
        <reporting>
            <simulationResult/>
        </reporting>
    </activity>
</task>
After running the task and listing the accounts, we see their synchronization situation was changed like this.
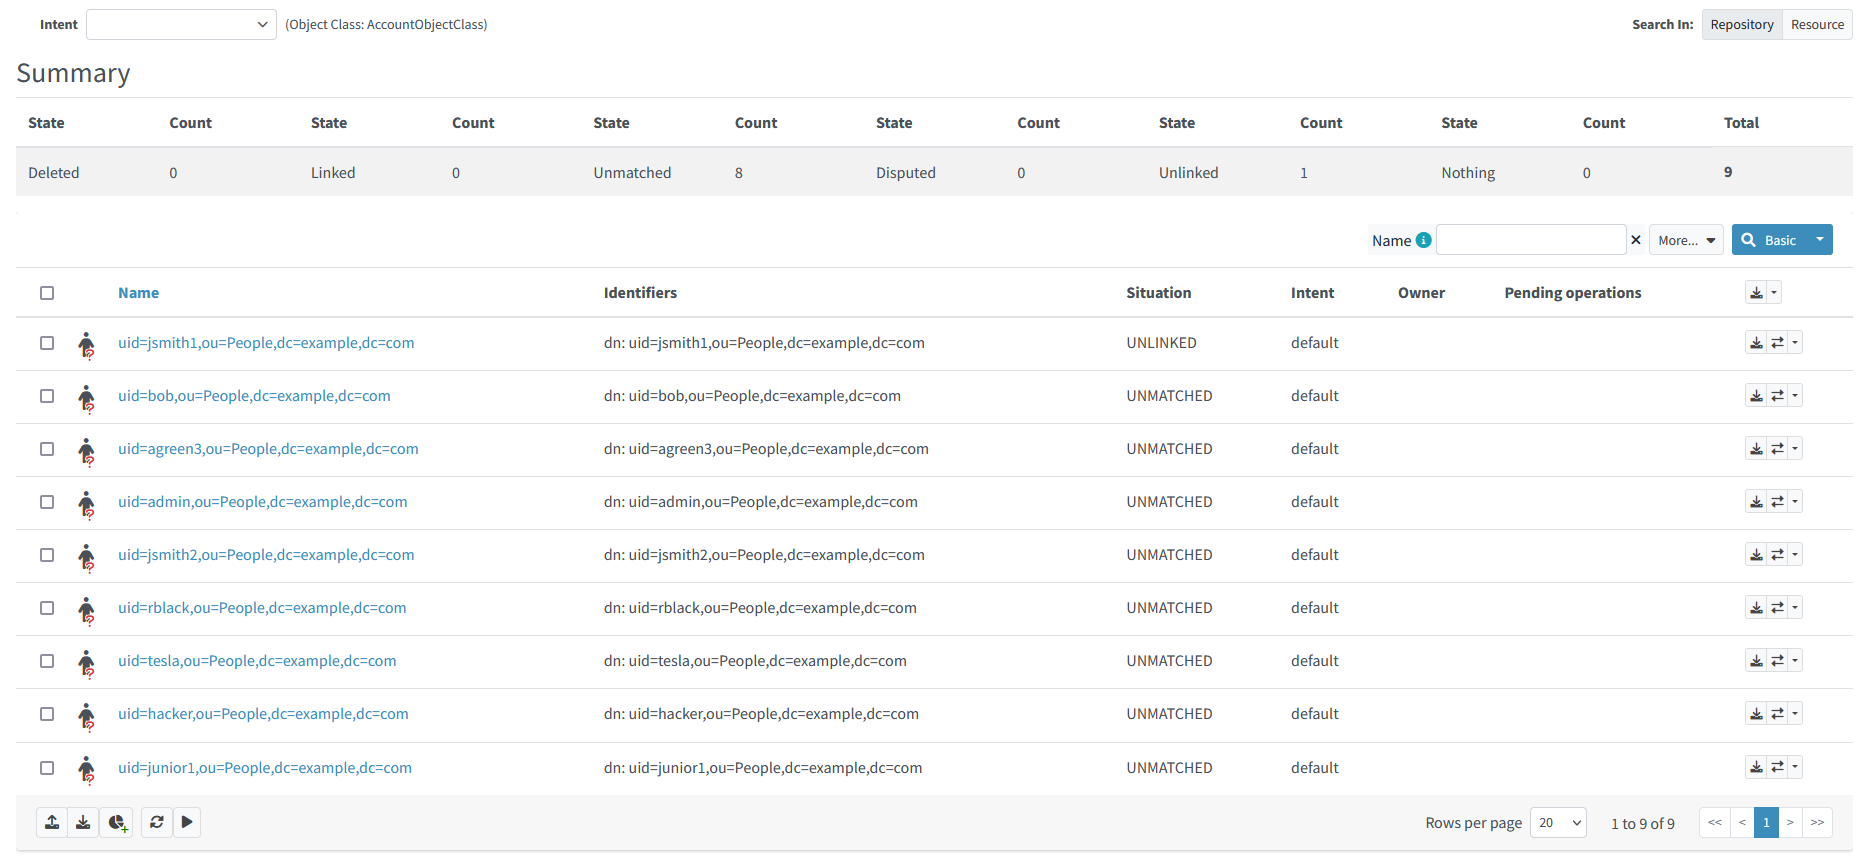
Figure 22. Content of LDAP resource after initial correlation run
Step LDAP-4: Improving the Correlation
Imagine now that further analysis showed that we can correlate remaining accounts either using e-mail address or (with lower certainty) using the user name. Please import the LDAP definition #4.
The configuration now looks like this:
Listing 13: Updated definition of LDAP resource correlation
<attribute>
    <ref>ri:employeeNumber</ref>
    <!-- The 'correlator' property is no longer here -->(1)
    <inbound>
        <target>
            <path>employeeNumber</path>
        </target>
        <evaluationPhases>
            <include>beforeCorrelation</include>
            <exclude>clockwork</exclude>
        </evaluationPhases>
    </inbound>
</attribute>
<attribute>
    <ref>ri:mail</ref>
    <inbound>
        <target>
            <path>emailAddress</path>
        </target>
        <evaluationPhases>
            <include>beforeCorrelation</include>
            <exclude>clockwork</exclude>
        </evaluationPhases>
    </inbound>
</attribute>
<attribute>
    <ref>ri:givenName</ref>
    <inbound>
        <target>
            <path>givenName</path>
        </target>
        <evaluationPhases>
            <include>beforeCorrelation</include>
            <exclude>clockwork</exclude>
        </evaluationPhases>
    </inbound>
</attribute>
<attribute>
    <ref>ri:sn</ref>
    <inbound>
        <target>
            <path>familyName</path>
        </target>
        <evaluationPhases>
            <include>beforeCorrelation</include>
            <exclude>clockwork</exclude>
        </evaluationPhases>
    </inbound>
</attribute>
<correlation>
    <correlators>
        <items>
            <item>
                <ref>employeeNumber</ref>
            </item>
            <composition>
                <tier>1</tier> (2)
            </composition>
        </items>
        <items>
            <item>
                <ref>emailAddress</ref>
            </item>
            <composition>
                <tier>2</tier> (3)
            </composition>
        </items>
        <items>
            <item>
                <ref>givenName</ref>
            </item>
            <item>
                <ref>familyName</ref>
            </item>
            <composition>
                <tier>3</tier> (4)
                <weight>0.8</weight>
            </composition>
        </items>
    </correlators>
</correlation>| 1 | The simple correlator was moved to the complex correlation configuration in correlation container. |
| 2 | Correlation on employeeNumber executes first.
If it finds a match, the correlation process stops here. |
| 3 | Correlation on emailAddress executes second.
If it finds a match, the correlation process stops here.
Note that we would need a way of telling midPoint that emailAddress matching should not apply if the employeeNumber value is present and not matching for particular candidate owner. |
| 4 | If givenName and familyName match, the candidate owner is presented but with a lower confidence (0.8), indicating a need for human confirmation. |
Now we can run the simulation of the correlation. The results would like the following:
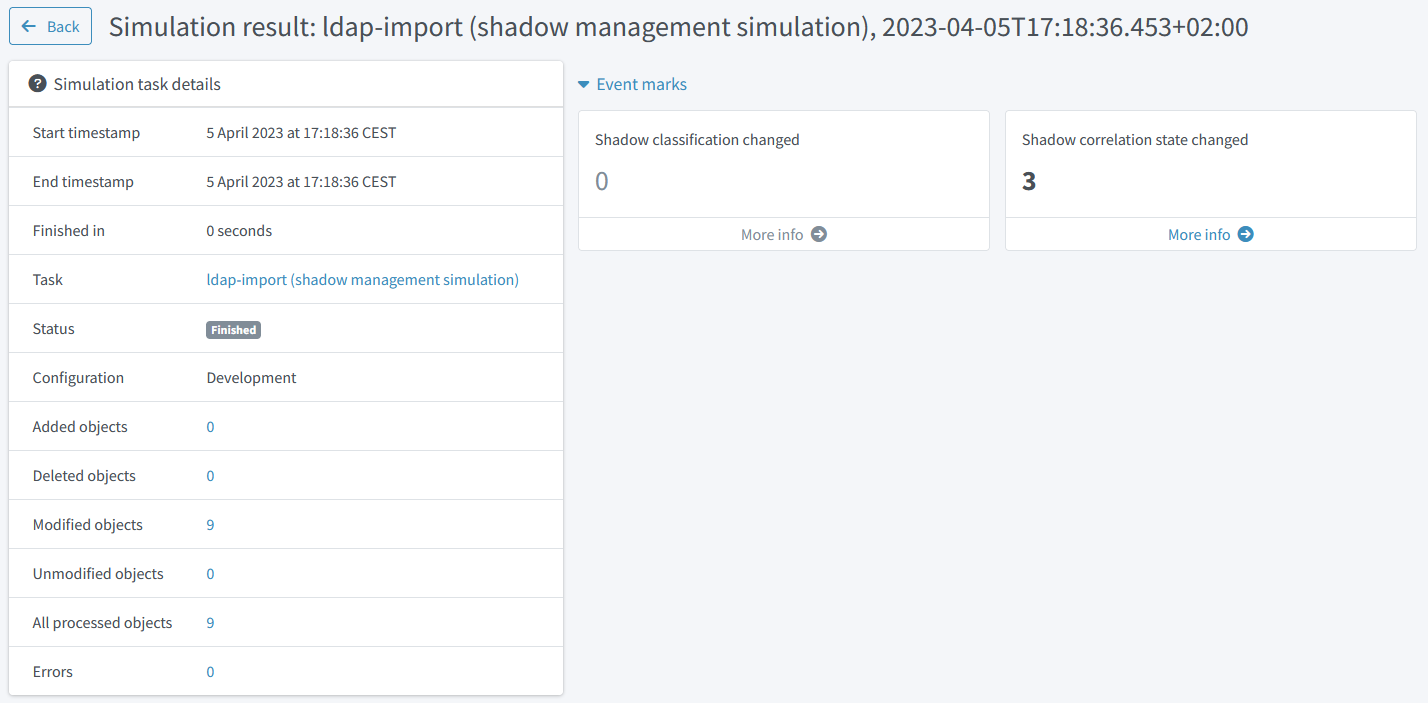
Figure 23. Simulation result capturing the second correlation
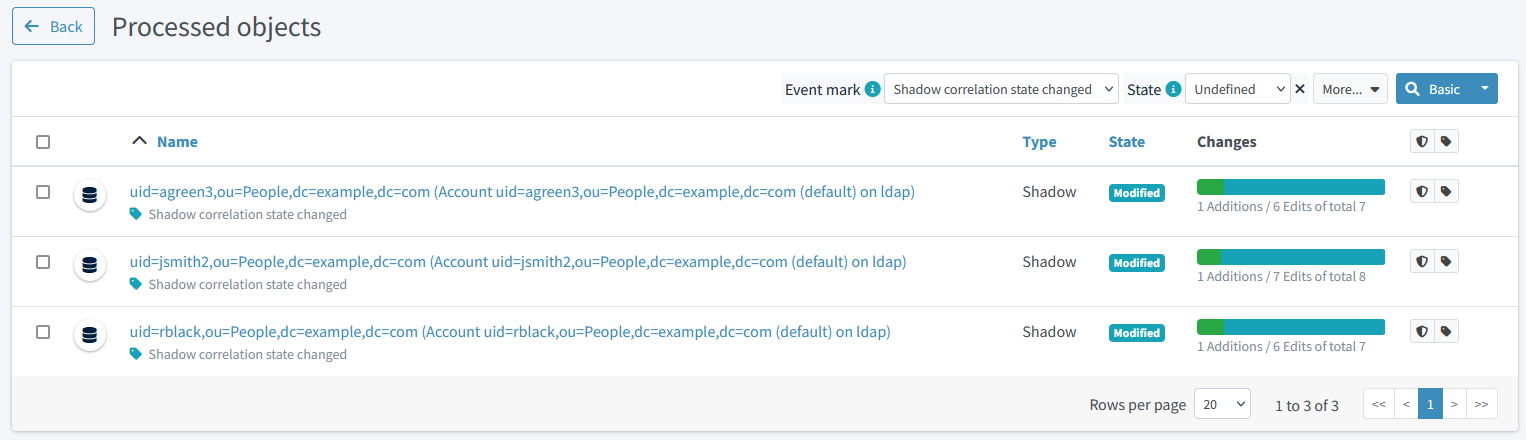
Figure 24. Correlated accounts

Figure 25. Correlated account details

Figure 26. Specialized correlation report
After we are satisfied with the results, we can "commit" them by executing the same task as in Step LDAP-3: Correlation on Employee Number.
Step LDAP-5: Marking Shadows as Ignored
Here we could mark some shadows as protected, "do not touch", "decommission later", or "correlate later":
| For more information about how to mark the shadows, please see Object Marks. |
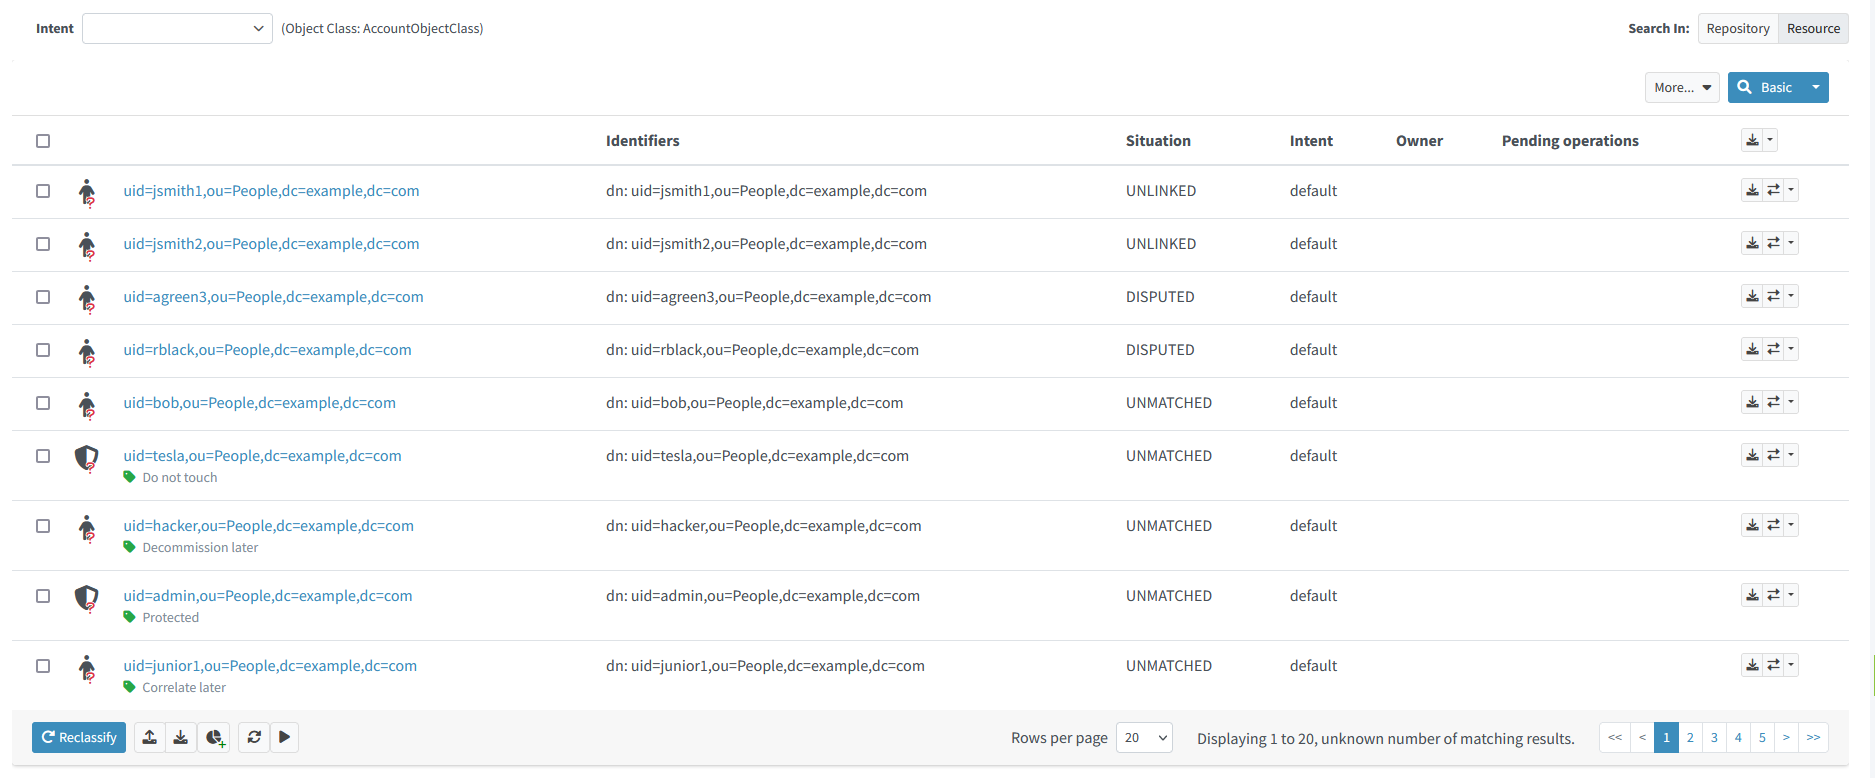
Figure 27. Marked shadows
These marked shadows will be skipped during synchronization activities.
Step LDAP-6: Linking the Remaining Shadows Manually
In order to link the shadows, we have to put the resource into production mode. We make sure that there are no inbound mappings that would move any data from the resource to midPoint. (If there were any, we could put them into development mode to avoid their unintentional use.)
So, please import the LDAP definition #5.
Listing 14: Updated definition of LDAP resource
...
<lifecycleState>active</lifecycleState>
...
<schemaHandling>
    <objectType>
        ...
        <synchronization>
            <reaction>
                <situation>linked</situation>
                <actions>
                    <synchronize/>
                </actions>
            </reaction>
            <reaction>
                <situation>unlinked</situation>
                <actions>
                    <link/>
                </actions>
            </reaction>
            <reaction>
                <situation>disputed</situation>
                <actions>
                    <createCorrelationCase/>
                </actions>
            </reaction>
            <reaction>
                <situation>deleted</situation>
                <actions>
                    <unlink/>
                </actions>
            </reaction>
            <!-- intentionally no reaction for unmatched -->
        </synchronization>
    </objectType>
</schemaHandling>
...
Let us run the regular LDAP import task. After that, the LDAP accounts should look like this:
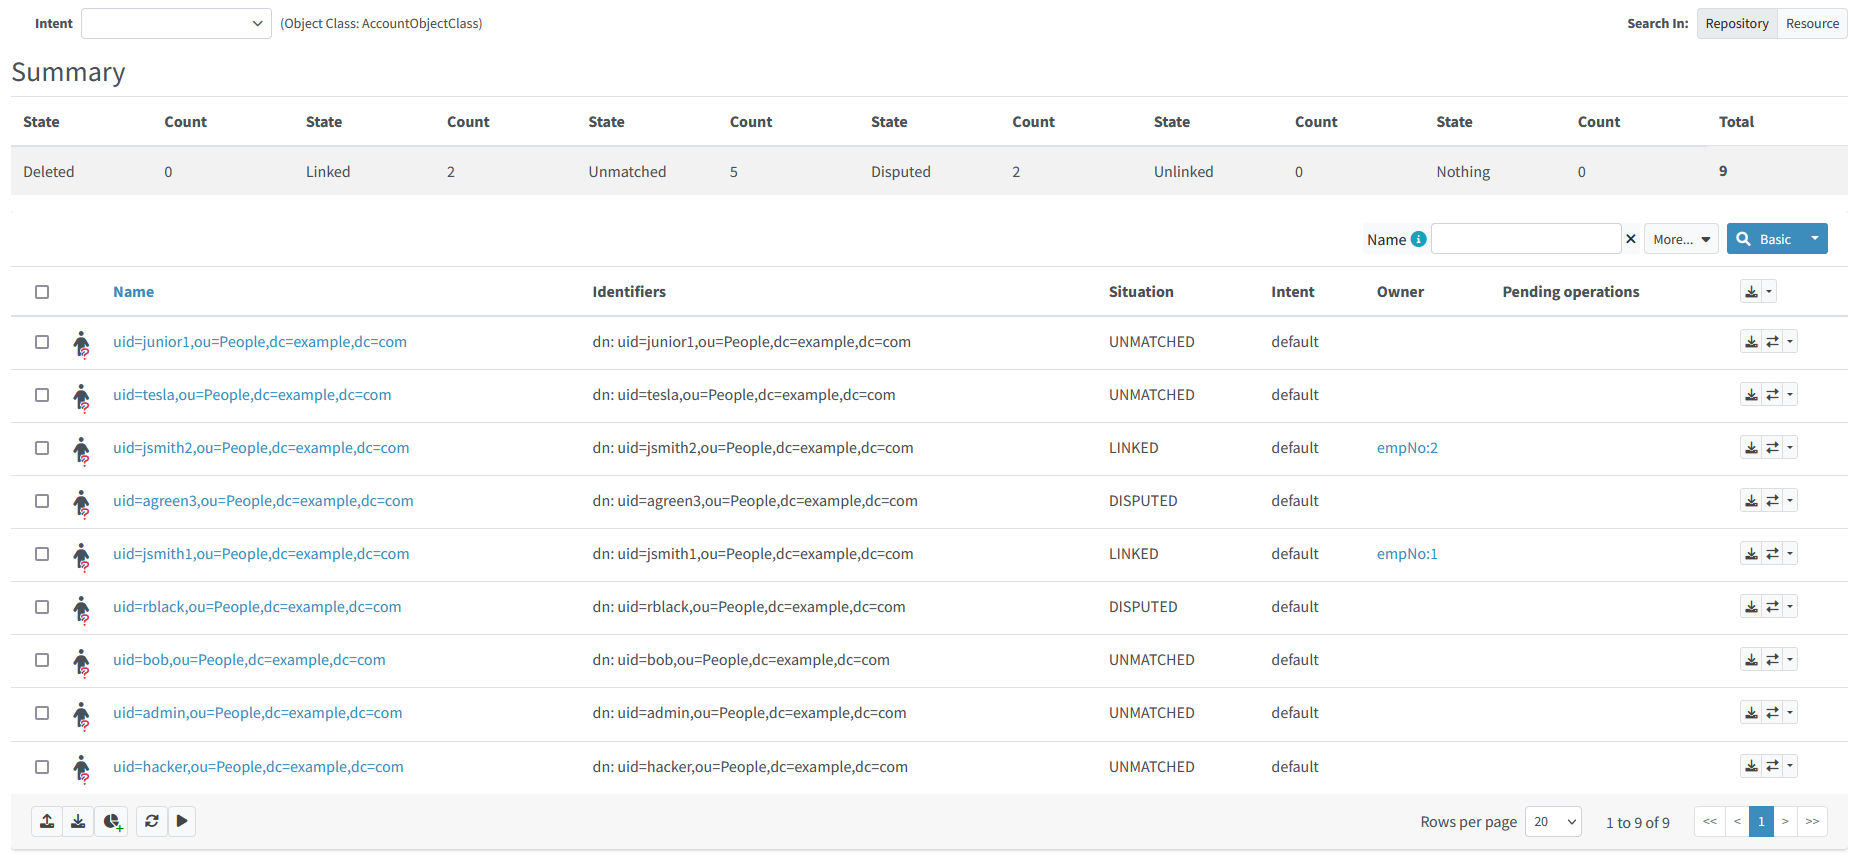
Figure 28. LDAP shadows after the first import
We see that two shadows are now linked to their owners (empNo:1, empNo:2), two are disputed, and others are unmatched.
We can link the disputed shadows by resolving appropriate cases: alice to empNo:3 and rblack to empNo:4.
Then we can link bob to empNo:5 manually.
After running the import again, the shadows should look like this:

Figure 29. LDAP shadows after the second import
Step LDAP-7: Importing the usernames into midPoint
Currently, our users have their (temporary) names derived from employee numbers:
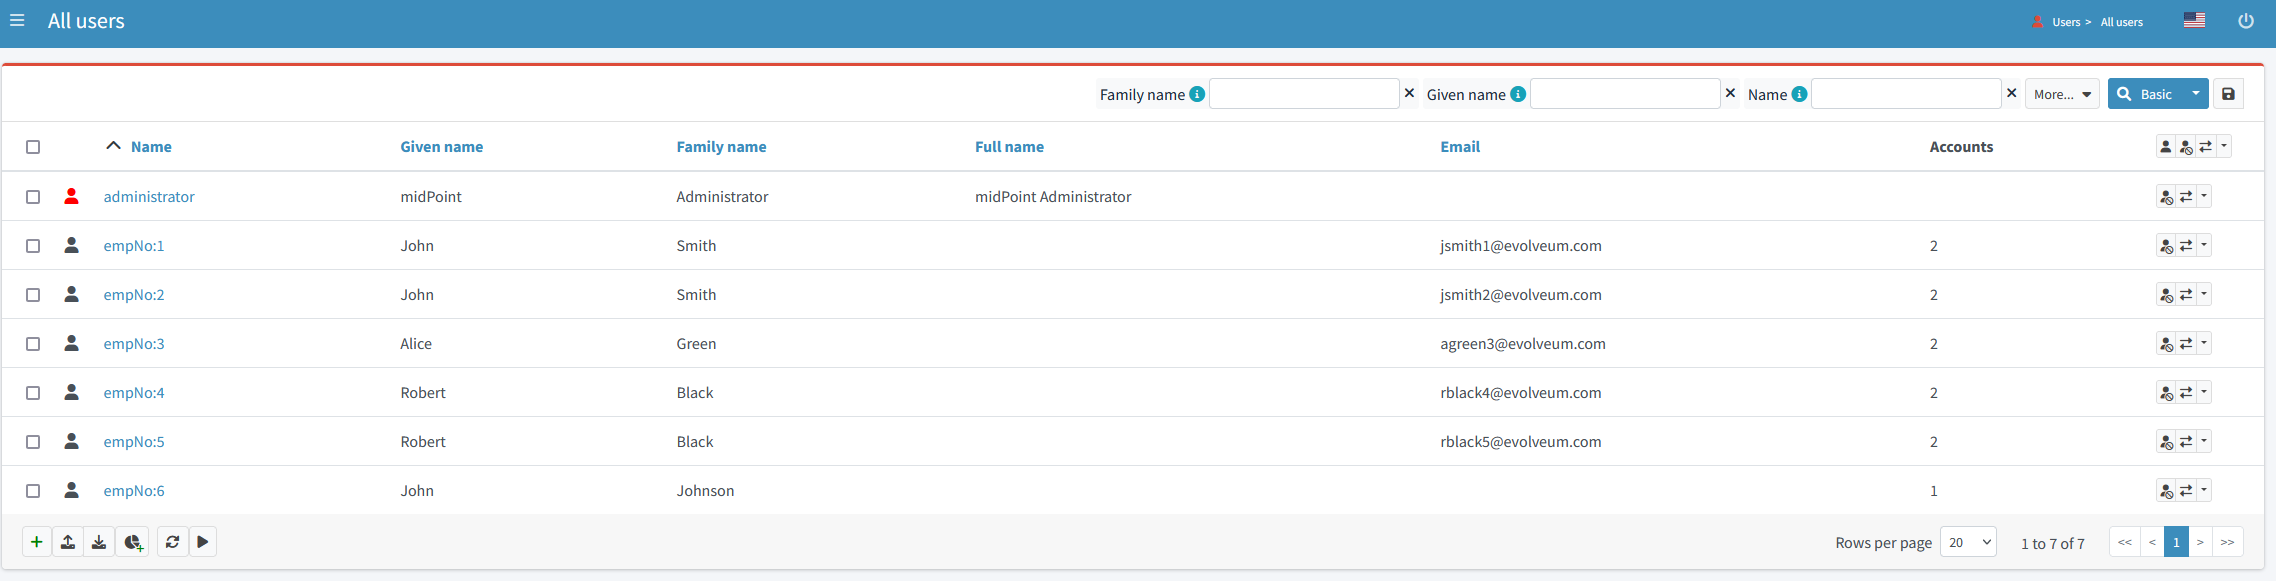
Figure 30. Temporary usernames
Eventually, we would like the names to be consistent with LDAP dn and uid values, and to be generated in such format for new users. To achieve this, we now need to import existing names from LDAP to midPoint.
Listing 15: Updated definition of LDAP resource
<attribute>
    <ref>ri:uid</ref>
    <inbound>
        <strength>strong</strength>
        <target>
            <path>name</path>
        </target>
        <condition>
            <script>
                <code> (1)
                    def userOld = midpoint.modelContext.focusContextRequired.objectOld
                    userOld?.asObjectable()?.name?.orig?.startsWith('empNo:')
                </code>
            </script>
        </condition>
    </inbound>
</attribute>| 1 | We want to replace the usernames only for those users that have a temporary one.
(In the future, we plan to allow having users without usernames.
The condition would be transferred to weak strength.)
Note that we have to explicitly use userOld value to avoid possible 'true→false' condition state changes that could result from the (repeated) execution of this mapping. |
After running the import, we can see the expected changes:
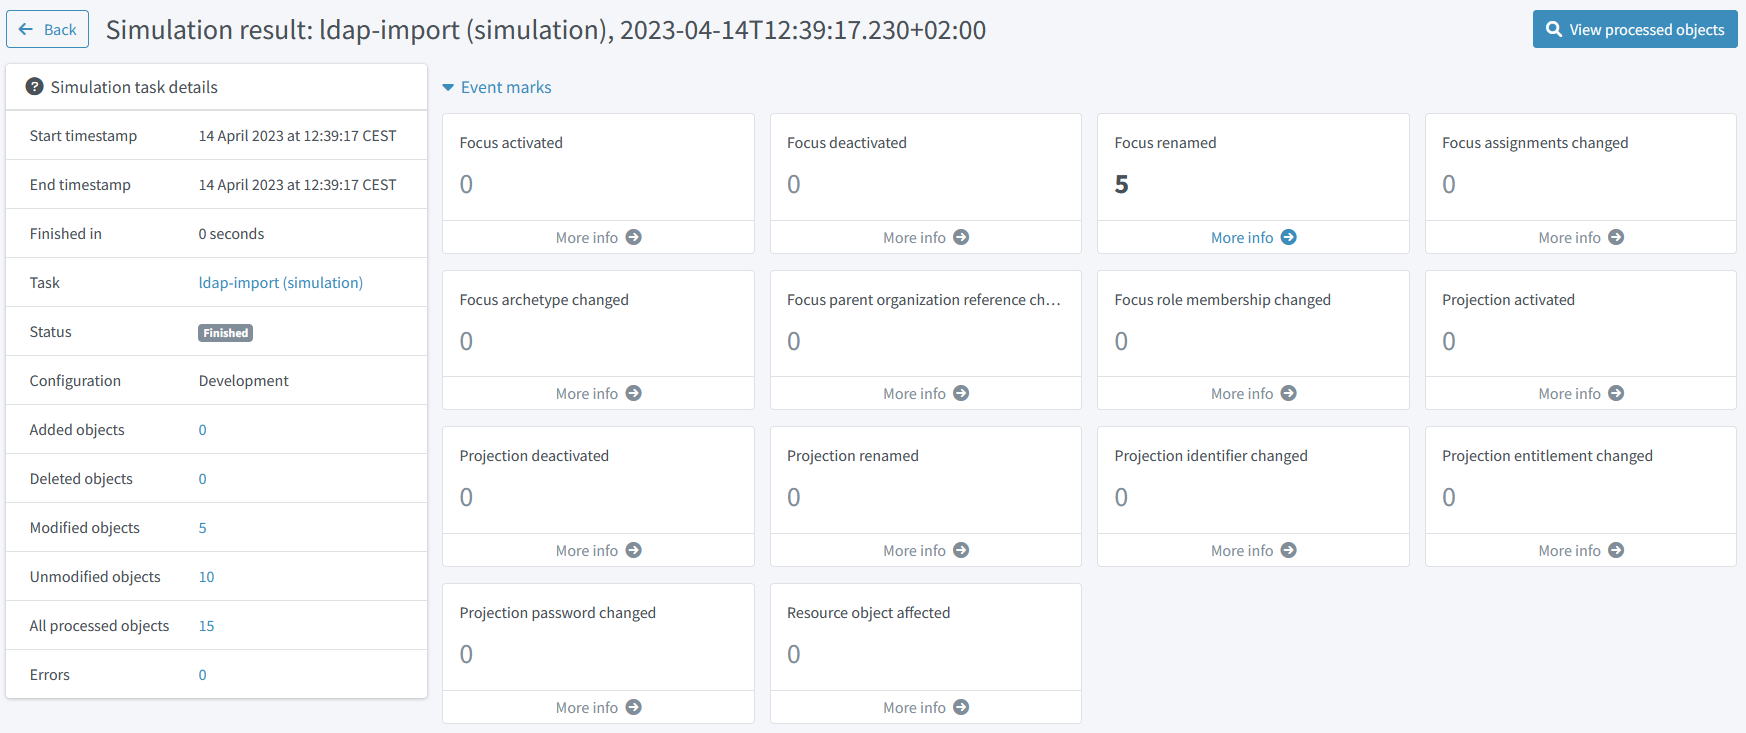
Figure 31. Simulation result after simulated import of usernames
We see 5 "focus renamed" events, so let us have a look.
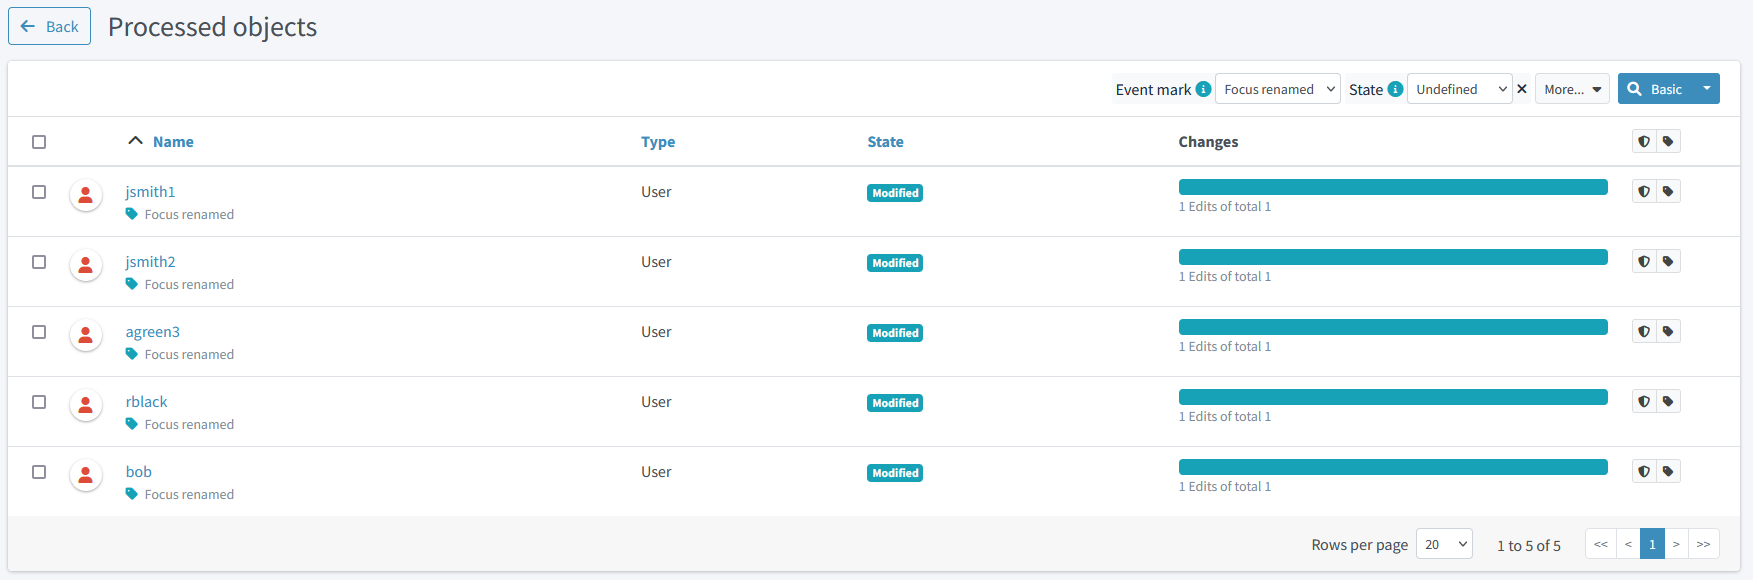
Figure 32. Simulation result objects
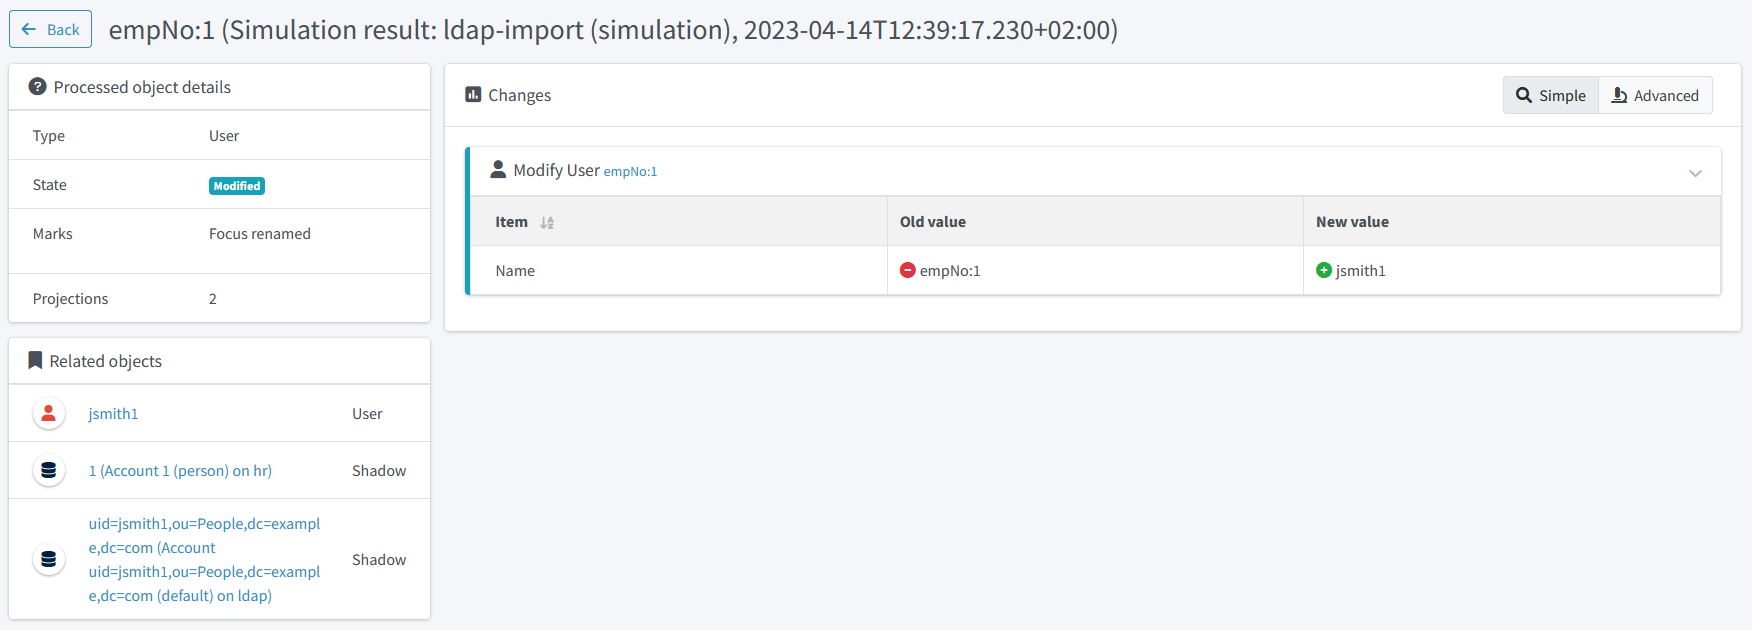
Figure 33. Simulation result object details
We can also run the "Simulation report: Items changed" to see the results in a spreadsheet.
We recommend setting "Show rows with no details" to false to hide objects that were not changed.
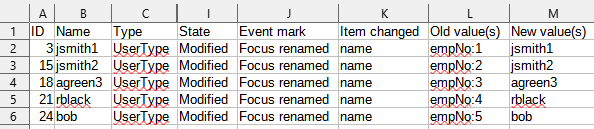
Figure 34. Simulation report
After we are satisfied with the result, we can switch the mapping to production mode and run the regular import or reconciliation task.
Conclusion
In this tutorial, we showed how to use new simulations feature to realize a simple scenario of connecting one source and one target resource.
Was this page helpful?
YES
NO
Thanks for your feedback