Working with midPoint Studio
Creating midPoint Project
To create a new midPoint project, follow these steps:
-
start IntelliJ IDEA.
-
go to File → New → Project…
-
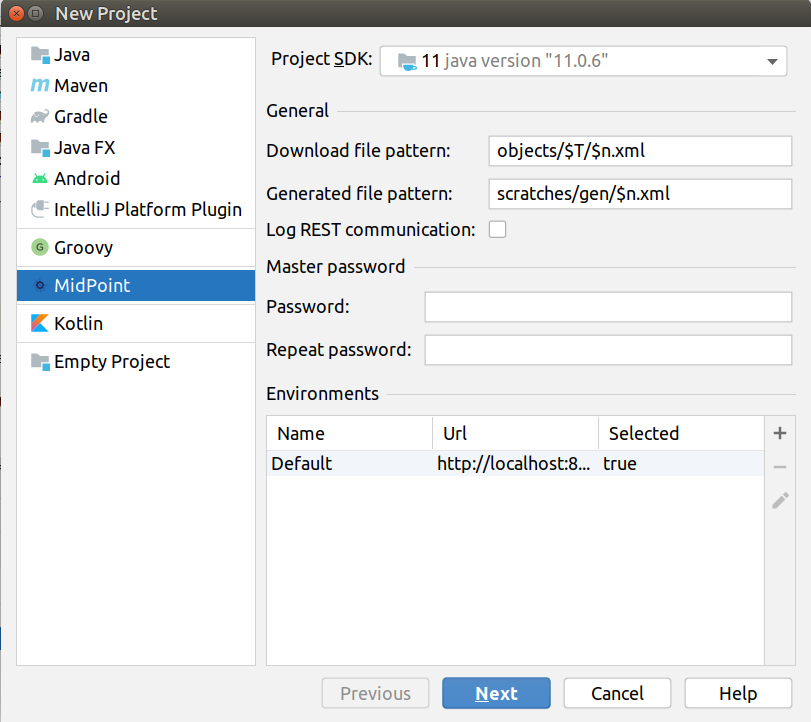
select MidPoint in the left panel
-
choose JDK in Project SDK
-
if SDK is missing you can click on Add SDK and select JDK to choose installation on file system or Download JDK
-
recommented JDK version and vendor is depending on midPoint version you are using. Check release notes for details.
-
-
-
keep Download file pattern as is unless you know what you are doing. See also Updating Project Settings
-
keep Generated file pattern as is unless you know what you are doing. See also Updating Project Settings
-
set the Master password for your encrypted properties store (
Keepass).-
the master password will be used for encryption of
Keepassfile. See Using Keepass File. -
the master password will be stored in your operating system key management subsystem to not ask for it each time you start IntelliJ IDEA
-
-
Select a proper Environment
-
by default there is a
Defaultenvironment forhttp://localhost:8080/midpoint -
you can modify or add new environments for your projects now or later, see Working With Environments
-
-
click Next button
-
specify Project name and Project location
-
click Finish button
Figure 1. Creating project, step 1
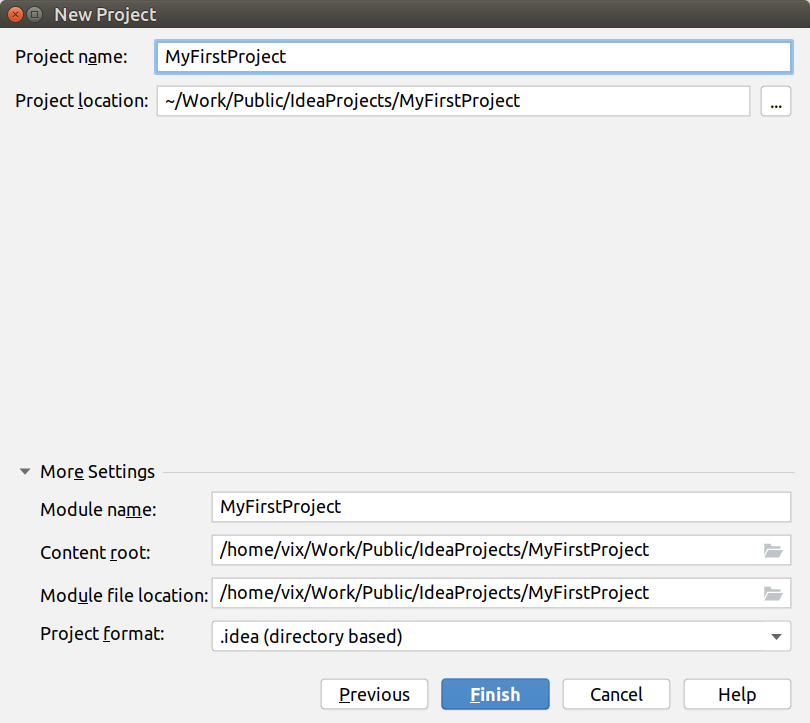
Figure 2. Creating project, step 1
IntelliJ IDEA will automatically open your new project.
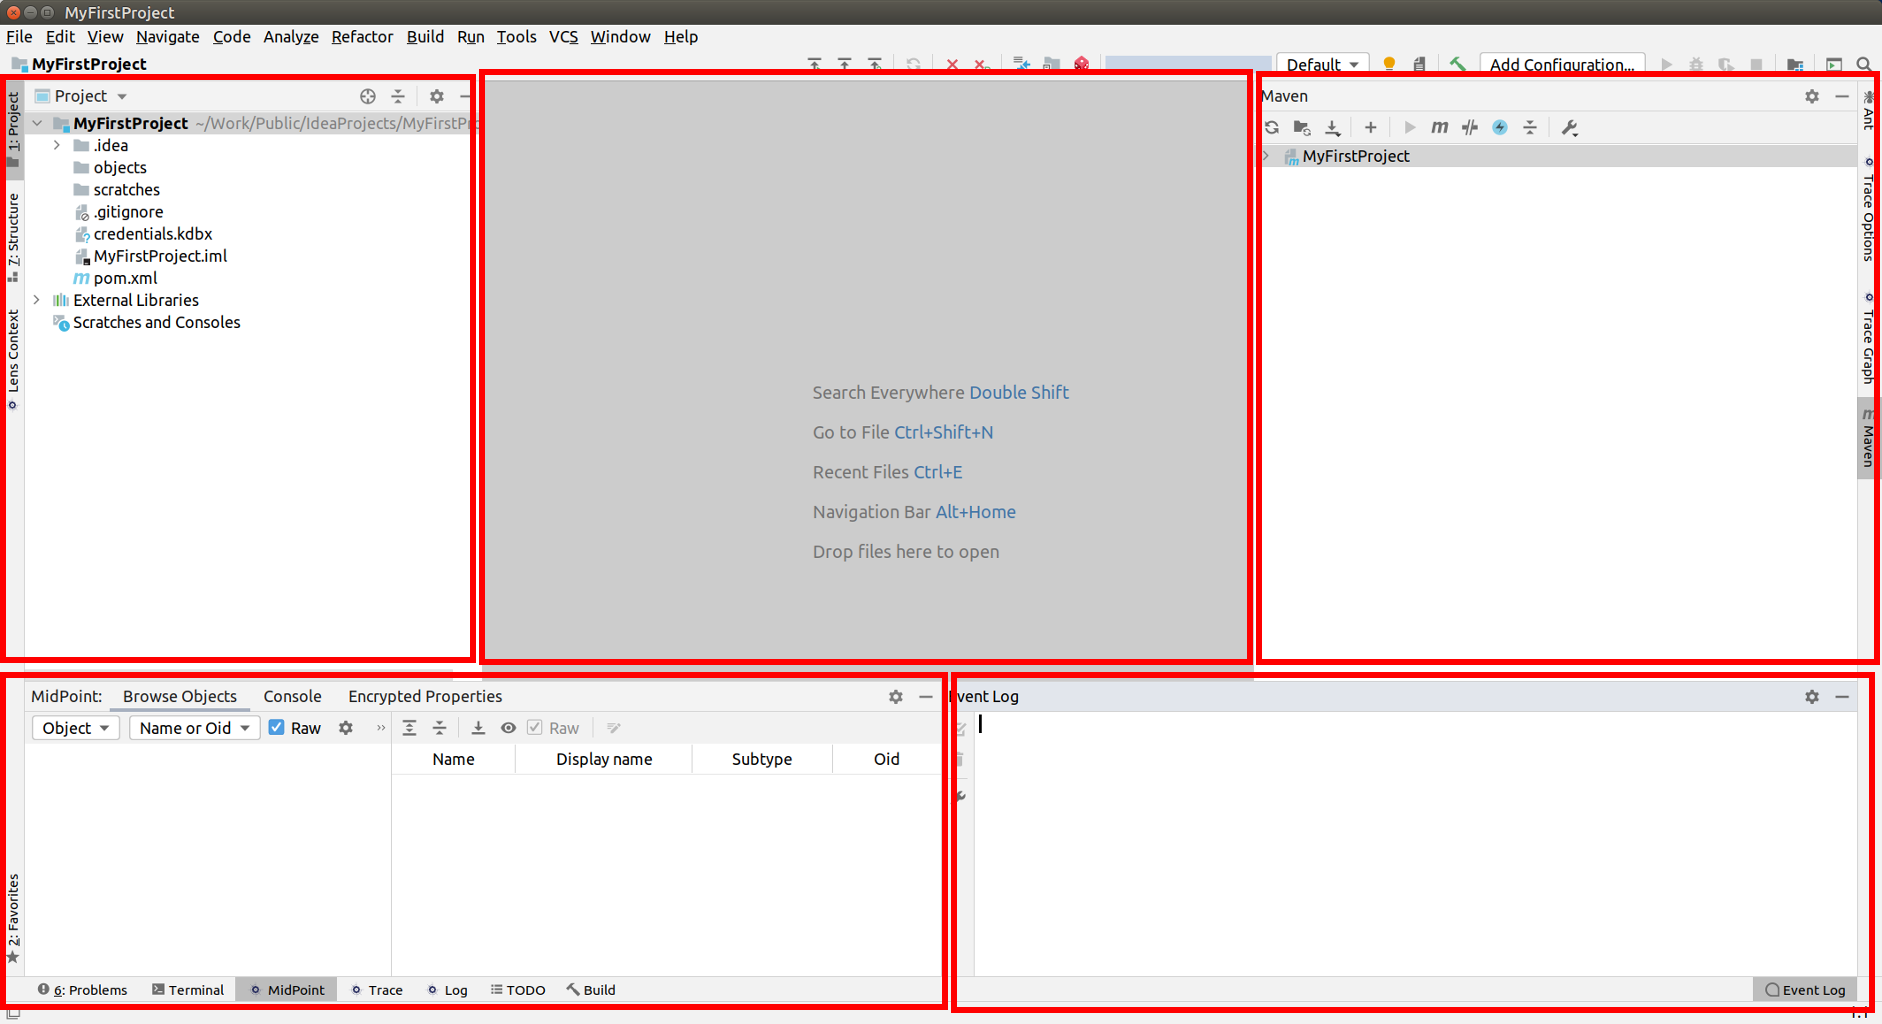
Figure 3. Newly opened project
MidPoint Studio stores the project configuration under .idea project
subdirectory and several files in the main project directory.
|
| File | Content |
|---|---|
|
Credentials/encrypted properties database ( |
. |
|
|
Project configuration directory. You should not touch these files. The only interesting file might be |
|
midPoint project object files directory with the usual subdirectories for object types |
|
Properties for Java code completion (based on specific midPoint version supported by MidPoint Studio). |
|
Directory for "temporary" files downloaded from midPoint repository. |
Using IntelliJ IDEA Interface
This section describes the default configuration of the IntelliJ IDEA when using midPoint Studio.
The main toolbar contains a section for midPoint-related tasks.

Figure 4. MidPoint toolbar section
The buttons are (from left to right):
-
Upload/Execute
-
Upload/Recompute
-
Upload/Test Resource
-
Refresh From Server
-
Diff Remote
-
Delete (non-raw)
-
Delete (raw)
-
Other Update Actions, contains the following:
-
Recompute
-
Download Selected Types
-
Test Resource
-
Upload/Execute (stop on error)
-
Upload/Test/Validate Resource
-
Cleanup File
-
-
Server Log
-
Generate Random OID
-
(environment color)
-
Environment selector
-
Test Connection
-
Generate Documentation
The interface uses several tool windows. It is possible to move and reorder them as you like.
Top-left Tool Window
-
Project: contains the list of files in your project. Everything related to midPoint objects will be in the
objects/subdirectory. -
Structure: contains the object structure from the file (elements)
-
Lens Context: TODO log/trace viewer
Top-center Tool Window
-
contains the currently opened midPoint object(s)
Bottom-left Tool Window
-
MidPoint: contains the MidPoint-related information with the following tabs:
-
Browse Objects: allows searching within midPoint repository and creating bulk tasks from the results. See Bulk Task Generator
-
Console: displays MidPoint Studio console (success/error messages)
-
Encrypted Properties: displays the content of the current Keepass database
-
Key: property name (such as username)
-
Environment: environment tied to this encrypted property (can be empty meaning all environments)
-
Value: encrypted value (such as password)
-
Description: encrypted property description (optional)
-
-
-
Problems: displays the detected problems within the editor (content validation)
-
Trace: TODO log/trace viewer
-
Terminal: opens a terminal window
The Key column of your Keepass database entries corresponds to the key
name in your operating system’s key database.
|
Bottom-right Tool Window
-
Event Log: contains the event log entries from IntelliJ IDEA
Working With Environments
You can create several environments for each project.
This can be used for example to allow connection to TEST, QA and PROD
environments of the same customer.
The environment Default is created automatically and points to http://localhost:8080/midpoint.
There is a color box specifying the color assigned to the environment for a quick overview of which environment are you currently working with.
| Unlike in the Eclipse plugin, the environments are now project-based. |
Selecting Environment
There are several ways how to select a new environment to connect to:
-
in the main toolbar, click the name of the current environment
-
select the environment to switch to
or:
-
in the main toolbar, click the name of the current environment
-
select Edit environments
-
select proper environment and click Edit icon
-
check Selected checkbox
-
click Save button
-
or:
-
press
Shiftkey twice to open the IntelliJ IDEA search window -
start to type
midpoint -
select the row MidPoint Settings to open midPoint project settings
-
the list of environments is displayed at the bottom of the page
-
select proper environment and click Edit icon
-
check Selected checkbox
-
click Save button
-
Testing Connection to Environment
You can test the connection to your current environment by clicking the Test icon. The result will be displayed in the Event log window and as a popup and will look like this:
Test Connection Message
21:26 Test connection: Connection test for 'Default' was successful. Version: 4.2-SNAPSHOT, build: v4.2devel-1670-g4643e042ec.
Adding A New Environment
To add a new environment:
-
in the main toolbar, click the name of the current environment
-
select Edit environments
-
click + icon
-
a new window will open, enter the following information:
-
Name: your new environment name. E.g.
QA -
Selected: check if you want to switch to the new environment
-
Server settings: select the connection information:
-
Url
-
Username: will be stored in your keepass database, see Using Keepass File
-
Password will be stored in your keepass database, see Using Keepass File
-
Ignore SSL Errors: check to ignore any SSL-related connection errors such as a missing or self-signed certificate
-
-
Proxy settings: enter your proxy server settings (optional)
-
Other: enter the other settings (optional)
-
Properties file: select the properties file for this environment. See Environment or Project-Specific Properties.
-
Color: select the color for this environment
-
-
click Test connection to test the connection to the new environment (optional)
-
click Save button to save the new environment
-
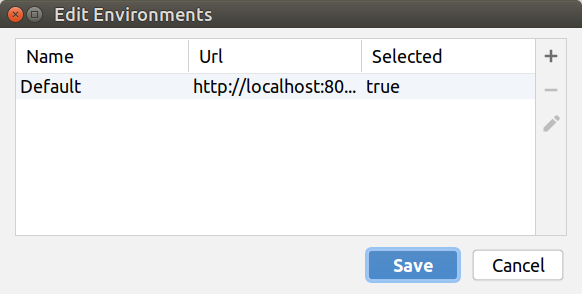
Figure 5. Edit environments
Updating Existing Environment
To update already existing environment:
-
in the main toolbar, click the name of the current environment
-
select Edit environments
-
select the environment to edit
-
click Edit icon
-
modify the desired parameters
-
click Save button to save the modified environment
Deleting Existing Environment
-
in the main toolbar, click the name of the current environment
-
select Edit environments
-
select the environment to edit
-
click Delete icon. The environment disappears from the list
-
click Save button to save the modified environment or Cancel button to not delete it
Working with midPoint Objects
You can do the following operations to the midPoint objects. The actions are available either from the main toolbar or from the context menu Update Object Actions for the currently opened file or for selected files in your list of objects.
Uploading midPoint objects
This operation will send the selected object to midPoint repository and optionally execute an after-upload action.
The following operations are available either from the main toolbar or from the Update object actions context menu:
-
Upload (Full Processing): will upload the selected object(s) and recompute it. If it’s an executable action script then it will be executed. If the object is a resource test connection will be executed as well.
-
Secondary actions hidden under Other Actions toolbar menu:
-
Upload/Execute: will upload the selected object(s). Tasks may be automatically executed (based on their
executionState). -
Upload/Execute (stop on error): will upload the selected object(s). Tasks may be automatically executed (based on their
executionState). The first object with an upload error will stop the action. -
Upload/Recompute: will upload the selected object(s) and recompute them after the upload.
-
Upload/Test Resource: will upload the selected object(s) and assuming they are resources, it will also test the connections.
-
The Console tool window will display the operation status, for example:
Message
2020-09-28T21:09:43.091+0200 UploadExecute: Initializing upload action
2020-09-28T21:09:43.094+0200 MidPointClient: Client created
2020-09-28T21:09:43.575+0200 UploadExecute: Upload 'Role X123' finished
Or, for upload/test resource: .Message
020-09-30T11:55:33.910+0200 UploadTestResource: Initializing upload action
2020-09-30T11:55:33.912+0200 MidPointClient: Client created
2020-09-30T11:55:34.557+0200 UploadTestResource: Upload 'CSV-1 (Document Access)' finished
2020-09-30T11:55:34.559+0200 MidPointClient: Starting test resource for 10000000-9999-9999-0000-a000ff000002
2020-09-30T11:55:35.191+0200 UploadTestResource: Test connection 'CSV-1 (Document Access)' finished
The Event Log tool window will display the errors or warnings, for example:
Message
21:09	Error: Exception occurred during upload of 'Role X123(4874b65b-fa18-419e-917f-e878122e64ca)', reason: Unknown response status: 400, reason: Bad Request

21:09	Warning
        There were problems during 'Uploading objects'
		Processed: 0 objects
		Failed to process: 1 objects
		Files processed: 0
		Failed to process: 0 files
| Rule of thumb: you typically want to use Upload/Test Resource for your resources and Upload/Execute for most other cases. |
Refresh From Server
This operation will re-download the selected object from midPoint repository and overwrite the file. You can execute this operation for the current window by clicking the Refresh From Server toolbar icon, or for file(s) in the list of files by clicking the context menu and selecting Update object actions → Refresh From Server. You will need to confirm the operation before proceeding.
The Console tool window will display the operation status, for example:
Message
2020-09-28T21:06:24.612+0200 MidPointClient: Client created
2020-09-28T21:06:24.612+0200 MidPointClient: Getting object <object type and oid here>
2020-09-28T21:06:24.770+0200 MidPointClient: Get done
The Event Log tool window will display the errors or warnings, for example:
Message
21:06	Refresh Action
        Reloaded 1 objects
        Missing 0 objects
        Failed to reload 0 objects
        Skipped 0 files
| The local file will be overwritten. All XML comments will be lost. |
Diff Remote
This operation will compate the selected object in midPoint Studio with its corresponding midPoint repository object.
TODO: add more documentation
Delete (Non-raw)
This operation will delete the selected object(s) from midPoint repository. Provisioning will be executed to delete also the object’s projections, if applicable. You can execute this operation for the current window by clicking Delete (non-raw) toolbar icon, or for file(s) in the list of files by clicking the context menu and selecting Update object actions → Delete (non-raw).
The Console tool window will display the operation status, for example:
Message
2020-09-30T12:07:43.043+0200 DeleteRawAction: Initializing delete action
2020-09-30T12:07:43.043+0200 MidPointClient: Client created
The Event Log tool window will display the errors or warnings, for example:
Message
12:07	Success
		Deleting objects finished.
		Processed: 1 objects
		Failed to process: 0 objects
		Files processed: 0
		Failed to process: 0 files
Delete (Raw)
This operation will delete the selected object(s) from midPoint repository with the raw flag.
No provisioning will be executed.
You can execute this operation for the current window by clicking Delete (raw) toolbar icon, or for file(s) in the list of files by clicking the context menu and selecting Update object actions → Delete (raw).
The Console tool window will display the operation status, for example:
Message
2020-09-30T12:08:46.043+0200 DeleteRawAction: Initializing delete action
2020-09-30T12:08:46.043+0200 MidPointClient: Client created
The Event Log tool window will display the errors or warnings, for example:
Message
12:08	Success
		Deleting objects finished.
		Processed: 1 objects
		Failed to process: 0 objects
		Files processed: 0
		Failed to process: 0 files
Browsing Objects
To browse midPoint repository objects, go to MidPoint tool window and select Browse Objects tab.
You can use the following to select the objects:
-
Object: allows to select the object type
-
Name or Oid: allows to select the object’s name or oid, or other options:
-
Name: to search only by the object’s name
-
Oid: to search only by the object’s oid
-
MidPoint query: (Axiom in older versions) to search objects by midPoint Query
-
XML query: (Query XML in older versions) to search by a query written in XML Query language
-
To fetch only a limited number of objects, use the Paging button.
To execute the search, click the Search button.
The results are displayed in the MidPoint window. You can do the following actions:
-
Download: will download and store the object in your project. By default, the directory with plural form of object type will be used. E.g.
objects/resources. -
Show: will download and store the object in a "temporary" subdirectory
scratches. -
Process: allows to execute an action for the selected result(s)
Example 1: Search all users containing
a in their name attribute:-
select User object type
-
select Name
-
enter the string
ain the text field under the query selector -
click Search button
Example 2: Search all users with directly assigned
Superuser role:-
select User object type
-
select MidPoint Query (Axiom in older versions)
-
enter the following query in the text field under the query selector:
assignment/targetRef/@/name = "Superuser" -
click Search button
| The paging with default page size 500 is always applied while searching using midPoint query. If you need to modify the max count of returned objects modify the paging via Paging button. |
Example 3: Search first 300 users with directly assigned
Superuser role using XML Query:If you prefer XML query langugage over midPoint Query, you can use XML query as well.
-
select User object type
-
select XML query (Query XML in older versions)
-
enter the following in the text field under the query selector
(remove the<paging>section to return all instead of the first 300. In XML query, the paging must be set manually in the query):<query xmlns="http://prism.evolveum.com/xml/ns/public/query-3"> <filter> <ref> <path>assignment/targetRef</path> <value oid="00000000-0000-0000-0000-000000000004"/> </ref> </filter> <paging> <offset>0</offset> <maxSize>300</maxSize> </paging> </query> -
click Search button
Bulk Task Generator
When you search for objects, you can view or download them, but you can do much more: you can execute bulk tasks using the search results. An iterative bulk task will be created.
You can select on which objects you want to execute the task.
Click Process icon in the results part of the MidPoint tool window and select:
-
Generate: select the action
-
Execution: select how the results will be processed
-
By OIDs, in one batch: the results will be processed by their OIDs
-
By OIDs, in batches of N: the results will be processed by their OIDs in batches (you need to select batch size N)
-
Using original query (selection ignored): the results will be processed by the original query and any selection is ignored
-
-
Use activity in task (for midPoint 4.4 and above): the task will be created using activities (midPoint 4.4 and above)
-
Create tasks in suspended state: the tasks will be created as
suspendedand not executed upon import to midPoint -
Execute in raw mode: the actions will be executed in
rawmode -
Use symbolic references: TODO
-
Runtime resolution: TODO
Then click a button:
-
Execute: execute the task immediately in midPoint
-
Cancel: abandon the operation
-
Generate XML: generate a bulk task object to be further customized and uploaded later
Upgrade task objects to use activity (midPoint 4.4)
This operation will update the selected task(s) locally. You can execute this operation for:
-
The current editor
-
Currently selected text in editor (containg task object)
-
Selected files and/or folder
Operation will be executed on what has focus and can be started by:
-
Clicking Other Actions toolbar icon and then choosing Upgrade task to activity (4.4) menu
-
Or for file(s) in the list of files by clicking the context menu and selecting Other Actions → Upgrade task to activity (4.4).
Operation will only process midpoint objects that are tasks and don’t already contain activity element.
Supported task types (handler URIs)
-
http://midpoint.evolveum.com/xml/ns/public/model/iterative-scripting/handler-3
-
http://midpoint.evolveum.com/xml/ns/public/model/reindex/handler-3
-
http://midpoint.evolveum.com/xml/ns/public/model/scripting/handler-3
-
http://midpoint.evolveum.com/xml/ns/public/model/shadow-integrity-check/handler-3
-
http://midpoint.evolveum.com/xml/ns/public/model/shadowRefresh/handler-3
-
http://midpoint.evolveum.com/xml/ns/public/model/synchronization/task/async-update/handler-3
-
http://midpoint.evolveum.com/xml/ns/public/model/synchronization/task/delete/handler-3
-
http://midpoint.evolveum.com/xml/ns/public/model/synchronization/task/import/handler-3
-
http://midpoint.evolveum.com/xml/ns/public/model/synchronization/task/live-sync/handler-3
-
http://midpoint.evolveum.com/xml/ns/public/model/synchronization/task/recompute/handler-3
-
http://midpoint.evolveum.com/xml/ns/public/model/synchronization/task/reconciliation/handler-3
Supported by archetypes
-
Asynchronous update task
-
Import task
-
Iterative bulk action task
-
Live synchronization task
-
Recomputation task
-
Reconciliation task
-
Single bulk action task
-
Utility task
| Please, be sure to review changes in task after migration. |
Generate Documentation
This operation will generate the documentation for the selected object(s). Studio internally uses midScribe tool to generate the documentation.
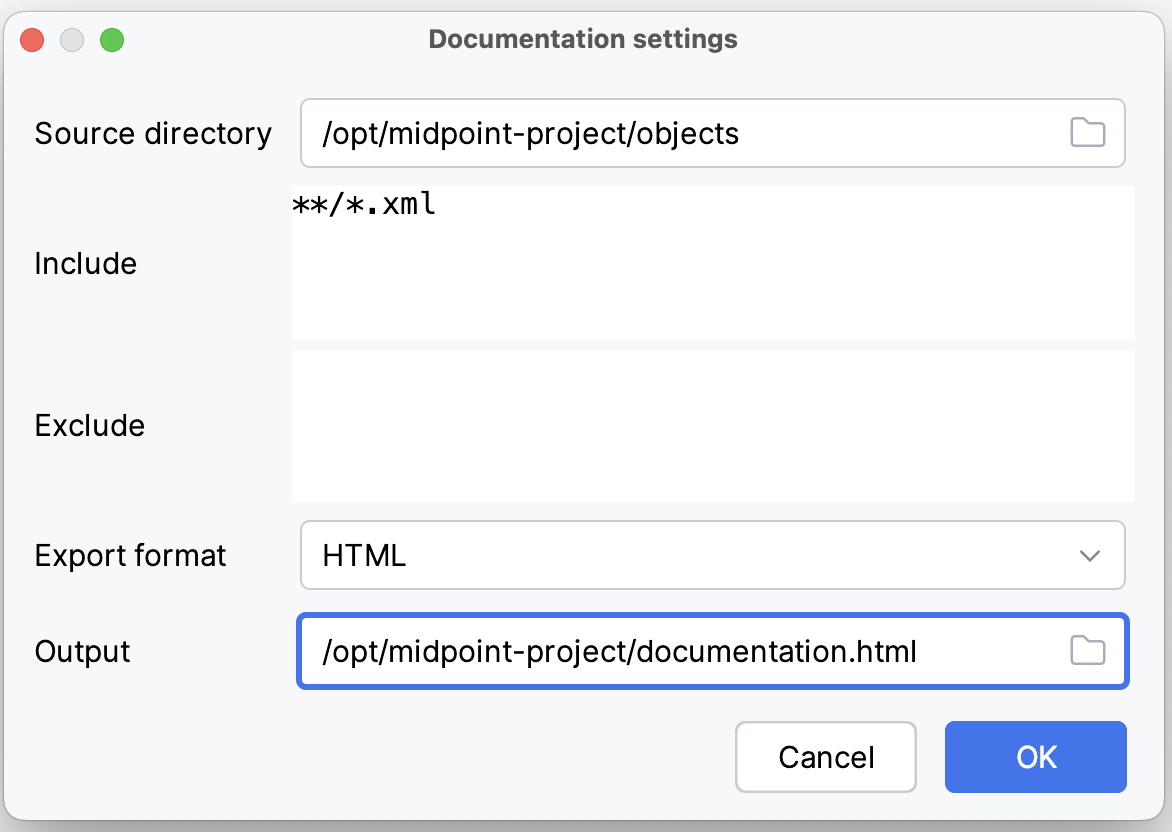
Figure 6. Generate documentation dialog
User dialog allows you to select the following options:
-
source directory - the parent directory where the files with midPoint objects are stored
-
include/exclude patterns - ant-like patterns to include/exclude files from the documentation
-
export format - the format of the generated documentation (HTML, PDF or ADOC)
-
output file - the file where the documentation will be generated
Cleanup File
This operation will remove all unnecessary data from the selected files/objects that were downloaded from midPoint. This is useful for better readability and as a preparation for files to be stored in a version control system.
Cleanup will remove operational data, and moreover it will check and do following:
-
For all objects
-
Check all references to other objects - validate if they can be referenced from project. Otherwise, user will be warned about missing references.
-
Check natural keys - natural keys are items that define identity of different parts of configuration. These are being used for example in debug logs, during configuration merge, etc. For example
outbound/namein resource object,panel/identifieradmin gui configuration.
-
-
For resources
-
Replace
connectorRefreferenceoidattribute withfilterdefinition if connector object is available. E.g. if environment is selected and connector object can be fetched. -
Asks whether to remove resource schema (
schema/definition) which will be generated upon upload for all resources that supports schema operation by connector (almost all).
-
Result of each cleanup and validation is displayed as notification in the bottom right corner of the screen. When there are missing objects, user can decide to download them from midPoint or mark them ignored so that it’s not reported in the future.
Configuration
The cleanup operation behavior can be tweaked in the project settings.
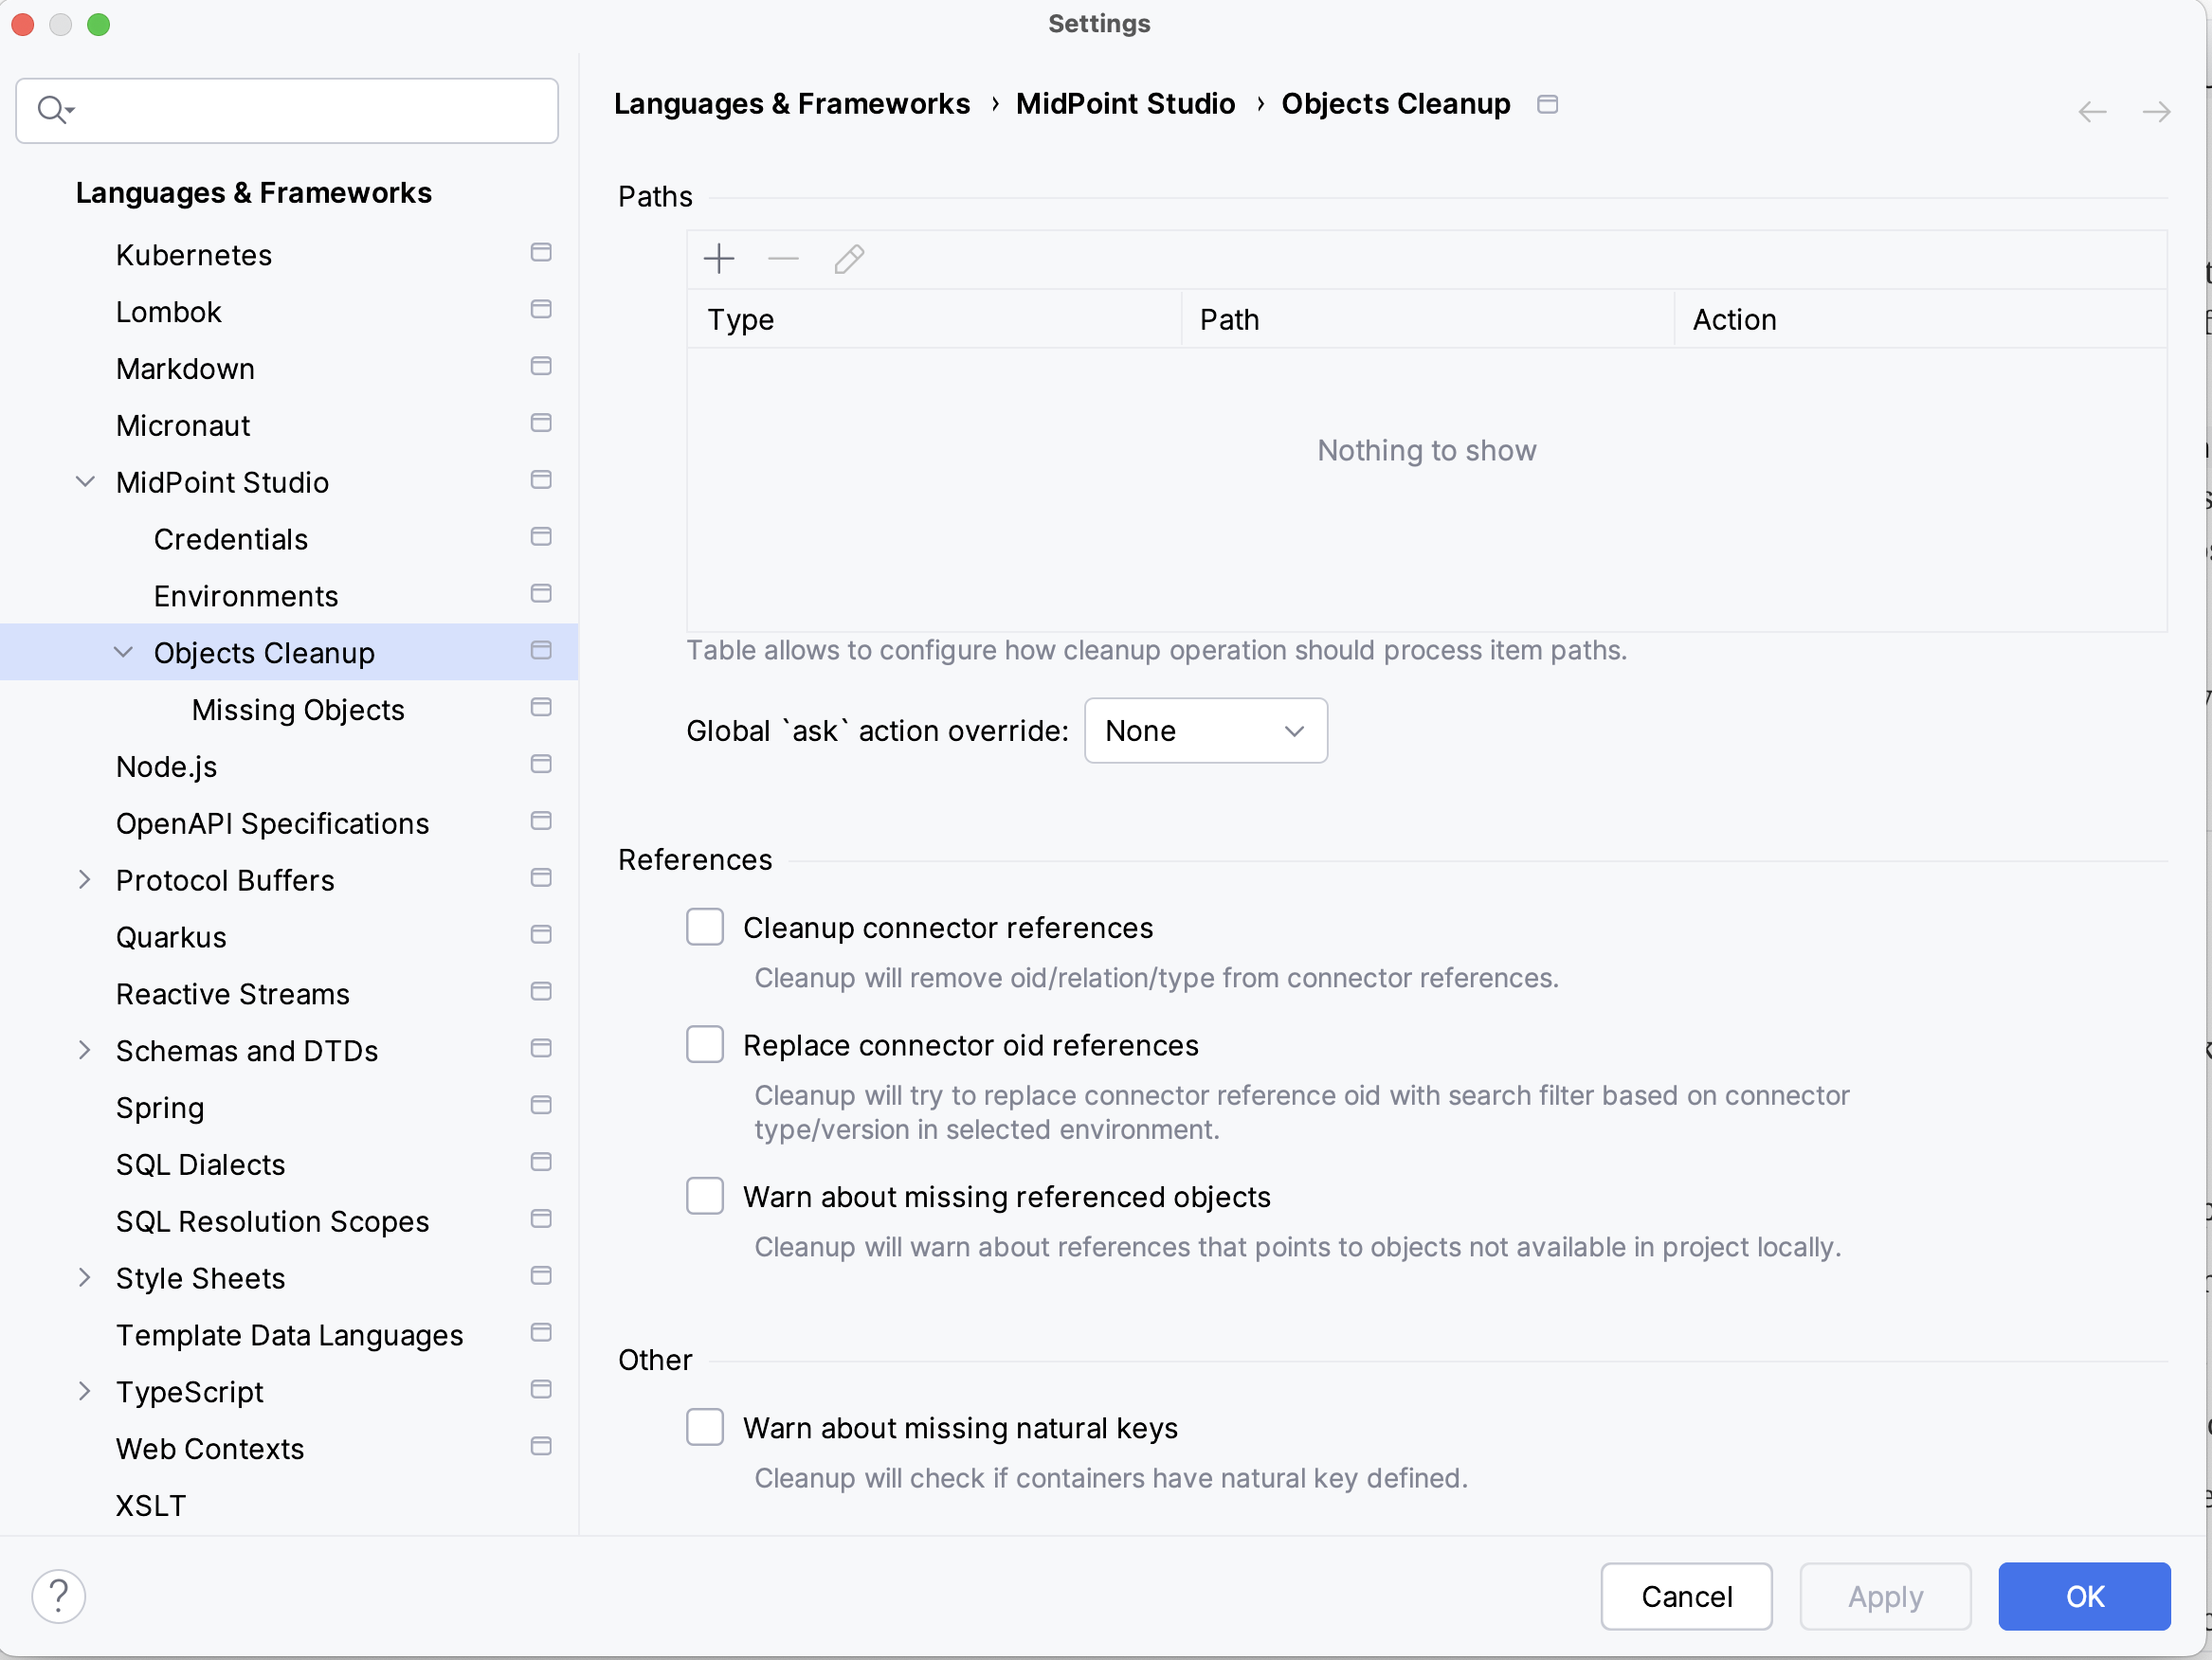
Figure 7. Objects cleanup
Settings allows to change cleanup behavior for different types and paths User can set whether to remove or keep specific parts, or to ask user for confirmation.
Cleanup path configuration
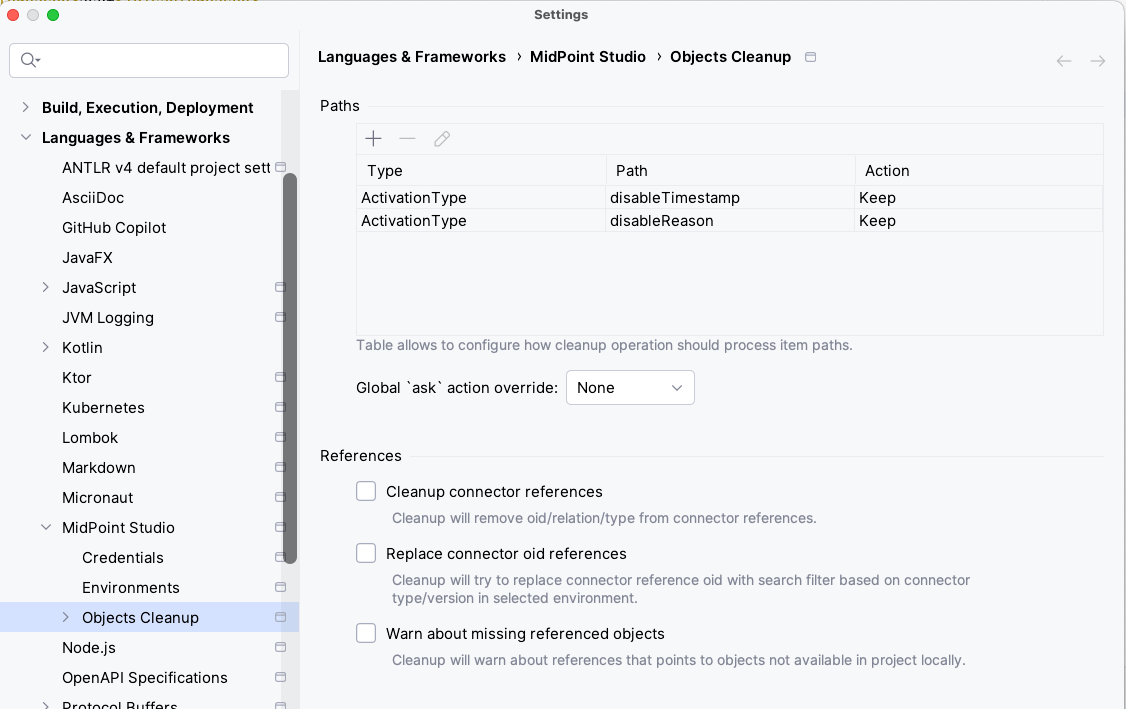
Figure 8. Cleanup path configuration
Previous example shows custom configuration for ActivationType/disableTimestamp and ActivationType/disableReason.
Both items are operational, therefore they would be removed during cleanup. With Keep action, cleanup will not remove them.
This configuration tells that all occurrences of disableTimestamp and disableReason items under ActivationType will not be removed during cleanup - anywhere in the objects.
If we want to keep only activation items for user, the proper way to configure paths is to set type to UserType and path to activation/disableTimestamp with Keep action .
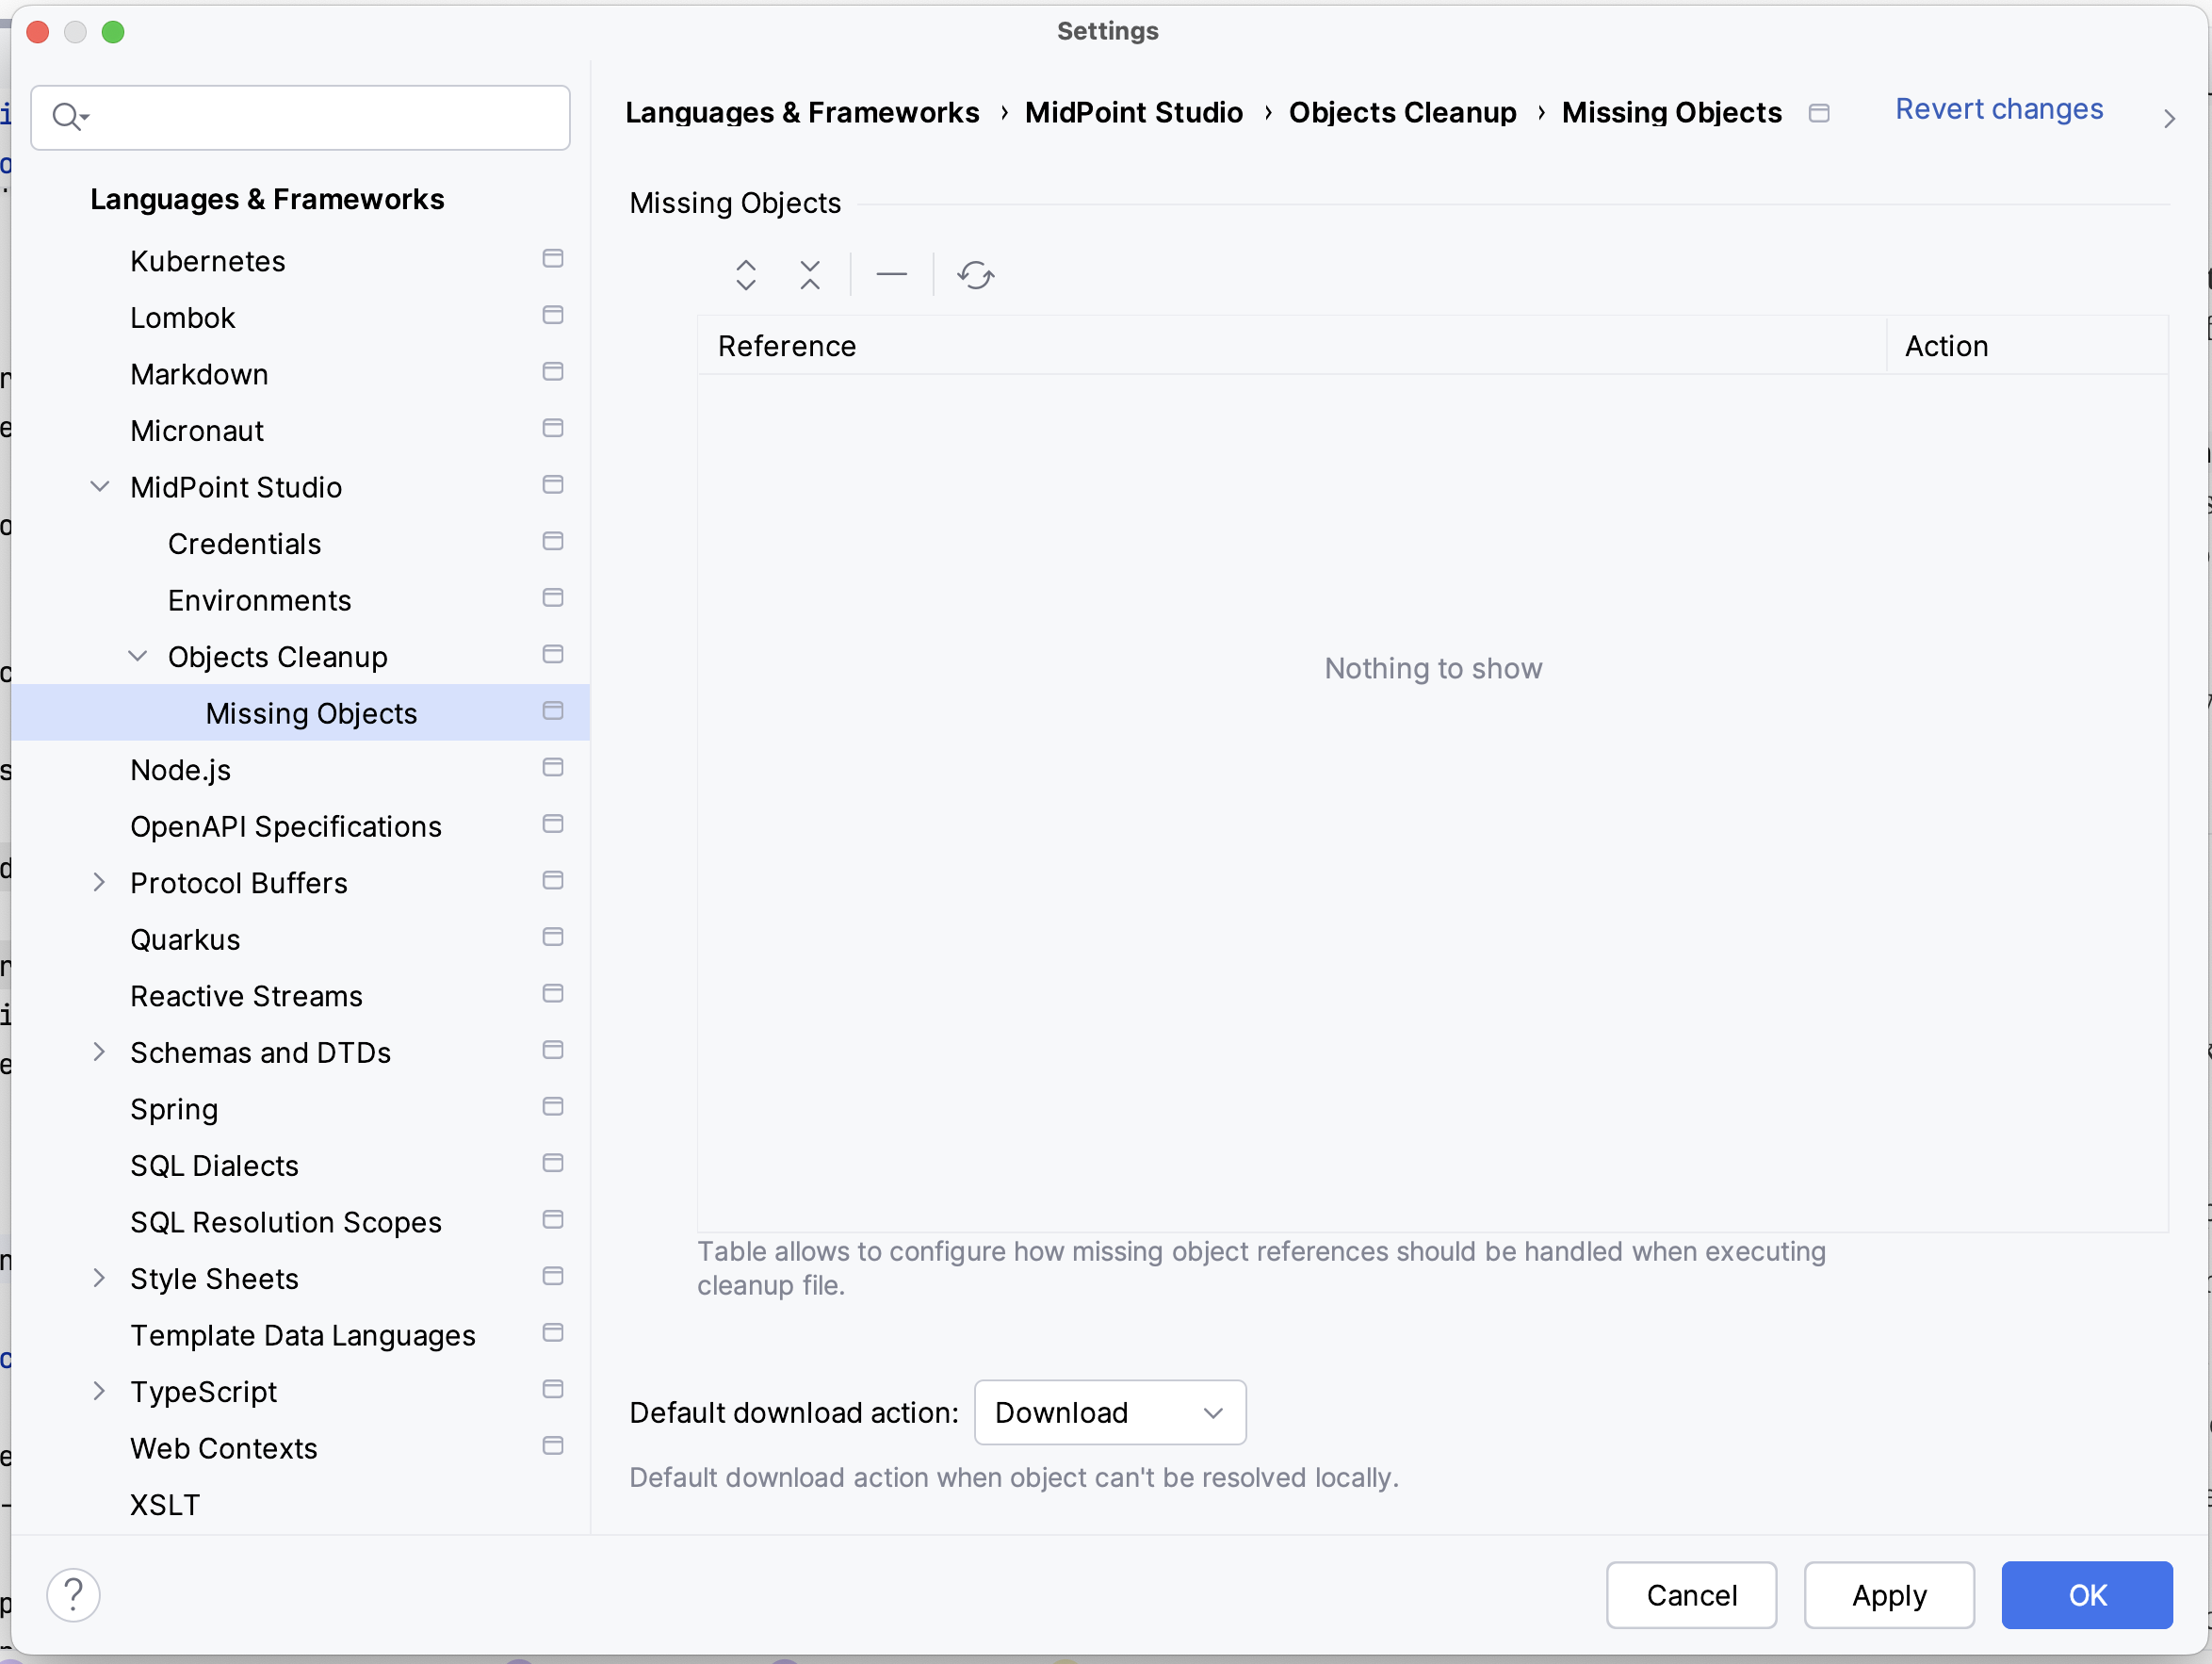
Figure 9. Missing objects
Settings for references validation, searching for missing objects in project can be changed in Missing Objects tab. Missing objects tab allows to list objects (oids) and action that should happend for such references.
For example if reference can’t be resolved within project, user can decide to automatically download missing object from midPoint. Otherwise, user might want to ignore missing reference, e.g. reference to connector object - connect to object is not needed to be stored inside project (and VCS).
Synchronize objects
This operation will synchronize the selected files with the midPoint repository. When synchronization is invoked on local objects, user interface similar to GIT is shown. On left side Studio displays list of files (and objects inside). Editor displays differences between local and remote object.
This view allows user to review differences between local and remote objects. It also gives user possibility to select which changes should be applied to local or remote object.
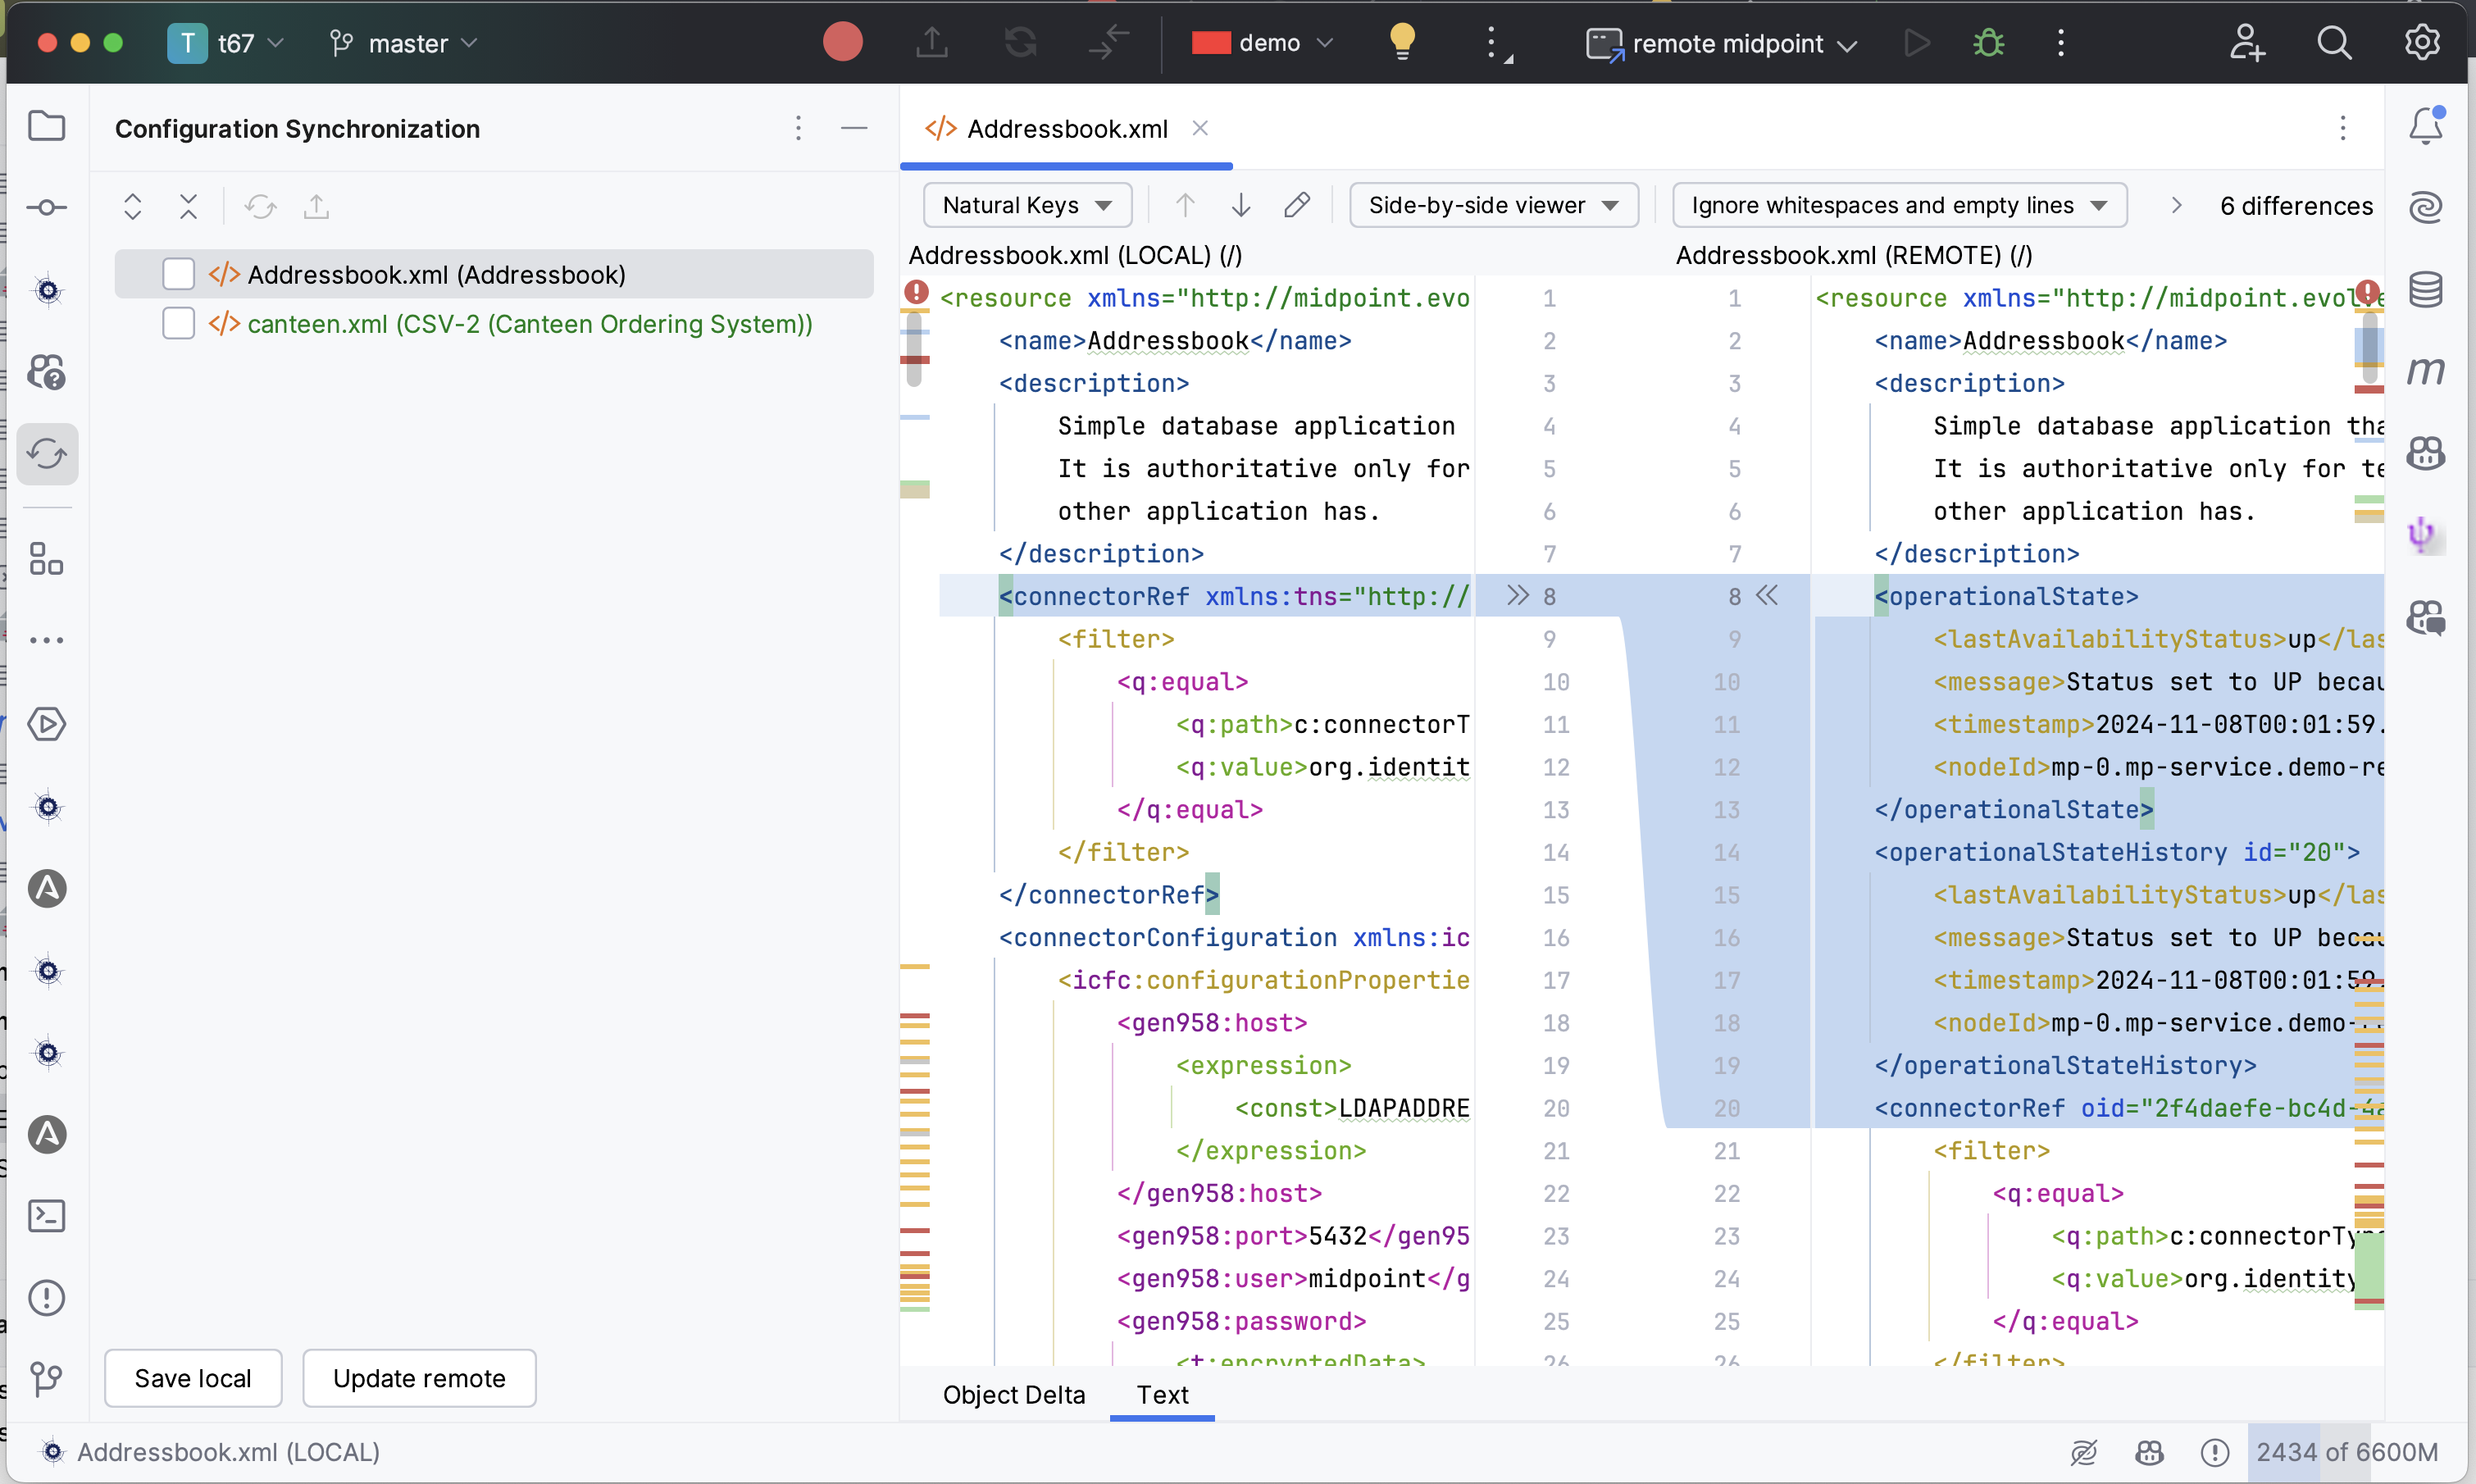
Figure 10. Objects synchronization
Working With Object Editor
The object editor uses all IntelliJ IDEA tricks to make the text editing very comfortable. Some midPoint object-related tricks are:
-
the ability to complete open elements (end tags)
-
the ability to complete variable names from mapping sources
-
the ability to suggest elements based on the schema
-
the ability to generate a new OID when creating a new object
-
the ability tu suggest OID based on the existing project files
-
the ability to resolve object names from OIDs based on the existing project files
-
the ability to navigate to other object by CTRL+clicking the OID in references
-
mixed syntax highlighting (XML/Groovy).
-
the ability to suggest and complete midpoint queries in filter
textelements
You can force most of the completions using CTRL+space.
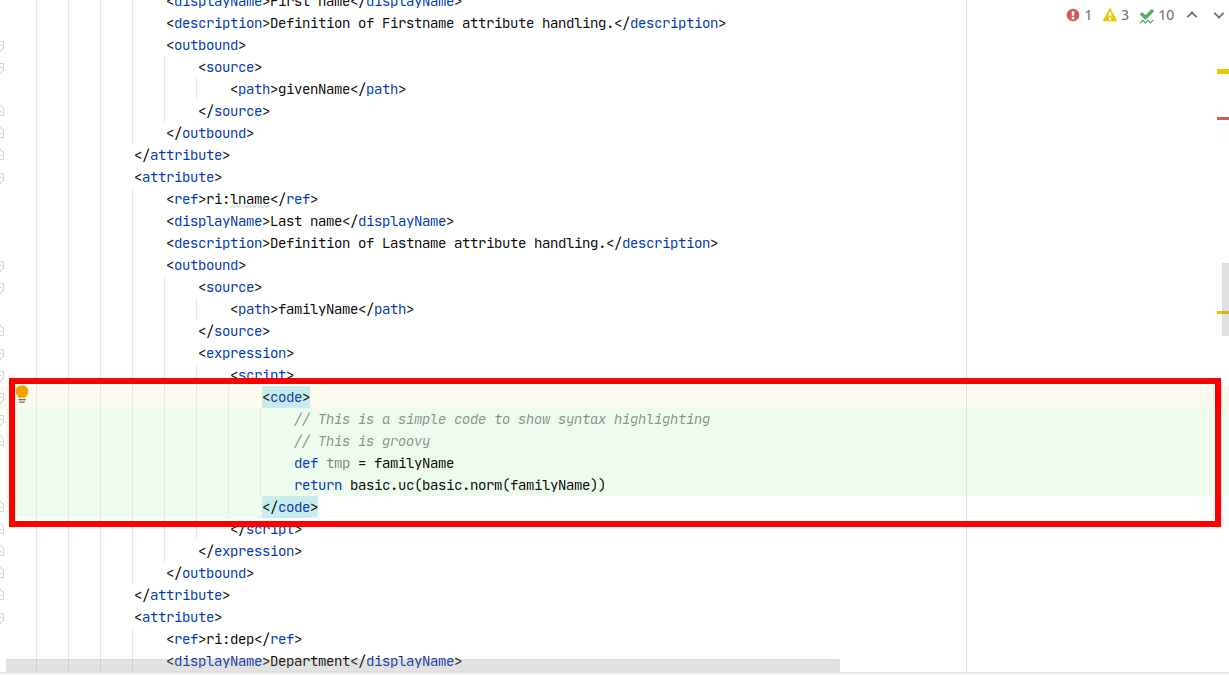
Figure 11. Mixed code completion
Creating a New MidPoint Object
This is best explained using an example for a new role creation:
-
under
objectsdirectory, create a newrolesdirectory unless it already exists by right-clickingobjectsdirectory and selecting New → Directory -
right-click
rolesdirectory and select New → File -
type a file name, e.g. 'role-test.xml'
-
an empty file is created/opened in the main window
-
start typing:
<role -
from the tooltip with object type hints, select
role -
xmlnsnamespace is automatically filled -
start typing
oid= -
from the tooltip select a random OID
-
type
>to close the element -
end-tag is automatically completed (
</role>) -
go under
<role …>element -
start typing
< -
all possible elements are displayed in the tooltip
-
continue with the role editing
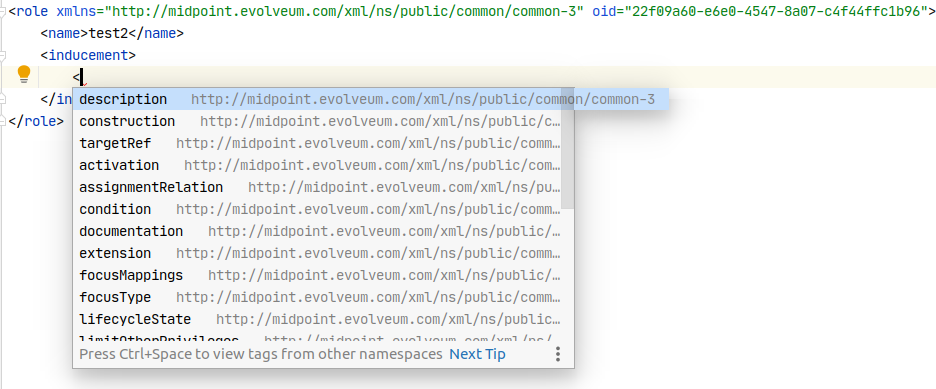
Figure 12. Suggested XML elements
Variable Name Completion
MidPoint Studio allows to auto-complete variable names in mappings/expressions. For example the built-in variables or variables from mapping sources can be completed.
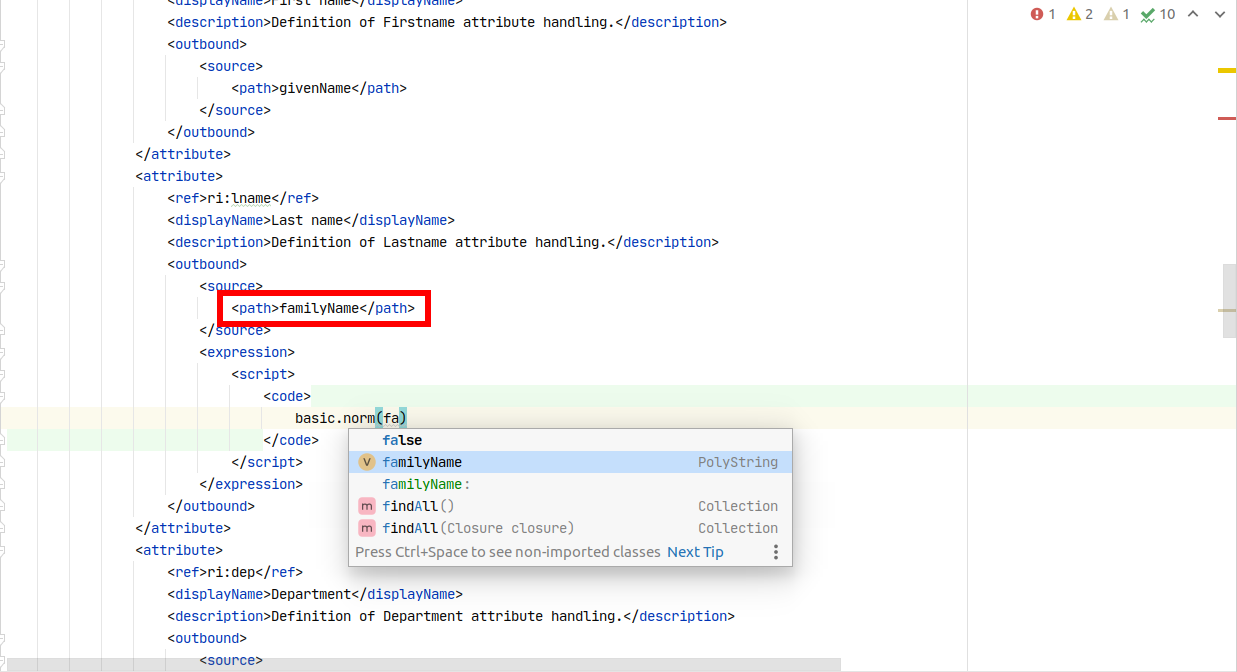
Figure 13. Suggested variables
Function Completion
MidPoint Studio allows to auto-complete function names in expressions.
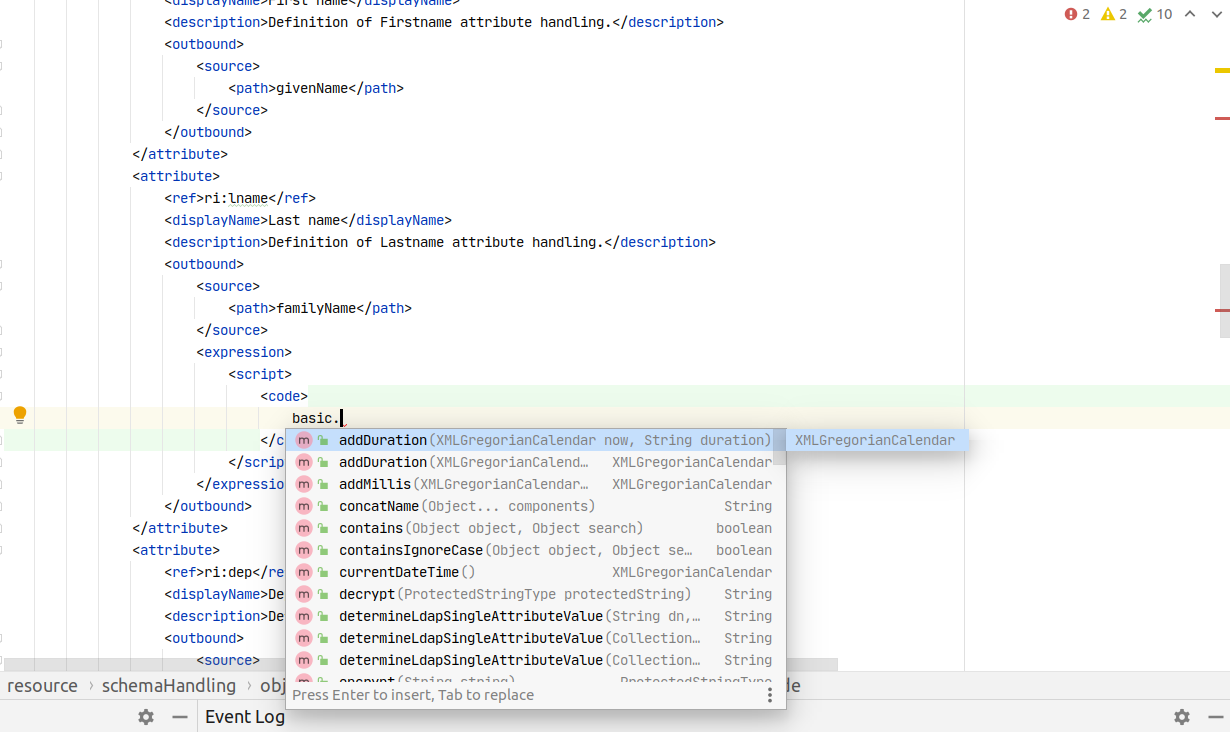
Figure 14. Suggested functions
Inserting OID
It is possible to generate a new random OID by clicking Generate Random OID button in the toolbar. OID will be generated and stored to clipboard.
When creating a new object, if you start to type oid=, a random OID will be generated by MidPoint Studio and can be inserted by selecting it in the tooltip.
Resolving Object Name from OID in References
MidPoint Studio will automatically resolve the object name for all OID references next to the OID.

Figure 15. Object name resolution from OID
This is done for objects in the project files, not fetching the data from the repository.
Cross-Referencing OIDs
When you are creating a reference to other object, if you start to type oid=, a list of known OIDs (from the project, not from the repository) will appear in the tooltip to select.
You can also start typing the object name to select from the list.
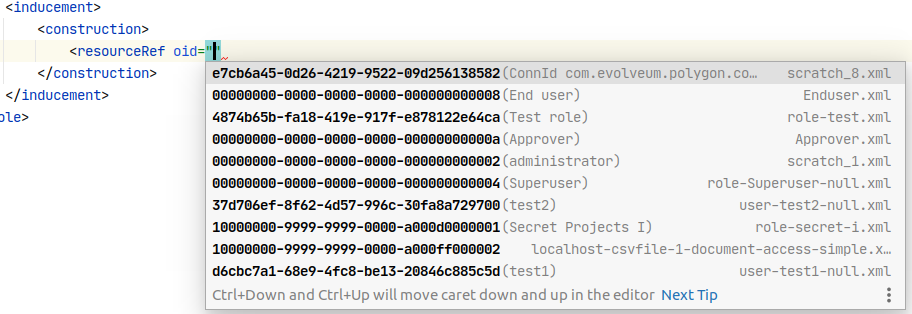
Figure 16. Suggested objects
Navigating to Other Referenced Objects
You can navigate to referenced objects within your project by clicking the OID in references with CTRL key pressed.
This is done for objects in the project files, not fetching the data from the repository.
Updating Project Settings
To update the project settings:
-
press
Shiftkey twice to open the IntelliJ IDEA search window -
start to type
midpoint -
select the row MidPoint Settings to open midPoint project settings
-
General section contains the general options:
-
Download file pattern: template for downloaded object file name relative to the project directory. Default:
objects/$T/$n.xml -
Generated file pattern: template for generated object file name relative to the project directory. Default:
scratches/gen/$n.xmlPlaceholder Description $tObject type singular. E.g.
resource$TObject type plural. E.g.
resources$nObject name (downloaded object) or
scratch_N(generated object)$oObject OID
-
-
Log REST communication: allows logging the REST communication between midPoint Studio and midPoint REST interface (useful for debugging)
-
Master password section allows to change the master password for the encrypted properties, see also Using Keepass File
-
Old password: enter the old password before changing the password
-
Password: enter the new password
-
Repeat password: enter the new password again
-
-
Environments section contains the list of environments. See also Working With Environments
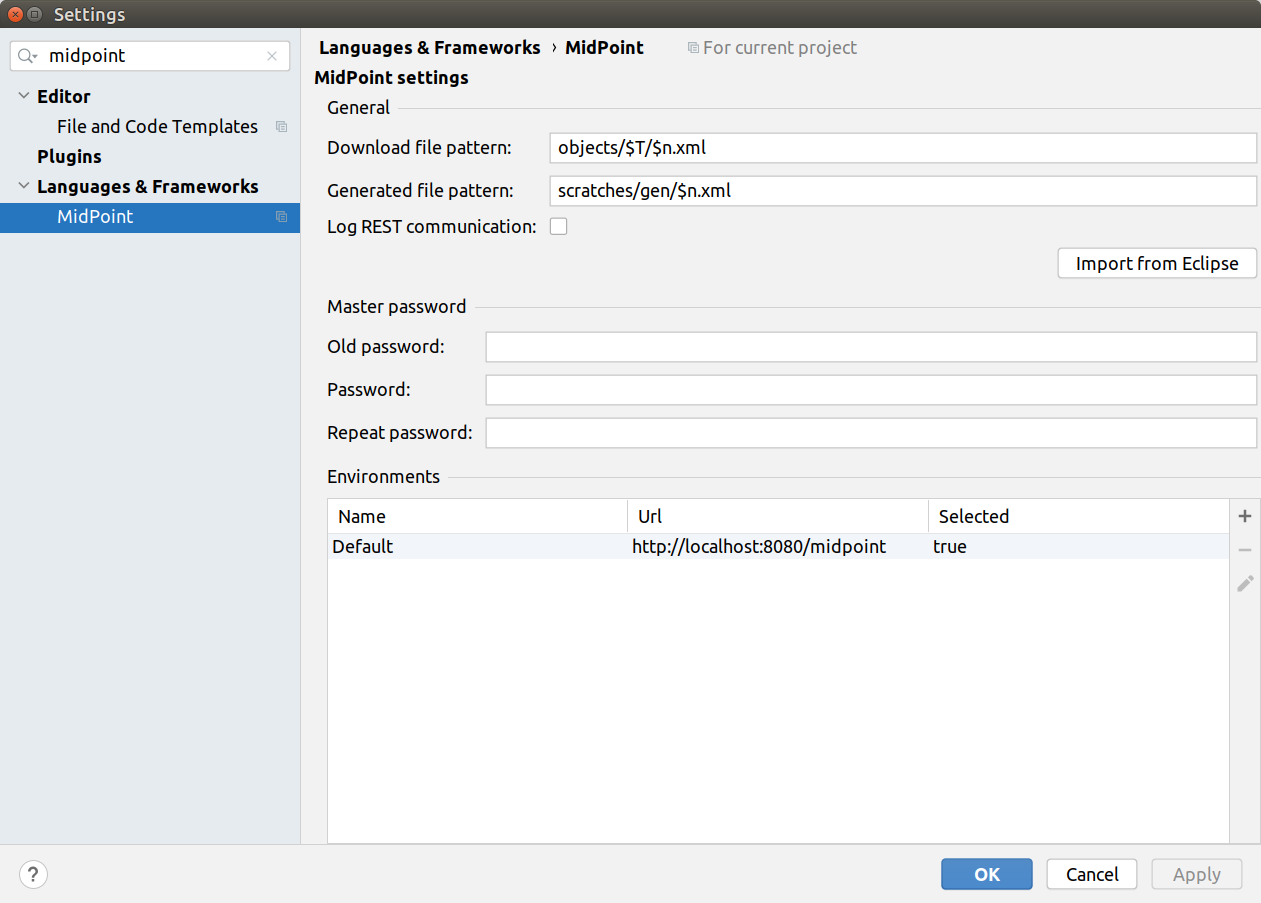
Figure 17. Project settings
Environment or Project-Specific Properties
Similar to Eclipse plugin, you can use "macro expansions" to avoid hard-coded
properties in your source files.
This allows to have the same source files and use them in multiple
environments where you have different hostnames, ports etc.
It is referenced by using the following syntax: $(propertyName).
See below for special cases.
Macro expansion example
<resource>
   ...
   <connectorConfiguration>
      <icfc:configurationProperties xmlns:icfcldap="http://midpoint.evolveum.com/xml/ns/public/connector/icf-1/bundle/com.evolveum.polygon.connector-ldap/com.evolveum.polygon.connector.ldap.LdapConnector">
         <icfcldap:port>$(ldapPort)</icfcldap:port>
         <icfcldap:host>$(ldapHost)</icfcldap:host>
         <icfcldap:baseContext>$(ldapBaseContext)</icfcldap:baseContext>
         <icfcldap:bindDn>$(ldapAdmin)</icfcldap:bindDn>
         <icfcldap:bindPassword>
            <t:clearValue>$(ldapPassword)</t:clearValue>
         </icfcldap:bindPassword>
         <icfcldap:pagingStrategy>auto</icfcldap:pagingStrategy>
         <icfcldap:vlvSortAttribute>entryUUID</icfcldap:vlvSortAttribute>
         <icfcldap:operationalAttributes>ds-pwp-account-disabled</icfcldap:operationalAttributes>
         <icfcldap:operationalAttributes>isMemberOf</icfcldap:operationalAttributes>
      </icfc:configurationProperties>
  ...
  </connectorConfiguration>
  ...
</resource>
In the above example, the following properties are used:
-
ldapHost -
ldapPort -
ldapBaseContext -
ldapAdmin -
ldapPassword
In Eclipse, there was a possibility to use properties file which would
store the properties and their values.
The possibilities in IntelliJ IDEA are expanded.
You can use a standard properties file, or a keepass file, or both.
Except of those, you can use the following special properties.
Special expression-like properties
The following table summarizes special expression-like properties.
| Property | Description | Example |
|---|---|---|
|
Name of the current project |
|
|
The OS directory of the current project. Useful for CSV resource pointing to a file within the current project directory. |
|
|
The name of the currently selected environment (for remote MidPoint) |
|
|
The content of the file will be inserted at this position. Useful for example to include notification configuration in |
|
Using Properties File
The properties file contains the definitions of the properties. You can use the properties files which are either environment-specific or project-specific. It all depends on which property file is used in your specific environment configuration.
Properties file is more convenient for storing non-sensitive properties as the properties file is not encrypted. The properties file can be edited as an ordinary text file. The appropriate location could be the root directory of your project.
The format is very simple:
Properties file example
ldapHost=server.example.com
ldapPort=389
ldapBaseContext=dc=example,dc=com
...
Some important notes:
-
property name cannot contain spaces or tabs or
=character -
property value can contain
=(so LDAP distinguished names are possible) -
property name can contain also dots (e.g.
mail.primary.server.nameandmail.secondary.server.nameare OK) -
you can use comments (
#) in the properties files
Using Keepass File
The keepass file is used for all environments for the project.
It’s primary use is to store credentials for your midPoint servers, but you can also use it to store arbitrary sensitive properties such as passwords.
The properties and their values are stored in an encrypted file (keepass2 format).
This file is created when you create your project credentials.kdbx) when you have specified your master password.
The master password is not stored anywhere in IntelliJ IDEA/project.
It is rather stored in your operating system keystore database.
The master password identifier is stored in the .idea/midpoint.xml file:
idea/midpoint.xml file:
<option name="projectId" value="91945432-7183-48f8-ab85-fb13cade9ed3" />In your operating system, the projectId can be searched in your key-storing application.
Then the master password can be revealed.
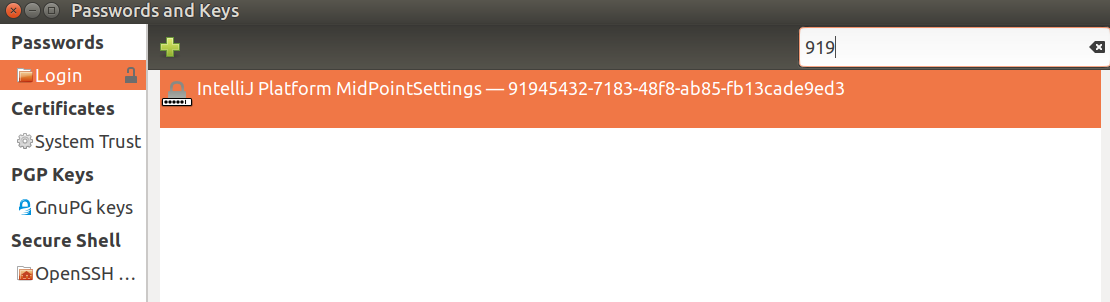
Figure 18. Password and Keys application on Ubuntu Linux showing the master password entry
You can also access the encrypted file using Keepass program.
To modify the content of your Keepass file:
-
go to MidPoint tool window
-
click Encrypted Properties tab
-
click + icon to add a new encrypted property and enter the following information:
-
Key: property name, e.g.
ldapPassword -
Environment: select a specific environment or
All Environments. MidPoint Studio will expand the macro only for that environment. -
Value: property value, e.g.
secret -
Description: property description (optional)
-
The credentials.kdbx file is ignored from versioning using the project’s .gitignore file. As it is encrypted, you might want to keep it under version control and share the password between your project team members using other channels.
|
| If you refer to a property which is stored both in the keepass file and standard properties file, the keepass file takes priority. |
Using Properties within Groovy code
In most cases you will use properties in configuration properties for resource, but sometimes you need to use them in expressions as well.
When using your properties in Groovy code (e.g. in expressions), you need to use single quotes ('), otherwise IDEA will complain with red underscores (but upload would still work):
. . .
    <bodyExpression>
        <script>
            <code>
                link = '$(public.http.url.pattern)' + "/admin/claimableWorkItems" (1)
                return "Please click on the following link to display work items to claim.\n" + link
            </code>
        </script>
    </bodyExpression>
. . .| 1 | we’re referring to property public.http.url.pattern defined in our property file. |
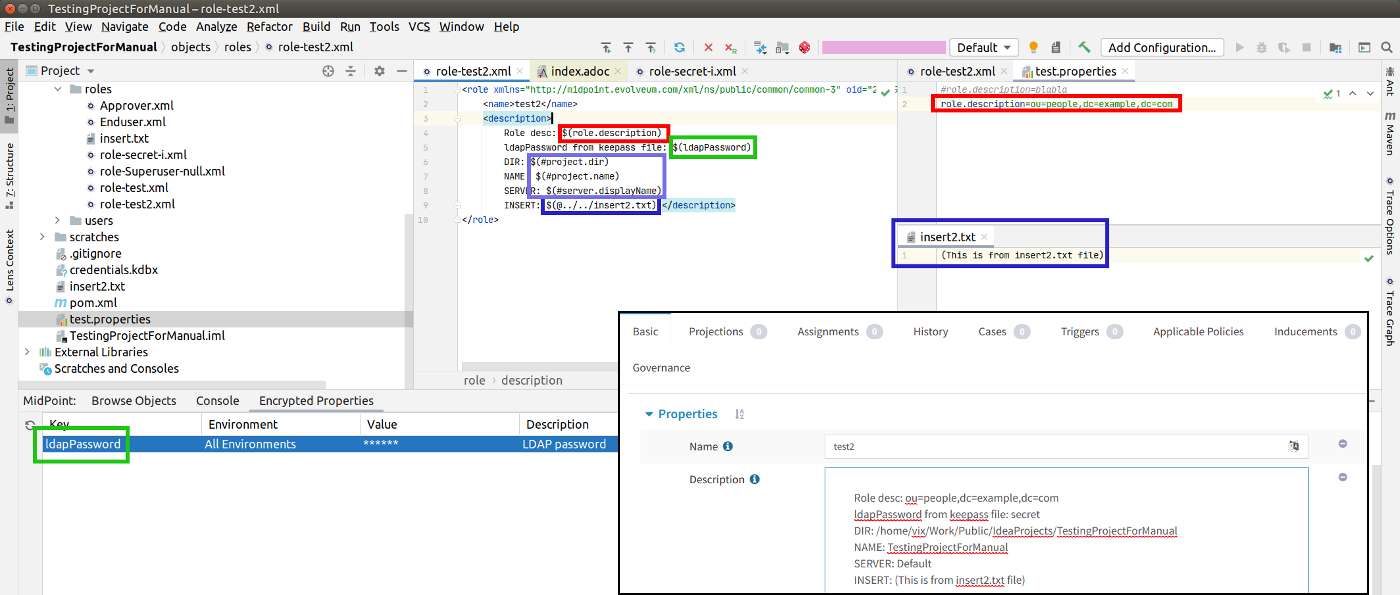
Example: All Properties Combined
A picture is worth a thousand words.
The following screenshot summarizes the possibilities and their result: midPoint role editor, the Description property displayed in a browser.
MidPoint role role-test2.xml references the following properties:
| Property | Origin |
|---|---|
|
Properties file |
|
Keepass file (property is encrypted) |
|
Expression - computed by MidPoint Studio |
|
Content of the file |
Tips & Tricks
-
Basic/Midpoint/Log script expression library code auto-completion does not work
Reload the project by right-clicking
pom.xmllocated in your project directory and select menu:Maven[Reload project]. -
XML elements are red, schemas are not found
If the Maven project is reloaded and the XSD schemas are not recognized, it is possible they are manually overriden in IDEA settings under File | Settings | Languages & Frameworks | Schemas and DTDs.
-
Testing connection to your project fails with: TestConnectionAction: Connection test exception for 'Midpoint Basics AWS' com.evolveum.midpoint.studio.client.AuthenticationException: Unauthorized
Please check for empty username and password in your midPoint project.
-
Connection to midPoint fails with: KIX path building failed: sun.security.provider.certpath.SunCertPathBuilderException: unable to find valid certification path to requested target
Please check your SSL certificates, or use Ignore SSL Errors in your Environment configuration.
-
Cleanup of special operational items like
disableTimestampanddisableReasonOperational items are removed during cleanup from the XML file. Most of them will be again computed by midPoint during the upload or recompute phase. Some of them however can’t be computed and user may like to keep them in the XML file during cleanup. Such items are for example
disableTimestampanddisableReasoninactivation. To keep them during cleanup, user can set up custom behavior for paths in the cleanup settings. SetKeepaction for typeActivationTypeand pathdisableTimestampand and the same fordisableReason. See Cleanup path configuration for more details.
Was this page helpful?
YES
NO
Thanks for your feedback